How I hid 1C base in Germany

When the management is worried about their data (no matter how far they don’t), then this is either a study of encryption, or the purchase of acid for the disk , or the search for overseas data centers. If the choice fell on the transfer of the server away from the country, then there is a whole heap of unobvious problems with its use by the rest of the office. The article will be about the scenario of transferring 1C to the European data center and about setting up the "homing" IPSec.
After all, the devil is in the details.
In one of the organizations I happened to be engaged in transferring some of its services to a German dedicated server. Why is a dedicated server, and it is in Germany - it does not matter, therefore we take as a given. It would seem a banal VPN and remote access to services - what could possibly go wrong?
We study the patient
Most of the company's users work with thin clients on the terminal server farm, and the perimeter is guarded by a router with a D-Link DFL-800 firewall with hundreds of IPsec tunnels raised. The same router is responsible for the reservation WAN.
For the transfer, we chose several 1C databases, the configuration of which is complicated by the multitude of exchanges and processing that other databases and network resources use. It is written all this is not known by anyone, so ask for advice did not work. Users log in to 1C using Active Directory, which I would not want to change.
Because of all this, to make another terminal server in Germany is not the best idea: the work of RDP inside the RDP (thin clients) leaves much to be desired, and the banal printing on redirected printers turns into a quest. Application virtualization might not be a base for Citrix XenApp, but after a long-term lease of a dedicated server, the budget was not so much.

To make changes to the database and infrastructure strive for zero, it was necessary to make a transparent VPN for a server located a thousand kilometers away. They took as a basis the typical IPSec tunnel based on Windows and the counterpart to D-Link. This is a fairly common solution with minimal investment.
It remains to answer three simple questions:
How to rewrite the paths to the databases for a couple of dozen users?
How to switch IPsec in case of failure of the main WAN channel in the office? The IPSec mechanism in Windows does not offer this feature by default.
- Will the router have enough strength to support another fairly loaded tunnel?
Let's start in order.
Slowly add the car to the domain ...
As a result of all frauds, the server must become a full member of the domain and see the entire local network through an encrypted channel. The general scheme turned out to be this (not original, but for a general idea it is better to draw):
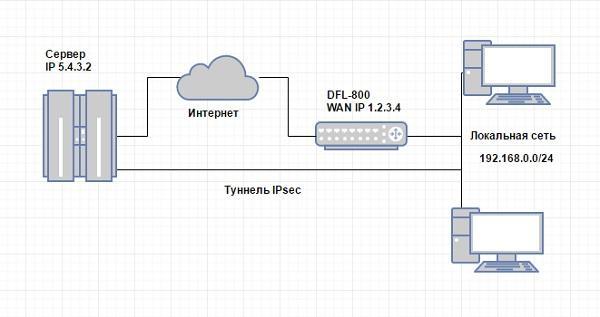
As the initial data, for an illustration:
IP addresses of the main and backup office provider 1.2.3.4 and 1.2.3.5;
Local area network of the office 192.168.0.0/24;
D-Link's internal address is 192.168.0.1;
- External server address 5.4.3.2.
To install the tunnel, you need to run several commands on the router and server.
On D-Link:
Add IPsec and IKE algorithms:
add IKEAlgorithms Medium DES3Enabled=True SHA1Enabled=True add IPsecAlgorithms Medium DES3Enabled=True SHA1Enabled=TrueAdd the external server address:
add IP4Address IP_Remote Address=5.4.3.2Add a key to IPsec:
add PSK Key_Remote Type=ASCII PSKAscii=MegaSecureKey Comments=MegaSecureKeyThe tunnel itself:
add IPsecTunnel Remote_Server LocalNetwork=InterfaceAddresses/lannet RemoteNetwork=IP_Remote RemoteEndpoint=IP_Remote IKEAlgorithms=Medium IPsecAlgorithms=Medium AuthMethod=PSK PSK=Key_Remote AddRouteToRemoteNet=True PFS=PFS NATTraversal=Off KeepAlive=Manual KeepAliveSourceIP=lan_ip KeepAliveDestinationIP=IP_Remote AutoInterfaceNetworkRoute=FalseActivate the settings:
activate- And we confirm them so that the smart router does not roll back the changes :
commit
On Windows:
Create a policy, but do not assign it:
netsh ipsec static add policy ipsec assign=no mmpfs=yes mmsec="3DES-SHA1-2"Add a filter action:
netsh ipsec static add filteraction name=ipsec action=negotiate qmpfs=yes qmsec="ESP[3DES,SHA1]:3600s"We configure two filters in one and the other side:
netsh ipsec static add filter filterlist=win2dfl srcaddr=5.4.3.2 dstaddr=192.168.0.0 dstmask=255.255.255.0 mirrored=nonetsh ipsec static add filter filterlist=dfl2win dstaddr=5.4.3.2 srcaddr=192.168.0.0 srcmask=255.255.255.0 mirrored=noCreate two policy rules with for filters:
netsh ipsec static add rule name=win2dfl policy=ipsec filterlist=win2dfl filteraction=ipsec tunnel=1.2.3.4 psk=MegaSecureKeynetsh ipsec static add rule name=dfl2win policy=ipsec filterlist=dfl2win filteraction=ipsec tunnel=5.4.3.2 psk=MegaSecureKey- Apply policy:
netsh ipsec static set policy name=ipsec assign=yes
Now the tunnel is working.
It should be noted that when working with more recent DFL, IPsec has proven itself better by using Windows Firewall. The configuration is done in the context of netsh advfirewall consec.
After raising the tunnel, we will prepare the network parameters of the server using wmi magic, after which you can add to the domain:
wmic nicconfig where IPEnabled=TRUE call SetDNSServerSearchOrder ("192.168.0.2","192.168.0.3") wmic nicconfig call SetDNSSuffixSearchOrder (mylocaldomain.com) The resulting tunnel worked at a speed of about 24 Mbps with the stated ceiling for a VPN of 60 Mbps. Since the ceiling needs to be divided in half because of the duplex - a good result for acceptable work 1C.
Replace all the way to the bases and do not go crazy
Automatic addition of paths to 1C databases was implemented by a monstrous script, line by line filling in the ibases.v8i file in the user profile. There are more successful alternatives to this option.
Suppose we have two bases and two security groups, buh and torg. Then the automatic connection mechanism looks like this:
Create two text files in a shared folder: buh.v8i and torg.v8i;
For each file, you must give read access only to the corresponding security group;
- The contents of the files are as follows:
buh.v8i:
[] Connect=Srvr="servername";Ref="buh"; ClientConnectionSpeed=Normal App=ThickClient WA=1 Version=8.3 torg.v8i:
[] Connect=Srvr="servername";Ref="torg"; ClientConnectionSpeed=Normal App=ThickClient WA=1 Version=8.3 All users need to register the paths to both of these files using the 1CEStart.cfg file. You can put it in the user profile by group policies (% appdata% \ 1C \ 1CEStart). With all users working on the terminal server, it is enough to put this file in C: \ ProgramData \ 1C \ 1CEStart. The file contents are as follows:
CommonInfoBases=\\___\buh.v8i CommonInfoBases=\\___\torg.v8i Now users, depending on the membership in the security group, will have a certain set of bases in 1C. When moving the database, it is enough to change only the contents of the v8i files.
But in that project they decided to show respect to history and solve the problem beautifully a bit later. AutoIT came to the rescue with a simple script:
#include <File.au3> ; 1 local $aArray = _FileListToArrayRec (" DFS- ", "ibases.v8i",1,1,0,2) if @error <> 1 then ; for $i=1 to $aArray[0] $iLine=0 While 1 $iLine += 1 $sLine = FileReadLine($aArray[$i],$iLine ) If @error = -1 Then ExitLoop ; … If StringInStr($sLine, 'Ref=" ";') Then ;… _ReplaceStringInFile($aArray[$i],$sLine,StringReplace($sLine," "," ")) EndIf WEnd Next EndIf Perhaps Powershell would be more elegant - it tastes and color.
Do not let go!
When the fundamentally remote databases became available for operation, it was the turn of the “checkers” of the backup WAN connection.
Of course, you can configure two tunnels through different providers, but did not want to once again load the already tired piece of iron. It was necessary only to teach IPSec to connect to a different address if the main one was unavailable.
A simple CMD script will help us:
@echo off Rem IP . Set office1=1.2.3.4 Set office2=4.3.2.1 Rem : Ping 10.0.0.10 -n 3 Rem if errorlevel 1 ( rem ping %office1% -n 3 rem – if errorlevel 1 ( ping %office2% -n 3 rem – . if errorlevel 1 ( echo %date% %time% office down >> check-ipsec.txt ) else ( Rem – echo %date% %time% reset tun office2 >>check-ipsec.txt netsh ipsec static set rule id=1 policy=ipsec tunnel=%office2% netsh ipsec static set policy name=ipsec assign=no netsh ipsec static set policy name=ipsec assign=yes ping 10.0.0.10 -n 3 ) ) else ( Rem , rem , . echo %date% %time% reset tun office1 >> check-ipsec.txt netsh ipsec static set rule id=1 policy=ipsec tunnel=%office1% netsh ipsec static set policy name=ipsec assign=no netsh ipsec static set policy name=ipsec assign=yes ping 10.0.0.10 -n 3 ) ) We put the script into autorun every five minutes, and the issue with fault-tolerant IPSec connection is resolved. Switching channels from the D-link DFL side I will not describe, everything is trite there, and there are instructions on the official website .
But accountants are indignant
The customer was satisfied, unlike his accountants. Slow work 1C because of insufficiently productive VPN, of course, annoying. Especially bad looks IT department caught in the reporting period. To make the remote 1C more responsive, later it is planned to replace the router with the D-Link DFL-870, in which a gigabit VPN is promised.
Nevertheless, the budget transfer of bases abroad can be considered valid.
')
Source: https://habr.com/ru/post/320016/
All Articles