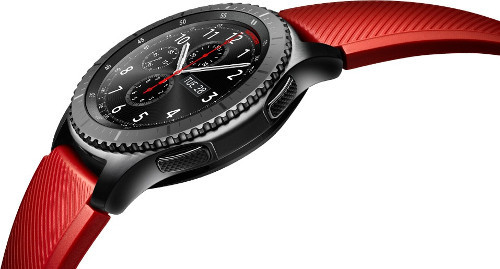
Creating a native watchface for Gear S3 / S2
What is tizen and what it is best eaten with probably will be able to tell Google or any other bing. And we will look at how to make a native application by writing as little as possible of the native code.
And so let's get acquainted with Edje. Edje is a way of describing the interface and actions in efl, a close analogue of qt quick, but appearing earlier and not dragging over part of the library's functionality.
First of all, consider the approximate structure of the edje file:
- collection - one root element per file;
- group - a group of elements, there may be several of them in the collection, in this context, for example, a normal dial and energy-saving programs that can be used as a separate component of a form, or as a layout for placing widgets;
- script - a block for writing your embryo code. This is such a simple language based on the Small language, with its help you can change the edje elements using any algorithm on the fly (for example, make a button running away from the mouse cursor);
- image - a block describing the used images;
- parts - in some way the main unit because it is in it that the parts are located which can later be used in the program window.
Now let's start making a face. First of all, we announced in the image block which images we will use.
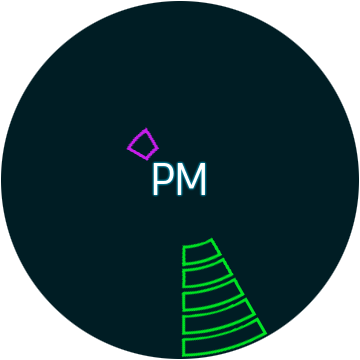
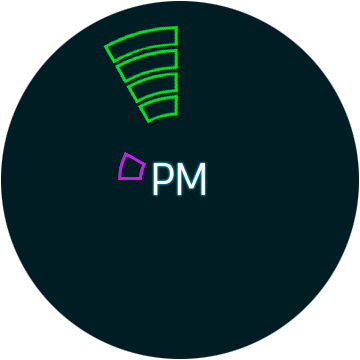
images { image: "aod_h.png" COMP; image: "aod_m1.png" COMP; image: "aod_m2.png" COMP; image: "aod_m3.png" COMP; image: "aod_m4.png" COMP; image: "aod_m5.png" COMP; } Next, we describe the displayed items and their default state and place a text field to indicate AM / PM. What and how we will do we will look at below.
parts { part{ name:"aod/h"; scale: 1; type: IMAGE; description{ state: "default"; max: 360 360; visible: 1; image.normal: "aod_h.png"; aspect: 1 1; align: 0.5 0.5; rel1.relative: 0.00 0.00; rel2.relative: 1.00 1.00; map.on: 1; map.rotation.z: 210.0; } } part { name:"aod/m1"; scale: 1; type: IMAGE; description { state: "default"; max: 360 360; visible: 1; image.normal: "aod_m1.png"; aspect: 1 1; align: 0.5 0.5; rel1.relative: 0.00 0.00; rel2.relative: 1.00 1.00; map.on: 1; map.rotation.z:0; } } part { name:"aod/m2"; scale: 1; type: IMAGE; description { state:"default"; max: 360 360; visible: 1; image.normal: "aod_m2.png"; aspect: 1 1; align: 0.5 0.5; rel1.relative: 0.00 0.00; rel2.relative: 1.00 1.00; map.on: 1; map.rotation.z:0; } } part { name:"aod/m3"; scale: 1; type: IMAGE; description { state:"default"; max: 360 360; visible: 1; image.normal: "aod_m3.png"; aspect: 1 1; align: 0.5 0.5; rel1.relative: 0.00 0.00; rel2.relative: 1.00 1.00; map.on: 1; map.rotation.z:0; } } part { name:"aod/m4"; scale: 1; type: IMAGE; description { state:"default"; max: 360 360; visible: 1; image.normal: "aod_m4.png"; aspect: 1 1; align: 0.5 0.5; rel1.relative: 0.00 0.00; rel2.relative: 1.00 1.00; map.on: 1; map.rotation.z:0; } } part { name:"aod/m5"; scale: 1; type: IMAGE; description { state:"default"; max: 360 360; visible: 1; image.normal: "aod_m5.png"; aspect: 1 1; align: 0.5 0.5; rel1.relative: 0.00 0.00; rel2.relative: 1.00 1.00; map.on: 1; map.rotation.z:0; } } part{ name:"aod/act"; scale: 1; type: RECT; description { state:"default"; color: 0 136 170 55; visible: 1; max: 360 360; align: 0.5 0.5; rel1.relative: 0.00 0.00; rel2.relative: 1.00 1.00; } } part { name:"ampm"; type: TEXT; scale: 1; effect: SOFT_OUTLINE; description { state:"default"; color: 255 255 255 255; color2: 0 136 170 100; max: 360 360; visible: 1; text { size: 35; font: "Sans"; text: "AM"; align: 0.5 0.5; min: 0 0; } align: 0.5 0.5; rel1.relative: 0.2505 0.3598; rel2.relative: 0.7505 0.6398; } } } Detailed parts documentation.
And now the fun begins, now we will describe the part that will allow using at least C code.
script { public minutes; public hour; public hideMinutes(val) { new i; new j; new pid; new buf[24]; j = val; for(i = 5; i > j; i--) { snprintf(buf, 23, "aod/m%d", i); pid = get_part_id(buf); custom_state(pid, "default", 0.0); set_state_val(pid, STATE_VISIBLE, 0); set_state(pid, "custom", 0.0); } } public showMinutes(val) { new i; new j; new Float:angle; new pid; new x; new buf[24]; j = val; x = (val / 5); angle = x * 30.0; for(i = 0; i < j; i++) { snprintf(buf, 23, "aod/m%d", i); pid = get_part_id(buf); custom_state(pid, "default", 0.0); set_state_val(pid, STATE_VISIBLE, 1); set_state_val(pid, STATE_MAP_ON, 1); set_state_val(pid, STATE_MAP_ROT_Z, angle); set_state(pid, "custom", 0.0); } } public setHour(val) { new Float:h; h = (val > 12 ? val - 12 : val)*30.0; if(val > 12) { set_text(PART:"ampm", "PM"); } else { set_text(PART:"ampm", "AM"); } custom_state(PART:"aod/h", "default", 0.0); set_state_val(PART:"aod/h", STATE_MAP_ON, 1); set_state_val(PART:"aod/h", STATE_MAP_ROT_Z, h); set_state(PART:"aod/h", "custom", 0.0); } public setMinutes(val) { new y; new x; if((val == 0)||(val == 60)) { hideMinutes(0); return; } x = val - ((val / 5)*5); y = val%5; showMinutes(val); if(y != 0) { hideMinutes(x); } } public setTime() { new y; new m; new d; new yd; new wd; new hr; new mn; new Float:sec; date(y, m, d, yd, wd, hr, mn, sec); setHour(hr); setMinutes(mn); } public message(Msg_Type:type, id, ...) { if(id == 0) { setTime(); } } } Here and now we will consider only the most important elements of embryo and skip a few moments, but what will cause questions or not will be considered now will be analyzed next time.
set_text(PART:"ampm", "PM"); - set the value of the element with the text;
custom_state(PART:"aod/h", "default", 0.0); - create a new state of the element based on the default state;set_state_val(PART:"aod/h", STATE_MAP_ON, 1);set_state_val(PART:"aod/h", STATE_MAP_ROT_Z, h); - rotate the element by h degrees;set_state(PART:"aod/h", "custom", 0.0); - we make the transition from the default state to the new state, the transition time is 0.0 seconds.
Also, parts can be accessed by part_id:new buf[24];snprintf(buf, 23, "aod/m%d", i); - I don't even know what to saypid = get_part_id(buf); - we get part_id by the name of the part;custom_state(pid, "default", 0.0);
public message(Msg_Type:type, id, ...) is a function that receives a signal from a native code.
The embryo syntax is very similar to the usual C. Of course there are several differences.
new local integer declarationnew <var>; - variablenew <var>[<size>]; - an array of 8 elements
Floating point numbers are smarter:new Float:<var name>;
Functions and global variables are declared using the public keyword;public message() - a function, as in C, a function can return a result or be interrupted with the help of return .
public <varName> is an integer variable, actually everything is the same as above about local variables, only public is used instead of new and the set_int (), get_int (), set_float () etc. functions are used to set values instead of the = sign.
Here we will move to the part on C. Everything will be quite simple here, we create a watchface project. In the example available in the Tizen Studio menu, we change a few functions.
Add a new edje field to the struct appdata in order not to constantly receive a pointer to the uploaded file.
typedef struct appdata { Evas_Object *win; Evas_Object *conform; Evas_Object *layout; Evas_Object *edje; } appdata_s; The loading is described in 2 functions below, everything is quite simple. In elm_layout_file_set, we transfer the layout which will be the base for our edje file, the path to the file, and the name of the group of elements
void data_get_resource_path(const char *file_in, char *file_path_out, int file_path_max) { char *res_path = app_get_resource_path(); if (res_path) { snprintf(file_path_out, file_path_max, "%s%s", res_path, file_in); free(res_path); } } void setup_layout(Evas_Object *layout) { char edje_path[PATH_MAX]; data_get_resource_path(EDJE_FILE_PATH, edje_path, sizeof(edje_path)-1); elm_layout_file_set(layout, edje_path, "layout/watchface"); evas_object_size_hint_weight_set(layout, 360, 360); evas_object_show(layout); } Here, the creation of the UI is all but setup_layout unchanged.
static void create_base_gui(appdata_s *ad, int width, int height) { int ret; watch_time_h watch_time = NULL; /* Window */ ret = watch_app_get_elm_win(&ad->win); if (ret != APP_ERROR_NONE) { dlog_print(DLOG_ERROR, LOG_TAG, "failed to get window. err = %d", ret); return; } evas_object_resize(ad->win, width, height); /* Conformant */ ad->conform = elm_conformant_add(ad->win); evas_object_size_hint_weight_set(ad->conform, EVAS_HINT_EXPAND, EVAS_HINT_EXPAND); elm_win_resize_object_add(ad->win, ad->conform); evas_object_show(ad->conform); /*Layout*/ ad->layout = elm_layout_add(ad->conform); elm_object_content_set(ad->conform, ad->layout); setup_layout(ad->layout); ad->edje = elm_layout_edje_get(ad->layout); ret = watch_time_get_current_time(&watch_time); if (ret != APP_ERROR_NONE) dlog_print(DLOG_ERROR, LOG_TAG, "failed to get current time. err = %d", ret); update_watch(ad, watch_time, 0); watch_time_delete(watch_time); /* Show window after base gui is set up */ evas_object_show(ad->win); } And the final touch will add a function.
static void update_watch(appdata_s *ad, watch_time_h watch_time, int ambient) { Edje_Message_Int *msg; if (watch_time == NULL) return; msg = alloca(sizeof(Edje_Message_Int)); msg->val = 1; dlog_print(DLOG_VERBOSE, __PRETTY_FUNCTION__, "EDJE NOT NULL"); edje_object_message_send(ad->edje, EDJE_MESSAGE_INT_SET, 0, msg); } It remains to collect all this and run on the clock or simulator.
')
Source: https://habr.com/ru/post/319982/
All Articles