Photoshop settings after installation
Despite the fact that Photoshop use less and less, it sometimes has to come back. The sketch does not work too well with raster (actually nothing), so I prepare the graphics in Photoshop. In this post I will share my interface settings.
The first is to install in the familiar English interface. If you skip this step, which I do with enviable regularity, then Photoshop will be installed by default with Russian.
Open the Creative Cloud, select the gear → "Settings ...". Open the Creative Cloud tab → Apps: Application Language → English. Now applications will be installed with the English interface.
After installation I place panels. Here is how they look the last 3 years.

All panels are placed on the right (long ago peeped at Birman).
In the settings panel of the layers, I remove all three checkboxes below.

“Use Default Masks on Fill Layers” adds an unnecessary mask when we fill the layer with “Solid Color ...” in the layers panel, and Expand New Effects expands the list of effects under the layer after the application. I’ll turn off 'copy' to Copied Layers and Groups' so that when I copy a layer, I’m not adding 'copy', 'copy 2', etc.
Info Panel

Here I turn off all unnecessary. I leave only the colors RGB and HSB.
Next, turn on the Move Tool (V) and make sure that the “Auto-Select” checkbox is removed, and the “Layer” is set in the drop-down menu.
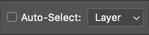
In order to select any object on the artboard in the process of work, we clamp cmd (Ctrl on Windows) and click on the desired object.
I switch to the Pen Tool (P) and set the “Rubber Band” checkbox in the drop-down menu.
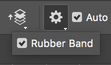
This is a super-useful feature when clipping pictures. A curve connecting them appears between the points, showing the path that you see before you set the point. In general, it's easier to try once :-)
Make sure that the correct color profile is enabled in the section “View” → “Proof Setup” → “Internet Standart RGB (sRGB)” and set to “daw” on “View” → “Proof Colors”
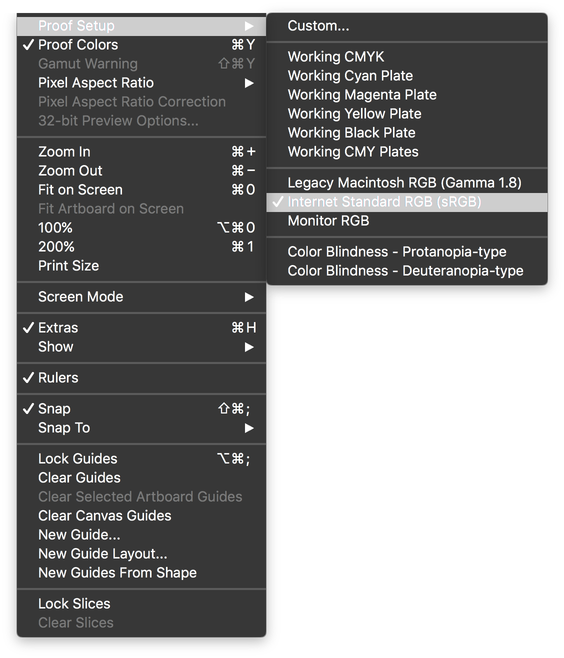
These settings force Photoshop to display colors in the standard web for sRGB mode.
Recently, I switched to an 8 pixel grid when building site and mobile interfaces. Therefore, I go to “File” → “Preferences” (cmd + k), tab “Guides, Grids & Slices”. Here, in the field “Grid” I set “Gridline Every: 80 pixels”, “Subdivisions 10”. As a result of this, when the grid is turned on, blocks of 80 x 80 px are displayed inside which are divided into 10 parts by 8 px.

It turns out that in the latest versions of Photoshop can build grids out of the box. To do this, go to “View” → “New Guide Layout ...”

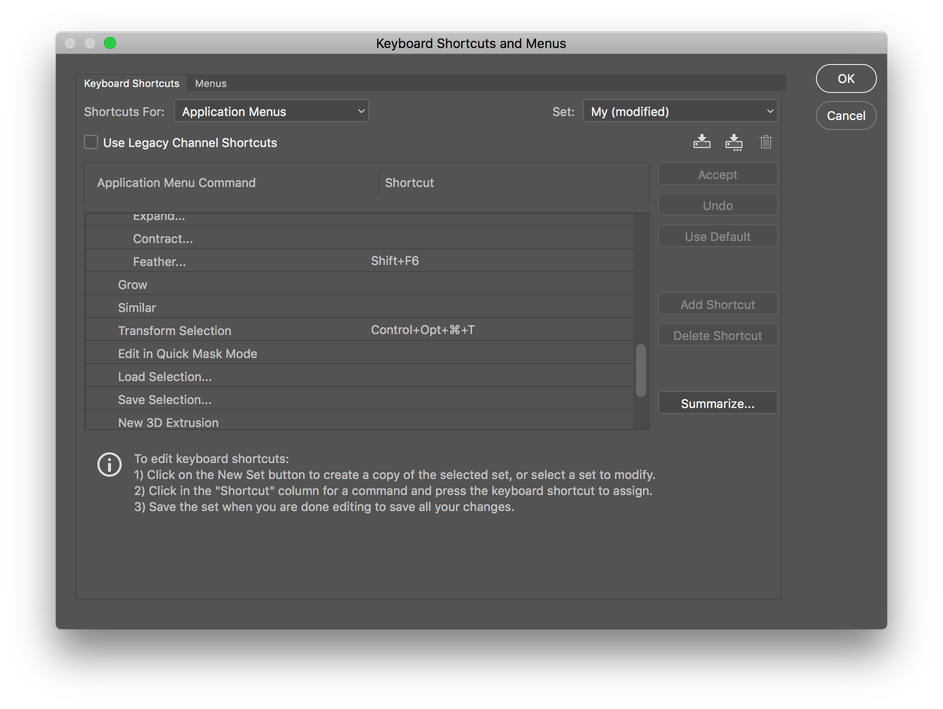
And also, I will definitely reassign a couple of hotkeys. This is done in “Edit” → “Keyboard Shortcuts ...”.
I set the combination Control + Opt + Comd + T to transform the selection (“Select” → “Transform Selection”) and Control + Opt + Comd + C for Crop Artboard (“Image” → “Crop”).
All the above interface settings can be saved, so that after reinstallation you do not run through all the menus again. Export and import of interface settings is in “Edit” → “Presets” → “Export / Import Presets ...”. Just before exporting, save your workspace in “Windows” → “Workspace” → “New Workspace ...”

What plugins, actions and tricks I use when working with Photoshop, if you are interested, I will write in the next post. Thanks for attention!
')
Source: https://habr.com/ru/post/319918/
All Articles