Shadow on the fence, or 25 trees for Adam Jensen
The story of how I tried to build beautiful three-dimensional shadows without going beyond the framework of a cozy two-dimensional game-development, and what came of it.
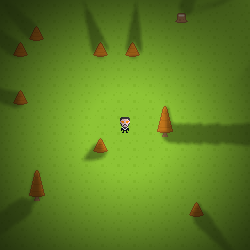
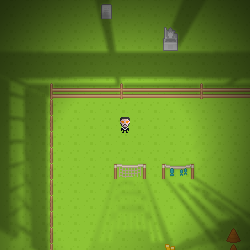
In preparation for the next Ludum Dare, I decided to try to sketch a few games of different genres. I generally have no experience in game development, so I considered only 2D games and only the Phaser.js engine. One of the ideas was the 2D stealth. And where stealth is, there is work with light and shadow. Googling a bit and finding, by the way, such good articles on Habré ( one and two times ), I took the Illuminated.js library, a random collection of assets from OpenGameArt.org, and soon I got this picture:
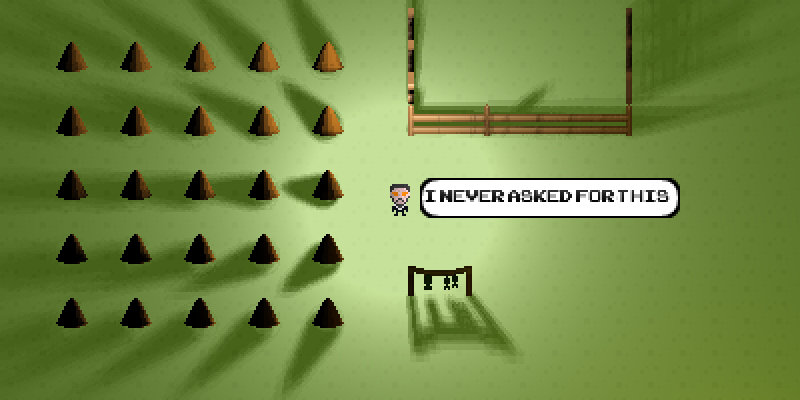
I liked the picture. Thanks to the light and the shadows, a certain mood, some depth appeared at once. It was frustrating that the shadows did not look quite natural. And no wonder, after all, illuminated.js works with a purely 2D environment (read, top view or side view), and here I have pseudo-3D (front view / top view). And you want and the final shadows instead of endless (if the light source is high), and that the light passed through the slots in the fence. In general, that was beautiful.
')
So, the statement of the problem looked like this:
( link to example )
The first method that came to mind was raycasting. That is, we take and from each pixel of the scene draw a line to the light source. If there is an obstacle on the way, it means that the pixel is in the shadow.

Obviously it was not worth making such a javascript, so the WebGL fragment shaders came to the rescue. Fragment Shader is performed by a video card for each pixel inside a drawn polygon (in our case, a rectangle the size of a canvas game), which exactly coincides with our goals. It remains to pass to the shader information about the light sources and obstacles.
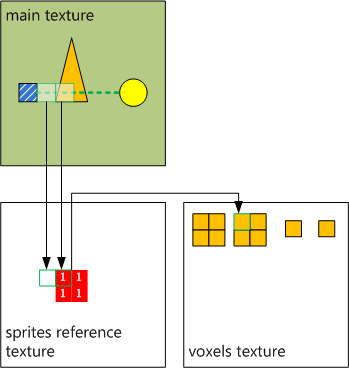
If the light sources are more or less clear, then the obstacles need to be moved in three dimensions. Let's say the 16x16 tree should become something like a cone with a base radius of 8 and a height of 16. Such a cone can be obtained by rotating the original sprite. A fence is enough to add a thickness of 2-3 pixels.
As a result, all used sprites turned into 3D models made in the form of a texture - 16 images per 1 sprite, sections for each height. You can call it a voxel model, but at that time I did not know such a word yet :)
The shader received this texture as an input, as well as a scene map with marks where what sprite is drawn (the sprite number is color coded). As a result, the algorithm was as follows:
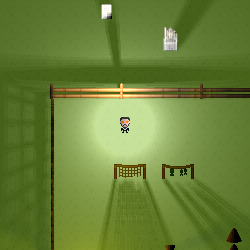
Oddly enough, it all started almost immediately, giving this picture:
Overall, not bad. But clearly not enough light / shading of the objects themselves. Let's say the trees “below” the light source are actually closer to us and should be shaded. The Christmas tree on the right should be lit half. And the gravestone in the screenshot on the right should be partially obscured by a fence.
Let's try to solve both problems at once. In the shader, we always throw a ray from the ground. However, we have 3D-models of sprites, and we know what point of the sprite at what height is located. Take advantage of this knowledge.
It is quite another matter.
You can see that our shadows are quite sharp - what’s on the ground, what’s on the objects themselves due to their “pixelation”. I also paid attention to this and already began to think how to solve this problem, until I ran into a problem of another kind:
I think those who have already looked at the shader code , immediately saw a bunch of problems:
So there was a second solution.
( link to example )
To eliminate the cascade appeal to textures, it was decided to make one texture with a 3D map of the whole world. Models we have low, from 16 to 32 pixels. The solution to the forehead would be to build 32 "slices" of the world and put them one after the other into one picture-texture. But this will not work: with a world size of 640x640, we get the size of the texture 32 times larger, and WebGL does not digest so much. Rather, as I suspect, it can digest depending on the combination of OS / Browser / Video card, but it’s better not to count on it.
Well, you need to think about how to shrink it all. In general, we do not need information about the color of the pixel, only its presence / absence at a given point.
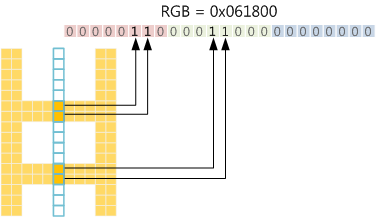
In WebGL, when loading a texture, we can specify its format (integer color components, or floating point, the presence / absence of an alpha channel). But since we work through Phaser, which by default uses single-byte color components. We have 3 color bytes per pixel, you can fit in them information about 24 pixels. If we package “height” in this way, then we will need a texture 2 times larger than the world - half for heights from 0 to 23 and half for heights from 24 to 31. Or, for simplicity, it is better to break exactly in half - below 16 and above 16 respectively.
Creating such a map in javascript is not difficult, since there are bitwise operations. But in the shader waiting for an ambush.

There is nothing to do - will have to do calculations. In fact, I need only one operation - checking that the bit is set in the correct position (position = z coordinate). With bitwise operations, this would be AND by mask, and so I had to write the following function:
If you translate into human language (or at least js), you get this:
By the way, if suddenly you think that mod in shaders always returns an integer - it is not.
You can get rid of the conditional statements using the built-in functions - mix, step, clamp. Using them allows the GPU to better optimize the code.
The resulting picture was not very different from the previous solution, but fps was already 1.5 to 2 times larger (more detailed calculations are at the end of the article).
By this time, I had already read a lot about the shadows and found out that in the 3D world most people use a method called shadow mapping . The essence of it is as follows:
In order for this to work as it should, you need to build models with honest three-dimensional polygons; you can't get by with pixel texture. Phaser, being engine sharpened under 2D, does not give opportunities to steer vertex shaders. But it makes it possible to draw an arbitrary canvas on itself. Therefore, we can build a 3D scene separately, make only shadows be drawn and then draw it over our 2D scene.
( link to example )
To work with three-dimensional objects, I took three.js , judging that working with webgl directly, I spend much longer.
First we had to turn sprites into 3D meshes. At that time I got acquainted with the tool MagicaVoxel (a good tool for working with voxels, by the way), looked exactly how it exports into the obj-file and first decided to repeat the transformation. The algorithm was as follows:
For the sake of interest, I converted the Christmas tree and counted the number of triangles. It turned out that for one small 16x16x16 pixel tree it took about 1000 triangles. Then a friend gave me this link - http://www.leadwerks.com/werkspace/topic/8435-rule-of-the-thumb-polygons-for-modelscharacter/ - where the sizes of models of some of the characters in popular games are shown. There I found this:

Well, from 25 of my trees, you can assemble a whole Adam Jensen!
In the end, I redid the conversion of sprites, skipping the stage with the "voxels". The figures of rotation (like Christmas trees) turned out to be more round and were lit a little more naturally (or unnaturally - depending on your views on the cone-shaped Christmas trees). To reduce the number of polygons, I stopped storing information about the color of each of them (so I was able to merge adjacent polygons into one), instead I added the original sprite as a material texture and referred to points on this texture in polygons (so-called .vv-mapping).
All this led to a two-fold decrease in the number of triangles, but, interestingly, it had no effect on performance. Very different things influenced the performance in this decision.
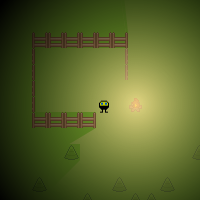
The solution works, and even draws shadows, no worse than my raycasting.
Of course, now the trees are drawn “from above”, since to build shadows, this is their correct position, and we partially lost the “magic” of the two-dimensional version ... But this problem can be solved.
three.js (or maybe any 3D engine at all, I’m not strong yet) to draw a single object (mesh) requires 2 things:
Thus, the material, or rather its shaders, is responsible for the specific rendering. We can easily take the material and correct the vertex shader so that the model is drawn rotated, but all the calculations (shadows, illumination) were applied to it as if there was no rotation.
As a result, I took all the objects of the scene and at the very end of the vertex shader, each one added the following lines:
Where
At the same time, I did not touch the varying variables that are passed on to the fragment shader. Therefore, the fragment shader will apply lighting and shadows in the old way, as if the object were not rotated, but it will be displayed rotated.
Let's see how all three options look like:
And compare the performance of different options.
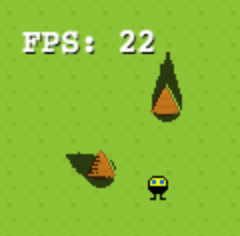
To evaluate the performance, I used the FPS indicator, which is considered in Phaser.js. When reading the results, it is necessary to take into account that Phaser.js does not display FPS above 60. I honestly tried to find how to fix it, but did not succeed and decided to score.

What catches your eye: in the FF, the 3D version shows itself as a rule worse than the RC version. Apparently, the problem is this:
And the result is, it seems, here is a bug in FF: Low performance of texImage2D with canvas .
Unfortunately, this is exactly the scenario I use: first, the three.js scene draws onto the canvas, and then this canvas is used as a phaser texture. Alas, I have not yet invented any workaround. (Unless to build the whole scene, and indeed the whole game, in three.js, but this contradicts the set conditions).
In chrome, the 3D version wins raycasting 2 times on average. However, it should be understood that the speed of raycasting depends largely on the size of the scene (or rather, on the size of the displayed part of it). For example, you can build shadows on a smaller texture (say, 2 times less - then you have to let 4 times less rays), and blur will hide blemishes from reducing the quality of shadows. In turn, for the 3D version, you can change the size of the shadow map texture - by default it is 512x512.
That's all. Hope it was helpful.
Thanks to my colleagues in LD Ruslan and Tole for their help in testing.
Prehistory
In preparation for the next Ludum Dare, I decided to try to sketch a few games of different genres. I generally have no experience in game development, so I considered only 2D games and only the Phaser.js engine. One of the ideas was the 2D stealth. And where stealth is, there is work with light and shadow. Googling a bit and finding, by the way, such good articles on Habré ( one and two times ), I took the Illuminated.js library, a random collection of assets from OpenGameArt.org, and soon I got this picture:
I liked the picture. Thanks to the light and the shadows, a certain mood, some depth appeared at once. It was frustrating that the shadows did not look quite natural. And no wonder, after all, illuminated.js works with a purely 2D environment (read, top view or side view), and here I have pseudo-3D (front view / top view). And you want and the final shadows instead of endless (if the light source is high), and that the light passed through the slots in the fence. In general, that was beautiful.
')
So, the statement of the problem looked like this:
- there is a drawn set of sprites (this is important, since I myself am not particularly able to draw and it is easier for me to generate images from raw materials)
- perspective - top / front, pseudo-3D. If it's just top / side, then illuminated.js and the methods mentioned above are also suitable.
- at the same time 2D engine. Still, the logic is easier to do in two dimensions, the levels are easier to make, the tools are there - for ludum dare this is all quite important.
Note to readers
Experienced game developers and 3D applications are unlikely to find something new for themselves. If you just care about the result and / or closer development on Unity, then such a scene is easier to compose in it - both light and shadows will work out of the box. This article can be viewed as an experiment, as well as a small piece of advice for those who, like me, are not friends with pencils and photoshop: even without drawing skills, it can be done beautifully by other means.
Solution 1. Naive raycasting
( link to example )
The first method that came to mind was raycasting. That is, we take and from each pixel of the scene draw a line to the light source. If there is an obstacle on the way, it means that the pixel is in the shadow.
Obviously it was not worth making such a javascript, so the WebGL fragment shaders came to the rescue. Fragment Shader is performed by a video card for each pixel inside a drawn polygon (in our case, a rectangle the size of a canvas game), which exactly coincides with our goals. It remains to pass to the shader information about the light sources and obstacles.
If you are interested in how to work with shaders in Phaser.js
Here you can see a simple example: http://phaser.io/examples/v2/filters/basic
If the light sources are more or less clear, then the obstacles need to be moved in three dimensions. Let's say the 16x16 tree should become something like a cone with a base radius of 8 and a height of 16. Such a cone can be obtained by rotating the original sprite. A fence is enough to add a thickness of 2-3 pixels.
As a result, all used sprites turned into 3D models made in the form of a texture - 16 images per 1 sprite, sections for each height. You can call it a voxel model, but at that time I did not know such a word yet :)
The shader received this texture as an input, as well as a scene map with marks where what sprite is drawn (the sprite number is color coded). As a result, the algorithm was as follows:
 |
|
 | 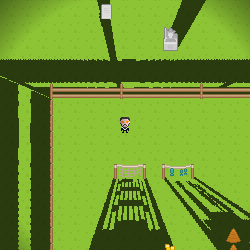 |
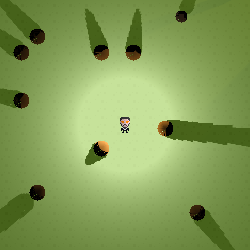
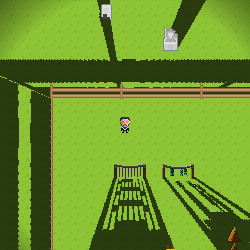
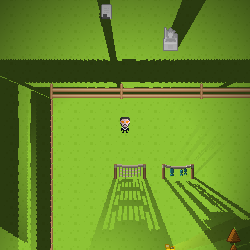
Overall, not bad. But clearly not enough light / shading of the objects themselves. Let's say the trees “below” the light source are actually closer to us and should be shaded. The Christmas tree on the right should be lit half. And the gravestone in the screenshot on the right should be partially obscured by a fence.
Let's try to solve both problems at once. In the shader, we always throw a ray from the ground. However, we have 3D-models of sprites, and we know what point of the sprite at what height is located. Take advantage of this knowledge.
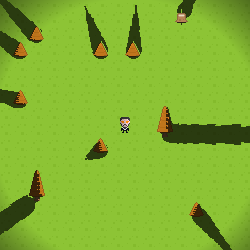 |  |
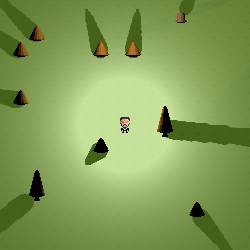
You can see that our shadows are quite sharp - what’s on the ground, what’s on the objects themselves due to their “pixelation”. I also paid attention to this and already began to think how to solve this problem, until I ran into a problem of another kind:
I think those who have already looked at the shader code , immediately saw a bunch of problems:
- nested loops (first by light sources, then by “steps” with raycasting)
- cascading texture calls (first to one to check if there is a sprite at this point, then to another - to check if there is a pixel at the desired point)
- many conditional statements (if)
So there was a second solution.
Solution 2: Improved Reykasting
( link to example )
To eliminate the cascade appeal to textures, it was decided to make one texture with a 3D map of the whole world. Models we have low, from 16 to 32 pixels. The solution to the forehead would be to build 32 "slices" of the world and put them one after the other into one picture-texture. But this will not work: with a world size of 640x640, we get the size of the texture 32 times larger, and WebGL does not digest so much. Rather, as I suspect, it can digest depending on the combination of OS / Browser / Video card, but it’s better not to count on it.
Well, you need to think about how to shrink it all. In general, we do not need information about the color of the pixel, only its presence / absence at a given point.
In WebGL, when loading a texture, we can specify its format (integer color components, or floating point, the presence / absence of an alpha channel). But since we work through Phaser, which by default uses single-byte color components. We have 3 color bytes per pixel, you can fit in them information about 24 pixels. If we package “height” in this way, then we will need a texture 2 times larger than the world - half for heights from 0 to 23 and half for heights from 24 to 31. Or, for simplicity, it is better to break exactly in half - below 16 and above 16 respectively.
What about the alpha channel?
In general, in addition to color components, we also have an alpha channel - a whole byte. However, it all rests on the presence / absence of "pre-multiplication" (premultiplied alpha). If this mode is enabled (it is enabled by default, besides, it is impossible to disable it in IE), then the color components cannot be greater than the alpha channel value, this color is considered incorrect and, apparently, is forced to the necessary form. This leads to a distortion of the three color bytes for some values of the alpha byte. So just in case, I do not use the alpha channel.
Creating such a map in javascript is not difficult, since there are bitwise operations. But in the shader waiting for an ambush.
There is nothing to do - will have to do calculations. In fact, I need only one operation - checking that the bit is set in the correct position (position = z coordinate). With bitwise operations, this would be AND by mask, and so I had to write the following function:
float checkBitF(float val, float bit) { float f = pow(2., floor(mod(bit, 16.))); return step(1., mod(floor(val/f),2.)); } If you translate into human language (or at least js), you get this:
function checkBitF(val, bit) { f = Math.pow(2, bit % 16); // f = 1 << bit; f1 = Math.floor(val / f); // , f1 = val >> bit if (f1 % 2 < 1) return 0; else return 1; // , 1. 0. } By the way, if suddenly you think that mod in shaders always returns an integer - it is not.
You can get rid of the conditional statements using the built-in functions - mix, step, clamp. Using them allows the GPU to better optimize the code.
Small example
Look at this shader: www.shadertoy.com/view/llyXD1 .
Above you will see the following lines:
To begin, set the MAX_STEPS number so that you have an average fps just below 60 (note that values above 60 are not shown). After that, change the third line to
I have fps 40 with raycastMath and 32 with raycastIf. The difference, in essence, is in the following lines:
Conditional operator:
Calculation:
Above you will see the following lines:
#define MAX_STEPS 1500 #define STEP_DIV MAX_STEPS #define raycast raycastMath To begin, set the MAX_STEPS number so that you have an average fps just below 60 (note that values above 60 are not shown). After that, change the third line to
#define raycast raycastIf I have fps 40 with raycastMath and 32 with raycastIf. The difference, in essence, is in the following lines:
Conditional operator:
bool isBlack(vec4 color) { if (color.r + color.b + color.g < 20./255.) { return true; } return false; } Calculation:
float getBlackness(vec4 color) { return step(20./255., color.r + color.b + color.g); } The resulting picture was not very different from the previous solution, but fps was already 1.5 to 2 times larger (more detailed calculations are at the end of the article).
By this time, I had already read a lot about the shadows and found out that in the 3D world most people use a method called shadow mapping . The essence of it is as follows:
- we first build the scene from the point of view of the light source and for each pixel of each triangle we remember the distance from it to the light source.
- Further, the obtained shadow map (shadow map) is used when constructing the scene from the point of view of the observer. For each pixel of each triangle, check with the corresponding point on the shadow map. If there is a pixel located closer to the light source, then our pixel is in the shadow.
In order for this to work as it should, you need to build models with honest three-dimensional polygons; you can't get by with pixel texture. Phaser, being engine sharpened under 2D, does not give opportunities to steer vertex shaders. But it makes it possible to draw an arbitrary canvas on itself. Therefore, we can build a 3D scene separately, make only shadows be drawn and then draw it over our 2D scene.
Solution 3: 3D shadows
( link to example )
To work with three-dimensional objects, I took three.js , judging that working with webgl directly, I spend much longer.
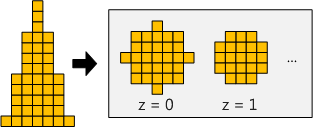
First we had to turn sprites into 3D meshes. At that time I got acquainted with the tool MagicaVoxel (a good tool for working with voxels, by the way), looked exactly how it exports into the obj-file and first decided to repeat the transformation. The algorithm was as follows:
- we take a voxel model (and I already knew how to build it)
- for each voxel, we determine the faces that are visible, i.e. do not border with other voxels
- write 2 triangles for each face + color information. In three.js THREE.BufferGeometry is well suited for its custom geometries. For the sake of experiment, I tried to add all voxels to the scene as single-pixel cubes (THREE.BoxGeometry) ... well, don't do that.
For the sake of interest, I converted the Christmas tree and counted the number of triangles. It turned out that for one small 16x16x16 pixel tree it took about 1000 triangles. Then a friend gave me this link - http://www.leadwerks.com/werkspace/topic/8435-rule-of-the-thumb-polygons-for-modelscharacter/ - where the sizes of models of some of the characters in popular games are shown. There I found this:
Well, from 25 of my trees, you can assemble a whole Adam Jensen!
In the end, I redid the conversion of sprites, skipping the stage with the "voxels". The figures of rotation (like Christmas trees) turned out to be more round and were lit a little more naturally (or unnaturally - depending on your views on the cone-shaped Christmas trees). To reduce the number of polygons, I stopped storing information about the color of each of them (so I was able to merge adjacent polygons into one), instead I added the original sprite as a material texture and referred to points on this texture in polygons (so-called .vv-mapping).
All this led to a two-fold decrease in the number of triangles, but, interestingly, it had no effect on performance. Very different things influenced the performance in this decision.
The solution works, and even draws shadows, no worse than my raycasting.
Of course, now the trees are drawn “from above”, since to build shadows, this is their correct position, and we partially lost the “magic” of the two-dimensional version ... But this problem can be solved.
three.js (or maybe any 3D engine at all, I’m not strong yet) to draw a single object (mesh) requires 2 things:
- Geometry - information about the form (read - a set of triangles with different attributes - the vector of normals, uv-coordinates of the texture, color, etc.)
- Material - information about the material (read - a set of vertex / fragment shaders that draw the shape, applying shadows, lighting, drawing reflections, etc. based on the material properties). In three.js there are several available materials, they differ in appearance, support of certain functions (for example, shadows can not all draw) and performance.
Thus, the material, or rather its shaders, is responsible for the specific rendering. We can easily take the material and correct the vertex shader so that the model is drawn rotated, but all the calculations (shadows, illumination) were applied to it as if there was no rotation.
As a result, I took all the objects of the scene and at the very end of the vertex shader, each one added the following lines:
gl_Position.z = gl_Position.y; gl_Position.y += -position.y/${size/2}. + position.z/${size/2}.; Where
- size - the size of the world (gl_Position should contain coordinates from -1 to 1, where the point (0,0,0) is the center of the scene)
- position - the relative position of the point inside the figure, the vertix attribute.
At the same time, I did not touch the varying variables that are passed on to the fragment shader. Therefore, the fragment shader will apply lighting and shadows in the old way, as if the object were not rotated, but it will be displayed rotated.
Results
Let's see how all three options look like:
| Naive raycasting | Raycasting | 3D |
|---|---|---|
 |  |  |
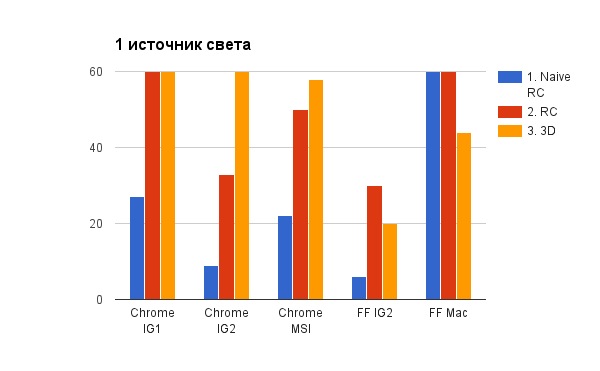
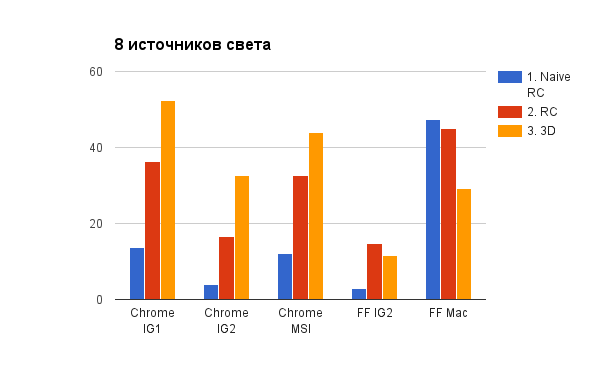
To evaluate the performance, I used the FPS indicator, which is considered in Phaser.js. When reading the results, it is necessary to take into account that Phaser.js does not display FPS above 60. I honestly tried to find how to fix it, but did not succeed and decided to score.
Workstation Legend
- Mac - Macbook Pro
Chrome was not considered, because FPS 60 is almost everywhere in it - MSI - Laptop with GeForce GTX 760M, Win8.
FF was not considered. many examples did not work on it at all - IG1 / IG2 - workstations with an integrated graphics card (Intel HD Graphics), Win7
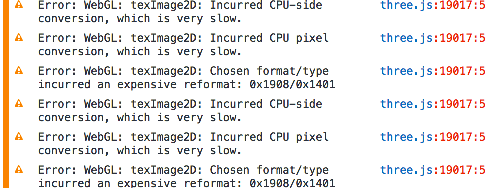
What catches your eye: in the FF, the 3D version shows itself as a rule worse than the RC version. Apparently, the problem is this:
And the result is, it seems, here is a bug in FF: Low performance of texImage2D with canvas .
Unfortunately, this is exactly the scenario I use: first, the three.js scene draws onto the canvas, and then this canvas is used as a phaser texture. Alas, I have not yet invented any workaround. (Unless to build the whole scene, and indeed the whole game, in three.js, but this contradicts the set conditions).
In chrome, the 3D version wins raycasting 2 times on average. However, it should be understood that the speed of raycasting depends largely on the size of the scene (or rather, on the size of the displayed part of it). For example, you can build shadows on a smaller texture (say, 2 times less - then you have to let 4 times less rays), and blur will hide blemishes from reducing the quality of shadows. In turn, for the 3D version, you can change the size of the shadow map texture - by default it is 512x512.
findings
- "Naive" raycasting gave a good FPS only on top machines, hellishly warming up the video card
- "Improved" raycasting and 3D - gave at least 40 FPS for Chrome on all tested machines under the following conditions:
- - one light source
- - four light sources + decrease texture / shadow map by 2 times
- In the FF, everything is sad
- In the case of raycasting, we get problems when the shadows have to drop moving objects - for this, we have to redraw the 3D map every frame and send it to the shader.
- In the case of a 3D solution in three.js, we are quite dependent on the capabilities of the library. Let's say we can't make the shadows blue (I don’t know why, really). And I did not manage to remove the glare from the light source on the "floor" (bright spot under GG).
That's all. Hope it was helpful.
Thanks to my colleagues in LD Ruslan and Tole for their help in testing.
Source: https://habr.com/ru/post/319530/
All Articles