Writing and running a script to simulate Verilog code in ModelSim
Hello! I hope everyone had a good holiday and is ready to conquer the heights of FPGA development with new forces.
Today I want to write a small guide to running testbenches on Verilog / SystemVerilog in ModelSim without using the GUI.
The plan will be:
- Adding paths to ModelSim in PATH.
- Writing a script with an explanation of commands.
- Run ModelSim with the execution of a written script.
Go! To start, on the hands you need to have the following:
- installed ModelSim;
- ready project on Verilog / SystemVerilog;
- ready testbench on Verilog / SystemVerilog;
As an example, we will consider the project HappyNY
So let's get started.
1. Adding the path to the executable modelsim file in PATH
You can easily check whether this should be done: type modelsim on the command line, if ModelSim starts up after that, then you can skip the current item. Otherwise, for Windows, this is done as follows: a command prompt is opened and the command is written
set PATH=%PATH%; C:\Progs\ModelSim10_5\win64 which contains the path to the executable modelsim (after; you need to specify your path to the executable file). After executing the command, perform the check indicated at the beginning of this item, if something is wrong, repeat the item.
2. Writing a script to run
ModelSim has a command line in which you can type a variety of commands to run and control the simulation. Quite detailed guide on the commands can be viewed here or here . For ModelSim scripts, the file format is * .do . Create a file with the specified extension in any text editor (notepad, sublime text, vim, notepad ++, BUT NOT WORD !!! ), and write the following commands there:
transcript on vlib work Let's sort this piece of the script.
The transcript command with the on flag is the same as echo , i.e. after specifying this command, all subsequent commands specified in the script are printed when run on the ModelSim command line, i.e. it becomes clear which command was executed when and after which one of them an error occurred (if any).
The vlib command creates a project library called work .
We continue:
vlog -sv +incdir+./ ./happyNY.sv vlog -sv +incdir+./ ./tb.sv The vlog command with flags is a call to the Verilog compiler.
The -sv flag, you guessed it, tells the compiler to use the SystemVerilog standard. All files are compiled independently, unlike, for example, from Quartus , so if you do, for example, import some parts of a package , then you need to do them in each file where they are used, or directly inside the file containing the package (Quartus, if you do not provide inclusion, will throw out an error in this case).
The +incdir+../ flag indicates where the compiler should look for include files (i.e. files listed in the code with the `include directive `include ).
Next comes the name of the file being compiled.
We continue:
vsim -t 1ns -voptargs="+acc" tb The vsim command is the start of a simulation.
The -t flag sets the precision of the time grid.
The -voptargs flag takes arguments for the subsequent automatic invocation of the vopt optimizer, i.e. vopt + acc will be called. This flag enables optimization for various objects in the project and includes the visibility of these objects in the simulator. Read more about it here on page 154.
At the end there is the name of the top-level testbench, in this example it is the same as the file name.
And finally, the last part of the script:
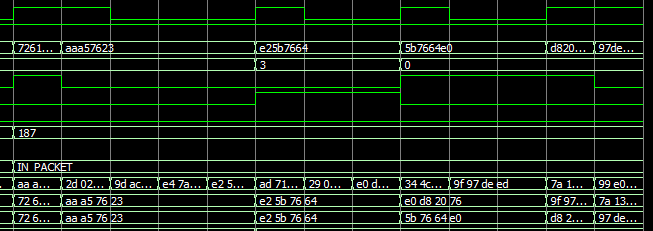
add wave /tb/clk add wave /tb/rst add wave -radix ASCII /tb/symbol configure wave -timelineunits us run -all wave zoom full First we add the signals we need to the Wave Window form with the add wave command. Please note that one of the signals has changed the display format to a character one using the -radix ASCII flag.
Next, we set the time scale units. Run the simulation on the script written in the testbench. We stretch (or compress) the image in the Wave Window so that it fits exactly in the size of the window.
3. Run ModelSim with script execution
First of all, you need to open a command prompt or terminal and go to the directory where your script and project files are located. Then you need to run the -do <script_name> executable file with the -do <script_name> key, in our case:
modelsim -do happyNY.do Nothing more needs to be done. If for some reason you could not add the path to ModelSim in the environment variables, instead of modelsim you can specify the full path to the executable file. If this did not work either, then by running ModelSim manually, you can go to the project directory in the ModelSim command line and run our script with the command:
do happyNY.do After all the above procedures, you should see this picture:

Thank you for your attention, good luck!
')
Source: https://habr.com/ru/post/319466/
All Articles