(I hope) everything you need to know about photogrammetry
In my previous articles, I always missed an introduction to photogrammetry, because there are many fact-finding instructions. However, recently I noticed that most of them do not consider in detail how to properly capture images. Therefore, I decided to create my own manual about everything I know in photogrammetry.
This article is intended for the following categories of users:
- Those who have never used photogrammetry or 3D scanning.
- Those who have already used photogrammetry, read introductory instructions and want to improve the quality of scanning.
- Those who already know all this, but want to check whether they have not missed anything.
To simplify the reading, I divided the topics into sections. You can safely skip those that you have already mastered. If you are a beginner, I highly advise you to read all the posts I mentioned. Sometimes I give links to several articles that cover one topic. Study them if you find free time. These articles are independent of each other, so if you have already read some previous posts, then please forgive me for repeating.
')
Special thanks to Yugoslav Pendić for editing and supplementing this article. I also thank the 3D scanning team for closing the gaps in my knowledge.
What is photogrammetry?
If you are reading this article, then I hope you already know what photogrammetry is. In short, this is the process of creating 3D models from several images of a single object, photographed from different angles.
Although this technique is not at all new, it is much older than the modern process, and it was widely used in cartography and geodesy. It has become more popular due to availability due to the increased power of computers, which allowed it to spread to other areas, such as video effects and game development.
If you want to quickly get acquainted with the beginnings of photogrammetry, I recommend studying the following materials:
- PhotoScan instructions and tests , short video by James Candy.
- Photogrammetry for the poor , Bertrand Benoit (Bertrand Benoit).
- The art of photogrammetry: familiarity with software and hardware .
Although Agisoft Photoscan is mentioned in these links, the concepts in question are suitable for any photogrammetry software.
Software
There are many programs for photogrammetry that can be used to process the captured images. Usually they all give fairly good results. However, some applications may have advantages in some areas. But still it is worth noting that although the rules for taking photos are the same for all software, there are recommendations specific to different applications, because each program processes the data in its own way. These recommendations allow you to fully utilize the capabilities of the software, and I advise you to take the time to become familiar with them.
For example, because of the slowness of computations in Agisoft, you can strive to record as much detail as possible into one image. And Reality Capture tends to filter out these background details, because they can make noise. However, Reality Capture is faster, so for it you can just take more photos.
And one more note: all descriptions are based on my personal experience with this software, which may differ from yours. I recommend to study these software options (or others) and make your own choice.
- Autodesk Remake: You may have heard about the Autodesk 123DCatch mobile application, a cloud photogrammetry software limited to 50 images per project, which are compressed to 3 megapixels. After it, Memento PC software was released, which was later renamed Remake. It can work both offline and in the cloud. In Remake, the generation process is performed with a single click, and the user has almost no control over data processing. There are free and professional versions. In the free version there is a limit of 125 images per project and only cloud processing is available. Subscription to the Pro version costs $ 30 per month, is limited to 250 images per project, and has the option of offline processing. After processing the scan, you can edit it, clean it inside Remake or import the mesh into other software. This is a useful option that I often use, although it would be nice to have more control over the grid generation process. The application also has an optimizer that reduces the number of mesh polygons and texture baking options that allow you to quickly create blanks for objects for game levels. Also review the license terms of your scans, because it may allow Autodesk to use them as promotional materials.
- Agisoft Photoscan: This is a very popular application widely used in the entertainment industry. Agisoft provides excellent scan results. provides control over the process of generating grids and has a convenient interface with detailed documentation. The standard version costs $ 180, but if you need the reference point option, which is very useful when doing a large scale scan, you will have to buy a professional version for $ 3,500. Despite the fact that in Agisoft there are no restrictions on the number of images, the more photos you use, the more powerful your computer needs for processing. Not to mention that the processing time can be quite large. Read the guides and tips on the Agisoft Technical Support website. Here is a useful guide to PhotoScan memory requirements , where there are useful tables. For example, here is a table of RAM requirements for a building model of 12 megapixel images.
| Photo | 20-50 | 100 | 200 | 500 |
|---|---|---|---|---|
| Minimum quality | 100 MB - 300 MB | 150 MB-450 MB | 300 MB-1 GB | 1 GB-3 GB |
| Low quality | 500 MB-1.5 GB | 750 MB-2.2 GB | 1.5 GB-4.5 GB | 4 GB-12 GB |
| Medium quality | 2 GB - 6 GB | 3 GB-9GB | 6 GB - 18 GB | 15 GB-45GB |
| High quality | 8 GB-24 GB | 12 GB-36 GB | 24 GB-72 GB | 60 GB-180 GB |
| Top quality | 32 GB-96GB | 48 GB-144 GB | 96 GB - 288 GB | 240 GB-720 GB |
- Reality Capture: this application can process data much faster than its competitors, and be controlled with a huge number of images on a regular desktop computer, if it has an NVidia graphics processor. Reality Capture outperforms other software thanks to the quick alignment feature, which allows you to build images in a few seconds even on a laptop. This is a great tool for checking data on the spot to make sure there are enough images. In Agisoft, almost the same alignment speeds can be achieved at lower settings, but RC is superior and much faster than Agisoft in reconstructing a cloud of points. It costs 99 € for 3 months, but in this version you can process 2500 images per project, which, however, is more than enough to scan any objects, except large-scale ones (locks, relief, etc.). If you need to process more images, you will have to buy a version of the CLI that costs € 7,500 per year. Both versions have the same features, including anchor points. It is worth noting that while Reality Capture does not support 16-bit output. However, this is a fairly new software, which is often updated, and 16-bit support will appear sooner or later.
- Pix4d: if you need to process more than 2500 images, and you have a one-time project, you may want to choose Pix4d with a monthly subscription for $ 350. The application can process large amounts of data on powerful computers, and it is slightly faster than Agisoft. Due to the specialized set of tools, this software is mainly distributed in industry and agriculture. On the YouTube channel , Pix4d has interesting webinars, which tell about the effective use of software and provide tips and tips on photogrammetry. It should be noted that when testing, I did not really like the quality of the resulting textures, but I was able to improve them with a small setting of parameters.
- Free software: there are many free alternatives, but, unfortunately, I have not tested them. I contacted the community, asked his opinion, and received the following answers. VSFM is a good, albeit outdated solution. In addition, it can not be used for commercial purposes. There are more modern software, such as Micmac, MVS and Python Photogrammetry Toolbox (PPT), but it does not have a GUI, and the lack of documentation and the need for programming skills can make it difficult for beginners. Despite this, all these solutions are functional, precise and very flexible. Micmac even has a wiki page . There is a new software Graphos with GUI, it should be free or cheap, but it has not yet been released, and updates have not been heard for a long time.
There is also a SuRe package, which is interesting because even working with him teaches you a lot - it has a GUI (the very first versions worked only with the command line) and the authors very openly talk about what they offer. However, SuRe is almost entirely aimed at using with large format cameras, the authors sell their code for inclusion in a more user-friendly environment. SuRe doesn't even have a “lining up” stage, it relies on data exported from Pix4D, Agisoft, or other products. It has the advantage of generating dense point clouds and surprisingly accurately textures models, but is incredibly greedy for RAM, even more so than Agisoft. In addition, the models (grids) he creates have tremendous detail, but it’s difficult to work with them if you don’t have a powerful computer. The package is not free, but by contacting the authors, you can get it for scientific use.

Computer
Computer requirements depend on the selected software, but through research and experimentation, I found that for most packages, the recommended minimum requirements are as follows:
- Processor: I recommend core i7 with at least 4 physical cores. Xeon is good, but many packages, for example, Reality Capture, prefer their speed to the number of cores. A single processor computer is recommended.
- Graphics processor: NVidia GTX card with at least 4 GB of VRAM (more than 4 GB may not be needed). Quadro compared with GTX gives a small performance boost, and GTX is much cheaper. You can also use AMD cards that showed slightly better performance in Agisoft, but unfortunately, only NVidia supports Reality Capture. Dual GPUs can give a performance boost, for example, dual GTX 1060 or GTX 1080 (TITAN will already be redundant). When using Agisoft, you will have to disable one logical (not physical) processor core for each graphics processor. Here is a link to GPU estimates in Agisoft. You can always find the latest estimates of central and graphics processors in Google.
- RAM: 32 GB is a good choice. Having tested different amounts of RAM and studied topics on the forums, I found out that 32 GB is a win-win situation. Most scans will run on 16 GB "with a squeak." Pix4D and Reality Capture work without problems with 32 GB, and Agisoft requires an increase in memory capacity depending on the number and resolution of images. It is important to add that most i7 processors support up to 64 GB of RAM.
- Drive : Most packages cache results to the drive in order to reduce the amount of RAM used, so SSD will reduce processing time. Need a drive with a capacity of at least 240 GB, 512 GB is recommended. You can always use an extra hard drive for cheaper image storage. But this will increase the time of the first processing stage, when the software loads images from the drive into memory.
- Cooling system: let's not forget that image processing takes a lot of time - days, sometimes even weeks. Therefore, you need to invest in a good cooling system to reduce the risk of damage to equipment. Do not work on a laptop, even if you have a good gaming laptop with good ventilation (for example, MSI or Alienware). It is not designed for such a load. (I understand that you may be limited in funds and the desktop computer is too expensive for you, everyone has had such problems. Sometimes I broke my rule and used a laptop, but this reduces its lifespan).
Equipment
When working with photogrammetry, the following tools are commonly used:
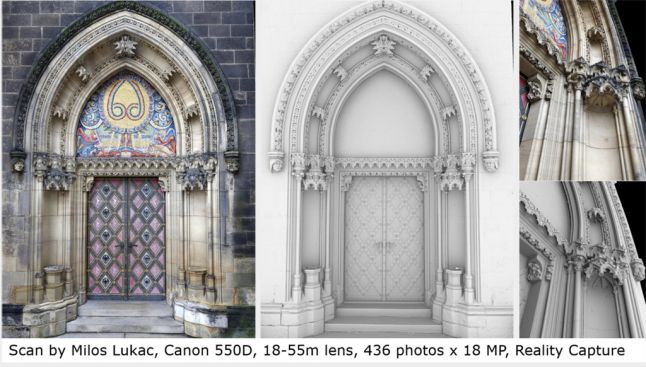
- Camera: This is the most obvious, it is impossible to take pictures without a camera. The ideal choice is a camera with the clearest pictures (for example, Nikon 810, Canon 5D), the resolution is also important, but not so much. You can make stunning scans even with a digital “reflex camera” for $ 300, you just need more pictures. In fact, there are more decent scans made on the phone camera. If possible, you should always shoot in RAW, postprocessing with little noise removal and sharpening will help increase resolution. Here is an example of a scan made by Milos Lukac (Milos Lukac) using a Canon 550D and Reality Capture.
- Lens: Use a lens with a fixed focal length, the sharper the better. If the camera has a lens with a variable focal length and you want to use it, then select the upper or lower limit and keep it throughout the shooting.
Agisoft users recommend the following camera settings:
- ISO as low as possible, preferably not higher than 400.
- The speed of work of the translator as high as possible, preferably not lower than 1/125.
- Focal length - use lens 50 to minimize distortion.
- Aperture — f8 is recommended. Note that higher values do not guarantee good results, because an object in the background can introduce noise. Sometimes it's better to blur it so the software ignores it.
- White balance should be set manually and should not change throughout the shooting session.
- Camera remote: you can buy it for just a couple of dollars on Amazon, so why not? It is especially useful when the shadow of the photographer appears on the scan and you have to shoot from a distance or the camera is too high to shoot from a high angle. In addition, you can use it for shooting "selfie".
- SD card: if you plan to shoot a lot of RAW, then it would be nice to get a good SD card with a large capacity. Just check if the capacity of the drive is compatible with your camera.
- Monopod: it is useful, especially if your hands are shaking and it is not possible to use an increased shutter speed. In addition, it costs only $ 10, so why not?
- Tripod : Yes, you will need it, especially in low light, when the flash cannot be used. Take pictures with it with a long exposure.
- Calibration Target (Color Checker): may be useful if you need to scan for accurate colors. See this short eat3D tutorial on how to use targets. Color Correct Reference Workflow .
- Drone: it is mainly useful when scanning terrain. In this case, he should fly nadir. In Pix4d, there is automation of this process using a mobile application. It is well integrated with drone DJI. You can also use the drone with GoPro. Drone can also be used to scan buildings or large structures, especially for shooting inaccessible places. You can always combine the airborne data with the removed "SLR" on the ground. In fact, it is even recommended, because only certain types of cameras can be hung on an inexpensive drone. Therefore, a combination of two sources will increase the quality of scans.
- CPL: Cross-polarization photography is a useful technique consisting of attaching a polarized filter to a light source (for example, a flash) and a camera lens to illuminate the model without creating bright areas, which helps in creating more consistent and flat textures.
- Special bleaching device: This special bleaching device is usually used for bleaching, i.e. removal of information about the light (for example, direct lighting, general lighting, reflected lighting). relating to the original environment in which the object was scanned. This allows you to add other information about the light corresponding to the new environment in which the scan is placed. Epic Games used this device to create a Kite demo and wrote a post about how resources were created for a demo in an open world, another post about choosing equipment and a third one that describes the process of desalinization. The device consists of 3 elements: a reflecting chrome ball, a frosted gray ball and a calibration target, which I have already mentioned. This device usually has some way of shooting panoramic HDR images of the environment in which it is placed. Later, the device is used to recreate the same lighting conditions of the scanned object. Then the captured panoramic image is used to orient the virtual chrome ball just as the real one was located. Matte gray ball is used to measure the level of illumination. Using this information, you can calculate the original lighting, bake it on the scanned object, and then subtract it from the original texture, getting an unlit object. If such a device is not available to you, try using another software technique that allows you to remove information about the light from the object. It was used in Star Wars Battlefront. The Star Wars development team described in some detail the workflow at the GDC in the good report " Photogrammetry and Star Wars Battlefront ", which is freely available at the GDC Vault. I recommend you watch it, it is really worth it. I also talked about the technique of "de-bleaching texture" in this article .
- Scale bar or coded targets: coded targets are printed markers that are positioned in the scene before the start of the shooting and can be used in Photoscan Professional as reference points for the coordinate system and scaling, or for correct image matching, which helps in adjusting the camera. It is better to use them when scanning a small object that requires an exact scale (for example, if requested by the customer). This method is also well suited for constructions that need to be documented in a similar way, but you need a larger scale ruler.
- Anchor points: they represent the actual 3D points in the scene that belong to the scan, which the user selects in several images for manual alignment of photos that could not be programmed. This is usually due to the lack of overlap between images. To build two photos of the software requires at least three points. Technically, reference points are not equipment, but are used in combination with high-precision GPS to record the coordinate values at the shooting location. They can be placed in the project for the proper alignment and scaling of the scan. To reduce the number of errors, it is recommended to select the reference points as far as possible from each other.
A DGPS (differential GPS) or total station is used as a high-precision positioning device. This mainly refers to the use of drones for land markings and in geodesy. Three points - this is the minimum, you may need more. They are arranged in such a way that the points are evenly distributed throughout the entire documented area, and several are located in the center. This is very difficult to achieve at the location of the shooting, and usually this approach is used in projects with high funding. Scaling is not a problem here, but positioning during surveying means that plans, analyzes or controls are obtained from the final result. Those. they will usually be used in the GIS workspace. - Spray: photogrammetry cannot scan translucent or reflective surfaces. This problem can be solved with a harmless matting spray. If you are interested in the details, you can watch the ten24 training video on 3D scanning of reflective objects using photogrammetry . You can use something like Krylon Dulling Spray, or try using a spray with water-soluble paint.
- Turntable: it is sometimes difficult to bypass the object around, and then it is easier to turn the object itself relative to the fixed camera. A word of advice: close the base of the table with a newspaper, so you get additional anchor points (recognizable patterns) that make it easier to line up the model.

Instructions
This section contains general tips on how to properly capture an image and what you should pay attention to.
First , read the excellent article The Art of Photogrammetry: how to take pictures , everything is very well explained in it.
Second , here are some general tips from the Reality Capture forums, from the 3D Scanning User Group, and from personal experience.
- Do not limit the number of images, Reality Capture can use any number. (Agisoft will also be able to process them, but this will require more processing power.)
- Use the highest available resolution.
- Each point of the scene surface must be clearly visible in at least two high-quality images. The “the more the better” rule works here, and you need to strive for at least three images, because most programs use triangulation calculation to get results. Agisoft definitely needs more than three to reduce noise.
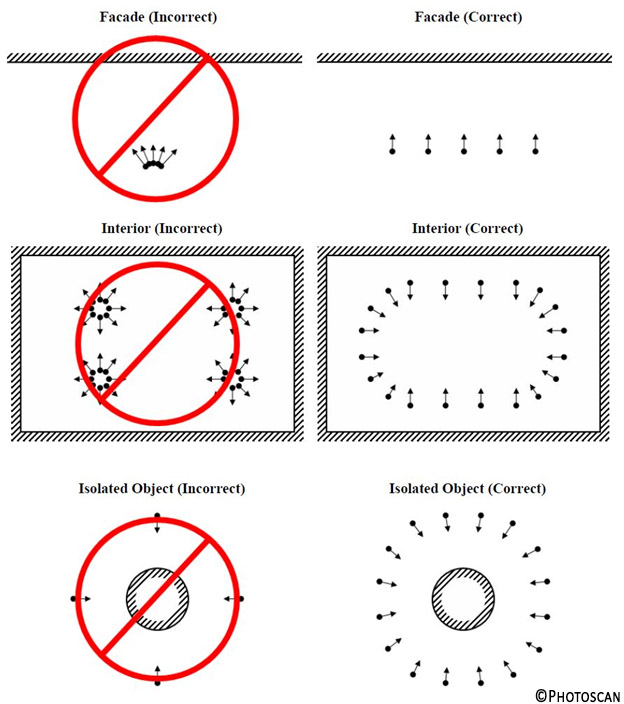
- Always move when shooting. Standing at one point, you only get a panorama that does nothing to help you create a 3D model, and even introduces errors into the scan. Move around the object in a circle, aiming for 80% overlap between photos.
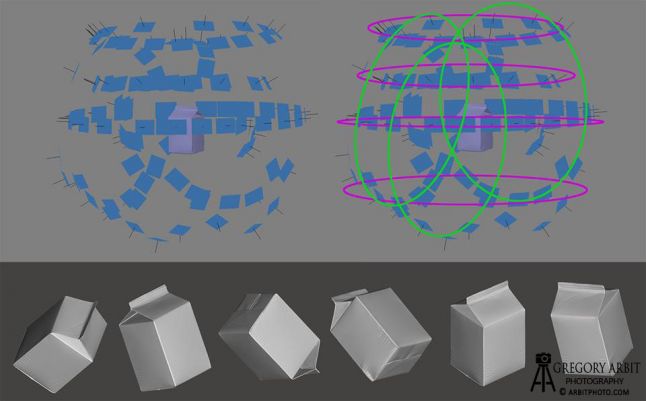
- Do not change the viewpoint by more than 30 degrees.
- Start by shooting the entire subject, move around it, and then focus on the details. Approach not sharply, but gradually.
- Complete routes. When shooting such objects as statues, buildings and the like, they should always move around and end up in the same place they started from.
- Do not stop on one tour, take a few from different heights.
- Rotate the camera (horizontal and vertical movement provides better calibration).
- Trust your instincts, experiment and do not be afraid to break the rules, if necessary.
Thirdly , even if you do not plan to use Agisoft, I highly recommend reading Chapter 2: Capturing photos from the user manual in PDF. It is short, easy to read and understandable to beginners. It covers aspects such as equipment, camera settings, requirements for objects and scenes, image preprocessing, various shooting options and limitations. Here are some images taken from this PDF :
Fourth , you should always be determined from the very beginning with the target resolution . In fact, you may not need as much resolution as you think, which will save processing time. Resolution depends on processing parameters, image resolution and the number of photos. All this can and should be borne in mind. When scanning stones for a game, 20 shots can suffice to get high-resolution models, especially if you put a procedural texture with details on top of the scanned texture. If you scan a lock , you might not need a large resolution either. Simply scan the lock in low resolution, select key duplicate elements and scan them in high resolution. Then generate the rest. The opposite situation may arise: you need 500 shots to scan a single pebble.
Most often, you do not need Ultra High Settings in Agisoft or High settings in Reality Capture.
Practice
Now that you know something about photogrammetry, here are some interesting examples worth trying:
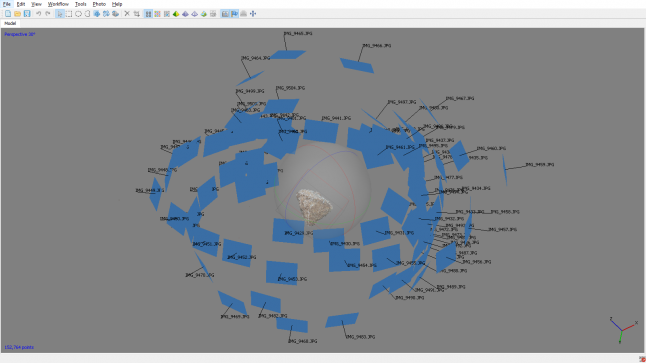
- Scan the stone , this is an easy target and a good task to start with. Try to take as few pictures as possible to reconstruct the full grid, and then start adding images to increase the detail resolution.
- Scan the statue : the statue looks like a stone with interesting concave shapes, which will slightly increase the complexity of the work.
- Scan the boot. I do not know why everyone is doing this. Perhaps this is some kind of initiation ritual, or something like that.
- Scan a narrow tunnel or stairways. The difficulty here is that you will not have enough space to move and shoot from different angles. The trick is to cross the tunnel, taking one shot of what is in front of you at each step forward.
- Scan the interior. Valve has an interesting approach that you can try.
- Scan the building or even the castle , try to do it with and without the drone. You can climb the building or use a long pole with a camera. Hint
- Scan the reflective surface. Explore this ten24 studio video on 3D scanning reflective objects using photogrammetry .
- Scan your head with one camera. It's hard, try not to move, or try using a turntable.
- Scan an insect. There is a good example of a scanned insect 2cgvfx.
- Scan the terrain. Explore another Valve approach , but I highly recommend exploring a drone-nadir approach.
Other scan methods
You should know that photogrammetry is not the solution to all problems. There are other scanning methods that work better in some cases.
- Lidar is a geodetic method of measuring the distance to a target by illuminating a target with a laser. 3D-, , . - , , . , Capturing Reality, Reality Capture . .
- David Laserscanner — , . (, ). , HP.
- Artec — , . .
- Microsoft Kinect , .
- RTI — , . RTI .
Conclusion
Get to work, do not hesitate, constantly practice and try to scan any available equipment.
If you read this article and all the others I referred to, and now you don’t know what else you can learn, then read my article “ The process of creating ready-made game textures and resources using photogrammetry ”. You can also read my other articles on the website of my game World Void on the Devlog page.
If you have any questions, or you think I missed something, then contact me on Twitter: @JosephRAzzam .
Source: https://habr.com/ru/post/319464/
All Articles