Training acid battery somehow and do it yourself
Sadness The battery died, undeservedly forgotten in the winter in the garage. I took it out of the motorcycle, or the alarm wentbbled up everything, or it wasn’t charged in the past pokatushki. Voltage meter showed 9V, that there is a crime.
I brought the battery home, warmed it, connected it to the charger. Charger after half an hour showed OK. Lied Nothing there is ok. The low beam bulb burned for about 10 minutes and then quickly turned into a “slightly warm air” state. Battery 6ah, lamp 55W.
Do not buy the same new battery? Winter time is. There is even an arduin box of all kinds of chips from China. In vain gather dust there or what?
')

In the distant Soviet army 30 years ago, I took a battery care course. Its main difference from the 21st century instructions was this: the battery must go through a series of charge and discharge cycles. Without this, how much of her in the charger do not hold, no matter how smart he is, she will die.
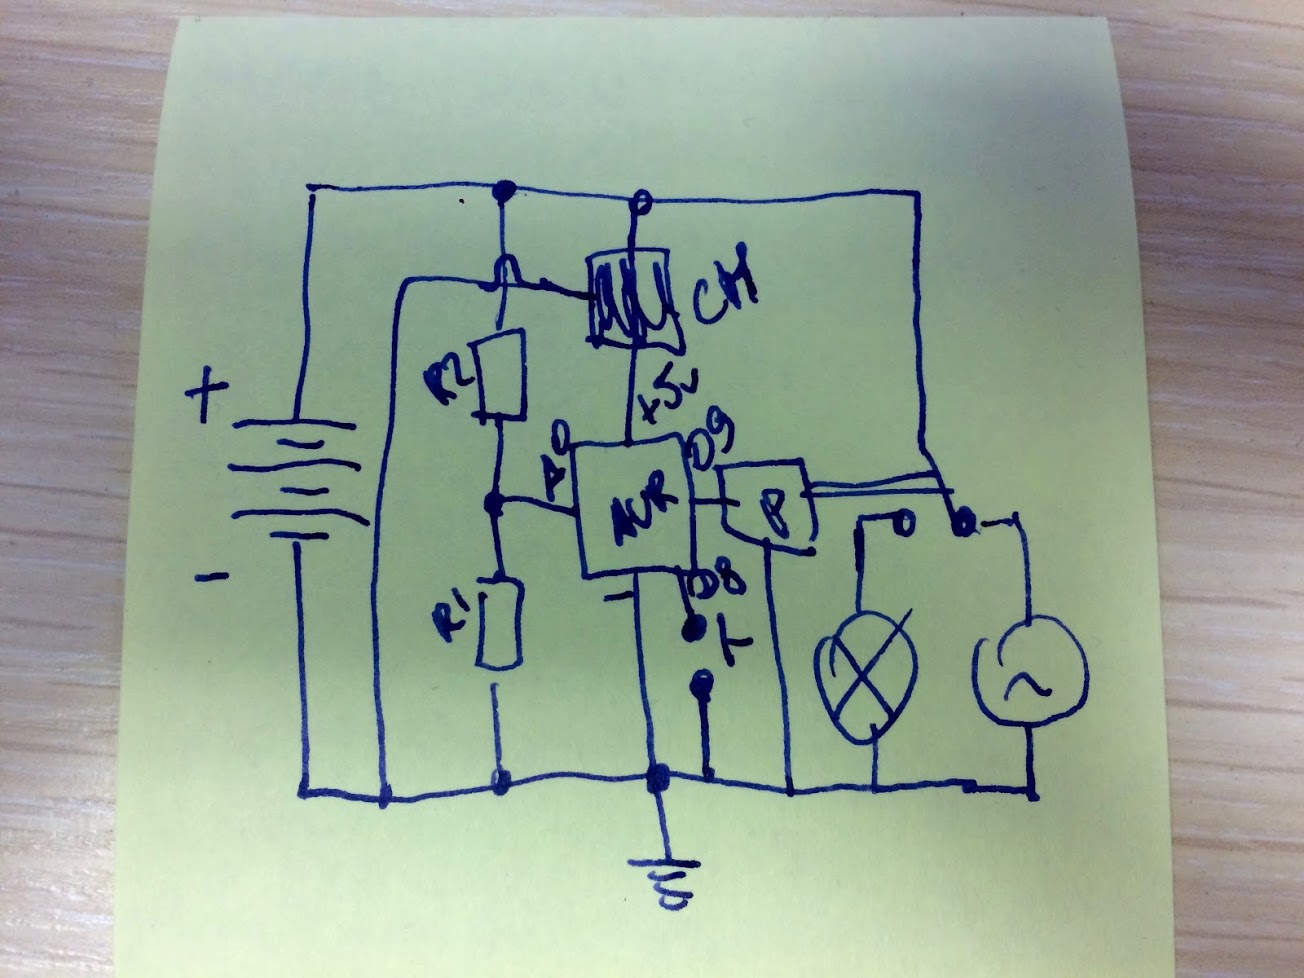
The theory of the process is easy to get used to. In practice, it is necessary to discharge a small current of several amperes to 10.8V, and then charge it to the stop. And so several times. Look at the light bulb quickly bored and I drew a diagram of the device.
Since I am not a professional battery rescuer, I collected everything somehow. Well, as befits an arduina lover.

Since I found myself not in this situation alone, I designed the project on a githaba so that others could also use it, and even put a beautiful scheme there by drawing it in easyeda.com

Analog feet read voltage and current, the potentiometer divided the battery voltage by about three. When the voltage drops below 10.8V, the charge is turned on, when the discharge exceeds 14.5V. And so three times. Then the battery was charged and the discharge was no longer turned on.
The process was launched with the button or automatically after a full charge. The dead of the batteries did not want to charge all the way and only warmed in vain. I kicked him with the button several times, then the process went.
There was an ammeter in the box, I used it to calculate the capacity of the battery when discharging. During the cycle in the terminal was visible:
When switching the mode, respectively, the final Ah value was visible for the previous process. The time spent on the cycle was also displayed.
I did not screw any displays, I watched the process from the terminal via usb / serial.
As a result, both batteries came to life and showed decent amperes approximately corresponding to their nominal values, which was even surprising for their age.
I brought the battery home, warmed it, connected it to the charger. Charger after half an hour showed OK. Lied Nothing there is ok. The low beam bulb burned for about 10 minutes and then quickly turned into a “slightly warm air” state. Battery 6ah, lamp 55W.
Do not buy the same new battery? Winter time is. There is even an arduin box of all kinds of chips from China. In vain gather dust there or what?
')
In the distant Soviet army 30 years ago, I took a battery care course. Its main difference from the 21st century instructions was this: the battery must go through a series of charge and discharge cycles. Without this, how much of her in the charger do not hold, no matter how smart he is, she will die.
The theory of the process is easy to get used to. In practice, it is necessary to discharge a small current of several amperes to 10.8V, and then charge it to the stop. And so several times. Look at the light bulb quickly bored and I drew a diagram of the device.
Since I am not a professional battery rescuer, I collected everything somehow. Well, as befits an arduina lover.
Since I found myself not in this situation alone, I designed the project on a githaba so that others could also use it, and even put a beautiful scheme there by drawing it in easyeda.com
Analog feet read voltage and current, the potentiometer divided the battery voltage by about three. When the voltage drops below 10.8V, the charge is turned on, when the discharge exceeds 14.5V. And so three times. Then the battery was charged and the discharge was no longer turned on.
#define POWERPIN 0 #define AMPERPIN 1 #define LIMIT 10.8f #define UPLIMIT 14.5f The process was launched with the button or automatically after a full charge. The dead of the batteries did not want to charge all the way and only warmed in vain. I kicked him with the button several times, then the process went.
There was an ammeter in the box, I used it to calculate the capacity of the battery when discharging. During the cycle in the terminal was visible:
- Current charge in Ah.
- Current discharge in Ah.
- Current in A.
- Voltage in V.
When switching the mode, respectively, the final Ah value was visible for the previous process. The time spent on the cycle was also displayed.
Actually program copy-paste from githab
/* ** 2 ** 3 ** 0 ** 1 ** 10.8 ** 5 ** ** . ** /. ** 10.8B . */ /* Todo: . -- . */ #define RELAYPIN 2 #define BUTTONPIN 3 #define POWERPIN 0 #define AMPERPIN 1 #define LIMIT 10.8f #define UPLIMIT 14.5f #define BADPOWER 5.0f #define CIRCLES 3 #define SWITCH_LAMP 0 #define SWITCH_CHARGER 1 // #define TICKS (60*5) void setup() { pinMode(RELAYPIN, OUTPUT); pinMode(BUTTONPIN, INPUT_PULLUP); digitalWrite(RELAYPIN, HIGH); Serial.begin(9600); Serial.println("Start..."); } int mode = SWITCH_CHARGER; int pressed = 0; int tick = 0; unsigned long start = 0; int circle = 1; float chargeAh = 0.0; unsigned long chargeMs = 0; float dischargeAh = 0.0; unsigned long dischargeMs = 0; void loop() { // if (circle > CIRCLES) return; // . float v = analogRead(POWERPIN) / 1023.0f * 3.0f * 5.0f; // float a = ((analogRead(AMPERPIN) * (5.0 / 1024.0)) - 2.5) / 0.1; // , - . if (v > BADPOWER) { // , . if (mode == SWITCH_CHARGER) { chargeAh += a * (millis() - chargeMs) / 3600000.0; chargeMs = millis(); if (digitalRead(BUTTONPIN) == LOW || v > UPLIMIT && circle <= CIRCLES) { mode = SWITCH_LAMP; digitalWrite(RELAYPIN, LOW); // . dischargeMs = millis(); Serial.print("Try "); Serial.println(circle); Serial.print("Charge was "); Serial.print(chargeAh); Serial.println("Ah"); dischargeAh = 0.0; Serial.println("LETS LIGHT!"); delay(100); pressed = 1; circle++; if (circle > CIRCLES) Serial.println("Thats enough!"); } } // , . if (mode == SWITCH_LAMP) { dischargeAh += a * (millis() - dischargeMs) / 3600000.0; dischargeMs = millis(); // . if (v < LIMIT) { mode = SWITCH_CHARGER; digitalWrite(RELAYPIN, HIGH); // . start = millis(); Serial.println("TIME TO SUCK ELECTRICITY!"); unsigned long msec = millis() - start; Serial.print("Discharge time "); Serial.print(msec / 3600000); Serial.print("h "); Serial.print((msec % 3600000) / 60000); Serial.print("m "); Serial.print((msec % 60000) / 1000); Serial.print("s "); Serial.println(); Serial.print("Appoximate capacity "); Serial.print(55 / 12); Serial.println("Ah"); Serial.print("Disharge was "); Serial.print(dischargeAh); Serial.println("Ah"); chargeAh = 0.0; } // . if (pressed == 0 && digitalRead(BUTTONPIN) == LOW) { mode = SWITCH_CHARGER; digitalWrite(RELAYPIN, HIGH); // . chargeMs = millis(); Serial.println("SUCK THE ELECTRICITY!"); Serial.print("Disharge was "); Serial.print(-dischargeAh); Serial.println("Ah"); chargeAh = 0.0; if (circle > CIRCLES) Serial.println("LAST CHARGING!"); delay(100); } } } else { Serial.println("BAD POWER!"); } if (tick == 0) { Serial.print(" Disharge = "); Serial.print(-dischargeAh); Serial.print(" Charge = "); Serial.print(chargeAh); Serial.print(" Current = "); Serial.print(a); Serial.print(" Voltage = "); Serial.println(v); } pressed = 0; tick = ++tick % TICKS; delay(1000); // } I did not screw any displays, I watched the process from the terminal via usb / serial.
As a result, both batteries came to life and showed decent amperes approximately corresponding to their nominal values, which was even surprising for their age.
Source: https://habr.com/ru/post/319414/
All Articles