FloatingActionMode - contextual action panel for Android
Contextual actions with list items are widely used with Android applications. It is rather convenient to select several elements or all elements of the list and apply some action to all selected elements at once. Delete, for example.
In Android applications, this can be used ActionMode , which allows you to display the available actions on the selected items on top of the Toolbar . You can also show the user how many items are currently selected or other useful information. This is convenient and looks good, but in some cases the information displayed on the Toolbar itself may be important and would not be desirable to hide it. For example, there may be the name and photo of the user, the list of messages with which is displayed in the list. When selecting some messages, it would be useful to see the name of the user to whom these messages are addressed.
In this case, you can display a context action panel with list items on top of the list itself, without blocking the Toolbar . I will discuss the creation of such a panel of contextual actions in this article.
Developed by CustomView - the contextual action panel I called FloatingActionMode or simply FAM .

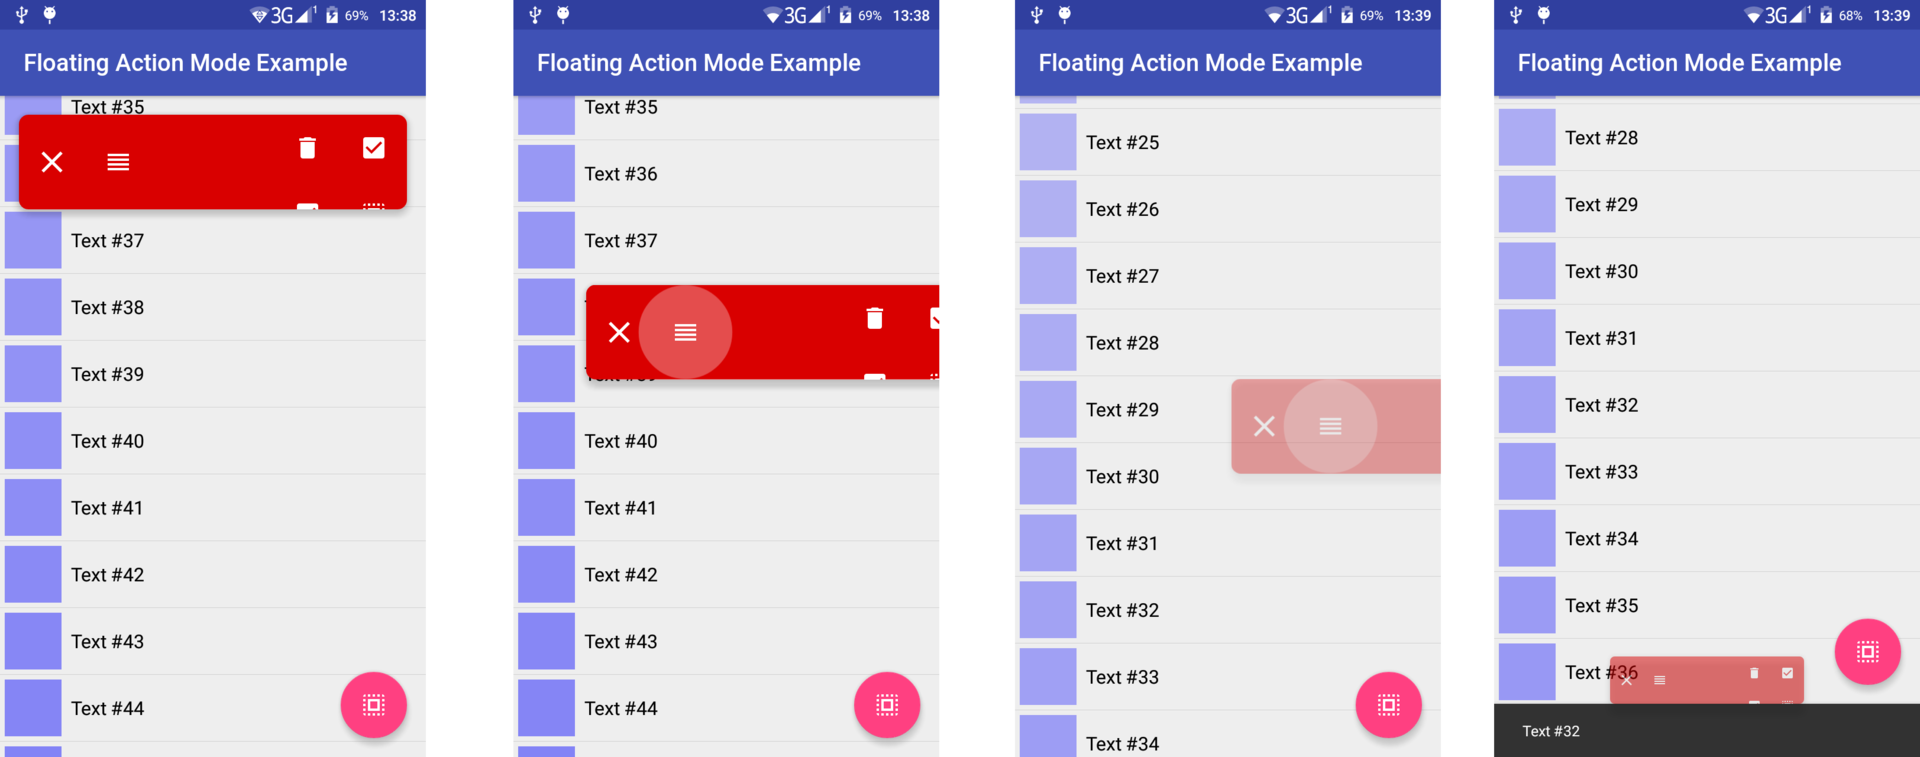
FloatingActionMode while running (fixed below)
Video - an example of working with FloatingActionMode (fixed below)
The comments indicated that it may not be very convenient for the user to drag the panel across the screen, so it can be fixed at the bottom of the screen, as shown in the screenshots and video above. (To do this, specify the attributes android:layout_gravity="bottom" and app:fam_can_drag="false" ).
At the same time, it is possible to allow the user to move the FAM around the screen, as shown in the following screens and videos.
FloatingActionMode while running
Video - an example of working with FloatingActionMode (Drag and Drop)
By default, the FAM does not have a background , so you can use whatever you need. Also, the android:translationZ="8dp" attribute can be used to create shadows on devices with API> = 21 android:translationZ="8dp"
XML attributes
To configure the FAM through a markup file, several special attributes are defined for it, which can also be changed programmatically:
fam_openeddetermines whether theFAMopen upon creation. (falseby default)fam_content_resisLayoutRes, which representsFAMcontent (several buttons, for example).Viewcreated fromfam_content_resadded to theFAMas a childView. The content can be changed programmatically while the application is running, therefore theFAMattribute can be specifiedandroid:animateLayoutChanges="true"for animated content changes. (no content by default)fam_can_closedetermines whether theFAMhave a button for closing. (trueby default)fam_close_iconis aDrawableResclose button. (default is a cross)fam_can_dragdetermines whether theFAMhave a drag button. (trueby default)fam_drag_iconis afam_drag_iconDrawableResbutton. (there is a default value)fam_can_dismissdetermines whether theFAMclose if the user drags him far enough horizontally (trueby default)fam_dismiss_thresholdis the horizontal shift threshold starting at which theFAMwill be closed when the userfam_drag_button. That is, if (getTranslationX/getWidth)>dismissThreshold, then theFAMwill be closed. (0.4fby default)fam_minimize_directiondetermines the direction in which theFAMwill move when collapsed. This attribute can have the following values (nearestdefault):top- theFAMwill move to the upper bound of the parent (excluding indents) during folding.bottom- theFAMwill move to the lower border of the parent (excluding indents) during folding.nearest-FAMwill move to the nearest (upper or lower) border of the parent (excluding indents) while folding
fam_animation_durationdetermines the duration of the folding /fam_animation_durationanimation. (400ms by default)
FAM also has OnCloseListener , which allows you to perform a specific action when the FAM closed by the user (deselect items from the list, for example).
Basic actions
The main actions with FAM are opening / closing and folding / unfolding. When opened, it appears and turns around, and when closed it collapses and disappears.
Expanding a FAM accompanied by an animation, during which it moves from the top or bottom edge of the parent ViewGroup (this edge is set by the fam_minimize_direction attribute) to its position specified by the markup file. Animation is set as follows:
animate() .scaleY(1f) .scaleX(1f) .translationY(calculateArrangeTranslationY()) .alpha(1f) When collapsing, the animation is performed "in the opposite direction":
animate() .scaleY(0.5f) .scaleX(0.5f) .translationY(calculateMinimizeTranslationY()) .alpha(0.5f) The calculateArrangeTranslationY() and calculateMinimizeTranslationY() methods allow you to calculate the translationY for the expanded and collapsed states, respectively, taking into account where the FAM user dragged the fam_minimize_direction attribute and the bottom and top indents, which will be discussed later.
Closing and dragging
For correct and beautiful work, FAM has buttons ( ImageView ) with the help of which the user can close the context actions mode or drag to another part of the screen vertically (if he is blocking the desired list item). The FAM can also be closed by dragging it horizontally (swipe to dismiss).
FAM is a LinearLayout , in which buttons are added during creation to close ( fam_drag_button ) and drag ( fam_close_button ). The ability to close / drag FAM can be turned on / off while the application is running, so the LinearLayout containing these buttons has the android:animateLayoutChanges="true" attribute android:animateLayoutChanges="true" .
<?xml version="1.0" encoding="utf-8"?> <merge xmlns:android="http://schemas.android.com/apk/res/android"> <LinearLayout android:layout_width="wrap_content" android:layout_height="?attr/actionBarSize" android:animateLayoutChanges="true" android:layout_gravity="center_vertical"> <ImageView android:id="@+id/fam_close_button" android:layout_width="?attr/actionBarSize" android:layout_height="?attr/actionBarSize" android:layout_gravity="center_vertical" android:background="@drawable/fam_image_button_background" android:scaleType="center" android:src="@drawable/fam_ic_close_white_24dp"/> <ImageView android:id="@+id/fam_drag_button" android:layout_width="?attr/actionBarSize" android:layout_height="?attr/actionBarSize" android:layout_gravity="center_vertical" android:background="@drawable/fam_image_button_background" android:scaleType="center" android:src="@drawable/fam_ic_drag_white_24dp"/> </LinearLayout> </merge> The drag and drop mechanism is implemented using OnTouchListener , which remembers the starting point of the touch and sets translationX and translationY to the touch when moving. When the user releases the drag button ( fam_drag_button ), the FAM returns to its original position horizontally, and if the user drags the FAM far enough horizontally, the method is called this@FloatingActionMode.close() .
fam_drag_button.setOnTouchListener(object : OnTouchListener { var prevTransitionY = 0f var startRawX = 0f var startRawY = 0f override fun onTouch(v: View, event: MotionEvent): Boolean { if (!this@FloatingActionMode.canDrag) { return false } val fractionX = Math.abs(event.rawX - startRawX) / this@FloatingActionMode.width when (event.actionMasked) { MotionEvent.ACTION_DOWN -> { this@FloatingActionMode.fam_drag_button.isPressed = true startRawX = event.rawX startRawY = event.rawY prevTransitionY = this@FloatingActionMode.translationY } MotionEvent.ACTION_MOVE -> { this@FloatingActionMode.maximizeTranslationY = prevTransitionY + event.rawY - startRawY translationX = event.rawX - startRawX if (canDismiss) { val alpha = if (fractionX < dismissThreshold) 1.0f else Math.pow(1.0 - (fractionX - dismissThreshold) / (1 - dismissThreshold), 4.0).toFloat() this@FloatingActionMode.alpha = alpha } } MotionEvent.ACTION_UP -> { fam_drag_button.isPressed = false this@FloatingActionMode.animate().translationX(0f) .duration = animationDuration if (canDismiss && fractionX > dismissThreshold) { this@FloatingActionMode.close() } } } return true } }) CoordinatorLayout Usage
As previously stated, the calculateArrangeTranslationY() and calculateMinimizeTranslationY() methods take into account the indents at the top and bottom to determine the correct position of the FAM . These indents are calculated using FloatingActionModeBehavior — the CoordinatorLayout.Behavior extensions, which AppBarLayout upper indent as the AppBarLayout height and the lower indent as the visible part of the Snackbar.SnackbarLayout .
Also, FloatingActionModeBehavior allows the FAM respond to scrolling, turning when scrolling down and turning around when scrolling up (quick return pattern).
open class FloatingActionModeBehavior @JvmOverloads constructor(context: Context? = null, attrs: AttributeSet? = null) : CoordinatorLayout.Behavior<FloatingActionMode>(context, attrs) { override fun layoutDependsOn(parent: CoordinatorLayout?, child: FloatingActionMode?, dependency: View?): Boolean { return dependency is AppBarLayout || dependency is Snackbar.SnackbarLayout } override fun onDependentViewChanged(parent: CoordinatorLayout, child: FloatingActionMode, dependency: View): Boolean { when (dependency) { is AppBarLayout -> child.topOffset = dependency.bottom is Snackbar.SnackbarLayout -> child.bottomOffset = dependency.height - dependency.translationY.toInt() } return false } override fun onStartNestedScroll(coordinatorLayout: CoordinatorLayout?, child: FloatingActionMode?, directTargetChild: View?, target: View?, nestedScrollAxes: Int): Boolean { return nestedScrollAxes == ViewCompat.SCROLL_AXIS_VERTICAL } override fun onNestedScroll(coordinatorLayout: CoordinatorLayout, child: FloatingActionMode, target: View, dxConsumed: Int, dyConsumed: Int, dxUnconsumed: Int, dyUnconsumed: Int) { super.onNestedScroll(coordinatorLayout, child, target, dxConsumed, dyConsumed, dxUnconsumed, dyUnconsumed) // FAM View. var parent = target.parent while (parent != coordinatorLayout) { if (parent == child) { return } parent = parent.parent } if (dyConsumed > 0) { child.minimize(true) } else if (dyConsumed < 0) { child.maximize(true) } } } This is how a FAM might look like in a markup file:
<android.support.design.widget.CoordinatorLayout> <android.support.design.widget.AppBarLayout> ... </android.support.design.widget.AppBarLayout> <android.support.v7.widget.RecyclerView app:layout_behavior="@string/appbar_scrolling_view_behavior"/> <com.qwert2603.floating_action_mode.FloatingActionMode android:id="@+id/floating_action_mode" android:layout_width="match_parent" android:layout_height="wrap_content" android:layout_margin="@dimen/action_mode_margin" android:animateLayoutChanges="true" android:background="@drawable/action_mode_background" android:translationZ="8dp" app:fam_animation_duration="@integer/action_mode_animation_duration" app:fam_can_dismiss="true" app:fam_can_drag="true" app:fam_content_res="@layout/user_list_action_mode_2" app:fam_dismiss_threshold="0.35" app:fam_drag_icon="@drawable/ic_drag_white_24dp" app:fam_minimize_direction="nearest"/> </android.support.design.widget.CoordinatorLayout> Source
The source code for FloatingActionMode is available on GitHub (the library directory). There is also a demo application using FAM ( app directory).
FloatingActionMode itself, as well as FloatingActionModeBehavior defined as open classes, so you can upgrade them as you need. Key FloatingActionMode methods are also defined as open .
Thanks for attention. Happy coding!
')
Source: https://habr.com/ru/post/319238/
All Articles