Thinking in the style of React

Translation of the official documentation library of the React.js library.
Thinking in the style of React
React, in our opinion, is the best way to build a large, fast web application using JavaScript. In our experience on Facebook and Instagram, the React app also scales very well.
One of the many great features of React is the principle of "As you design an application, you also create it." In this tutorial, you will go through the entire mental process of designing and creating a React application that displays a data table for a product search.
Let's start with the layout
Imagine that we have some JSON API and layout from our designer. The layout looks like this:
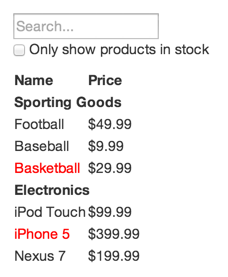
Our JSON API returns some data in the following form:
[ {category: "Sporting Goods", price: "$49.99", stocked: true, name: "Football"}, {category: "Sporting Goods", price: "$9.99", stocked: true, name: "Baseball"}, {category: "Sporting Goods", price: "$29.99", stocked: false, name: "Basketball"}, {category: "Electronics", price: "$99.99", stocked: true, name: "iPod Touch"}, {category: "Electronics", price: "$399.99", stocked: false, name: "iPhone 5"}, {category: "Electronics", price: "$199.99", stocked: true, name: "Nexus 7"} ]; Step 1: We translate the user interface into the Component hierarchy
The first thing we do is draw the boxes around each component (and subordinate components) on the layout and assign them names. If you work with a designer, he may have already done this, so you need to talk to him! It may turn out that the names of the layers in Photoshop are quite suitable for naming your React components!
But how to find out what should be the final separate component? Simply use the same methods to determine when creating a new function or object. One of these methods is the principle of sole responsibility , that is, a component, ideally, should create only one thing / entity. If a component creates multiple entities that are repeated in other components, then it should be decomposed into smaller components.
The more often you display the JSON data model as a user interface, the faster you will come to the conclusion that if the data model is built correctly, then your user interface (and, therefore, the structure of components) looks beautiful. The reason is that the user interface and data model tend to adhere to the same information architecture , which means that dividing the user interface into components is often a trivial task - "Just break it into components that represent exactly one piece of your data models ".
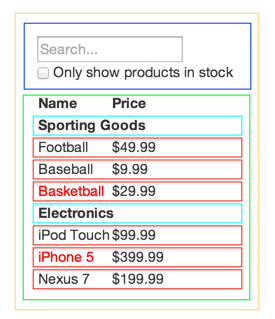
As can be seen from the layout - we have five components in our simple application. We have highlighted each of the components with multi-colored boxes.
FilterableProductTable(orange): contains our entire tableSearchBar(blue): accepts all user inputProductTable(green): displays and filters a set of data based on user input.ProductCategoryRow(cyan): displays the title for each categoryProductRow(red): displays a row for each product
If you look at ProductTable , you will see that the table header (containing the labels "Name" and "Price") is not highlighted in a separate component. This is a matter of preference, and there are arguments for one option or another. For this example, we left the header as part of ProductTable , because it is part of the dataset visualization that is the responsibility of ProductTable . However, if the heading would be more complicated (for example: we would have to add the ability to sort by columns), of course, we would allocate it into a separate component ProductTableHeader .
Now that we have defined the components in our layout, let's arrange them in a hierarchy. It is easy. Components that are included in another component in the layout should look like descendants in the hierarchy:
FilterableProductTableSearchBarProductTableProductCategoryRowProductRow
Step 2: Create a static version in React
<div id="container"> <!-- . --> </div> body { padding: 5px } class ProductCategoryRow extends React.Component { render() { return <tr><th colSpan="2">{this.props.category}</th></tr>; } } class ProductRow extends React.Component { render() { var name = this.props.product.stocked ? this.props.product.name : <span style={{color: 'red'}}> {this.props.product.name} </span>; return ( <tr> <td>{name}</td> <td>{this.props.product.price}</td> </tr> ); } } class ProductTable extends React.Component { render() { var rows = []; var lastCategory = null; this.props.products.forEach(function(product) { if (product.category !== lastCategory) { rows.push(<ProductCategoryRow category={product.category} key={product.category} />); } rows.push(<ProductRow product={product} key={product.name} />); lastCategory = product.category; }); return ( <table> <thead> <tr> <th>Name</th> <th>Price</th> </tr> </thead> <tbody>{rows}</tbody> </table> ); } } class SearchBar extends React.Component { render() { return ( <form> <input type="text" placeholder="Search..." /> <p> <input type="checkbox" /> {' '} Only show products in stock </p> </form> ); } } class FilterableProductTable extends React.Component { render() { return ( <div> <SearchBar /> <ProductTable products={this.props.products} /> </div> ); } } var PRODUCTS = [ {category: 'Sporting Goods', price: '$49.99', stocked: true, name: 'Football'}, {category: 'Sporting Goods', price: '$9.99', stocked: true, name: 'Baseball'}, {category: 'Sporting Goods', price: '$29.99', stocked: false, name: 'Basketball'}, {category: 'Electronics', price: '$99.99', stocked: true, name: 'iPod Touch'}, {category: 'Electronics', price: '$399.99', stocked: false, name: 'iPhone 5'}, {category: 'Electronics', price: '$199.99', stocked: true, name: 'Nexus 7'} ]; ReactDOM.render( <FilterableProductTable products={PRODUCTS} />, document.getElementById('container') ); Now that you have your Component hierarchy, it's time to implement your application. The easiest way is to start with a static version that displays the data model and user interface, but there is no interactivity. Separation of static and interactive parts is a good solution, because The task of implementing a static version is to input a large amount of text from the keyboard with the least thought process, whereas the realization of interactivity requires a lot of thought process and little keyboard input. Next we will see why.
The implementation of the static version is the mapping (rendering) of the data model, during which you create Components that use other Components and transmit data through props (Properties) . props are ancestral to child data transfer tools in the React Component hierarchy. In React, there is such a thing as state — never use the State to create a static version. The main purpose of the State is interactivity, it is necessary for transmitting and recording data that changes over time. Because, at the moment, you are creating a static version of the application - you do not need to use the State.
You can implement the application top-down or bottom-up. That is, you can start by building Components of a higher hierarchy level (starting with FilterableProductTable ) or vice versa from a low level ( ProductRow ). In simpler applications, as a rule, it is easier to go from top to bottom, and in larger ones - from bottom to top and in parallel to write tests as components are implemented.
At the end of this step, you will have a library of reusable Components that display your data model. Components will only have a render() method, since this is a static version. The component at the top of the hierarchy ( FilterableProductTable ) will receive the data model via props . If you make a change to the underlying data model and call ReactDOM.render() again, the user interface will be updated. Isn't it true - there is nothing complicated in it, because it is really very simple? React one - way data flow (also called one - way linking ) provides modularity and speed.
A slight digression: Properties (props) and State (state)
In React, there are two "models" of data: props and state. It is important to understand the difference between them. If you are not sure that you know the difference - re-read the relevant section of official documentation .
Step 3: Determine the minimum (but sufficient) representation of the State of the user interface
In order to make the user interface interactive, you need to be able to register changes in the underlying data model. In React, this is done simply by state .
To build the correct application, first of all, you need to think about the minimum set of changeable states necessary for your application. Adhere to the principle of DRY: Don't Repeat Yourself (Do not repeat) . Ideally, the minimum representation of the State of your application should not contain anything that can be calculated based on the available data (in props and state) at the point in time when it is needed. For example: If you build an application that displays a to-do list, stay within the array containing records of cases — do not create a separate State variable that displays the number of cases. Instead, at that moment when you need to display the number of cases - just take the length of the existing array.
Let's think over all data units in our application. We have:
- Original product list
- Search text entered by user
- Checkbox value
- Filtered product list
Let's go through each item and determine if it is a State. For each data unit, we need to ask three questions:
- Is this data transmitted via props from the ancestor? If so, then this is most likely not a state.
- Does this data remain unchanged over time? If so, then this is most likely not a state.
- Can you calculate this data based on the available (in props and state) in your Component? If so, then this is not a state.
The original list of products is transmitted through props - it means this is not the State. The search text and checkbox value may change over time and cannot be calculated from the available data — these are States. And finally: The filtered list of products can be calculated by combining the original list of products, the search text and the check box value - this is not the State.
As a result, our States:
- Search text entered by user
- Checkbox value
Step 4: Determine where our Status will be placed
<div id="container"> <!-- . --> </div> body { padding: 5px } class ProductCategoryRow extends React.Component { render() { return (<tr><th colSpan="2">{this.props.category}</th></tr>); } } class ProductRow extends React.Component { render() { var name = this.props.product.stocked ? this.props.product.name : <span style={{color: 'red'}}> {this.props.product.name} </span>; return ( <tr> <td>{name}</td> <td>{this.props.product.price}</td> </tr> ); } } class ProductTable extends React.Component { render() { var rows = []; var lastCategory = null; this.props.products.forEach((product) => { if (product.name.indexOf(this.props.filterText) === -1 || (!product.stocked && this.props.inStockOnly)) { return; } if (product.category !== lastCategory) { rows.push(<ProductCategoryRow category={product.category} key={product.category} />); } rows.push(<ProductRow product={product} key={product.name} />); lastCategory = product.category; }); return ( <table> <thead> <tr> <th>Name</th> <th>Price</th> </tr> </thead> <tbody>{rows}</tbody> </table> ); } } class SearchBar extends React.Component { render() { return ( <form> <input type="text" placeholder="Search..." value={this.props.filterText} /> <p> <input type="checkbox" checked={this.props.inStockOnly} /> {' '} Only show products in stock </p> </form> ); } } class FilterableProductTable extends React.Component { constructor(props) { super(props); this.state = { filterText: '', inStockOnly: false }; } render() { return ( <div> <SearchBar filterText={this.state.filterText} inStockOnly={this.state.inStockOnly} /> <ProductTable products={this.props.products} filterText={this.state.filterText} inStockOnly={this.state.inStockOnly} /> </div> ); } } var PRODUCTS = [ {category: 'Sporting Goods', price: '$49.99', stocked: true, name: 'Football'}, {category: 'Sporting Goods', price: '$9.99', stocked: true, name: 'Baseball'}, {category: 'Sporting Goods', price: '$29.99', stocked: false, name: 'Basketball'}, {category: 'Electronics', price: '$99.99', stocked: true, name: 'iPod Touch'}, {category: 'Electronics', price: '$399.99', stocked: false, name: 'iPhone 5'}, {category: 'Electronics', price: '$199.99', stocked: true, name: 'Nexus 7'} ]; ReactDOM.render( <FilterableProductTable products={PRODUCTS} />, document.getElementById('container') ); So, we have defined the minimum set of Application States. The next step we need to determine which component changes or owns this state.
Remember: In React, one-way data transfer runs down the Component hierarchy. Perhaps, from this it is not immediately clear which component should be the owner of the State. This part is often quite challenging for beginners - so follow these steps to clarify this issue:
For each unit of State of your application:
- Identify all Components that render (render) something based on that State.
- Find a common ancestor for these Components (a single Component in the hierarchy is higher for all Components that need this State).
- You can designate the found common ancestor or any Component in the hierarchy of your higher one as the owner of the State.
- If the common ancestor is not in your Component hierarchy, you need to create a higher-level Component simply to be designated as the owner of the State.
So let's apply this strategy to our application:
- The
ProductTablecomponent needs a State to filter the list of products, while theSearchBarComponent needs a State to display a search query and checkbox status. - A common ancestor for them is the
FilterableProductTableComponent. - Thus, conceptually, a contact point for filtering a list and selected values is in the Component
FilterableProductTable
Great, we determined that our Status should be placed in the FilterableProductTable Component. First we add the instance property this.state = {filterText: '', inStockOnly: false} to the constructor FilterableProductTable component to determine the initial state of our application. Then we filterText and inStockOnly to the ProductTable and SearchBar components via props . And the final step is to use props to filter the rows in the ProductTable and set the values of the form fields in the SearchBar .
You can start the application and see how it will behave: set the filterText value in the Component FilterableProductTable to 'ball' and restart the application. You will see that the data table is updated correctly.
Step 5: Add Backflow
<div id="container"> <!-- . --> </div> body { padding: 5px } class ProductCategoryRow extends React.Component { render() { return (<tr><th colSpan="2">{this.props.category}</th></tr>); } } class ProductRow extends React.Component { render() { var name = this.props.product.stocked ? this.props.product.name : <span style={{color: 'red'}}> {this.props.product.name} </span>; return ( <tr> <td>{name}</td> <td>{this.props.product.price}</td> </tr> ); } } class ProductTable extends React.Component { render() { var rows = []; var lastCategory = null; this.props.products.forEach((product) => { if (product.name.indexOf(this.props.filterText) === -1 || (!product.stocked && this.props.inStockOnly)) { return; } if (product.category !== lastCategory) { rows.push(<ProductCategoryRow category={product.category} key={product.category} />); } rows.push(<ProductRow product={product} key={product.name} />); lastCategory = product.category; }); return ( <table> <thead> <tr> <th>Name</th> <th>Price</th> </tr> </thead> <tbody>{rows}</tbody> </table> ); } } class SearchBar extends React.Component { constructor(props) { super(props); this.handleChange = this.handleChange.bind(this); } handleChange() { this.props.onUserInput( this.filterTextInput.value, this.inStockOnlyInput.checked ); } render() { return ( <form> <input type="text" placeholder="Search..." value={this.props.filterText} ref={(input) => this.filterTextInput = input} onChange={this.handleChange} /> <p> <input type="checkbox" checked={this.props.inStockOnly} ref={(input) => this.inStockOnlyInput = input} onChange={this.handleChange} /> {' '} Only show products in stock </p> </form> ); } } class FilterableProductTable extends React.Component { constructor(props) { super(props); this.state = { filterText: '', inStockOnly: false }; this.handleUserInput = this.handleUserInput.bind(this); } handleUserInput(filterText, inStockOnly) { this.setState({ filterText: filterText, inStockOnly: inStockOnly }); } render() { return ( <div> <SearchBar filterText={this.state.filterText} inStockOnly={this.state.inStockOnly} onUserInput={this.handleUserInput} /> <ProductTable products={this.props.products} filterText={this.state.filterText} inStockOnly={this.state.inStockOnly} /> </div> ); } } var PRODUCTS = [ {category: 'Sporting Goods', price: '$49.99', stocked: true, name: 'Football'}, {category: 'Sporting Goods', price: '$9.99', stocked: true, name: 'Baseball'}, {category: 'Sporting Goods', price: '$29.99', stocked: false, name: 'Basketball'}, {category: 'Electronics', price: '$99.99', stocked: true, name: 'iPod Touch'}, {category: 'Electronics', price: '$399.99', stocked: false, name: 'iPhone 5'}, {category: 'Electronics', price: '$199.99', stocked: true, name: 'Nexus 7'} ]; ReactDOM.render( <FilterableProductTable products={PRODUCTS} />, document.getElementById('container') ); To the current step, we have created an application that correctly transmits and uses props and state moving down the Component hierarchy. The time has come to add support for data transfer in the opposite direction: the components of the form that are located down the hierarchy need to somehow update the State in the FilterableProductTable Component.
The React mechanism for creating this data stream is well developed to create an easy understanding of how the program works, but it requires a bit more keyboard input than traditional two-way data binding.
If you try to enter text or check the checkbox in the current version of the example, you will find that React ignores your input. This is intentionally established by us, since we set the value of the value property to input always equivalent to the state passed from the FilterableProductTable Component.
Let's think about what we want to happen. We want each time a user makes changes to a form, the State is updated to display user input. Since Components need to update only their own State, the FilterableProductTable Component FilterableProductTable to pass a callback mechanism to the SearchBar Component, which will signal each time the State is to be updated. We can use the onChange event in form components to report this. Then, the callback passed by the Component FilterableProductTable will call setState() and the application will be updated.
Although it looks complicated, it’s actually just a few lines of code. And it’s really transparent how your data is transmitted through the entire application.
That's all
I hope this tutorial has given you an idea of how to think when building React components and applications. Although we had to type a little more code than you are used to, remember that the code is read several times more often than it is written, and our code is read easily due to transparency and modularity. As you begin to build large libraries or applications, you truly appreciate this transparency and modularity, and the possibility of reuse will invariably result in less and less code.
')
Source: https://habr.com/ru/post/319134/
All Articles