How to start using SSD hardware encryption using the example of Samsung EVO 850 and sedutil
This is just a short hint, which I hope can be used for other drives with built-in encryption (SED, self encrypting drives). There is no in-depth explanation of the principles and terms.
Samsung EVO or PRO always stores data in an encrypted (AES) form, even if you didn’t do anything about it. Just until you have turned on security, it always returns decrypted data. And when you turn on security, it will require a password to decrypt. This means that setting the password will not lead to the fact that the speed of the disk will fall, everything is encrypted without it. It also means that you do not have to encrypt the disk from beginning to end - it is already encrypted.
However, there is no information about which encryption key is used. Perhaps it is the same for all model discs, or, for example, for those that are supplied to us. And with serious effort (for example, to solder a piece from the donor disk, in which the password is not set), you can read the data.
')
But if it’s just unpleasant for you, like me, that someone can shamelessly delve into the data of a lost or stolen laptop, then the proposed method is enough.
You can close the data on the Samsung EVO disks in one of three ways (no need to try to combine them, just break everything):
1. Set the ATA disk password in BIOS
This is the easiest way, but almost useless. In addition to the user-password, the BIOS, as a rule, also registers the master-password, which is known to the service of the computer manufacturer, and then good people can help to decrypt the data to anyone who asked for help. See, for example, iXBT conferences, “Remove password from BIOS (BIOS)”.
The network describes examples of ugly BIOS work when setting the ATA password, caching the password in the BIOS and reading it from there, using hdparm instead of the BIOS to set the password, reading the disk with the password set on the computer of the same model, etc. If you wish, you can read and appreciate yourself, but this method has disappointed me.
2. enable eDrive functionality and use BitLocker
Not bad, but suitable only for expensive versions of Windows, and not suitable for linux, if that.
3. use TCG OPAL functions through sedutil
Large strokes: the idea of this method is that when activating protection, after turning on the power, the disk, instead of its real contents, shows a small service section. There you can write anything, but usually it is a utility that asks you for a password and tries to feed it to the disk so that it will work for real.
The advantage of this method is that the password is entered before the operating system is loaded, that is, you do not need to change anything in the operating system, and there is no one to intercept this password.
The downsides are:
- The computer cannot be set to standby. After resuming the power to the disk, it will be in a locked state. The operating system, waking up in RAM, will fall sharply.
- Unnecessary reboot - after entering the password, when the disk has opened its true contents, the machine reboots, so that the BIOS will again determine what kind of disk it is.
Before continuing, let us ask ourselves, is it possible, as a result of wrong actions, to turn a disk into a brick, that is, into a mass-dimensional model of a disk that does not respond to external stimuli?
Well, you can easily lose data if you incorrectly set a password when closing a disk, or forget it right away, for example. Therefore, it is MANDATORY to perform a backup before all subsequent actions.
In the case when the disk cannot be decrypted, it can usually be reset to its original (factory) state, but at the price of total data loss.
Total: the brick can be brought back to life, but data can be lost.
Let's go back to the Samsung drives.
There are no Samsung utility disks on the service partition. There are commercial programs that can prescribe themselves there, but we will use the free open source utility - sedutil (nee - msed).
Go to https://github.com/Drive-Trust-Alliance/sedutil/wiki
Downloading files from the executable distributions section (don't forget to open .gz archives !!!):
The sedutil_WIN.zip archive is what we will use to revive disk encryption if we work under Windows. Next comes the description of the work under Windows. Work with the linux version is almost the same. Unless the drive names are different, for example, instead of \\. \ PhysicalDrive0 there will be / dev / sda.
The LINUXPBARelease.img.gz archives or UEFI64_Release.img.gz - contain what will be loaded from a small disk partition when its main contents become locked after the power is turned off. Different options for machines with BIOS and UEFI.
Archive Rescue.img.gz - contains the image of the recovery utility - if something goes wrong and wants to bring everything back, and the computer does not boot.
We write the recovery utility on the flash drive just in case (suggested by the Win32DiskImager program) and check that we can boot from it. At the same time, we will see that it works from the linux command line, and make sure that we are not afraid of it.
It is also recommended to write to the site on another LINUXPBARelease.img flash drive and check that when loading and entering any password we will see a list of disks. But this is not the case, the site has an outdated description, which they forgot to change (as of 01/01/2017). If the disk is not yet encrypted, we will receive only error messages and go to reboot. Do not be discouraged, this is normal (as described in Issues on github).
So, from the command line, let's see which of our disks is capable of self-encryption:
V:\sedutil>sedutil-cli --scan Scanning for Opal compliant disks \\.\PhysicalDrive0 12 Samsung SSD 850 EVO 1TB EMT01B6Q \\.\PhysicalDrive1 12 Samsung SSD 850 EVO mSATA 500GB EMT41B6Q No more disks present ending scan Close both drives, but the password for them will be one. Since we will enter it on the command line, it is necessary that there are no characters in it that have special meaning on the command line, such as any spaces, slashes-less-quotes-less-more. In addition, the characters that you will use must be available when typing from the keyboard when the computer starts (read, the characters of the QWERTY keyboard). Finally, hammer the password into a text file, save it to a USB flash drive, and paste it using Copy-Paste into the following commands.
Suppose we have a boot disk - PhysicalDrive1.
Let us have the password MyPassword.
V:\sedutil>sedutil-cli --initialsetup MyPassword \\.\PhysicalDrive1 - 13:21:04.000 INFO: takeOwnership complete - 13:21:04.436 INFO: Locking SP Activate Complete - 13:21:05.982 INFO: LockingRange0 disabled - 13:21:05.513 INFO: LockingRange0 set to RW - 13:21:06.028 INFO: MBRDone set on - 13:21:06.558 INFO: MBRDone set on - 13:21:07.057 INFO: MBREnable set on - 13:21:07.057 INFO: Initial setup of TPer complete on \\.\PhysicalDrive1 Download the bootloader image to the service partition (here you must determine which version of the bootloader you need: BIOS or UEFI)
V:\sedutil>sedutil-cli --loadPBAimage MyPassword <.img> \\.\PhysicalDrive1 - 13:01:34.000 INFO: Writing PBA to \\.\PhysicalDrive1 | [*********************] 1049600 bytes written - 13:03:38.317 INFO: PBA image < > written to \\.\PhysicalDrive1 V:\sedutil>sedutil-cli --setMBREnable on MyPassword \\.\PhysicalDrive1 - 13:05:02.000 INFO: MBRDone set on - 13:05:03.562 INFO: MBREnable set on The very moment after which the disk starts to behave differently after turning off the power:
V:\sedutil>sedutil-cli --enableLockingRange 0 MyPassword \\.\PhysicalDrive1 At the same time, we encrypt the second disk (not bootable). All the same, only the loader can not write to it.
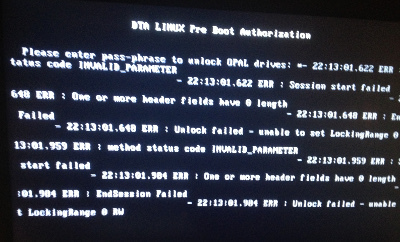
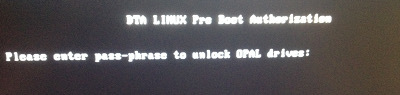
V:\sedutil>sedutil-cli --initialsetup MyPassword \\.\PhysicalDrive0 V:\sedutil>sedutil-cli --enableLockingRange 0 MyPassword \\.\PhysicalDrive0 After turning off the power and turning on again, we will see a password request. If you enter it incorrectly - reboot and re-request. If correct, reboot and start the operating system from the opened disk partition.
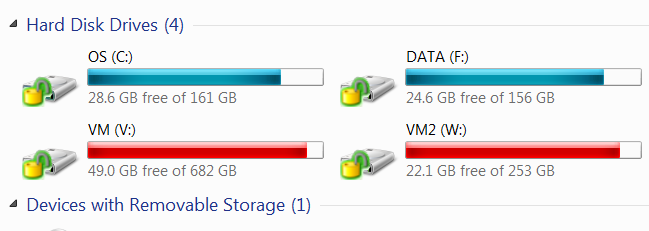
If successful, you can see how the icons of the disks have changed in Windows - they have opened yellow locks:
In case of failure ... Hmm ... Weekend long today. Start with a more detailed study of the sedutil utility, guided by the link above.
First of all, the section “Remove OPAL” tells how to restore the usual behavior of the disk, so that it works again without changing the partitions when turned on and without requesting a password.
The “PSID Revert” section provides extreme measures when you forget / do not know the password, but want to revive the disk at the cost of data loss. In this case, you will need to find out the unique disk number (PSID), usually written somewhere on his body.
Successes.
Source: https://habr.com/ru/post/319054/
All Articles