Installing OpenCV in Windows for Dummies and connecting the library to Code Blocks
This article will be useful for
A brief digression on the content. If for the first time you hear about everything that is written below, then just read and study the article in order. If you already know something, you can skip this point in the article.
- How to use the command line
All about the necessary set of commands to build OpenCV . - GCC compiler
A little bit about how to find the GCC assembly you need and a warning about possible errors, as well as a little about some of the built-in GCC libraries for parallelizing processes on the CPU and GPU . - Compiler installation
You will learn how to write PATH environment variables, and what problems may arise when installing a compiler. - CMake
A little about Cmake . - Opencv
You will learn where to download and how to prepare for installing OpenCV , as well as a little about the library itself. - How to use CMake
You will learn how to set up a compiler in Cmake and specify the paths to the library and to the assembly. - Configuring the assembly OpenCV in Cmake
You will learn about some of the OpenCV build options, to customize it to your needs. - Code :: Blocks
A little bit about Code :: Blocks. Creating a sample project. - Problems with Code :: Blocks
What glitches happen when working with Code :: Blocks. - Connect OpenCV to Code Blocks
All necessary and detailed information to connect the OpenCV library to your project. - Errors during compilation of the program with the OpenCV library
Here is the order of connection of the OpenCV library files, and also discusses errors due to the lack of libraries required for OpenCV to work. - Conclusion
How to use the command line
If on Linux the command line is an integral part of the operating system, then on Windows it is almost never needed. However, we want to become a true expert and learn how to program for any hardware in any OS, write programs in a notebook, etc.? Therefore, we will start with the command line, although we will need it only for two commands - mingw32-make and mingw32-make install , but more on that later. If you already know how to use the command line, you can skip this step. Otherwise, look under the spoiler.
')
Command line
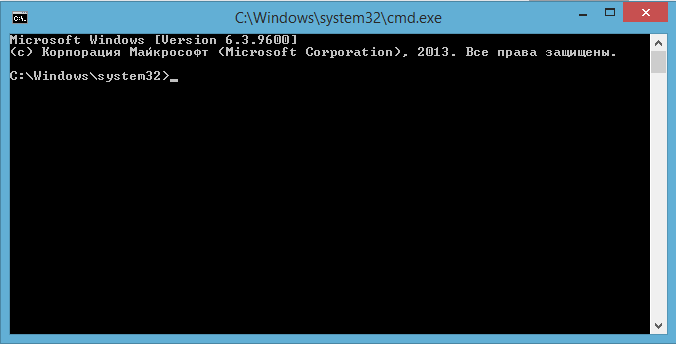
So, first run the command line. Go to the START and in the search enter cmd . What the search finds, then run. This window should appear:
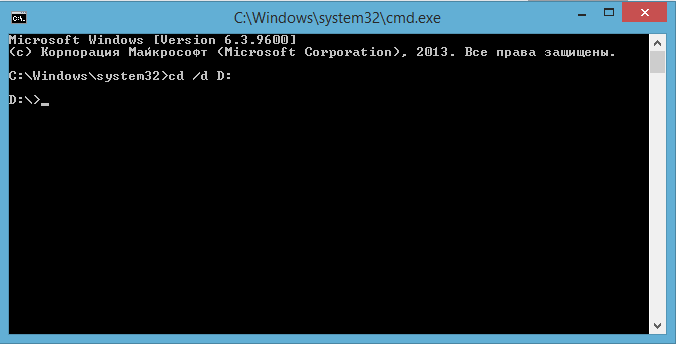
To go to disk D: you need to type the command cd / d D:, as in the picture.
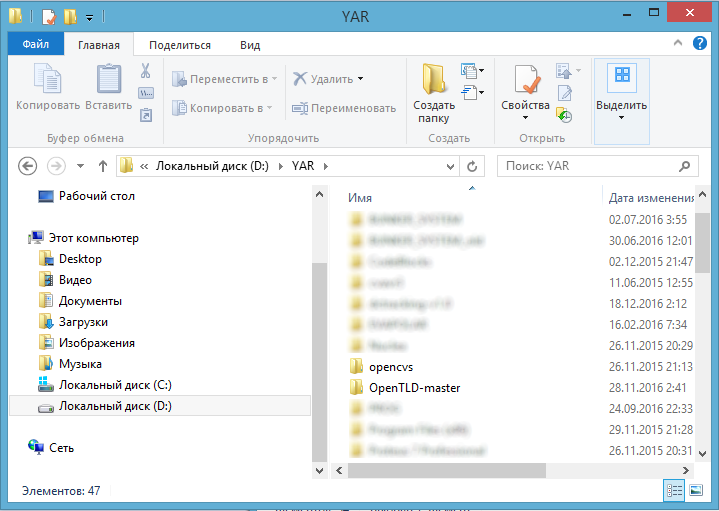
Then try to go to the folder (in the example, this is the YAR folder). The cd team can help us with this. In my case, you just need to type cd YAR and press the Enter key, as in the picture.

If you need to go back, just type the command cd .. , and you will find yourself in the previous folder. It is also often convenient to use the Tab key so that the command line lists the names of folders starting with the character you typed after the cd command , such as on this animation.
The command line shows only two folders with the letter 'o' , since there are only two such folders in the YAR folder.
This is the minimum set of commands to move in the file system that we need to know. Remember them, cd / d <disk name> moves to the specified disk, cd <folder name> moves to the specified folder, and the cd command returns us back.
To go to disk D: you need to type the command cd / d D:, as in the picture.
Then try to go to the folder (in the example, this is the YAR folder). The cd team can help us with this. In my case, you just need to type cd YAR and press the Enter key, as in the picture.
If you need to go back, just type the command cd .. , and you will find yourself in the previous folder. It is also often convenient to use the Tab key so that the command line lists the names of folders starting with the character you typed after the cd command , such as on this animation.
The command line shows only two folders with the letter 'o' , since there are only two such folders in the YAR folder.
This is the minimum set of commands to move in the file system that we need to know. Remember them, cd / d <disk name> moves to the specified disk, cd <folder name> moves to the specified folder, and the cd command returns us back.
GCC compiler
 There is a good, free and open source compiler - GCC . For Windows, there is a collection of free Windows compilers for C and C ++ - MinGW . I have not used other compilers, therefore I do not touch on this article.
So, the compiler means GCC , we google MinGW , but do not rush right away to download anything. First you need to catch a couple of subtleties, since we are sitting under Windows . First of all, if you download the first thing that comes to hand, even the latest build of the compiler, later you may be disappointed when an error like this appears during the assembly of the OpenCV library:
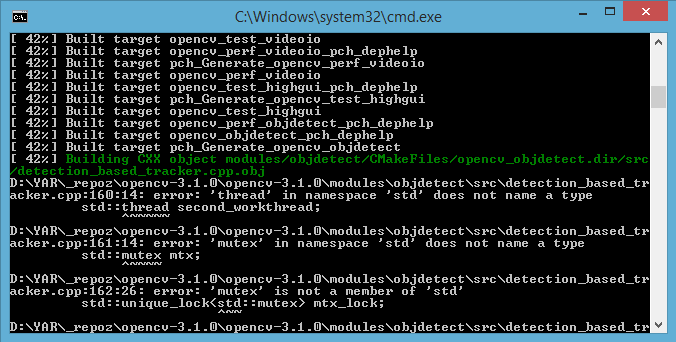
Pay attention to the line: error: 'thread' in namespace 'std' does not name a std :: thread second_workthread; This error suggests that the standard library std does not have a thread class, and this is despite the fact that std is the standard library, and the thread class in it must be mandatory in C ++ 11 , and the MinGW compiler is version 6 of you. The fact that many MinGW builds for Windows do not support working with threads through std :: thread . Therefore, you need to find a MinGW assembly ( or build MinGW yourself ) with the working class std :: thread . Including therefore it is impossible to use TDM GCC . In another way this problem cannot be solved.
If you are satisfied with the version of MinGW 5.1 , then I advise you to download it here , using this set of compilers, I successfully assembled OpenCV on Windows 10 .
If you are interested in how you can parallelize processes between the cores of the processor or video card using OpenMP libraries, OpenACC, then you should read about it under the spoiler.
And if for the time being it is too lazy to delve into everything, just download the compiler by reference , unpack the archive, move the contents of the archive to where you need, and follow the instructions further.
Read more about process parallelization
If you are interested in parallelizing processes on a GPU using the OpenACC library built into the compiler, then I advise you to find version 6 of GCC for Windows , because the technical vision specialist will probably want to write something of his own (for example, a neural network) using the power of the GPU . The fact is that GCC version 5.1 includes an experimental version of OpenACC , and therefore is not very suitable for these purposes. However, you can use CUDA , especially since OpenCV is friends with CUDA , and if you are going to make PC applications with a powerful nvidia video card for the future, then you do not need to get acquainted with OpenACC . Also in the GCC compilers there is another useful library that is used in OpenCV . This is OpenMP . With OpenMP, you can easily do parallelization of calculations between the processor cores ( CPU ), increasing the speed of the program several times. Therefore, I advise you to study OpenMP and download a compiler with its support. Choose compilers based on the bitness of your system .
Compiler installation
After you download MinGW , you will need to spend a couple of simple manipulations with it - set the bin folder in the PATH environment variable. This is necessary in order to use the make or mingw32-make command from the command line, otherwise you will have to wait for the following message: “mingw32-make” is not an internal or external command, executable program or batch file . Also in the bin folder are dynamic libraries for the compiler to work, which windows simply will not see, if you do not write the path to the bin folder in the PATH environment variable.
So, to register the path to the folder with compilers in the PATH environment variable, first go to START , then poke into this computer and go to the properties . There we click Advanced system settings , we find and click the environment variables and then, or in the window , user’s environment variables (if you make this variable only for yourself), or in the system variables window (if you make a variable for all Windows users), we find the PATH variable ( or Path ) and in it we add your path to the bin folder. For example, as in my case, C: \ MinGW \ mingw64 \ bin . We prescribe the path after the ';' character. If you do not have a PATH in the list of variables, you can create it, and then there will be only one way in it - the path to your GCC compiler . Do not forget to move MinGW to a convenient folder for you before setting the path to the bin folder. Also, do not forget to restart the command line (if you have already started it) after adding the MinGW bin folder to your PATH .
How to write PATH in pictures
Install cmake
 Cmake is a useful thing, it is a cross-platform utility for automatically assembling a program from source code . We will need it to prepare OpenCV for assembly. Download Cmake , if you have a 64-bit system, download the archive cmake-3.7.1-win64-x64.zip . When the archive is downloaded, unpack it where it is more convenient for you. Cmake can be used through the GUI . To do this, in the folder with Cmake go to the bin folder and click cmake-gui.exe . Now for the time being we will postpone Cmake and get down to OpenCV .
Opencv
 If you are reading this article, then most likely you already know why OpenCV is needed, and what this library is capable of. The rest can watch this video and read here . To install OpenCV, we need to download two archives. One archive directly with the OpenCV library itself, and the second archive - additional modules for the OpenCV library . Each module is responsible for something different, for example, the bioinspired module contains a model of the retina and can be used for motion detection or to equalize the brightness in the image. Some modules are included in the archive with the OpenCV library .
So, google extra modules to find modules for OpenCV . If you are too lazy to search, you can download it here .
Then google the OpenCV library itself, you can download it here and here (in the second case, select OpenCV for Linux / Mac , since the Windows version is designed for Visual Studio ). At the time of this writing, the latest version of OpenCV 3.2.0 .
After you have downloaded two archives, unpack them and move the contents where it is convenient for you. Go to the OpenCV folder and create a build folder there (or call it whatever you like, it's just a folder where OpenCV will be going). And now you can start working with Cmake .
The build folder in the folder with the OpenCV library
How to use Cmake
In the Cmake window , click Browse Source and select the folder where the OpenCV library files are located. Then click Browse Build and select the build folder that you previously created inside the folder with the OpenCV library . As a result, it should turn out approximately as in this picture.
Cmake window with specified OpenCV library folders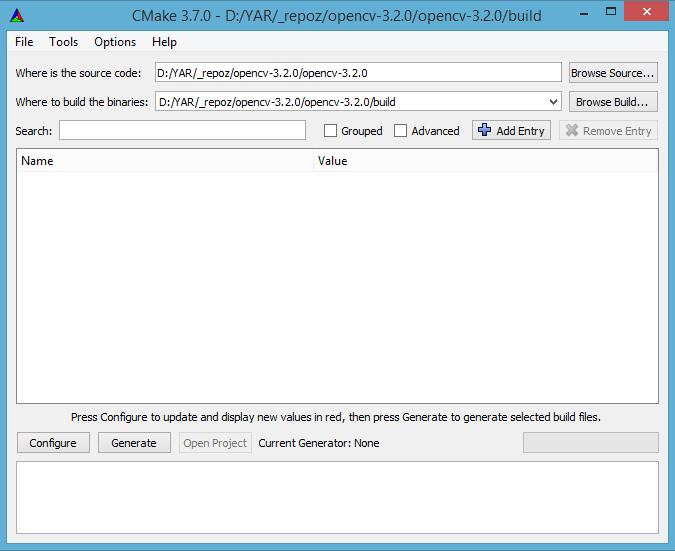
Then we press the Configure button, a window should appear where you can configure what exactly you want to build the library for.
Cmake window view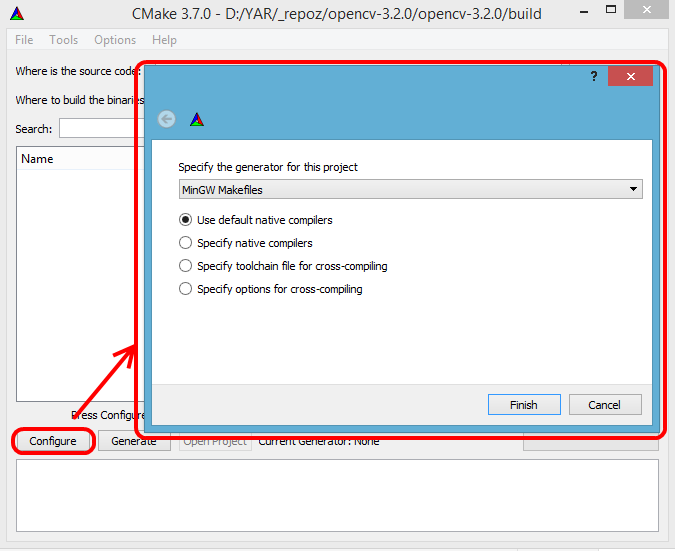
Where it is written Specify the generator for this project, leave it unchanged, the MinGW Makefiles line will say that Cmake will compile the library with the instruction file for the make program under the MinGW compilers. That such Makefiles can be read here , and how to use it, here . However, for the time being it is not necessary to spray it, we continue the installation of OpenCV . Select Specify native compilers , then click Next .
What the Cmake window should look like with the correct points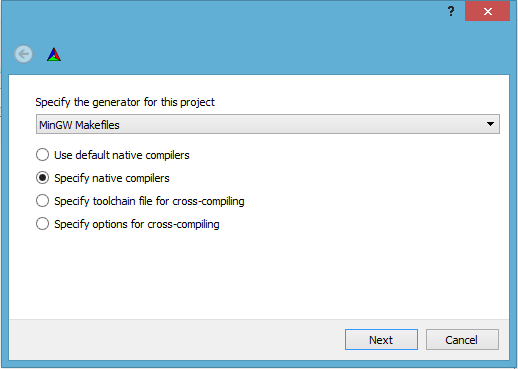
Further in a new window we select compilers for the C and C ++ language . These compilers are located in the bin folder of the MinGW compiler set. For the C language, we write the path to the program in the bin folder, which ends with mingw32-gcc.exe , and for the C ++ language - the path to the program that ends with mingw32-g ++. Exe , the Fortan language is not touched. In my case, the bin folder contains such programs as the x86_64-w64-mingw32-gcc.exe and x86_64-w64-mingw32-g ++. Exe compilers , which I indicated. If you forget what exactly you need to specify in these points, you can search in the Code :: Blocks compiler settings (If you downloaded it with the built-in MinGW compiler). To do this, go to Settings in the Code :: Blocks program, select the Compiler item, go to the Toolchain executables . The Program Files tab on the C Compiler and C ++ Compiler lines shows the compilers for C and C ++ .
Setting compilers in Cmake in pictures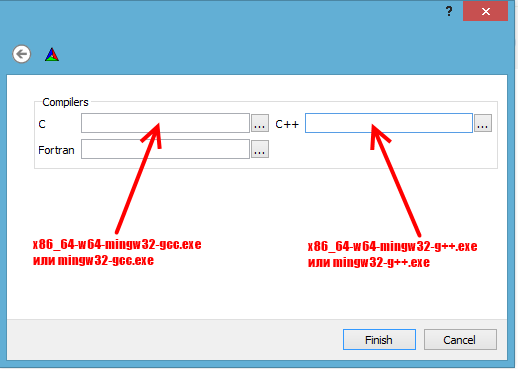
The result should be something like this
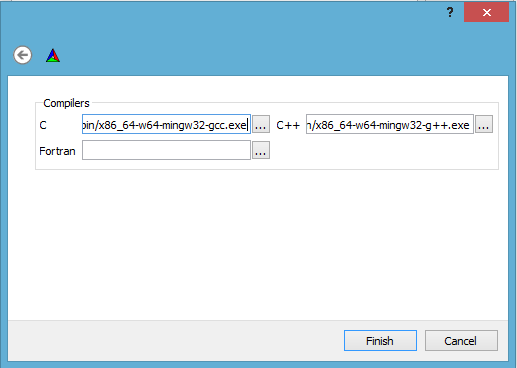
The result should be something like this
Where are the settings for the Code :: Blocks compiler in pictures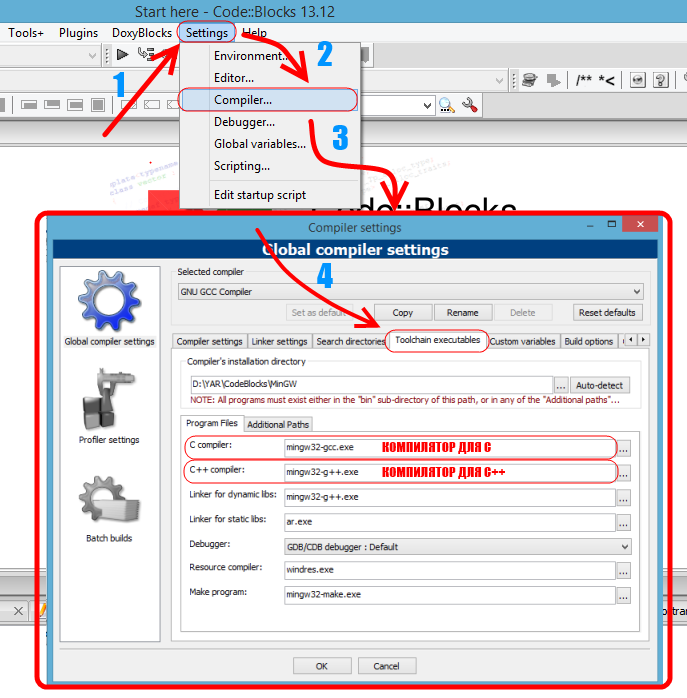
Click the Finish button in the settings of the Cmake compilers ...
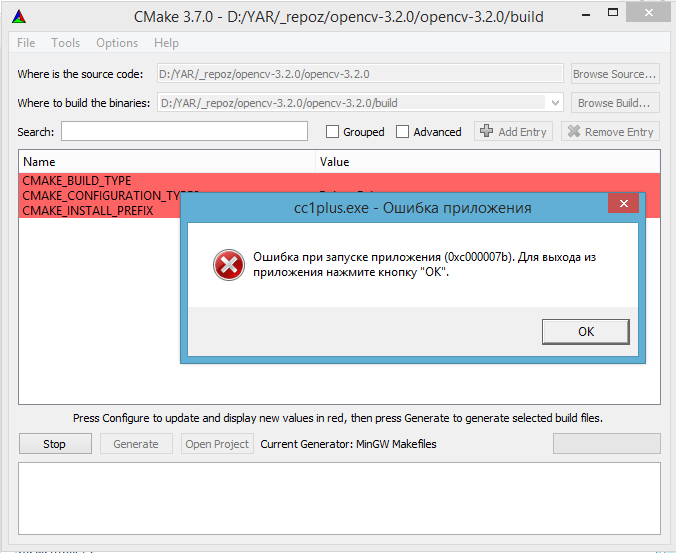
This means that the OpenCV library is too complicated for the average person, and in vain we generally started to install it. In order to use it, you must first get an academic crust and study programming 10-20 years, and in general, technical progress has already gone too far, and no DIY projects will not be hijacked behind it ... In short, quit this business, this is not for you.
Just kidding The error is most likely caused by the fact that Windows does not see the compiler dll , despite the fact that we have set the bin folder in the PATH . Therefore, go to the bin folder and copy all dll files, and then paste into the system32 folder , which is located in the Windows folder on the C: drive. In my case there were a lot of such dll files.
Dynamic DLLs in the bin MinGW folder
Now press the Cmake Configure button again and the process should go successfully. In the end we get the following picture:
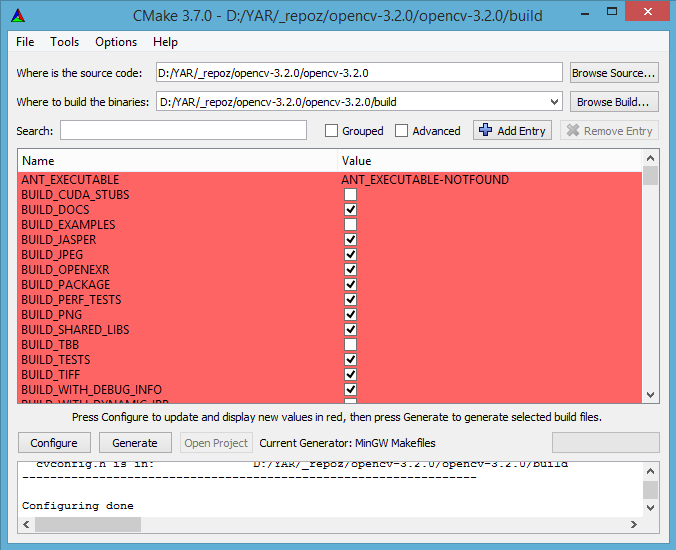
Configuring the assembly OpenCV in Cmake
As you can see, there are many options. We will touch on some important ones. Let's start with the external modules of OpenCV . In Cmake, we search for the OPENCV_EXTRA_MODULES_PATH option ( Cmake has a search in which it is convenient to search for the option you are interested in) and prescribe the path to the external modules that we downloaded in a separate archive opencv_contrib-master.zip . In my case, the path looks like this: D: \ YAR \ _repoz \ opencv_contrib-master \ opencv_contrib-master \ modules .
OPENCV_EXTRA_MODULES_PATH in the picture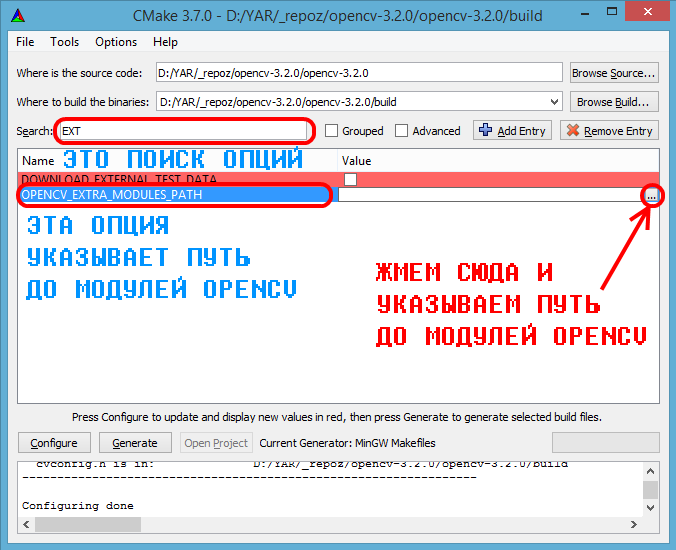
Consider flags, for example, BUILD_EXAMPLES includes the construction of examples, you can tick. BUILD_SHARED_LIBS (the default is a check mark) indicates whether to build dynamic libraries or static ones. Static libraries will be embedded in the program code of your program, so it will be easier to transfer it from one computer to another, however, the program will weigh more. Dynamic libraries can use all your programs, but they may not be on another computer if OpenCV is not installed. WITH_TBB includes the use of the Intel Threading Building Blocks library, if you have it installed on your computer, you can enable this option (however, it is worth noting that Cmake includes some options itself if the necessary software is detected on the computer). WITH_CUDA enables the use of CUDA to work with the GPU ( CUDA must be installed on the computer). CMAKE_BUILD_TYPE can have two states, Debug and Release , select the type of assembly you need.
After you have decided on all the options, click the Configure button again. After Cmake finishes, click the Generate button. If everything went without errors, now it is behind the command line. So, open the command line and go to the build folder. We write mingw32-make on the command line and press Enter . It should look like this:
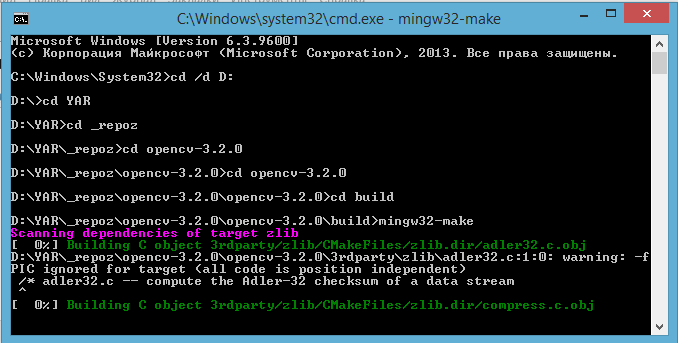
The assembly of OpenCV has begun, now we have to wait ... You can go for a while to drink tea or see how to hack time .
If there are no errors on the command line screen, and the assembly has reached 100%, then you can write the command mingw32-make install .
mingw32-make install in the picture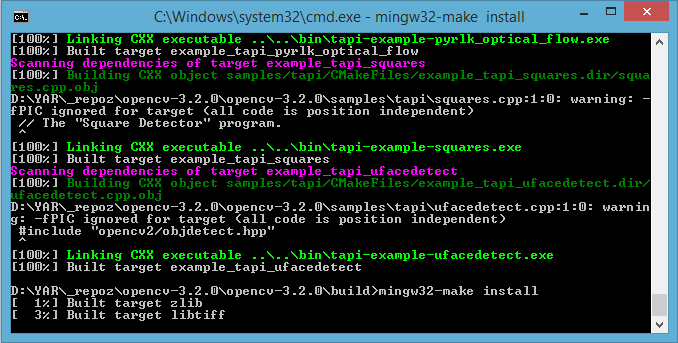
When the installation of OpenCV is complete, all the necessary files should appear in the build folder or in the install folder in the build folder.
Install folder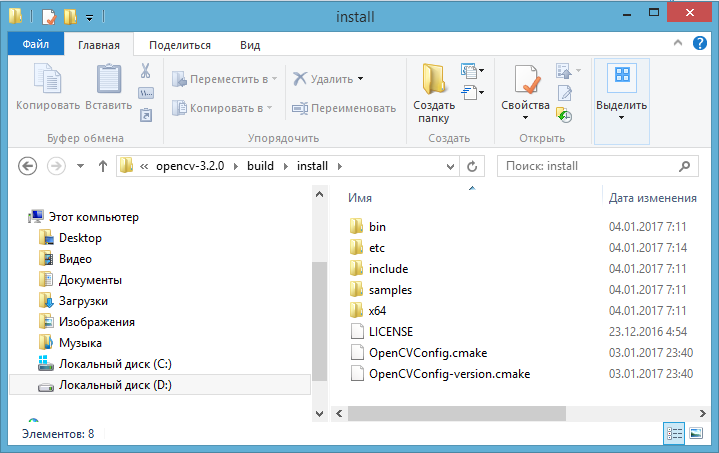
All include .hpp and .h files that you will include in your code will be placed in the include folder. Next in the lib folder or in my case opencv-3.2.0 \ build \ install \ x64 \ mingw \ staticlib are all the libraries of OpenCV . In my case, these are static .a libraries. Also there should be a file in which you can look at the order of connection of these libraries, for example, the file OpenCVModules.cmake. If you open it, you can find the following there:
OpenCVModules file contents
foreach(_expectedTarget zlib libtiff libjpeg libwebp libjasper libpng IlmImf opencv_core opencv_flann opencv_imgproc opencv_ml opencv_photo opencv_reg opencv_surface_matching opencv_video libprotobuf opencv_dnn opencv_fuzzy opencv_imgcodecs opencv_shape opencv_videoio opencv_highgui opencv_objdetect opencv_plot opencv_superres opencv_xobjdetect opencv_xphoto opencv_bgsegm opencv_bioinspired opencv_dpm opencv_face opencv_features2d opencv_line_descriptor opencv_saliency opencv_text opencv_calib3d opencv_ccalib opencv_datasets opencv_rgbd opencv_stereo opencv_tracking opencv_videostab opencv_xfeatures2d opencv_ximgproc opencv_aruco opencv_optflow opencv_phase_unwrapping opencv_stitching opencv_structured_light) list(APPEND _expectedTargets ${_expectedTarget}) if(NOT TARGET ${_expectedTarget}) list(APPEND _targetsNotDefined ${_expectedTarget}) endif() if(TARGET ${_expectedTarget}) list(APPEND _targetsDefined ${_expectedTarget}) endif() endforeach() You see the zlib libtiff libjpeg libwebp , etc., these are libraries, only here they are listed in the correct order. If you connect them in the wrong order in which the compiler will check them, errors will occur, but more on that later.
The opencv-3.2.0 \ build \ install \ x64 \ mingw \ bin directory contains HAAR cascade training programs that may be useful in the future to train an OpenCV detector on objects of interest to you, and here opencv-3.2.0 \ build \ install \ etc \ haarcascades are already trained cascades.
Code :: Blocks
 It seems, I said that a true specialist can code in a notebook, but for the time being we will focus on the Code :: Blocks development environment. This is a free cross-platform development environment, i.e. You can use the development environment both under Windows and under Linux . In this article, the connection OpenCV will be in this development environment. If you are not familiar with this programming environment yet, there is some information for you under the spoiler.
Read more about Code Blocks
Download the latest version, you can with the built-in MinGW compiler, to do this, download the links codeblocks-16.01mingw-setup.exe here . After installing Code :: Blocks, try creating a test project. To do this, perform the actions in this sequence: File -> New -> Project ... , select the Console Application and click Go , select the C ++ or C compiler, write the project name, click Finish . To see the main file of the program, click on the left cross on the Sources inscription inside the Management window in the Projects tab. Selecting the main file, you can see its contents, there should be something like this (for C ++):
Upstairs in the development environment there is an icon with a yellow gear, click on it to compile the program. Then click on the icon, similar to the Play button, and the program will start. All of the above actions can be viewed as an animation below.
#include <iostream> using namespace std; int main() { cout << "Hello world!" << endl; return 0; } Upstairs in the development environment there is an icon with a yellow gear, click on it to compile the program. Then click on the icon, similar to the Play button, and the program will start. All of the above actions can be viewed as an animation below.
Problems with Code :: Blocks
Sometimes a running program fails to close. Most often this happens if you make the completion of the program through the development environment by clicking the Abort icon. In this case, go to the task manager and see the processes. Remove the task that is your program.
Your program in the task manager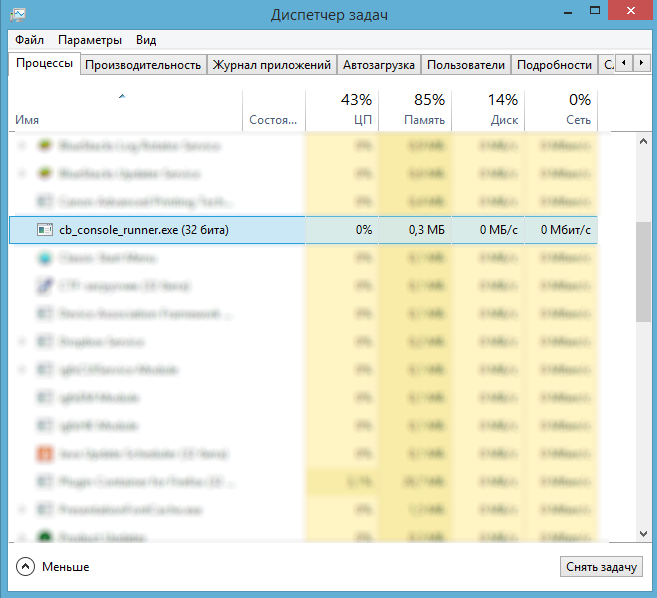
It also happens that after connecting header files, Code :: Blocks starts to slow down terribly. This problem can be solved by unchecking the box in Update parser when typing (on save otherwise) in the development environment settings ( Settings → Editor ... → Code completion ).
Where is Update parser when typing (on save otherwise) in pictures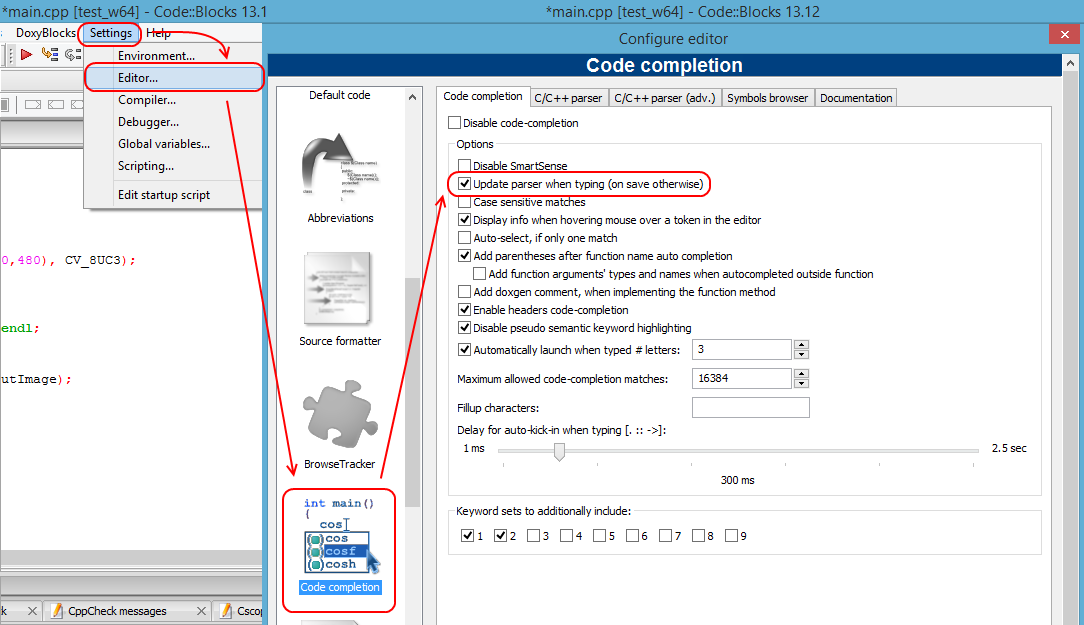
Connect OpenCV to Code Blocks
And then came the long-awaited moment. OpenCV can be connected both to a specific project and in the global settings of the Code Blocks programming environment in order not to bother with the settings for each project with OpenCV separately. Both options are implemented almost the same. So, first connect the library. I want to remind you that if you compiled OpenCV using dynamic libraries, then the files with the dll extension (which you should find somewhere in the folder with the collected library) need to be moved to the folder with your program (drop them into the folder with the Code Blocks project ) or copy them to the system32 operating system folder . Although in theory everything should work if these files are in one of the paths specified in the PATH . Otherwise, your program will compile, but it will give an error when it starts up. In my case, OpenCV is built using static libraries.
So, first connect the library. Go to the compiler settings ( Settings → Compiler ... → Global Compiler Settings → Linker Settings ) and add all library files there (in my case these files are located here opencv-3.2.0 \ opencv-3.2.0 \ build \ install \ x64 \ mingw \ staticlib ). Next, go to the Search directories settings and in the Compiler and Linker tab, set the paths to folders with OpenCV header files. In my case, these paths are: D: \ YAR \ _repoz \ opencv-3.2.0 \ opencv-3.2.0 \ build \ install \ include (required!), D: \ YAR \ _repoz \ opencv-3.2.0 \ opencv -3.2.0 \ build \ install \ include \ opencv2 and D: \ YAR \ _repoz \ opencv-3.2.0 \ opencv-3.2.0 \ build \ install \ include \ opencv for easy connection of header files (instead of #include " opencv2 \ cv.hpp " write immediately #include <cv.h> );
How to connect OpenCV in pictures
For OpenCV version 2.0 at this stage (most likely) everything would be ready. However, for version 3.1 and 3.2, an error will appear when trying to compile a program. Try running this program:
Test program code
#include <iostream> #include <cv.h> #include "opencv2/opencv.hpp" #include "opencv2/core.hpp" #include "math.h" using namespace std; // // 640 480 // 3 ( ) cv::Mat inputImage(cv::Size(640,480), CV_8UC3); int main() { cout << "Hello world!" << endl; double t = 0.0; while(1) { unsigned long offsetImage = 0; // // unsigned char colorR = 255; unsigned char colorG = 255; unsigned char colorB = 255; for (short x = 0; x < inputImage.cols; x++) { // for (short y = 0; y < inputImage.rows; y++) { // ... // (BGR) inputImage.data[offsetImage] = colorB; inputImage.data[offsetImage + 1] = colorG; inputImage.data[offsetImage + 2] = colorR; // offsetImage += 3; } } // cv::putText(inputImage,"Hello world!", cv::Point(180 + 120 * sin(3.1415*t),240 + 120 * cos(3.1415*t)), CV_FONT_HERSHEY_SIMPLEX,2.0, cv::Scalar(rand() % 256, rand() % 256, rand() % 256)); t+=0.08; // cv::imshow("test", inputImage); // 200 char symbol = cv::waitKey(200); if (symbol == 'b' || symbol == 'B') { // B // break; } } // inputImage.release(); return 0; } After an unsuccessful attempt to compile it, such an error may appear, for example:
This means that technical vision is a very difficult direction, and for good reason you decided to do this. There are many other professions in the world where you don’t have to understand programming and, especially, technical vision. In the field of IT, everything has been invented long ago for you, and there is no point in trying to do something yourself, and, even more so, to climb into startups. It remains only to accept the fact that you are doomed to remain just a consumer of high technology until the end of your days ... Just kidding, of course!
Errors during compilation of the program with the OpenCV library
So, we will understand in errors.
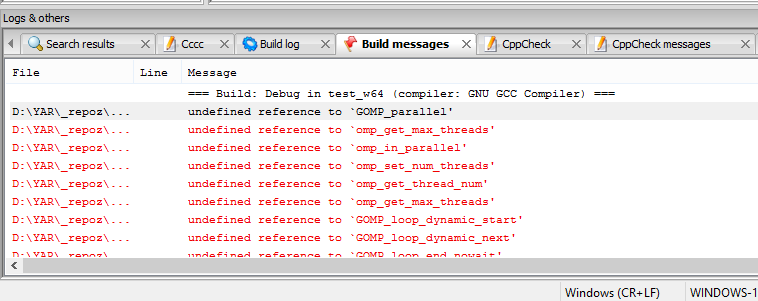
undefined reference to `GOMP_parallel '
libopencv_core320.a(parallel.cpp.obj):parallel.cpp: undefined reference to `GOMP_parallel' From the error log you can see that the problem lies in the libopencv_core320 file of the OpenCV library , the compiler does not know what GOMP_parallel is . Such errors usually mean that a certain library was not connected. In this case, this OpenMP library, which I mentioned at the beginning of the article, when I wrote about the GCC compiler . Connect it and see next. How to connect OpenMP to the project, you can read here .
This is the OpenMP connection for the OpenCV libraries.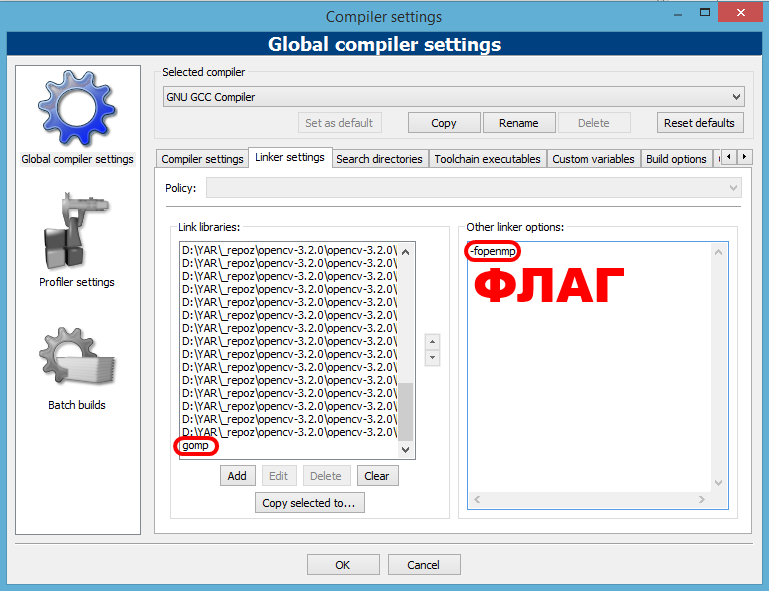
Now, when trying to compile, errors may again occur, such as:

Important information from the error log
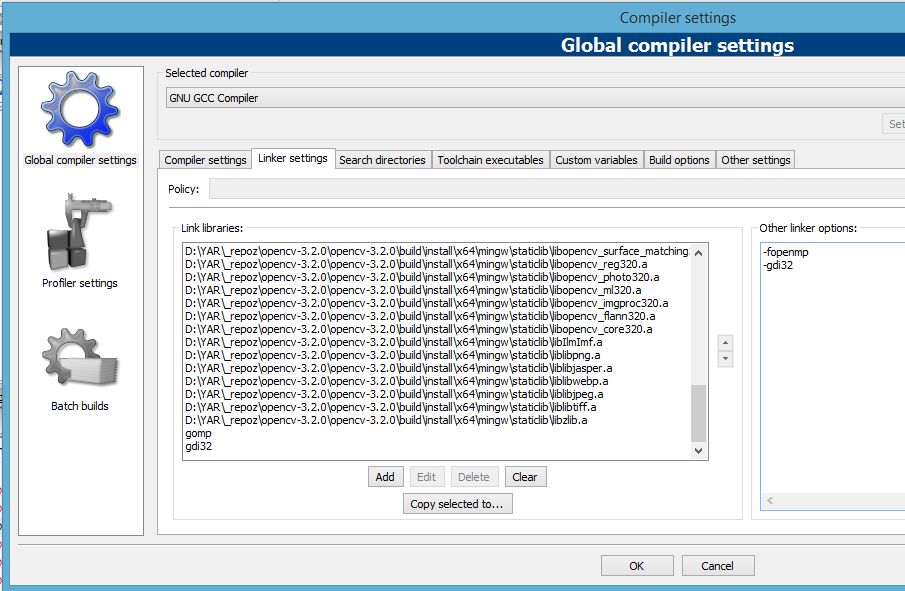
libopencv_highgui320.a(window_w32.cpp.obj):window_w32.cpp undefined reference to `__imp_GdiFlush'| This log shows that the problem is in the GDI library, which allows applications to use graphics and formatted text on a monitor and printer. Add it the same way as the previous library.
Adding GDI Library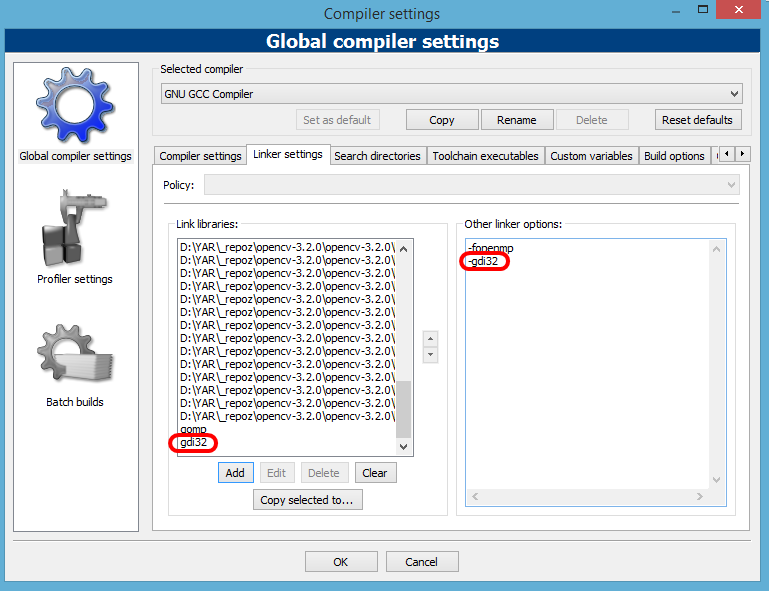
Another mistake is probably the most important one.
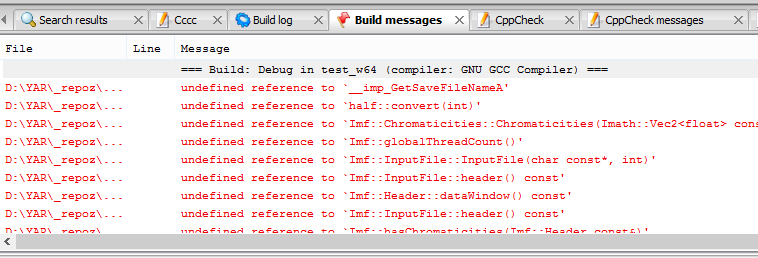
The logs show that there is some kind of Imf library, for example, undefined reference to Imf :: Chromaticities :: Chromaticities . However, this library is already in OpenCV, and besides, we have already connected it!
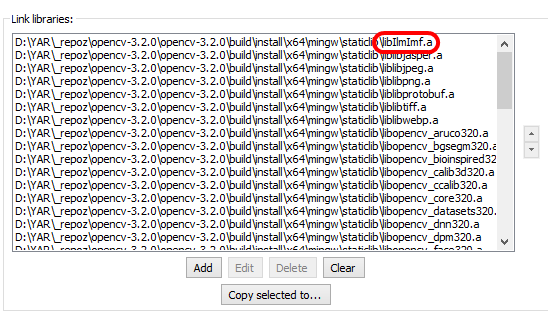
The fact is that the compiler checks the libraries in the Windows environment, starting from the end of the list of libraries that we added. And as you can see in the picture, the libIlmImf.a file is at the beginning, and as a result, the compiler first finds the library, which uses the functions from the libIlmImf.a file, and then finds the libIlmImf.a file, but it's too late - it has already informed that there is mistake. This question is resolved simply - you need to bring our list of library files in the correct order. This is done with the "up" and "down" buttons, which I noted in the picture.
Buttons
The connection order of the libraries can be found in the .cmake files in the folder with the libraries OpenCV , I already wrote about this in this article above. I will give the order of connection for OpenCV 3.2
How to connect libraries OpenCV
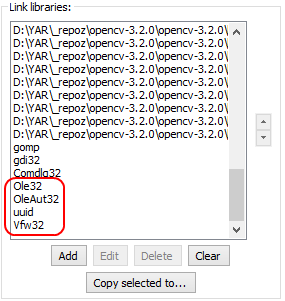
So the connection order looks in Code Blocks:
But the list, which in Code Blocks will have to fill from the bottom up.
But the list, which in Code Blocks will have to fill from the bottom up.
zlib
libtiff
libjpeg
libwebp
libjasper
libpng
IlmImf
opencv_core
opencv_flann
opencv_imgproc
opencv_ml
opencv_photo
opencv_reg
opencv_surface_matching
opencv_video
libprotobuf
opencv_dnn
opencv_fuzzy
opencv_imgcodecs
opencv_shape
opencv_videoio
opencv_highgui
opencv_objdetect
opencv_plot
opencv_superres
opencv_xobjdetect
opencv_xphoto
opencv_bgsegm
opencv_bioinspired
opencv_dpm
opencv_face
opencv_features2d
opencv_line_descriptor
opencv_saliency
opencv_text
opencv_calib3d
opencv_ccalib
opencv_datasets
opencv_rgbd
opencv_stereo
opencv_tracking
opencv_videostab
opencv_xfeatures2d
opencv_ximgproc
opencv_aruco
opencv_optflow
opencv_phase_unwrapping
opencv_stitching
opencv_structured_light
Another possible error:
libopencv_highgui320.a(window_w32.cpp.obj):window_w32.c undefined reference to `__imp_GetSaveFileNameA' It is allowed by adding the Comdlg32 library. To do this, simply add Comdlg32 to Linker Settnigs .
Connecting Comdlg32 Library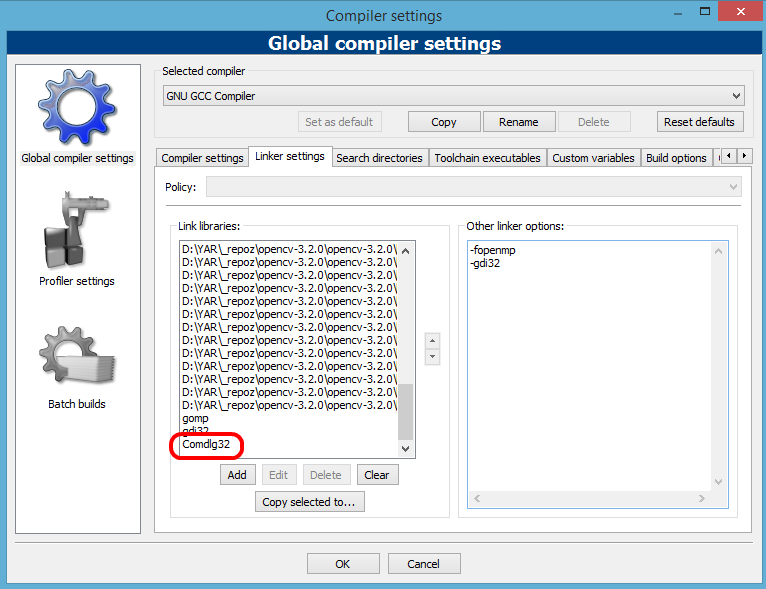
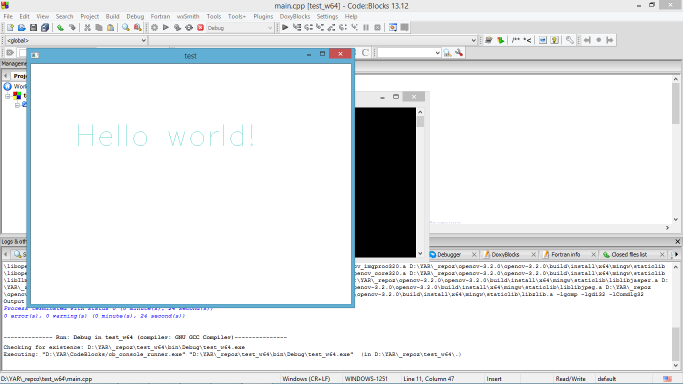
Now, if at compile time no errors occurred, you can run the program. If you used the sample program from my article, you should have something like this:
Update
After writing this article, I found a couple more errors like undefined reference to . Below are lists of errors and libraries that need to be added to correct the situation.
The absence of the connected Ole32 library causes the following errors:
undefined reference to `__imp_CoTaskMemFree'
undefined reference to `__imp_CoCreateInstance'
undefined reference to `__imp_CoCreateInstance'
The absence of the connected OleAut32 library causes the following error:
undefined reference to `__imp_OleCreatePropertyFrame'
The absence of the connected uuid library causes the following errors:
undefined reference to `IID_IPersistStream'
undefined reference to `IID_IUnknown'
undefined reference to `IID_ISpecifyPropertyPages'
undefined reference to `IID_IPropertyBag'
The absence of a connected Vfw32 or Avifil32 library causes the following errors:
undefined reference to `AVIStreamRelease'
undefined reference to `AVIFileRelease'
undefined reference to `AVIFileOpenA'
undefined reference to `AVIFileCreateStreamA'
undefined reference to `AVISaveOptions'
undefined reference to `AVIMakeCompressedStream'
undefined reference to `AVIStreamSetFormat'
undefined reference to `AVIStreamWrite'
Do not forget to connect them in your Code :: Blocks!
Update: reading avi file does not work
If you have problems using cv :: VideoCapture , namely OpenCV does not want to open video files, then you just need to copy the opencv_ffmpeg library to your program folder (in my case it is called opencv_ffmpeg320_64.dll , version of opencv 3.2 , was here: opencv -3.2.0 \ build \ install \ x64 \ mingw \ bin ).
Conclusion
Installing OpenCV for a newbie may seem like a very difficult task, since the probability of encountering errors is great, and the knowledge to understand what is still not so much. I hope this article will help everyone who is just starting to program, and save you a couple of days or weeks of searching on the Internet. And finally. Maybe you are wondering how much time it takes to become a labor specialist? The answer to this question is under the spoiler.
Do not open
Source: https://habr.com/ru/post/318846/
All Articles