Creating a blog engine with Phoenix and Elixir / Part 7. Add comments / New Year's announcement in the conclusion

From the translator: “ Elixir and Phoenix are a great example of where modern web development is heading. Already, these tools provide high-quality access to real-time technologies for web applications. Sites with increased interactivity, multiplayer browser games, microservices - those areas in which these technologies will serve a good service. The following is a translation of a series of 11 articles that describe in detail the aspects of development on the Phoenix framework that would seem such a trivial thing as a blog engine. But do not hurry to sulk, it will be really interesting, especially if the articles encourage you to pay attention to the Elixir or become its followers.
In this part, we will prepare a foundation for comments, to then revive them using Phoenix channels.
At the moment, our application is based on:
')
- Elixir : v1.3.1
- Phoenix : v1.2.0
- Ecto : v2.0.2
Where did we leave off
Now the engine supports the use of a small Markdown-editor to decorate posts, so our craft becomes like a full-fledged project! However, we still have no way to get feedback on the posts that we write. The good news: adding this feature is quite simple. All work will be built on what we have already done.
Let's start with the simple. Instead of the requirement to register, we will create new comments in the pending approval status. Comments will be visible on the post page immediately after checking, or by clicking "Show unconfirmed".
Add a comment model
Let's start by adding a model for comments. Comments will be:
- Author (string type)
- Message (text type)
- Sign of approved comment (boolean type, false by default)
- Post to which the comment relates (link to the table with posts)
We do not need a full set of templates and the rest of the charms, so we use the
mix phoenix.gen.model . mix phoenix.gen.model Comment comments author:string body:text approved:boolean post_id:references:posts Then we will migrate:
mix ecto.migrate Link comments with posts
In the
web/models/comment.ex you can see that comments are already associated with posts, but there is not enough connection in the opposite direction.So add the following code to the “posts” schema definition in the
web/models/post.ex file: has_many :comments, Pxblog.Comment After executing the
mix test command, everything should still be green! Now let's check the link between posts and comments.To do this, open the
test/support/factory.ex file and add the Comment factory. Write this line to the top of the file, following the rest of the aliases: alias Pxblog.Comment And then this code to the bottom:
def comment_factory do %Comment{ author: "Test User", body: "This is a sample comment", approved: false, post: build(:post) } end Accordingly, it is necessary to create several tests for the factory to become useful. Open the file
test/models/comment_test.exs and add the following code to it: import Pxblog.Factory # ... test "creates a comment associated with a post" do comment = insert(:comment) assert comment.post_id end Run the tests again. They should stay green!
Adding routes for comments
Let's start by creating the main routes for comments. Open the
web/router.ex : resources "/posts", PostController, only: [] do resources "/comments", CommentController, only: [:create, :delete, :update] end Comments make sense only in the context of posts, so we put them inside. At the same time, in other routes that we have already identified, posts are embedded in users! I do not want to create extra routes for posts, so we will use the parameter
only: [] . Then add comment resources to allow them to create, delete and update them. :create - to add comments by unauthorized users (created by unconfirmed). :delete - allows the author of the post and administrators to delete comments, and :update - approve them for display to the public.Adding Controllers and Views
Now that our models are configured, we need to create a controller with a couple of methods. The display of comments will be implemented through the post controller, but the creation / update / deletion must be implemented in their own controller. Let's start by creating the
web/controllers/comment_controller.ex file: defmodule Pxblog.CommentController do use Pxblog.Web, :controller end We will also create a view in the web / views / comment_view.ex file, as Phoenix wants.
defmodule Pxblog.CommentView do use Pxblog.Web, :view end Now let's go back to the controller and add the basic structure of the three actions:
create , update and delete . def create(conn, _), do: conn def update(conn, _), do: conn def delete(conn, _), do: conn Then you need to create a template for adding a comment in the new directory, which we will place on the post display page:
$ mkdir web/templates/comment Allowing users to post comments.
Let's start by creating the
web/templates/comment/form.html.eex : <%= form_for @changeset, @action, fn f -> %> <%= if @changeset.action do %> <div class="alert alert-danger"> <p>Oops, something went wrong! Please check the errors below.</p> </div> <% end %> <div class="form-group"> <%= label f, :author, class: "control-label" %> <%= text_input f, :author, class: "form-control" %> <%= error_tag f, :author %> </div> <div class="form-group"> <%= label f, :body, class: "control-label" %> <%= textarea f, :body, class: "form-control", id: "body-editor" %> <%= error_tag f, :body %> </div> <div class="form-group"> <%= submit "Submit", class: "btn btn-primary" %> </div> <% end %> The usual form, there is nothing to discuss.
Now let's move on to the
web/templates/post/show.html.eex file, to which we will add a link to this form. Please note that in this template we use two variables @changeset and @action . We will come back to this later in the web/controllers/post_controller.ex . Now let's continue working with the template. After the list of post attributes, add the following line: <%= render Pxblog.CommentView, "form.html", changeset: @comment_changeset, action: post_comment_path(@conn, :create, @post) %> We need to refer to “form.html” inside the
CommentView , so we CommentView pass the name to the first argument in the render call. We need to transfer there @comment_changeset (which we have not yet determined, but we will do it soon) and @action is the way to send comments.Now we can go to the
web/controllers/post_controller.ex and make everything work. Change the show function according to the code: def show(conn, %{"id" => id}) do post = Repo.get!(assoc(conn.assigns[:user], :posts), id) comment_changeset = post |> build_assoc(:comments) |> Pxblog.Comment.changeset() render(conn, "show.html", post: post, comment_changeset: comment_changeset) end Now let's go back to CommentController (
web/controllers/comment_controller.ex file) and fill the contents with the create function. Right in front of the functions, add the following code: alias Pxblog.Comment alias Pxblog.Post plug :scrub_params, "comment" when action in [:create, :update] Including update in the scrub_params call will come in handy later. Now, jump to the create function and place the following code in it:
def create(conn, %{"comment" => comment_params, "post_id" => post_id}) do post = Repo.get!(Post, post_id) |> Repo.preload([:user, :comments]) changeset = post |> build_assoc(:comments) |> Comment.changeset(comment_params) case Repo.insert(changeset) do {:ok, _comment} -> conn |> put_flash(:info, "Comment created successfully!") |> redirect(to: user_post_path(conn, :show, post.user, post)) {:error, changeset} -> render(conn, Pxblog.PostView, "show.html", post: post, user: post.user, comment_changeset: changeset) end end We will now create a comment when we receive the comment_params parameters and the post_id post identifier, as they are required. First, we take the linked post (do not forget to preload the user and comments, as the template will soon begin to refer to them), on the basis of which we will create a new changeset. To do this, starting with the post, go along the chain to the
build_assoc function to create a linked scheme, which is determined by the atom. In our case, an associated comment is created. The result, together with comment_params, is passed to the Comment.changeset function. The rest of the work is standard with one exception.The error condition is a bit more complicated, because we use a different view render. First we pass the connection connection, then the associated View View (in our case
Pxblog.PostView ), the template for the render, and all the variables used in the template: @post , @user , and @comment_changeset . Now you can test: if you send a comment with errors, you will see a list of them directly on the page. If there are no errors when sending a comment, you will receive a blue flash message at the top of the page. We are making progress!Comment output
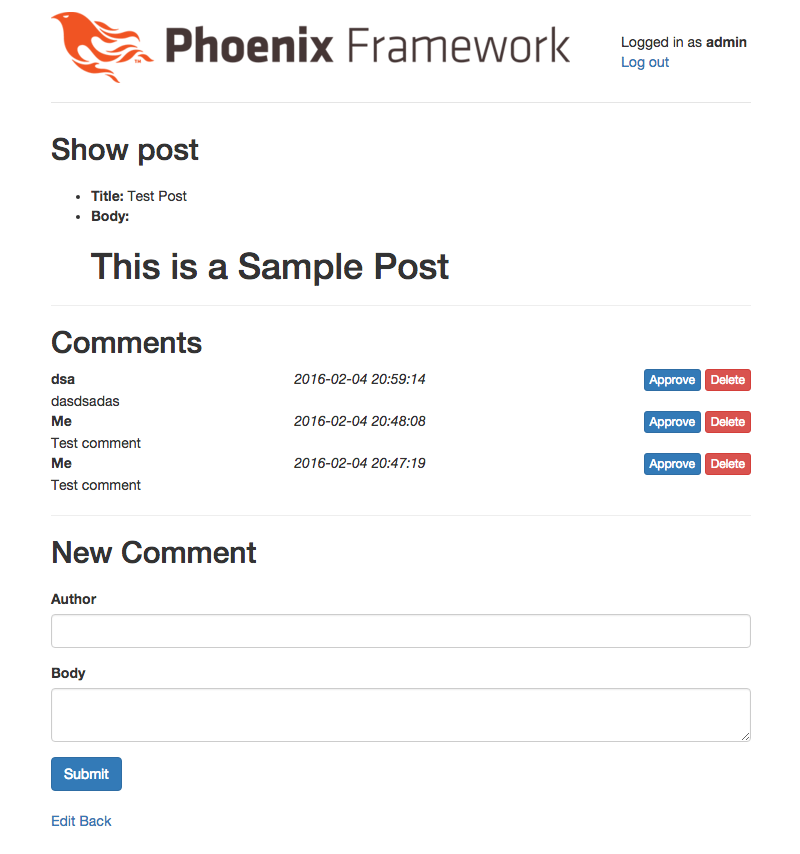
Now we need to display comments on the post page. To do this, we will create a general comment template that can be used in any places for different purposes. Create a file
web/templates/comment/comment.html.eex and fill it with the following: <div class="comment"> <div class="row"> <div class="col-xs-4"> <strong><%= @comment.author %></strong> </div> <div class="col-xs-4"> <em><%= @comment.inserted_at %></em> </div> <div class="col-xs-4 text-right"> <%= unless @comment.approved do %> <button class="btn btn-xs btn-primary approve">Approve</button> <% end %> <button class="btn btn-xs btn-danger delete">Delete</button> </div> </div> <div class="row"> <div class="col-xs-12"> <%= @comment.body %> </div> </div> </div> Here everything is clear without explanation. The approve / delete buttons are not yet connected. We will address this issue in the following sections. We also need to change the controller to preload comments, and include the comment list itself in the show template. Let's start with updating the controller. Add a line to the
show function from the web/controllers/post_controller.ex immediately after the line with the receipt of posts: post = Repo.get!(assoc(conn.assigns[:user], :posts), id) |> Repo.preload(:comments) Thus, we will provide the loading of comments as part of the post. Finally, open the
web/templates/post/show.html.eex file and add a template section that displays comments: <div class="comments"> <h2>Comments</h2> <%= for comment <- @post.comments do %> <%= render Pxblog.CommentView, "comment.html", comment: comment %> <% end %> </div> Add controller tests
You can not stop until some conditions are not covered by tests. We need to test the create function for success and failure, since code can be executed along any of these paths.
Create the file
test/controllers/comment_controller_test.exs and proceed: defmodule Pxblog.CommentControllerTest do use Pxblog.ConnCase import Pxblog.Factory @valid_attrs %{author: "Some Person", body: "This is a sample comment"} @invalid_attrs %{} setup do user = insert(:user) post = insert(:post, user: user) {:ok, conn: build_conn(), user: user, post: post} end test "creates resource and redirects when data is valid", %{conn: conn, post: post} do conn = post conn, post_comment_path(conn, :create, post), comment: @valid_attrs assert redirected_to(conn) == user_post_path(conn, :show, post.user, post) assert Repo.get_by(assoc(post, :comments), @valid_attrs) end test "does not create resource and renders errors when data is invalid", %{conn: conn, post: post} do conn = post conn, post_comment_path(conn, :create, post), comment: @invalid_attrs assert html_response(conn, 200) =~ "Oops, something went wrong" end end Use the Pxblog.Factory factory again. We will also set the two variables of the
@valid_attrs and @invalid_attrs in the same way as we did before. Add a setup block, inside which we set up a default user and a post to work with.Let's start with a test to successfully add a comment. We send a POST request to the embedded path with valid attributes and check that, as expected, the redirection worked, and a comment was added to the post.
Now let's do the same, but with invalid data, and check that we received the message “Oops, something went wrong” in the form of HTML. Done!
Further steps
We have prepared an excellent foundation for comments, which we can definitely continue to develop. For example, we still do not have the ability to approve and delete comments. In the next few parts, we will work a little more to improve the comments before moving on to the Phoenix-based live comment system.
Other series articles
- Introduction
- Authorization
- Adding Roles
- Process roles in controllers
- We connect ExMachina
- Markdown support
- Add comments
- We finish with comments
- Channels
- Channel testing
- Conclusion
Conclusion from the Wuns
In the two months that we had this year, we managed to take the first steps in popularizing the Elixir. First of all, we founded the Russian-speaking community Wunsh.ru , for which a dozen and a half of the most interesting articles about Elixir and functional programming were translated into Russian.
At the beginning of the week, we updated the site and shared five articles. We hope they will provoke you and convince you to try the language. For example, write a simple application in the winter holidays. Tomorrow we will send subscribers a full set of published articles. So sign up today and invite your friends . We will be glad to such a gift!
The next step of the project is to write a serious introduction for newbies, translate official documentation and answer frequently asked questions in detail:
- Where to begin?
- How to deploy a project?
- Which editor to use?
- What tasks to solve?
Other…
Next year will be filled with the rapid movement of the language itself. Its introduction to Russian companies. About the language will not just know, it will begin massively (as far as possible) to use.
Thanks for coming into our materials. If you are a subscriber, invite your friends.
Happy New Year!
Source: https://habr.com/ru/post/318790/
All Articles