Boring about the work of decoding ngfw

If you want to completely spoil the first date - talk to the girl about decoding. Yes, and in the case of the subsequent - is also not worth it.
Our meeting with you is not the first , so this text will again deal with decoding.
Yes, I will talk again about SSL. I can gladden myself and you with the fact that this is the second and last material on this topic. Maybe.
Last time, we figured out why you might need to decrypt the long-suffering SSL.
In this material we will analyze exactly how decryption works with certificate substitution.
')
What do we need for this?
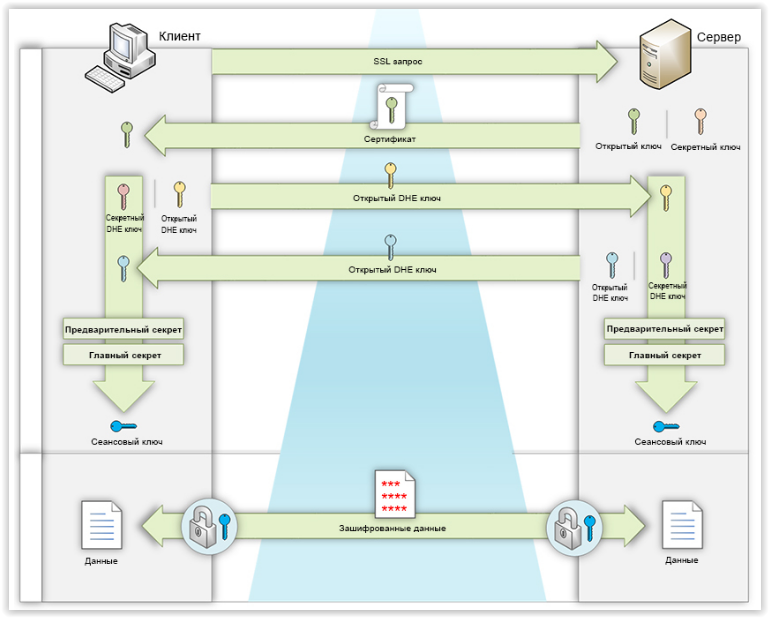
First, let's remember how SSL works. I will briefly describe the main points.
After establishing a TCP session between the client and the server, SSL Handshake occurs. Within it, both parties exchange messages Client Hello and Server Hello.

SSL connection establishment dump from vk.com
Client Hello describes the supported encryption parameters, Server Hello contains the parameters selected from the options offered by the client. Client Hello and Server Hello can be used as an indicator for establishing an SSL session. When these messages appear, the device (vFTD in our case) scans the configured decryption policies for a decision on whether to further decrypt the session or not.
If the configured policies dictate the decryption of traffic, the device becomes man-in-the-middle (MITM) and decrypts the transmitted data. With the successful launch of MITM, we have two established SSL sessions.
The first is between the client and the descrambler (vFTD). The second is between the descrambler and the server. Encrypted data comes from the client to vFTD.
Deciphered. They are checked by various policies (access, IPS, file, AMP, etc.). If the decrypted data from the client is checked, it is encrypted again and sent to the server. If they do not pass any test, the data is either simply blocked (not sent to the server), or the session is reset. Server responses are handled similarly.
For a device to become a MITM in an SSL session, it takes a little. At the SSL handshake stage, in addition to authentication and other actions, a shared session key is formed. It is with its help that the transmitted data will be encrypted. For this, a symmetric algorithm will be used.
There are two of the most common ways to form a common session key over open communication channels on the Internet: RSA and ECDH (Diffie-Hellman). The process of generating session keys is shown in the diagrams below (taken from the material “ Analysis of SSL / TLS traffic in Wireshark ”):

Formation of a session key when using RSA
In the case of RSA, the client generates a pre-master secret. Encrypts it with the public key from the server certificate and sends it. You can decrypt the pre-secret only with the private key, which is known only to the server.
Now both sides have a preliminary secret. They form the main secret and further the common session key.
Session key generation using ECDH
In the case of ECDH, the SSL certificate key pair is not used for encryption at all. The client and the server form Diffie-Hellman random key pairs - open and closed. Each party transmits its public key to the other party in an unencrypted form.
Further, using the Diffie-Hellman algorithm, the client and server compute a shared pre-secret from their own secret key and someone else’s public secret. After that, each party generates a shared master secret and session key.
When using ECDH, you must preserve the integrity of the Diffie-Hellman transmitted public keys. The server signs its own Diffie-Hellman public key using its private certificate key. The client can verify the authenticity of the received Diffie-Hellman public key using the public key of the server certificate.
Thus, in order to organize a MITM for an SSL session, in most cases it will be sufficient to replace the server certificate with your own. If the substitution is successful, it will be possible to get a shared session key with the client and be able to decrypt the data.
In the case of RSA, the MITM device will be able to decrypt the pre-secret using the certificate’s own private key. If ECDH is used, the device will be able to sign its Diffie-Hellman public key in such a way that the signature is considered valid on the client’s side.
In order to replace the server certificate with your own (for which we will know the private key), we need our own certificate to ensure correct server authentication on the client side. Simply put - it is necessary that the client browser does not issue any warnings or locks when replacing the certificate. For this, in most cases it is necessary that:
- The subject field of the certificate contained the Common Name parameter with a value equal to that entered in the address bar of the browser;
- The certificate was signed by a trusted certificate authority.
Wildcard certificates
This is a certificate that is ordered to the domain. In such a certificate, the Common Name parameter is written in the subject field with an “asterisk”, for example, * .mysite.ru. Thus, a single certificate can be used on all domain services: ra.mysite.ru, owa.mysite.ru, etc. It may be cheaper than ordering a separate certificate for each service.
The downside is that if the wildcard certificate is compromised in any way, all services will suffer at once. After all, all servers will have the same private key.
The downside is that if the wildcard certificate is compromised in any way, all services will suffer at once. After all, all servers will have the same private key.
Of course, in order for a certificate to be considered valid on the client’s side, other conditions must be met: it should not be revoked, expired, etc. But all these conditions are taken into account at the stage of signing the certificate by its own certification authority.
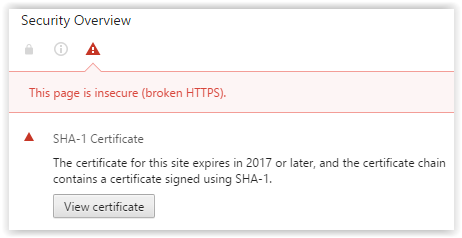
SHA-1
Now browsers are gradually forced to abandon the use of SHA1RSA as a digital signature algorithm. For example, chrome will display a red crossed out https in the address bar:

Chrome swears at SHA-1
Details
To avoid such warnings, the certification authority must use strict HASH generation algorithms for signing certificates — the SHA-2 family.
Chrome swears at SHA-1
Details
To avoid such warnings, the certification authority must use strict HASH generation algorithms for signing certificates — the SHA-2 family.
When using Certificate pinning, a service certificate must be signed by a strictly defined certificate authority. If this is not the case, access to the resource is blocked even if the certificate is signed by a trusted authority.
Accordingly, for resources with certificate pinning, decryption with certificate spoofing will not work.
Thus, in order to organize MITM in an SSL session, the device must generate a new certificate with the same fields as the certificate of the remote server. At the same time, we will have a known private key. A new certificate must be signed using a trusted certificate authority.
In practice, this is implemented as follows:
A company must have its own certification center, the root certificate of which is placed into trusted companies on all devices. This is a necessary condition.
The certificate authority requests a new certificate using the “Subordinate certificate authority, hereafter SubCA) pattern. The peculiarity of this certificate is that using its private key, you can sign other certificates (the CA flag is set in the “certificate main limitations” extension).
Since SubCA is signed by a trusted root certificate, client machines will trust both themselves and any certificate signed with it. SubCA and its corresponding private key is installed on the device, which is supposed to be the MITM in an SSL session. Thanks to this, every time a client attempts to establish an SSL session with an HTTPS server, our device will be able to:
- Intercept the server certificate;
- Create a private key;
- Generate a new certificate with the same fields as the replaced one;
- Sign the generated certificate using SubCA.
If everything is configured correctly, the user browser will not issue any warnings when opening https pages. The user will be able to determine whether the certificate has been changed, only if it gets into the settings.
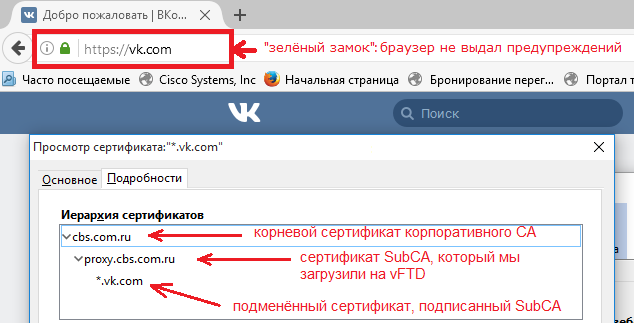
Certificate Chain in Mozilla
If you look at the fields of the final certificate, you will see that the subject field contains the correct Common Name value.
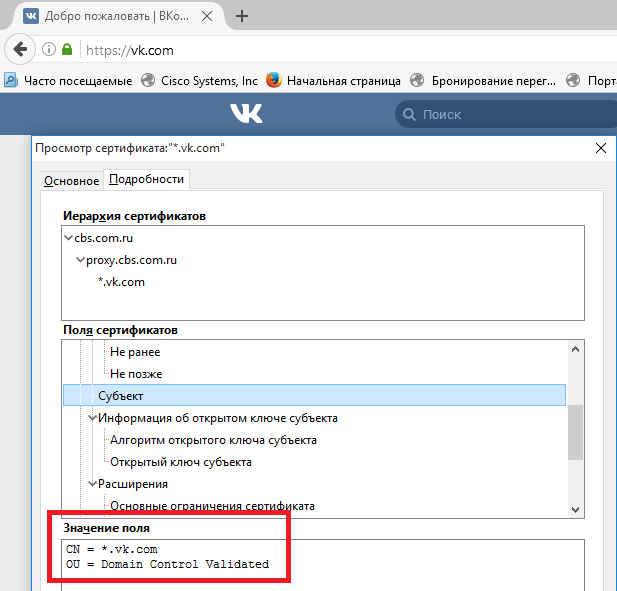
Common Name field
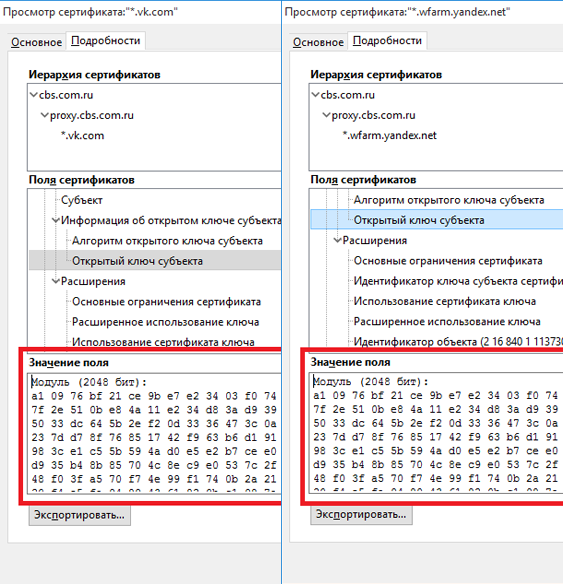
If we compare the real and spoofed certificates, we see that they actually differ in the values of public keys and digital signatures (in this case, I neglect the serial number, etc.).
Certificate Replaced
Certificate: Data: Version: 3 (0x2) Serial Number: 1482311739306634470 (0x14923aac5bc36ce6) Signature Algorithm: sha256WithRSAEncryption Issuer: C=RU, ST=Moscow, O=CBS, OU=Computers, CN=proxy.cbs.com.ru/emailAddress=uskov@cbs.ru Validity Not Before: Sep 4 21:17:41 2015 GMT Not After : Sep 16 11:56:55 2018 GMT Subject: OU=Domain Control Validated, CN=*.vk.com Subject Public Key Info: Public Key Algorithm: rsaEncryption Public-Key: (2048 bit) Modulus: 00:a1:09:76:bf:21:ce:9b:e7:e2:34:03:f0:74:02: 84:13:7f:2e:51:0b:e8:4a:11:e2:34:d8:3a:d9:39: 5b:ea:87:50:33:dc:64:5b:2e:f2:0d:33:36:47:3c: 0a:97:a7:ce:23:7d:d7:8f:76:85:17:42:f9:63:b6: d1:91:ea:18:de:98:3c:e1:c5:5b:59:4a:d0:e5:e2: b7:ce:e0:75:74:93:d9:35:b4:8b:85:70:4c:8e:c9: e0:53:7c:2f:9f:4b:e1:48:f0:3f:a5:70:f7:4e:99: f1:74:0b:2a:21:6a:9d:9f:20:f4:e5:fa:94:89:43: 61:82:0b:c1:98:7a:e3:7c:4e:cf:8b:6c:ad:6b:ce: 1b:0f:4d:e3:db:d4:47:5c:e8:77:aa:71:ea:62:8f: 17:c9:3b:a3:e2:29:ce:62:e2:31:71:a8:83:2a:41: d9:6b:a7:b8:75:d0:07:fc:10:f1:6e:69:84:4b:b1: 11:f8:ae:20:94:44:0d:b0:7b:0f:d2:bd:b3:1d:1c: 7c:ae:f8:cf:37:e2:aa:4a:d2:de:24:60:50:06:f9: c6:65:f0:9c:63:4f:53:eb:db:59:a4:93:14:b2:6f: aa:b3:fb:50:ae:6e:e4:b9:3f:fa:69:b3:43:32:3f: 7a:4b:57:41:2d:7e:c8:41:00:f8:68:6a:43:53:83: 5c:c3 Exponent: 65537 (0x10001) X509v3 extensions: X509v3 Basic Constraints: critical CA:FALSE X509v3 Extended Key Usage: TLS Web Server Authentication, TLS Web Client Authentication X509v3 Key Usage: critical Digital Signature, Key Encipherment X509v3 Subject Alternative Name: DNS:*.vk.com, DNS:vk.com X509v3 Subject Key Identifier: 18:91:5E:8A:5A:58:5D:AB:86:73:6D:C0:06:57:C2:6C:62:4E:5C:64 Signature Algorithm: sha256WithRSAEncryption 8d:bc:a8:ce:af:5d:39:fc:6a:ac:48:39:9a:7e:32:01:27:68: de:95:5c:4b:24:3a:51:5d:d2:90:e4:22:c1:55:5e:65:ea:4f: 59:2c:76:b0:48:53:d8:6e:c6:e3:2a:cb:26:e6:40:e3:9a:36: 4c:6b:29:52:1c:b5:83:c6:10:8e:cb:f8:6d:a9:ae:d7:71:1b: 92:69:99:c0:1e:de:2f:02:82:17:d6:1d:52:35:65:f7:ca:a7: 9c:fe:e6:1f:3b:a4:36:c2:4a:4e:e2:f2:7d:66:e1:c4:ea:e9: ca:d0:a9:76:fc:84:f1:55:e7:d8:04:45:04:9a:15:0d:23:c9: e1:0a:b0:9e:cb:3b:c0:86:d3:e4:23:3e:c5:8a:13:20:96:ac: 6d:d8:79:ea:b9:83:b9:a7:fe:79:67:41:3d:7d:1f:22:eb:20: b9:6c:06:34:cb:fb:17:a7:b3:fc:5a:2c:a2:4f:86:0a:80:53: ea:f2:71:4a:36:80:a3:fb:2e:42:76:c6:f8:68:6c:78:f0:5c: 5d:cd:c4:0a:05:29:a3:c5:a7:87:c4:87:af:5c:29:54:a1:8e: 94:2f:72:89:54:c4:76:cb:0b:87:f9:29:a1:18:4e:55:97:e2: 1f:86:2e:97:ca:15:40:6e:d4:29:25:eb:1c:5a:2e:b9:3d:e6: bb:5e:4d:18 But the real certificate
Certificate: Data: Version: 3 (0x2) Serial Number: 7817290772096849405 (0x6c7c988a18c595fd) Signature Algorithm: sha256WithRSAEncryption Issuer: C=US, ST=Arizona, L=Scottsdale, O=GoDaddy.com, Inc., OU=http://certs.godaddy.com/repository/, CN=Go Daddy Secure Certificate Authority - G2 Validity Not Before: Sep 4 21:17:41 2015 GMT Not After : Sep 16 11:56:55 2018 GMT Subject: OU=Domain Control Validated, CN=*.vk.com Subject Public Key Info: Public Key Algorithm: rsaEncryption Public-Key: (2048 bit) Modulus: 00:db:c0:ab:97:82:f1:70:06:3f:d9:9d:79:85:a8: 7c:11:d2:17:c5:9a:61:b1:72:06:d7:5e:21:7f:3d: 3b:c2:cd:dd:f4:d8:62:8a:7b:23:b7:cb:08:70:db: bf:e8:85:f7:23:92:09:56:1c:bc:e4:f8:cd:81:01: 82:43:8d:37:b9:f1:6a:14:ac:68:fa:a4:ef:fd:5b: 99:ad:f1:df:04:00:1a:e2:8a:7e:80:6a:27:b3:60: 71:27:8d:dd:37:d2:df:2d:22:fe:f3:cb:cf:68:62: 65:d4:ff:88:47:6a:78:4d:bf:8f:8f:0d:06:47:3a: b0:84:f0:a4:ea:9e:69:59:97:e5:03:a9:36:0e:93: e6:2e:4e:d6:2a:bd:ea:bc:64:b8:9c:7d:a3:5e:c4: ce:1c:74:82:4d:95:bc:00:a0:01:3e:d1:3f:2a:18: 7c:49:7c:af:6a:41:61:4b:99:1d:af:95:f4:77:c6: e0:4e:60:aa:96:63:ee:68:96:63:33:fc:81:41:e5: 2c:15:0f:1d:39:f8:00:ac:05:13:f2:80:dd:96:00: 2d:42:4b:d5:c9:f7:26:08:67:68:f8:15:e4:25:43: cd:e1:09:4c:5c:ab:15:23:d8:30:f1:89:b7:83:92: fd:15:ad:b6:5b:e4:5c:b2:fa:7d:d1:b2:00:43:39: d9:a3 Exponent: 65537 (0x10001) X509v3 extensions: X509v3 Basic Constraints: critical CA:FALSE X509v3 Extended Key Usage: TLS Web Server Authentication, TLS Web Client Authentication X509v3 Key Usage: critical Digital Signature, Key Encipherment X509v3 CRL Distribution Points: Full Name: URI:http://crl.godaddy.com/gdig2s1-118.crl X509v3 Certificate Policies: Policy: 2.16.840.1.114413.1.7.23.1 CPS: http://certificates.godaddy.com/repository/ Authority Information Access: OCSP - URI:http://ocsp.godaddy.com/ CA Issuers - URI:http://certificates.godaddy.com/repository/gdig2.crt X509v3 Authority Key Identifier: keyid:40:C2:BD:27:8E:CC:34:83:30:A2:33:D7:FB:6C:B3:F0:B4:2C:80:CE X509v3 Subject Alternative Name: DNS:*.vk.com, DNS:vk.com X509v3 Subject Key Identifier: 18:91:5E:8A:5A:58:5D:AB:86:73:6D:C0:06:57:C2:6C:62:4E:5C:64 Signature Algorithm: sha256WithRSAEncryption 80:61:fc:da:a9:f2:ea:f3:4a:70:4e:8a:39:3e:eb:9b:77:c2: c9:5d:da:30:20:7a:31:8f:19:f8:2f:b5:1b:4a:87:74:fb:99: 59:78:0f:45:1b:9d:9d:76:29:5f:48:90:08:a5:f8:c8:2e:9f: 55:ea:54:33:c1:a1:a3:7e:7f:8c:32:c5:a8:0f:9b:04:c7:d1: 55:30:7e:09:87:03:7e:88:82:32:0a:cb:0c:66:f0:50:85:b2: e4:43:67:38:88:50:84:54:41:4b:bc:3e:b0:47:8f:71:46:e4: 9a:cf:f1:a4:39:a9:4b:ca:63:44:c3:34:7d:7b:ca:de:6c:91: 5b:15:09:06:b3:4c:56:6d:23:03:1b:dc:c5:d1:e5:a3:9f:d2: 4d:be:d2:ff:62:4a:75:f7:4f:29:a4:7d:35:cf:33:06:83:6a: 50:f6:25:ce:a7:59:ac:05:fe:74:7b:c7:89:06:f5:a8:2e:4e: d4:34:a1:e1:68:7b:66:8b:53:a8:41:ba:a7:50:72:49:94:e6: 4a:ad:2d:26:95:a3:5d:ce:e3:8b:d9:6c:d2:1e:31:4b:28:ab: e2:33:c5:5e:3f:82:dd:e1:e8:36:a2:b5:08:d8:b3:2e:23:b4: 9b:b4:e6:4a:ab:21:2d:6b:aa:5f:fd:56:31:dc:86:32:85:04: 01:5a:b9:64 The last thing I wanted to point out is that vFTD uses the same key pair to generate any certificate that has been replaced. What is actually logical: why waste resources already loaded with encryption / decryption of the device to generate new key pairs. If you open the page ya.ru and view the received certificate, we see that the public key will be the same as that of the replaced certificate for vk.com.
Replaced and real certificate
This concludes the description of the SSL decryption mechanism on the NGFW. Greetings to everyone awake, we finally did it! It was painful, but now you know a little more about SSL. Whether it was worth it or not is at your discretion.
PS: And yes, I convey greetings from my colleagues (and join): Happy New Year, everyone! May the new year have less bugs, crutches and dances with a tambourine!
PPS: For those who are interested in how this kitchen is tuned to FirePOWER - velkam in the tackle.
Setting SSL decryption on FMC v6.1.0.1
First we prepare SubCA. We generate a pair of keys (open and closed). We sign the certificate on the corporate certification authority using the Subordinate certificate authority template. To do this, you can use the openssl utility. It is available from the FMC command line. Example commands for generating CSR:
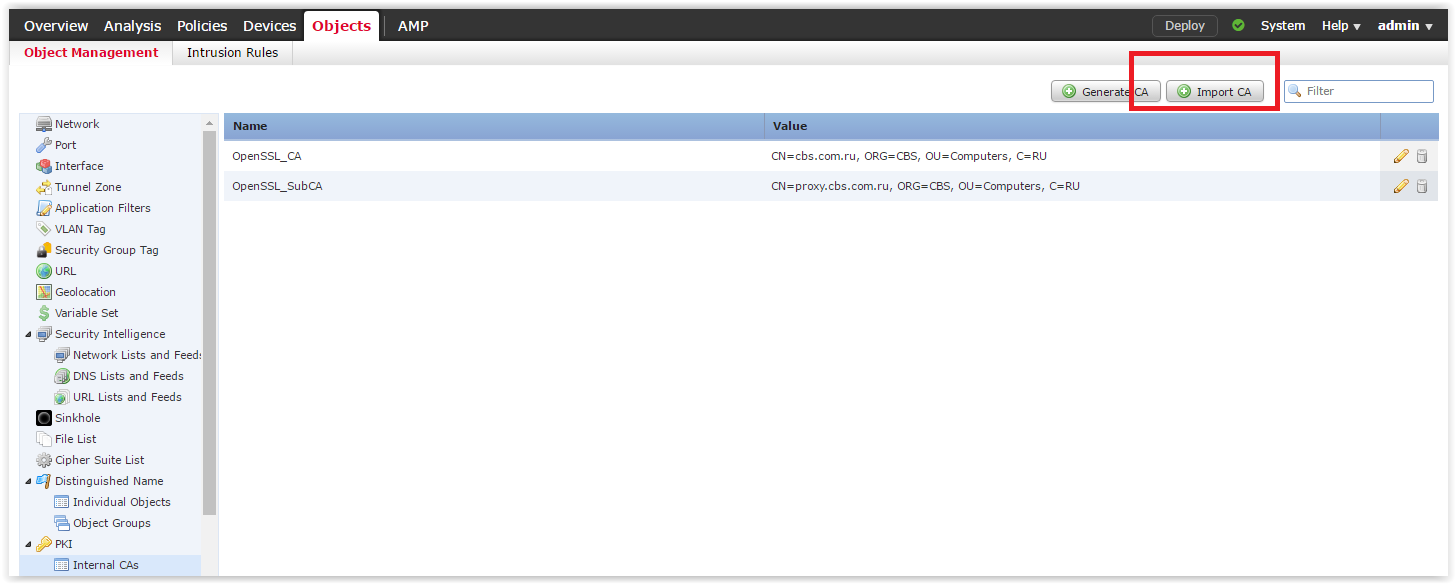
After we receive the signed certificate, we install it on the FMC. Go to the tab Objects -> Object Management -> PKI -> Internal CAs and click on Import CA:
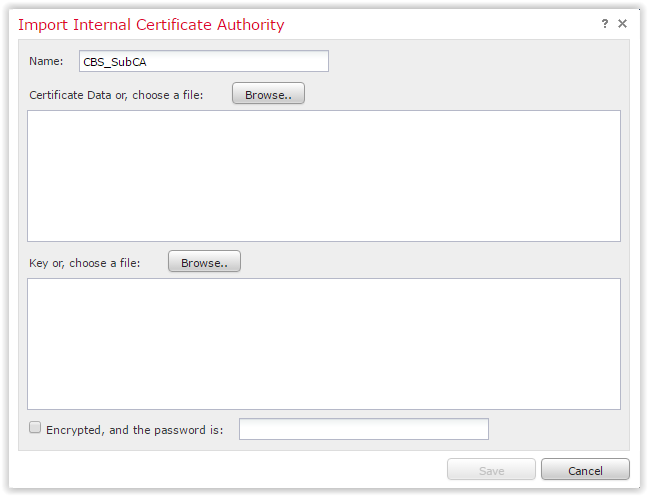
You will be prompted to upload the certificate and its private key. We got them earlier with the help of openssl and corporate CA. Set the name for the new CA and enter the password of the private key (if necessary):
Everything is ready to create a policy of decryption. Go to Policies -> SSL:

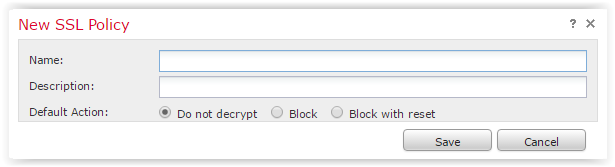
Click "New Policy", set the name of the policy, the default action and, write your Opus Magnum in the description:
Decryption policies in familiar tablets. Their fields describe the pattern of traffic to be decrypted:
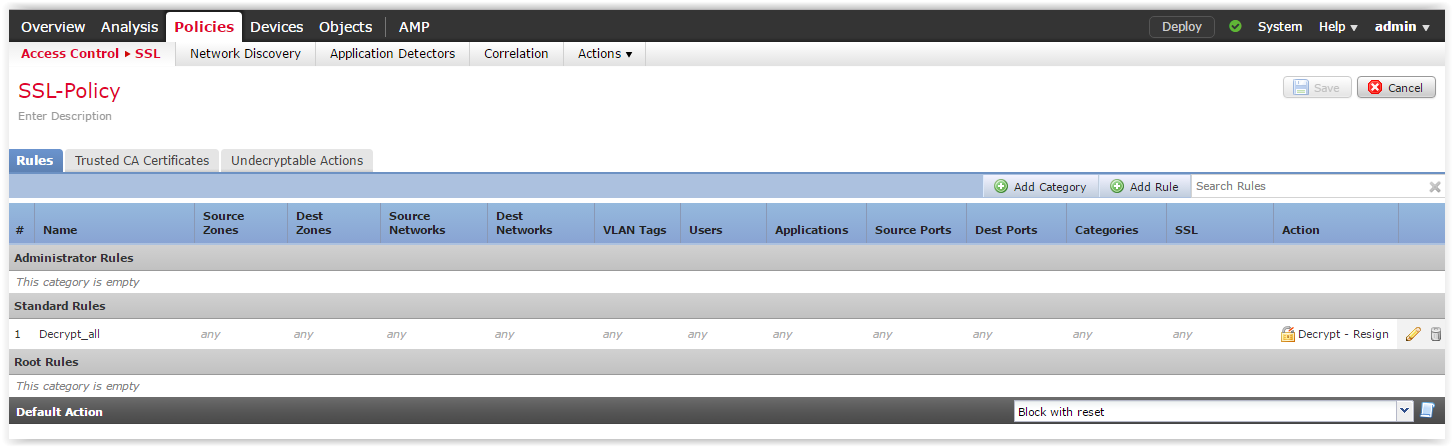
Click Add Rule and describe the traffic pattern. In the simplest case, you can make a rule without specifying any parameters. In this case, any SSL traffic will be decrypted. As the action, select "Decrypt - Resign". In the field after the word “with” we select the certificate loaded in the previous steps. This is the very SubCA with which we will sign a spoof certificate.

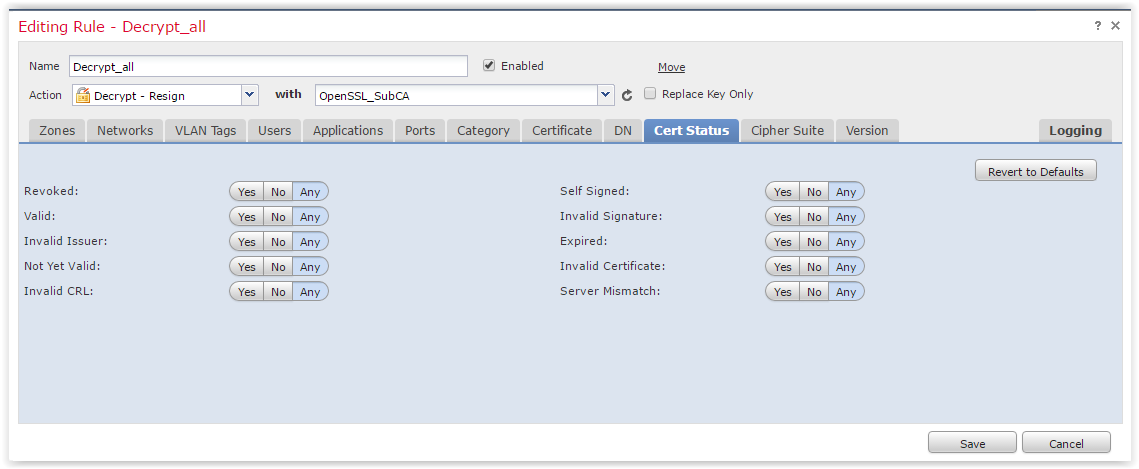
As you can see in the screenshot, FMC provides the broadest possibilities for describing the traffic pattern for decryption. You can select traffic by users, application type, URL category, server certificate settings (DN, Cert Status, Cipher Suite, Version), etc.
For example, a screenshot of the Cert Status tab:
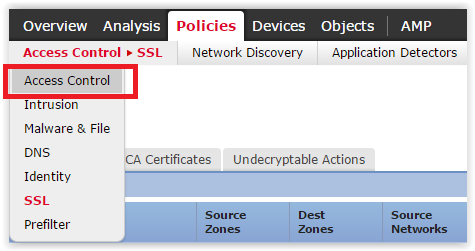
After setting all the necessary rules, click Save. The decoding policy is ready. But in order for it to start working, it must be tied to the access policy. Go to Policies -> Access Control:
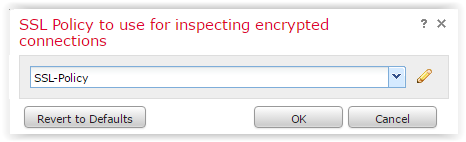
Select the access policy we are interested in and click on the pencil. In the expanded tab, we need to select the decryption policy created in the previous step:
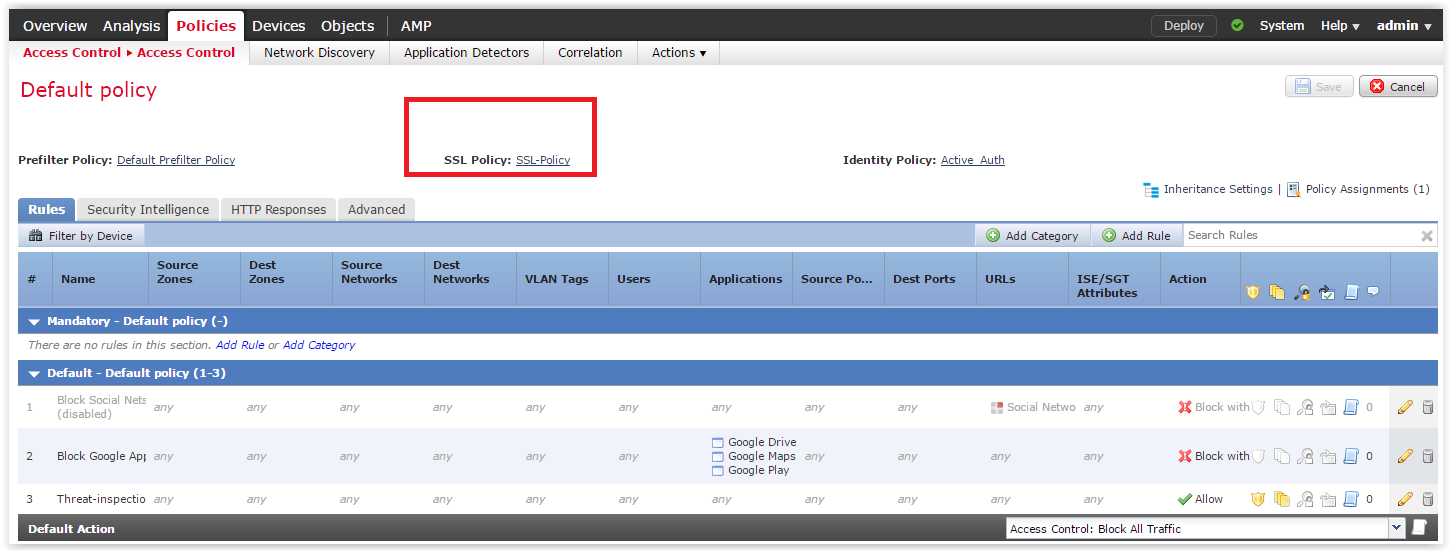
Click Save. Do not forget to perform deploy changes to a managed device (vFTD in my case):


openssl rand -out ./private/.rand 1024 openssl genrsa -out ./private/cakey.pem -aes256 -rand ./private/.rand 2048 openssl req -new -key ./private/cakey.pem -out subcareq.pem -config openssl.cnf -sha256 After we receive the signed certificate, we install it on the FMC. Go to the tab Objects -> Object Management -> PKI -> Internal CAs and click on Import CA:
You will be prompted to upload the certificate and its private key. We got them earlier with the help of openssl and corporate CA. Set the name for the new CA and enter the password of the private key (if necessary):
Everything is ready to create a policy of decryption. Go to Policies -> SSL:
Click "New Policy", set the name of the policy, the default action and, write your Opus Magnum in the description:
Decryption policies in familiar tablets. Their fields describe the pattern of traffic to be decrypted:
Click Add Rule and describe the traffic pattern. In the simplest case, you can make a rule without specifying any parameters. In this case, any SSL traffic will be decrypted. As the action, select "Decrypt - Resign". In the field after the word “with” we select the certificate loaded in the previous steps. This is the very SubCA with which we will sign a spoof certificate.
As you can see in the screenshot, FMC provides the broadest possibilities for describing the traffic pattern for decryption. You can select traffic by users, application type, URL category, server certificate settings (DN, Cert Status, Cipher Suite, Version), etc.
For example, a screenshot of the Cert Status tab:
After setting all the necessary rules, click Save. The decoding policy is ready. But in order for it to start working, it must be tied to the access policy. Go to Policies -> Access Control:
Select the access policy we are interested in and click on the pencil. In the expanded tab, we need to select the decryption policy created in the previous step:
Click Save. Do not forget to perform deploy changes to a managed device (vFTD in my case):
Source: https://habr.com/ru/post/318592/
All Articles