Hakintosh: we deploy macOS Sierra on Intel-PC in detail and clearly
READ ME PLEASE
1. All files are uploaded to MEGA. Who has problems with it - in the comments perezalili on the torrent.
2. Please do not ask me about installing Macs on laptops. I ask you to. You are welcome. This is a very hemorrhoidal process. Set yourself a Ubuntu and connect the Mac theme. The same experience will get
3. I rarely answer Habré, write in all questions.
If you CAN'T unpack files on a USB flash drive, please step back from the climat and immediately read the book Computer for Dummies: a detailed guide on how to use a PC !!!
1. All files are uploaded to MEGA. Who has problems with it - in the comments perezalili on the torrent.
2. Please do not ask me about installing Macs on laptops. I ask you to. You are welcome. This is a very hemorrhoidal process. Set yourself a Ubuntu and connect the Mac theme. The same experience will get
3. I rarely answer Habré, write in all questions.
This manual / guide / etc is written for those who are too lazy to collect pieces of this or that information about installing "Mac" on a PC, everything is clear and on the shelves.
To begin with, before, in fact, installing the system on a PC, you need to decide whether we need it or not, as the system itself is very specific in terms of installation and configuration, if you, of course, do not have an apple device. It makes no sense to explain that the deployment of the system, which was not originally planned for desktop PCs, is difficult and you can kill everything from 2 to N hours, depending on the compatibility of hardware.
')
Now, let's look into what Hackintosh is: the word “hackintosh” was formed from the merger of two words “Macintosh” and “Hack”, which in essence means “cracked mac”, although there is nothing in common with “hacking”.
In this guide, we will consider the creation of an installation flash drive from under Windows (since this is the most popular system among “beginner hackintoshkans”), installing the system on a blank disk, kernel extensions for your hardware and, in fact, installing and configuring the bootloader (at this very moment and many problems arise)
Machine author:
CPU: Intel Core i5 4460 3.2 GHz (Haswell)
Memory: 16 GB Crucial Ballistix Sport
Graphics: MSI GeForce GTX 760 2048MB
Motherboard: Gigabyte GA-H81-S2V (UEFI Bios)
Memory: 16 GB Crucial Ballistix Sport
Graphics: MSI GeForce GTX 760 2048MB
Motherboard: Gigabyte GA-H81-S2V (UEFI Bios)
ACHTUNG
The author DOES NOT WARRANT the performance of the system at the same level as his. The system works on different machines in different ways and you do not need to blame the author for the "curved instruction"
I also want to note that in this article, the work goes with NVidia video cards and UEFI BIOS.
Well, let's go.
Step 1. Evaluation and analysis of iron
Yes, despite the fact that Hakintosh somehow runs on almost any configuration, he always does it in different ways. Therefore, we should immediately analyze our hardware.
Processors
So, let's start with the fact that the system WILL NOT work on the machines on AMD processors (the very death state of agony, in which it will arrive, is very difficult to call “work”). Yes, in fact, you can put a custom kernel, reflash it, and so on, but it makes sense to reinvent the bicycle from the sticks, if one way or another it will break. The system rises without any problems on Intel processors, starting with Core i3 (we are talking specifically about macOS Sierra 10.12, previous releases can also be installed on Core 2 Duo and Pentium processors). In my case, the i5 4460 stone fell out (4 cores, 4 streams, turbo-boost to 3.4 GHz).
ACHTUNG 2
There are problems on socket 2011-3 processors, in particular on the X99 chipset. Usually manifested due to too large bells and whistles of the motherboard.
Video Cards
Next, we determine the graphics. If you use Intel's integrated graphics (in my case, this is the HD4600), then you will most likely need a separate “factory” graphics (although they can get started natively).
List of supported Intel Graphics Graphics
Intel HD 3000
Intel HD 4000
Intel HD 4600 (laptops)
Intel HD 5000
Intel HD 4000
Intel HD 4600 (laptops)
Intel HD 5000
Radeons (AMD) are turned on, but again with a bang. For example, new cards (RX-4 **), as well as the well-known R9 380 or R9 380x can simply display the download on a black screen.
List of precisely supported AMD cards
Radeon HD 4000 series
Radeon HD 5000 series
Radeon HD 6000 series (Desirable 6600 and 6800)
Radeon HD 7000 series (Desirable 7700, 7800, and 7900)
Radeon R9 200 series (R9 290 will not start)
Radeon R9 300 series (There may be problems with the R9 380. I haven’t personally checked, but judging by the reviews on Reddit, there are problems with these cards)
In this manual, we will not consider the AMD graphics factory, since it all boils down to framebuffer patches and Device ID substitutions in the bootloader (which is individual for each). Read more about AMD cards here: tyk (English).
Quite another thing is with the cards from NVidia. Plant almost everything, except for some very talented.
List of NVidia work cards
Geforce 7000 series
Geforce 8000 series
Geforce 9000 series
Geforce 200 series
Geforce 400 series
Geforce 500 series
Geforce 600 series
Geforce 700 series
Geforce 900 series
UPD 14.05 Geforce GTX 1000 Series
Geforce 8000 series
Geforce 9000 series
Geforce 200 series
Geforce 400 series
Geforce 500 series
Geforce 600 series
Geforce 700 series
Geforce 900 series
UPD 14.05 Geforce GTX 1000 Series
More than sure that you will find your card in the list.
Network Controller
I think you do not need to chew on how you can determine your network card ...
Newbie guide
Open Task Manager → Performance tab → Ethernet (Windows 10); network black is in big black letters there.
By the way, you can still see the BIOS
By the way, you can still see the BIOS
Anyway, we will not dwell on this in detail. The network card in any case will have to start, so just give a list of supported network cards.
Network cards
5 Series - 82578LM / 82578LC / 82578DM / 82578DC
6 and 7 Series - 82579LM / 82579V
8 and 9 Series - I217LM / I217V / I218LM / I218V / I218LM2 / I218V2 / I218LM3
RTL8111, 8168, 8101E, 8102E, 8131E, 8169, 8110SC, 8169SC
RTL8111 / 8168 B / C / D / E / F / G
RTL8101E / 8102E / 8102E / 8103E / 8103E / 8103E / 8401E / 8105E / 8402 / 8106E / 8106EUS
RTL8105 / 8111E / 8111F / 8136 / 8168E / 8168F
AR8121, 8113, 8114, 8131, 8151, 8161, 8171, 8132,8151, 8152, 8162, 8172
AR816x, AR817x supported
BCM5722, 5752, 5754, 5754M, 5755, 5755M, 5761, 5761e, 57780, 57781, 57785.5784M, 5787, 5787M, 5906, 5906M, 57788, 5784M
88E8035, 88E8036, 88E8038, 88E8039, 88E8056, 88E8001
E2200
Intel Gigabit
5 Series - 82578LM / 82578LC / 82578DM / 82578DC
6 and 7 Series - 82579LM / 82579V
8 and 9 Series - I217LM / I217V / I218LM / I218V / I218LM2 / I218V2 / I218LM3
Realtek
RTL8111, 8168, 8101E, 8102E, 8131E, 8169, 8110SC, 8169SC
RTL8111 / 8168 B / C / D / E / F / G
RTL8101E / 8102E / 8102E / 8103E / 8103E / 8103E / 8401E / 8105E / 8402 / 8106E / 8106EUS
RTL8105 / 8111E / 8111F / 8136 / 8168E / 8168F
Atheros
AR8121, 8113, 8114, 8131, 8151, 8161, 8171, 8132,8151, 8152, 8162, 8172
AR816x, AR817x supported
Broadcom
BCM5722, 5752, 5754, 5754M, 5755, 5755M, 5761, 5761e, 57780, 57781, 57785.5784M, 5787, 5787M, 5906, 5906M, 57788, 5784M
Marvell
88E8035, 88E8036, 88E8038, 88E8039, 88E8056, 88E8001
Killer
E2200
Memory
There are no restrictions. The system runs on two gigabytes. Recommended 4. Author recommends 8.
With iron, in fact, sorted out. If at this stage you do not change your mind, go ahead.
Step 2. Make a bootable USB flash drive and deploy the installer to it.
So, here we come to the practice. Let me remind you that we are doing all this from under Windows. Immediately I say that we will not use images from the rutreker, which are so vehemently advised by
A flash drive> 8 GB is required. Any.
Downloading: tyk
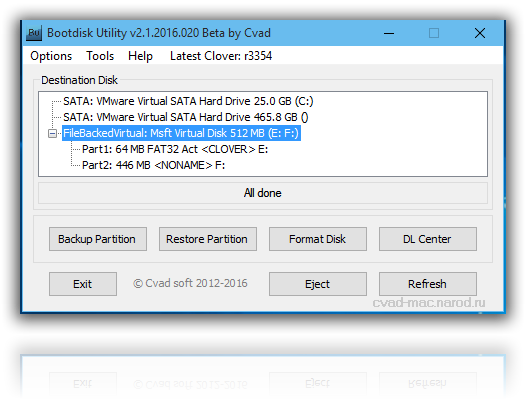
1. Run the utility
2. Destination disk → choose our flash drive
3. Format disk
Now we wait. The flash drive will be formatted in Apple HFS and split into two sections, one of which will have the bootloader (CLOVER) installed, and the second will remain clean so that the installer can be deployed there.
After the executed manipulations we get approximately the following picture:
Next, you need to deploy the installer to the second section. We also do this through the BDU utility. However, the question is where to get the image. Option two: take ready, already unpacked, or personally get it from Install Mac OS Sierra.app from the AppStore. Since the second method requires a lot of time, and look for this .app itself for a very long time, we will use the first one. Craftsmen have already prepared ready-made HFS files for this utility, have extracted them from .app for us. All we need is to download it (the image weighs almost 5 gigs, so you can just put it on download). Actually, download macOS 10.12 Sierra from here .
Downloaded.
1. We get from the archive HFS Partition File (HFS +), a file with the extension .hfs .
2. In the BDU "Destination disk" utility window, select Part 2 of our broken flash drive.
3. Open the "Restore partiton".
4. Search and select our * .hfs file. Please note that it should be no more than PART 2 section .
5. We are waiting for its unpacking.
That's all, the installer on the flash drive is unpacked and ready to go.
Now we need some files for your system. Everything I need is collected in this archive. I will explain later what and for what.
→ Download
You will also need this kexte, download it too: tyk . We unpack the folder from the archive into the root of the section with Clover, and the kext into the folder that we unpacked. All is ready. The flash drive is made. Go ahead.
Step 3. Install macOS Sierra on Intel-PC
We check that the flash drive is inserted into port 2.0. Reboot, go in the BIOS. Let me remind you that the BIOS we have - UEFI. Disable virtualization (Intel Virtualization). In the boot priority (BOOT) we specify our flash drive. Make sure that it will be loaded exactly in UEFI mode. Save and apply settings, reboot. We fall into the Clover'a menu.
Clover ("Clover") - the hackintosh bootloader, as well as its installer.
Press the down arrow until we get to the Options menu. Press Enter. All we need here is this line:
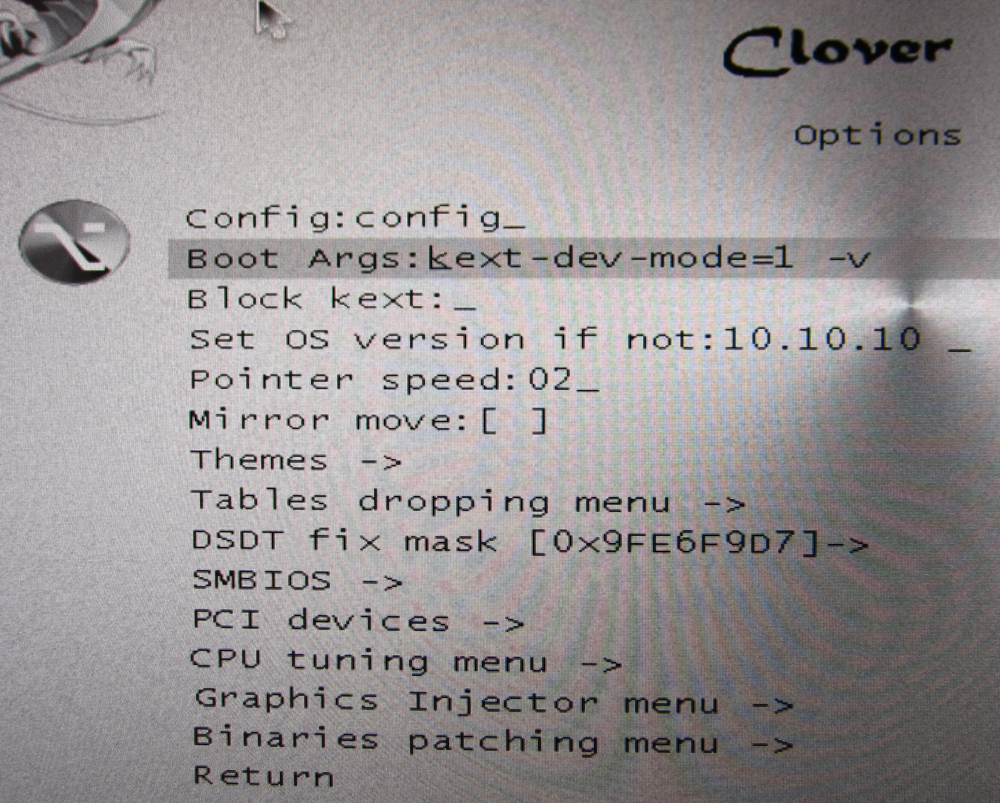
We register the following in it:
kext-dev-mode=1 rootless=0 -v npci=0x2000 nv_disable=1 Let me explain what each of these arguments do:
kext-dev-mode=1- required arg, without which the hack will not start. Allows you to load into the system cakes (Initially, FakeSMC.kext).rootless=0disables SIP (System Integrity Protection). Required arg.-v- "Verbose mode". Instead of a beautiful apple, we will see a “console” download so that you can recognize the error, if one appears.npci=0x2000(or 0x3000, depending on the PCI-e version) - optional. We warn you to stop loading at the PCI scanning stage. You can not register.nv_disable=1- at will. To avoid artifacts when loading and other debris, disable the graphical shell. Loaded in native graphics mode in orthodox 144p resolution. You can not register.
Apply arguments by pressing Enter. Select Boot Mac OS Sierra from OS X Base System. And so, went to my dear download. Immediately analyze some errors: still waiting for root device - the IDE controller does not have time to connect.
Fix
Reconnect the USB flash drive to another 2.0 port, boot with the following arguments:
kext-dev-mode=1 rootless=0 cpus=1 npci=0x2000 -v UseKernelCache=NoMissing Bluetooth controller transport - the video card did not turn on, or FakeSMC.kext did not get stuck. Check that there is FakeSMC.kext in the kexts / other folder. Sinezub has nothing to do with it.
Fix
Load up like this:
Or so:
kext-dev-mode=1 rootless=0 -v npci=0x2000Or so:
kext-dev-mode=1 rootless=0 -v -x npci=0x2000If such errors still remain, then we try to load as follows:
kext-dev-mode=1 rootless=0 -v npci=0x3000 darkwake=0 nv_disable=1 cpus=1 In other cases, only Google will help, although these fixes should solve these problems.
We wait. At some points may hang. If it hangs more than a minute - reboot. Should help in some cases.
And here we are, in fact, in the installer. Choose a language and click on the arrow. There will be a loading of the language pack (it may hang for a minute). Now open Utilities> Disk Utility, we need to format the disk under macOS. Select the desired disk, click "Erase." For convenience, we call the new disc “Macintosh HD”. We format, close the disk utility. Next, select the disk on which we will install the system (in our case, Macintosh HD), install.
Installation takes from 15 to 30 minutes, it all depends on the speed of writing to disk. After installation, the system will offer us to set up an Internet connection - skip, we will do this later. We do the user. Done, we are in the system. Rather, in its stump. While we still do not work. If you restart the machine, it will be impossible to get into the system (due to the absence of a bootloader).
Fix
If the computer is still rebooted or out, then you can choose to boot from a flash drive, then select “Boot macOS Sierra from Macintosh HD” in the clover menu, while not forgetting to set the boot arguments in the options menu.
Go ahead…
Step 4. Basic system setup and installation of cakes
So, here we are in the system. As long as she can do little, we won’t go online, the graphics aren’t working, and in general everything looks like something very, very bad. It needs to be fixed.
We will understand what the cakes are.
Kext (Kernel Extension) - kernel extensions that launch this or that equipment that is incompatible with the original poppy (for example, from where in the aimak will we find a network card from Realtek or a sound card?). Here we need them now.
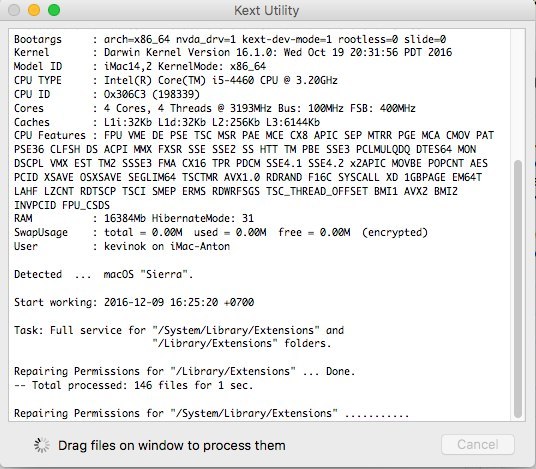
To begin, we will need the PostInstall folder, which you unpacked into the CLOVER partition on the bootable USB flash drive. From there, we need, first of all, the Kext Utility utility, which allows you to install cakes into the system. Run it, enter the password from the user, wait until we see the inscription "All done".
We install the cake on the network card (Network folder, sorted it into folders under each network card), just drag it into the program window. We are waiting for the “All done” message to appear. Next, go to the CLOVER section of our flash drive, then to kexts, then to Other. We copy from there FakeSMC.kext to any place (Better to the same PostInstall), then by the same way as the text on the network card, install it. Also need a box on USB 3.0. It was in the archive Legacy_13.2_EHC1.kext.zip, which you unpacked in PostInstall. Install it.
Done, we started the Internet, USB and allowed the system to boot at all (FakeSMC.kext simulates the System Management Control chip, which is only present on Apple motherboards. Without this catex, the system simply will not start).
Now install the bootloader. Go to the folder PostInstall → Clover_v2.3k_r3949. There is a * .pkg file, open it.
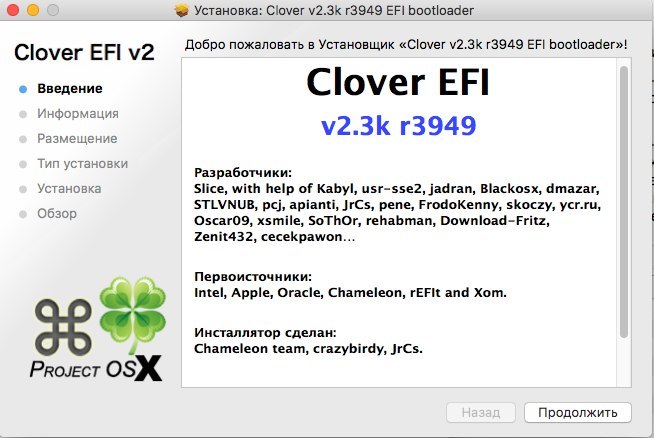
We click to continue, we read info about the loader (I say lies, also click continue). Next, in the lower left corner click "Configure".
For UEFI-boot set the following settings:
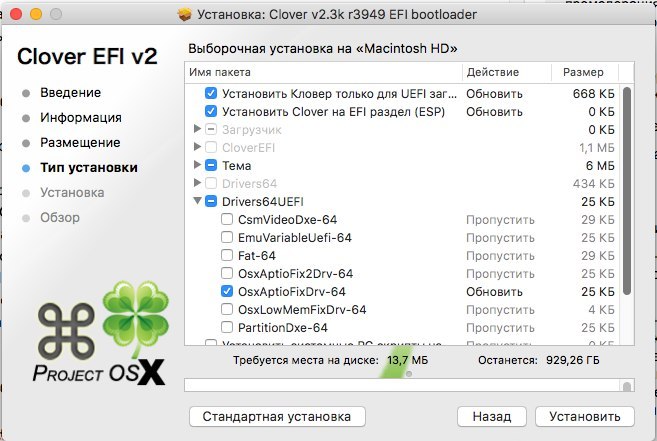
We'll talk about Legacy download later, since everything is a bit more complicated there and DSDT will have to be patched.
Click "Install". Let's go the bootloader installation process.
Done, the bootloader is installed.
Step 5. Configure the bootloader
After installation, we get a clean, unconfigured Clover loader, which needs to be slightly configured. Open Clover Configurator (in the future I do not advise using this program for point editing of the bootloader config).
First we need to get to the EFI partition with the loader. In the left menu, click Mount EFI. Then click Check partition, a table of all sections will appear. The partition we need should be on the same partition as the Apple_HFS, it is displayed as EFI EFI. Click Mount partition. In the list, select the disk we need (for example, disk0s1). Please note that there is a bug when you can not see all sections. Roll the mouse wheel, so you can scroll between sections and select the desired one.
Next, click Open Partition. Open the "folder" with the desired section. Go to EFI> CLOVER. Copy plist.config to the PostInstall folder, for convenience. Also just in case, copy it somewhere else, since the one we just copied will be edited. And one more for backup. Copy, open plist.config.
We see about the following:
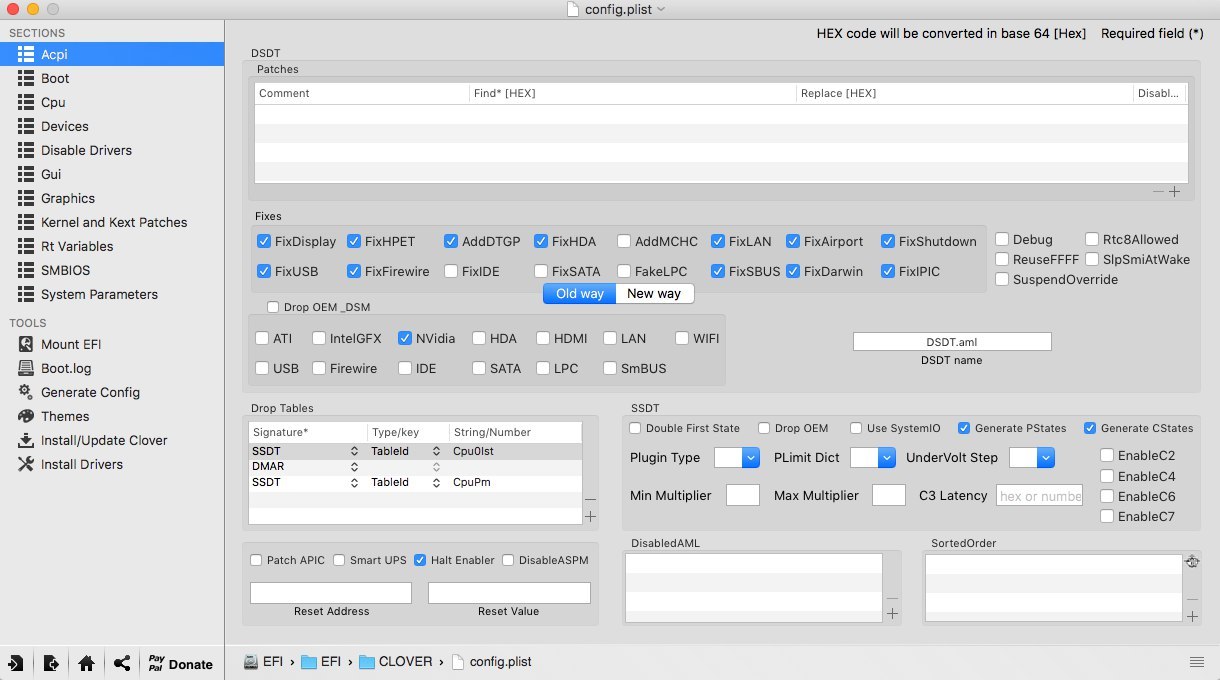
ACPI - Do not touch the fixes, drop (DropOEM) our video card (DropOEM_DSM works when there are two DSDT patches. Therefore, we leave the original autopatch method in the loader, and turn off our, if one appears).
Go to the BOOT section.
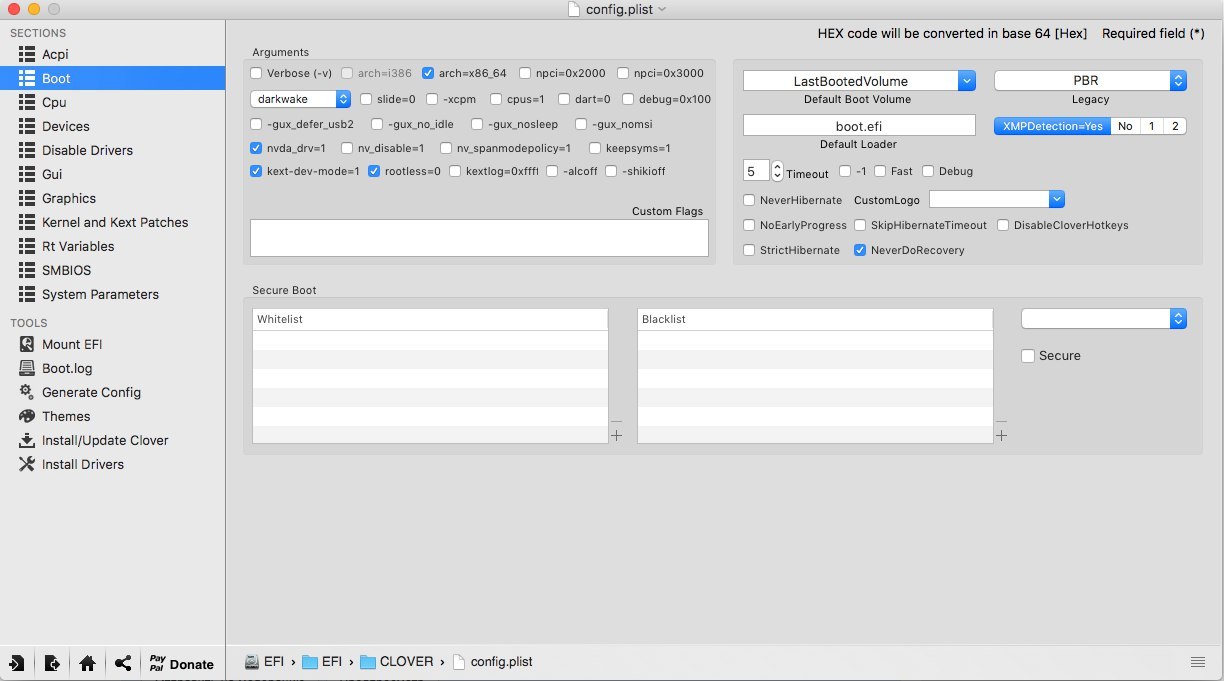
So, here we should dig. Arguments expose themselves, depending on the system.
-v (verbose)is the familiar “text” boot mode. It is better not to turn it on, but to prescribe manually if necessary.arch- architecture. In my case x86_64npciis the key already known to us. Expose if necessary. I recommend doing the first boot without it, but in Verbose mode.darkwake- responsible for sleep and hibernation. It has 7 modes. If the dream does not start changing hibernatemode in the terminal, then I recommend by trial and error to find the desired darkwake mode.cpus=1- run using only one kernel. I do not recommend to choose.nvda_drv=1- activation of Nvidia's web driver, which we will install later. Choose if you have nVidia.nv_disable=1- disable the invisible graphics and launch on the native poppy driver. It is better not to choose, but manually prescribe if necessary.kext-dev-mode=1androotless=0already explained earlier.
Go to the right subsection.
Default Boot Volume- the partition from which the default will begin the selection of the disk to boot. The default is LastBootedVolume (the last selected partition).Legacy- Legacy Boot for older versions of Windows and Linux. Very much depends on the hardware and the construction of BIOS, so several algorithms were developed:LegacyBiosDefault- for those BIOS UEFI, where there is a protocol LegacyBios.PBRTest, PBR- PBR Boot options, then just brute force. In my case, PBR works.XMPDetection=YESis an important parameter. Fixes the amount of RAM, slots, dies, frequency and number of channels.DefaultLoader- if there are several boot loaders on a partition, select the default one. Should not be empty!Timeout- time to automatic boot.Fast- a parameter that skips the selection of a partition and immediately goes to the download-1 (Timeout -1)- disable autoboot.
The CPU section is skipped, the loader itself will pick up the desired values. Devices are also better to skip if you have nothing to "fake." Disable Drivers - disable unnecessary drivers on boot. GUI - customize the appearance of the loader. I think there is nothing to explain here, there are no special parameters here. Screen resolution, language and menu theme. It's simple. Graphics - graphics settings and injections.
Parameter Inject NVidia do not touch! On launch will be artifacts. It is designed to run old GT cards
Kernel and Kext Patches - patches and kernel customization. Apple RTC is selected by default. Better not to touch. SMBIOS - the most juice, customization and fake "poppy".
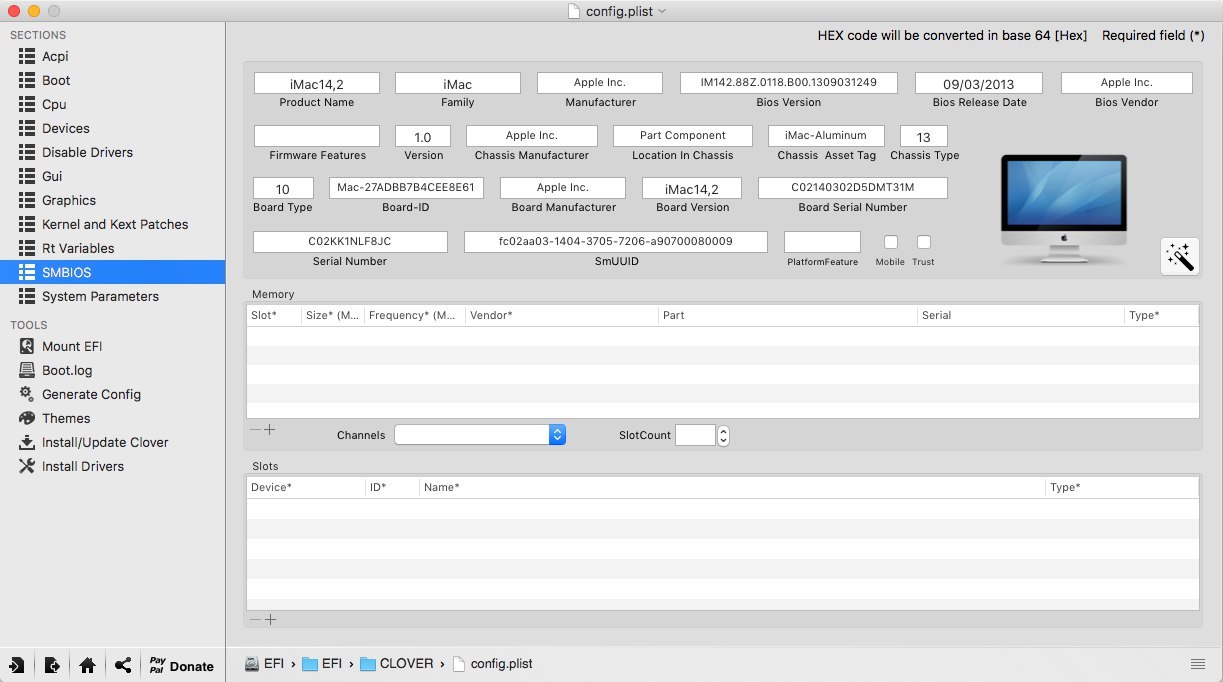
To configure the factory information, click on the icon of the magic wand. Next, select the iMac (If PC) or MacBook (if laptop).
ACHTUNG 3
You can also look among the older configs, such as MacMini, or Mac Pro. Your task is to find the poppy most similar to your iron.
Do not add anything to the Memory and Slots. These are purely cosmetic parameters that clover picks up at the loading stage. Incorrectly set parameters can cause conflicts.
WARNING: Nvidia video cards with no policy changes only work on iMac13.1 and iMac14.2 mac models.
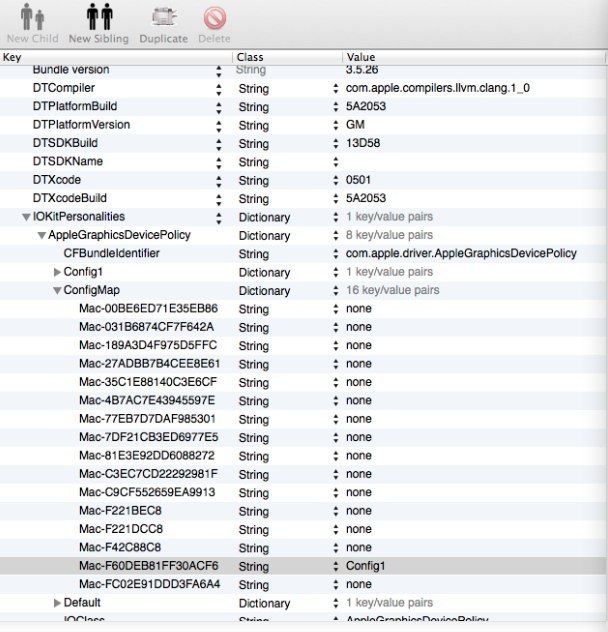
In AppleGraphicsControl.kext / Contents / PlugIns / AppleGraphicsDevicePolicy.kext / Contents / info.plist fix Config1 to none here:
Now it should work.
Is done. We don’t touch anything else, we’ve done the basic settings. Save our file. Now we copy it to the CLOVER folder of the EFI section, authorize, replace. Let me remind you that before that you had to make a backup.
Step 6. Installing the graphics driver and first rebooting
Here we are almost there. Now it remains only to start a video card. In the PostInstall folder is the WebDriver * .pkg package. Open it, install it. Next, it prompts us to reboot. Reboot.
Now make sure that we boot not from the USB flash drive, but from the hard disk in UEFI mode . Select Boot macOS Sierra from Macintosh HD. We start.
Note
I recommend using the -v option for the first run so that if something goes wrong, you can immediately identify the error. If the boot loader breaks down and you cannot get into the system, then boot from the USB flash drive, write the necessary keys in the options and load the system into Verbose mode.
Done, here we are in the system. In the picture, I approximately showed how the axis will look after all the settings. Pay attention to how the system understood your "poppy", as well as the frequency of the processor.
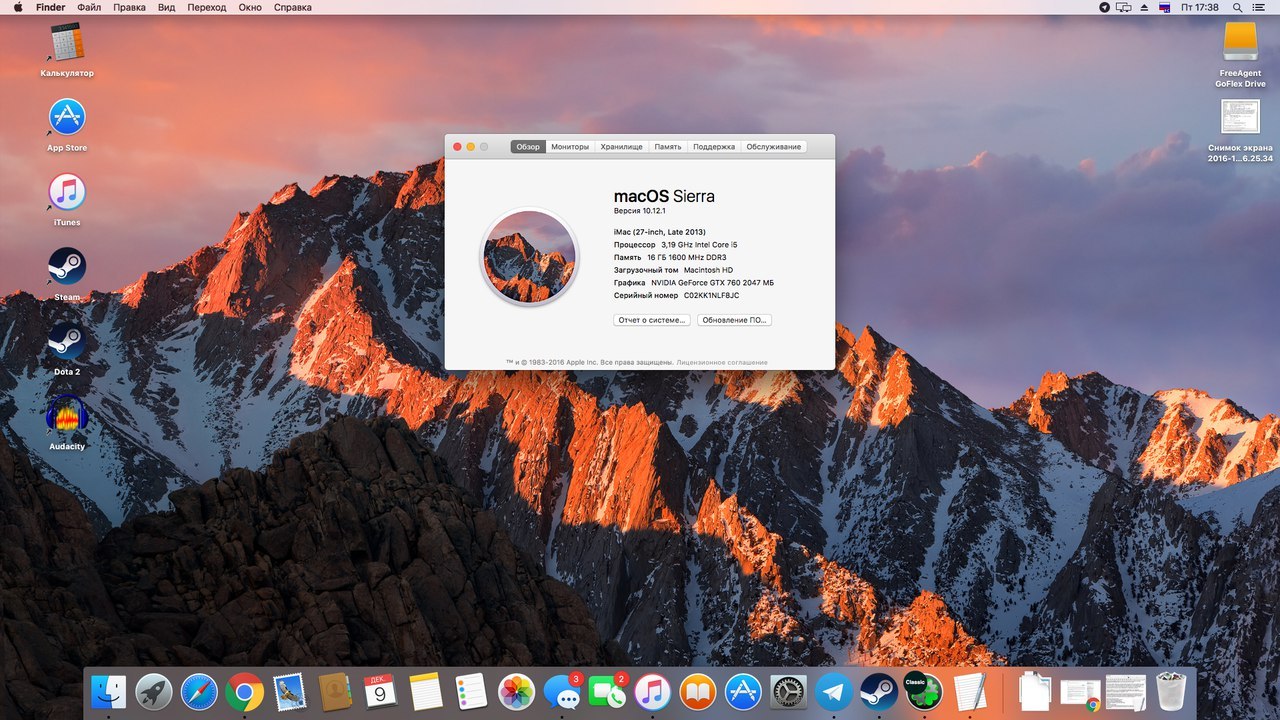
A sure sign of the operation of the nvidia driver is its logo on the taskbar. I turned it off, by the way, since it interferes, but you can get access to the invisible control panel through the "System Settings ...". Internet can be checked through Safari. USB 3.0 is trivially sticking a USB flash drive into port 3.0.
Additionally
- Sound
With regard to the sound, the situation is different. If you have an external sound card, then simply download the drivers for it from the manufacturer’s website (analog devices, such as mixing consoles, do not require drivers and start up right away). For the embedded sound card, use one of these cases:
VoodoHDA . Craftsmen have written down instructions for setting it up. I will not copy it, but just give a link to the archive .
PS The author recommends moving the kext by hand, however, all this can be done through the Kext Utility.
AppleHDA
Regards AppleHDA
The following conditions must be met in order for it to work:
- Presence of vanilla (pure) AppleHDA.kext cake in the system.
- Presence of HDEF section in your DSDT (or fix Clover FixHDA_8000-> True)
- Specify the layout in DSDT (or in the config.plist of Clover Devices-> Audio-> Inject-> 1,2,28 ... etc. Choose from those that are registered for your codec above)
- Remove ALL patches for sound (if they were in your config.plist) from the KextsToPatch section
- Remove DummyHDA.kext (if used)
- If used VoodooHDA.kext - delete. Also delete AppleHDADisabler.kext and rebuild the cache.
- Intel HDMI 4000/4600 requires Clover Fix UseIntelHDMI-> True
Actually, that's all. After we get macos Sierra ready for work.
UPD on 05/14/2017
- In the comments, kind people reloaded the file from mega to torrent. This is due to the fact that many have a problem when downloading a file from mega. I admit honestly, I did not know that Mega has a download speed limit (I use a premium account). Also, all questions, please write to me in the VC, but first check the comments. There is a chance that your problem has already been solved there. Again, I am not responsible for any risk that may be caused to your computer. Also, I want to stipulate one point that the article is presented solely for educational purposes. The fact of installing hackintosh on a PC is a gross violation of Apple’s policy on their system, which is punishable by law. The author does not call for using MacOS on non-Apple computers and does not encourage changing the source code of the system.
- The end
Source: https://habr.com/ru/post/318448/
All Articles