Tap gesture to hide the keyboard in iOS (Swift 3)
In this article we will explain how to hide the keyboard by clicking on the view from the very basics to the implementation of one line or completely without code.

The basics
The following case is quite often encountered: by pressing the background, hide the keyboard.
Basic solution - we have a link to UITextField , create a UITapGestureRecognizer with a method that removes the selection from the text field and it looks like this:
This article uses Swift 3, but can be implemented on other versions and on Objective-C.
class ViewController: UIViewController { @IBOutlet weak var textField: UITextField! override func viewDidLoad() { super.viewDidLoad() let tapGesture = UITapGestureRecognizer(target: self, action: #selector(self.tapGesture)) view.addGestureRecognizer(tapGesture) } func tapGesture() { textField.resignFirstResponder() } } Problems of this code:
viewDidLoaddirty and unreadable- a lot of code in the controller
- not reusable
Make it readable
To solve the first problem, we can move the code for creating and adding a gesture to a separate function:
class ViewController: UIViewController { @IBOutlet weak var textField: UITextField! override func viewDidLoad() { super.viewDidLoad() addTapGestureToHideKeyboard() } func addTapGestureToHideKeyboard() { let tapGesture = UITapGestureRecognizer(target: self, action: #selector(self.tapGesture)) view.addGestureRecognizer(tapGesture) } func tapGesture() { textField.resignFirstResponder() } } The code has become even more, but it has become cleaner, more logical and more pleasant to the eye.
Code reduction
To solve the second problem, UIView has a method:
func endEditing(_ force: Bool) -> Bool It is responsible for removing the selection from the view itself or its subview. Thanks to him, we can greatly simplify our code:
class ViewController: UIViewController { override func viewDidLoad() { super.viewDidLoad() addTapGestureToHideKeyboard() } func addTapGestureToHideKeyboard() { let tapGesture = UITapGestureRecognizer(target: view, action: #selector(view.endEditing)) view.addGestureRecognizer(tapGesture) } } If you do step by step, then do not forget to remove the textField property from IB.
Also change thetargetfromselftoview.
The code began to please the eye! But you still have to copy it to each controller.
Copying solution
For reusability, let's take out our method of adding a controller to an extension :
extension UIViewController { func addTapGestureToHideKeyboard() { let tapGesture = UITapGestureRecognizer(target: view, action: #selector(view.endEditing)) view.addGestureRecognizer(tapGesture) } } And the code of our controller will look like this:
class ViewController: UIViewController { override func viewDidLoad() { super.viewDidLoad() addTapGestureToHideKeyboard() } } Clean, one line of code, and it is reusable! Perfect!
Several views
The solution above is a very good one, but there is one drawback to it: we cannot add a gesture to a specific view.
To solve this case, use the UIView extension:
extension UIView { func addTapGestureToHideKeyboard() { let tapGesture = UITapGestureRecognizer(target: self, action: #selector(endEditing)) addGestureRecognizer(tapGesture) } } and accordingly the controller code will look like this:
class ViewController: UIViewController { override func viewDidLoad() { super.viewDidLoad() view.addTapGestureToHideKeyboard() } } Here another problem arises: this extension solves the problem only for the controller view. If we add someView to the view and hang a gesture on it, it will not work. This is all due to the fact that the endEditing method endEditing works for a view that contains an active view or is itself, and most likely our text field will not be in it. We solve this problem.
Since the controller's view will exactly contain an active view, and our added view will always be in its hierarchy, then we can reach the view of the controller via superview and call endEditing .
Get the view controller through the UIView extension:
var topSuperview: UIView? { var view = superview while view?.superview != nil { view = view!.superview } return view } I have to say, changing the selector to:
#selector(topSuperview?.endEditing) still will not work. We need to add a method that will call the construct above:
func dismissKeyboard() { topSuperview?.endEditing(true) } Now we replace the selector with:
#selector(dismissKeyboard) So, the extension for UIView will look like this:
extension UIView { func addTapGestureToHideKeyboard() { let tapGesture = UITapGestureRecognizer(target: self, action: #selector(dismissKeyboard)) addGestureRecognizer(tapGesture) } var topSuperview: UIView? { var view = superview while view?.superview != nil { view = view!.superview } return view } func dismissKeyboard() { topSuperview?.endEditing(true) } } Now, using addTapGestureToHideKeyboard() for any view we will hide the keyboard.
KeyboardHideManager
![]()
I used the solution above for a long time, but then I began to notice that even one line pollutes the view installation function. Also, (rarely, but still happens) does not look very nice when it is the only method in viewDidLoad :
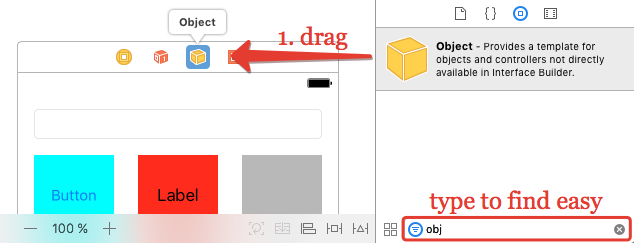
override func viewDidLoad() { super.viewDidLoad() addTapGestureToHideKeyboard() } Together with the space, it takes 5 lines, which greatly affects the purity of the controller! I had an idea to do all this without code, so that there was not one extra line in the controller. I created a class that can be added to IB using Object

And using @IBOutlet bind the @IBOutlet we need:
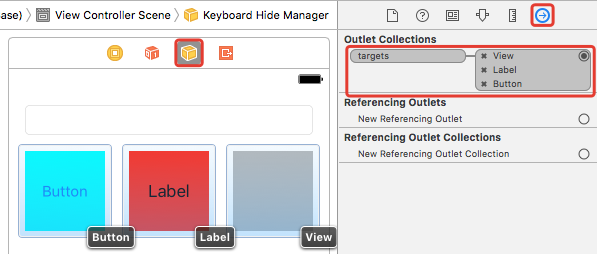
The simplest implementation of this class is to add a gesture to each view using the above functions:
final public class KeyboardHideManager: NSObject { @IBOutlet internal var targets: [UIView]! { didSet { for target in targets { addGesture(to: target) } } } internal func addGesture(to target: UIView) { let gesture = UITapGestureRecognizer(target: self, action: #selector(dismissKeyboard)) target.addGestureRecognizer(gesture) } @objc internal func dismissKeyboard() { targets.first?.topSuperview?.endEditing(true) } } extension UIView { internal var topSuperview: UIView? { var view = superview while view?.superview != nil { view = view!.superview } return view } } To use this class, you need three simple steps:
- 1) Drag Object to controller
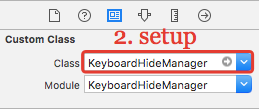
- 2) Set KeyboardHideManager as a class for this object.
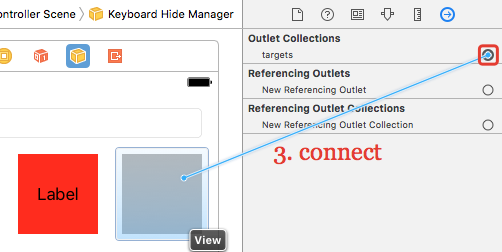
- 3) Connect the desired views with the targets property
Yes, there are more actions than to write a single line (or several lines if there are several specific views), for this very line is not in the controller.
Someone may say that it is better to write a line in the code, so it is more understandable, and they will be right, on the one hand. I am in favor of taking out of the controller, all that can be done and thus easing it.
This class can be connected via CocoaPods or simply copied to the project.
Link to the KeyboardHideManager source code with full ReadMe about the library itself and its connection.
Total
We disassembled the implementation of the popular case, reviewed several of its solutions, in one line and without any code at all. Use the way you like it more.
')
Source: https://habr.com/ru/post/318434/
All Articles