Android Things

Google introduced an updated platform for the Internet of things - Android Things
December 13, Google officially announced the release of the Developer Preview of its platform for the Internet of things with the support of development for Android. Now everyone familiar with Android development will make it even easier to enter the world of creating IoT devices.
Three types of devices are officially supported:
')
Support for two more is expected shortly:
- Intel® Joule ™ 570x
- NXP Argon i.MX6UL
All you need to develop an application is Android Studio, and one of the devices above.
application
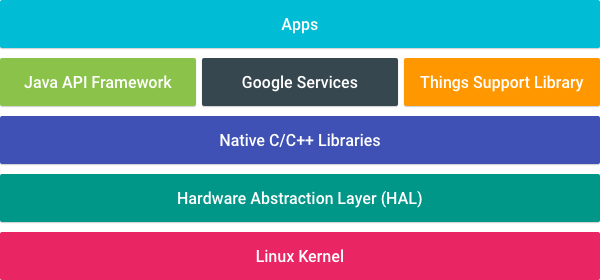
Structure of the Android app Things
All examples you can see in the official repository . There is a template for starting a new application.
As a rule, several applications cannot be installed on Android Things devices, so the only application will automatically start when the device starts.
To display the application uses the same UI toolkit as a regular Android application, does not support the system status bar and navigation buttons. The presence of a display is not necessary for the application to work, and all events are automatically delivered to the application's activity.
In the application's gradle-file, install minSdkVersion 24 and add the provided-dependency:
provided 'com.google.android.things:androidthings:0.1-devpreview' In AndroidManifest, you must specify in the application:
<uses-library android:name="com.google.android.things"/> There is only one activity in the application that starts when the device starts and is destroyed when it is turned off.
To ensure the automatic start of the activation at the start of the device, it is necessary to add additional parameters to it:
<intent-filter> <action android:name="android.intent.action.MAIN"/> <category android:name="android.intent.category.IOT_LAUNCHER"/> <category android:name="android.intent.category.DEFAULT"/> </intent-filter> Standard themes are also available: Theme.DeviceDefault
Periphery
The platform supports a set of hardware interfaces: GPIO, PWM, I2C, SPI, UART. Libraries for connecting various peripheral devices available out of the box:
- RGB LED apa102
- Bmx280 temperature sensor
- Button
- Touch sensor cap12xx
- UART GPS
- Displays HT16K33, TM1637, OLED display ssd1306
- Accelerometer MMA7660FC
- Servo
- Speaker
- Rainbowhat
There is an opportunity to write your driver. Here, Google introduces the concept of the user driver , which assumes that the driver for the sensors will support the already existing service of working with drivers, which will make it easy to use them on various platforms.
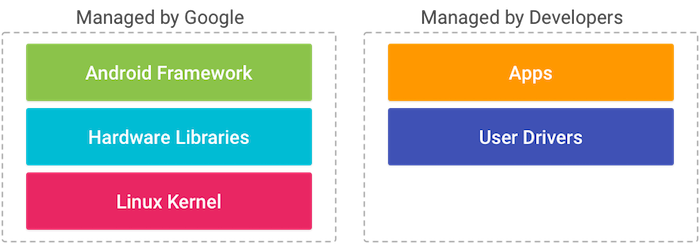
Almost equally
Three types of drivers are supported:
I think the main interest is the connection of various sensors, so I’ll dwell on this in more detail.
First you need to create a driver object. The sensor driver must inherit the UserSensorDriver abstract class and override only two methods:
read - is called to receive new data from the sensor and should return data in the form of an object of class UserSensorReading.
setEnabled - used to enable sleep mode or power saving.
Next, with the help of UserSensor.Builder, we create our UserSensor object, specify its name, manufacturer, specify its type and pass it the driver. We register the sensor in the UserDriverManager manager and do not forget to disable registration when the application is closed.
Read more about creating drivers here .
As can be seen from the demo examples, the application consists of two main parts. Activity in which all the work takes place and the auxiliary class BoardDefaults, which returns the string name of the pins to which certain devices are connected, depending on the platform on which the application is running.
To work with supported devices, the system provides PeripheralManagerService with which you can get a list of available pins / tires for a specific platform, as well as indicate which pin our device is connected to.
Each type of device has its own set of methods for controlling and feedback interfaces.
LED connection example
And pass the boolean value
PeripheralManagerService pioService = new PeripheralManagerService(); mLed = pioService.openGpio(BoardDefaults.getLedGpioPin()); mLed.setDirection(Gpio.DIRECTION_OUT_INITIALLY_LOW); And pass the boolean value
mLedGpio.setValue(value); Connection example
And then catch the button
mButtonInputDriver = new ButtonInputDriver( BoardDefaults.getGPIOForButton(), Button.LogicState.PRESSED_WHEN_LOW, KeyEvent.KEYCODE_SPACE); mButtonInputDriver.register(); And then catch the button
@Override public boolean onKeyUp(int keyCode, KeyEvent event) { if (keyCode == KeyEvent.KEYCODE_SPACE) { // button pressed return true; } return super.onKeyUp(keyCode, event); } For details, see the example of connecting a large number of sensors.
Platform features
First, the limitations. Many standard applications and content providers are not available on the platform, as well as some Google APIs.
Since due to the lack of a status bar, notifications are not supported, the NotificationManager API is not available.
But not a little is available:
Cast
Drive
Firebase analytics
Firebase Cloud Messaging (FCM)
Firebase Crash Reporting
Firebase Realtime Database
Firebase remote config
Firebase storage
Fit
Instance ID
Location
Nearby
Places
Mobile Vision
And there can not but please the presence of support for Firebase Realtime Database, Firebase Analytics and FCM, which will easily allow you to manage Android Things devices via the Internet and collect data from them.
Also, there is no need to request permissions in the process of work, all permissions specified in AndroidManifest will be automatically given.
Google weave
Along with Android Things, Google introduced the Weave platform. The platform includes:
- Weave Server, which registers devices, exchanges and stores data, as well as integrates with other Google services;
- SDK for connecting devices to the Weave server. Currently supported platforms: Linux, Qualcomm QCA4010, and Marvell MW302;
- A set of tools for development and integration, including a special application.
Weave currently supports: HVAC controllers, light bulbs, sockets, TV and switches.
To gain access to all the features of the platform, you must join the Google group.
Weave is already being used in Philips Hue and Samsung SmartThings devices and there are agreements on the use of the platform by a number of other manufacturers Belkin WeMo, LiFX, Honeywell, Wink, TP-Link and First Alert.
Cost of
Raspberry Pi 3 model B ~ 4 000r. + power supply from 500r. (Intel® Edison with Arduino Breakout Kit ~ 7500r. + Power supply from 800r.) + SD card 32GB ~ 700r. Prototyping board from 700 r.
As a result, a great New Year's gift will cost you about 7,000 rubles. And also there are ready-made kits, including the Raspberry Pi 3 with a certain set of sensors, for about the same price.
Happy New Year, everyone!
→ Android Things official website
→ Github repository with examples
→ Official Google Weavr website
Source: https://habr.com/ru/post/318296/
All Articles