Deploy a VMware Virtual SAN 6.2 Test Cluster
Introduction
I was assigned the task of deploying a cluster of VMware Virtual SAN 6.2 for performance testing, analysis of the capabilities, features and principles of operation of hyperware convergent software storage from VMware.
In addition, the test bench created should be a platform for developing and testing testing distributed storage systems, including for hyperconvergent infrastructures (HCI).
The results of testing and describing his methodology in this article will not be, probably a separate publication will be devoted to this.
')
This article will be useful to specialists who first encounter the deployment of a VMware Virtual SAN 6.2 cluster. I tried to point out the pitfalls that you can run into when you raise the cluster, which will significantly reduce the time and nerves on their detour.
Test bench description
Iron
4 identical hosts in the following configuration:
- Platform - AIC SB302-LB (3U 16-Bay Storage Server, not certified for vSphere 6.2)
- Processor - Intel® Xeon® CPU E5-2620 v4 @ 2.10GHz - 8 cores, hyper-threading included - 2 pcs.
- RAM - 128 GB
- NVMe-flash - HGST Ultrastar SN150 HUSPR3216AHP301, 1.6TB PCIe - 2pcs (certified for Virtual SAN 6.2, only for all-flash, according to HGST is also certified for hybrid)
- HDD - HGST Ultrastar 7K6000 HUS726020AL5214 2TB 7200 rpm SAS 12Gbit / s - 8pcs (not certified for Virtual SAN 6.2, only for 6.5)
- Bootable media - SSD 60GB
- Disk Controller - LSI Logic Fusion-MPT 12GSAS SAS3008 PCI-Express (certified for vSphere 6.2, but not certified for Virtual SAN 6.2)
- 2 1GbE ports
- 2 IB 40Gbps ports - on the HCA Mellanox ConnectX-2 / ConnectX-3 in IPoIB mode
IB switch Mallanox SB7790
Software: VMware vSphere 6.2
vCenter Server Appliance 6.0.0.20100
ESXi 6.0.0.4600944
Version of VManox ConnectX-3 driver for VMware for operation in IPoIB mode: MLNX-OFED-ESX-2.4.0.0-10EM-600.0.0.2494585
Virtual SAN cluster description
Trial license vSphere - full stuffing
vCenter Server Appliance is deployed as a VM on a dedicated local boot SSD of one of the hosts
HA cluster of 4 hosts, Virtual SAN (vSAN) cluster is deployed on it
Virtual SAN uses all the carriers of 4x vSphere cluster nodes (with the exception of bootable SSDs): 8 identical disk groups (DG) - 2 per host; Each DG includes 1 NVMe-flash for cache and 4 HDD for capacity. We get a hybrid storage with a raw total capacity of 57.64TB - 32 capacity drive at 1.82TB (real disk capacity 2TB)
Installing ESXi, drivers, vCenter and patches
Preparation and initial deployment
First you need to check the compatibility of the existing server hardware with VMware vSphere software and Virtual SAN. It should be borne in mind that the compatibility of iron with the correct version of vSphere does not guarantee its compatibility with Virtual SAN. Therefore, you should immediately check the compatibility of equipment with vSAN (Virtual SAN). To do this, we go to the VMware Compatibility Guide resource, select the Virtual SAN in the “What are you looking for:” field and get a lot of opportunities for searching and basic configuration of ready solutions certified for working with vSAN (Virtual SAN Ready Node).
This will be useful for those who are going to deploy a new VMware vSAN cluster and, without unnecessary problems, select ready-made hosts from a favorite vendor certified by VMware for its volumes and loads. A tool for selecting pre-tested "cubes" for building HCI.
If we don’t want to put up with it, ready-made systems for our tasks will not be entirely optimal, too expensive, or redundant. If we want to choose each element of the host so that it is ideally suited for target loads. If we want to make sure that vSAN is compatible with the existing equipment and, if necessary, purchase the missing nodes. In all these cases, we need to look below and click on the link “ Build Your Own Based on Certified Components ”.
After we have verified that the available hardware is completely (or not quite, as in my case) compatible with vSAN, it is necessary to download vSphere software. For testing purposes, you can register on the VMware website and download the ESXi and vCenter distributions of the required version and some other components for free if you need them.
In early November 2016, at the time of preparation for the deployment, a version of VMware vSphere and Virtual SAN - 6.2 (6.0 update2) was available. At the end of November, version 6.5 appeared, but I didn’t rush to carry out tests on a too fresh and unpatched solution, I stopped at 6.2.
VMware makes it possible to use a fully functional version of vSphere (Enterprise Plus) for 60 days, without the need to separately download and install vSAN, it is included in the hypervisor distribution (ESXi).
Downloading and installing ESXi task is quite simple, any schoolgirl (and even more so admin-enik) can cope with it. When deploying the vCenter infrastructure management server, I didn’t bother with Windows; for simplicity and reliability, I settled on the vCenter Server Appliance (vCSA) distribution kit — a ready-made free VMware eplaens for Linux. Just install and admin via web GUI.
My test hosts are equipped with 60GB bootable SSDs. This is more than enough to install ESXi. The vCenter Server Appliance was also deployed on 1 of these SSDs in “thin disk” mode - there was enough space.
When working with vCSA it is useful to know the following nuances.
During vCSA deployment, you need to specify:
• root password - for managing the eplaens (vCSA);
• vCenter SSO administrator name (for example, administrator) and its password, domain name (for example, vsphere.local) - for centralized management of the virtual infrastructure (VI).
When administering, please note that:
1. For the centralized management of the VIs, it is necessary to log in to https: / IP-address (domain name) _ (set during vCSA installation). The port does not need to be specified, it is standard. The account used is the vCenter SSO administrator, and the FQDN is mandatory, for example, administrator@vsphere.local.
2. To manage the eplaens itself (vCSA), it is necessary to log in to https: / IP-address (domain name): 5480 (we explicitly specify this port). The account used is root.
Access to the ESXi command line
To install patches and drivers, perform some accompanying and diagnostic manipulations, you need access to the ESXi command line.
Centralized management of virtual infrastructure updates, especially in production, is expedient and convenient to do through the vSphere Update Manager (vUM). For vSphere version 6.2 and previous, vUM needs to be deployed on a Windows machine. In version 6.5, the situation is much nicer - vUM is an optional vCenter Server Appliance service, you do not need to deploy a separate VM on Windows. For test purposes, especially if the number of hosts is small (for example, 4, as in my project), it is impractical to deploy a separate vUM-VM, it is easier to do with the command line.
For the old memory (vSphere 5.0) I decided to install VMware-vSphere-CLI for remote access to the command line of hosts. However, this turned out to be terribly inconvenient, since for each command it is necessary to add a huge piece of “bukav” for authorization on the target host, for example, “--server 172.16.21.76 - username root --thumbprint 2F: 4B: 65: EC: C9: FA : DF: AC: 20: 62: 3D: 5D: 4B: E4: 43: EC: 35: 74: AE: 86 ”, and then enter the root password.
In order to learn how to correctly run esxcli commands from my administrator PC on Windows, I killed half a day. Firstly, VMware-vSphere-CLI has crookedly risen on windows 10, for correct work it is necessary to run commands from the folder in which this package is installed or to conjure with environment variables. Secondly, it is necessary for each host to determine its “footprint” (--thumbprint 2F: 4B: 65: EC: C9: FA: DF: AC: 20: 62: 3D: 5D: 4B: E4: 43: EC: 35 : 74: AE: 86), without it the team will not work. Third, the root password must be entered separately each time, because if I copy the command along with the --password parameter and password, I get an error related to the input language (I saved the whole command and copied it from Notepad). Half a day was gone, since all these subtleties and errors and their elimination were far from obvious. If you suddenly want to get stuck with VMware-vSphere-CLI, this paragraph should make your life easier.
After defeating VMware-vSphere-CLI and learning how to cook it, I realized that it is simply inconvenient. It is much more convenient to allow SSH access on each host and use Putty. The commands are short, you do not need to enter the password every time, copying and paste into Putty is much more convenient.
To do this, you need to start the SSH and ESXi Shell services on each host. This can be done through DCUI (connect to the host directly) or vSphere Client (Configuration - Security Profile).
Patch installation
I have had the experience of deploying and maintaining vSphere 5.0 for several years. I never installed patches and there were no problems, I only installed updates, for example, so that VMs could be raised to Win 2012 R2 (update 3 was needed), plus just for reliability.
In this project, the patches were very helpful. Installing patches solved the following problems:
• Time of live migration of VM was reduced by an order Prior to installing patches on a completely unloaded vMotion VM infrastructure with Win7 on which no tasks were running, it took about a minute to complete. After patching - a few seconds.
• Fixed a problem with the performance degradation of hybrid vSAN 6.2. The problem is described in this article " vSAN 6.2 hybrid disk group performance degradation (2146267) ". It says that the performance of hybrid clusters vSAN degraded during the transition from versions 6.0 and 6.1 to version 6.2. This is caused by a slave low-level background process that snaps into unique storage blocks for the deduplication mechanism that appeared in version 6.2. It is only useful in an all-flash cluster when the “dedup” is turned on, but it mistakenly starts up and takes resources in hybrid versions. A problem is solved either by installing a patch or by disabling the mechanism by a special command.
From here I conclude that during the initial installation it is necessary to check the availability and install the patches. It will not be superfluous, it will not harm, but it can relieve from problems. Moreover, it is better to do this before installing additional drivers on ESXi, setting up the infrastructure, raising VMs and services. Why, I will explain later.
You need to search for patches using this or this link, and you need to select “ESXi (Embedded and Installable)” to search for ESXi patches and “VC” to search for vCenter patches.
After downloading the patches proceed to their installation. The patch on vCSA is conveniently installed via web-gui. It is necessary to mount a disk image with a patch to the vCSA-VM, for this it is better to put it on the local host datastor where this VM is spinning (I put it on the boot SSD). You can also forward the image from your admin PC over the network (the image is large, I thought it was long and unreliable, subjectively). Then you need to go to vCSA (https: / IP-address (domain name): 5480, under root), select the Update tab and update from the image (Chesk Updates - CDROM). Theoretically, at this step, it was possible to update from the Internet (Chesk Updates - URL), if there is a connection, I think the vCSA itself would be updated from the global web.
Upgrading ESXi hosts is a bit more complicated. The downloaded patches are zip archives with VIB files, you need to place the target host on the local datastore (I put it on the boot SSD, for this I created the Update folder on it in the root). To download patches to the local host datastor, install the old-kind “thick” vSphere-client, cling to the hosts with it, then in the Summary tab, look for the Storage section and right-click on the target datastore — Browse Datastore, then load the desired file or folder.
After that, to install each patch (I had 4 of them), you need to run the following command:
esxcli software vib update -d /vmfs/volumes/local_datastore_name/update_folder_name/ESXi600-201605001.zip Where:
-d - argument for installing packages from a zip-archive (if you unzip and install separate packages - files * .VIB, then you need an argument –v);
/vmfs/volumes/local_datastore_name/update_folder_name/ESXi600-201605001.zip - full path to the patch.
You do not need to extract anything from the archive, the esxcli software vib update command with the –d parameter will do everything itself.
After installing each patch, the console (in my case, Putty) will display the result of the installation: such packages are installed, removed and skipped, a reboot is required. Rebooting after installing each patch is optional, you can install everything, then reboot.
Keep in mind that there is a similar esxcli software vib install command, unlike update, it removes manually installed drivers. Therefore, it is better to use update, this option allows you to save non-standard drivers, avoiding their reinstallation (after install, all IB drivers flew off and the network fell off).
Driver installation
The nontrivial task was to make vSphere 6.2 make friends with the InfiniBand network in IPoIB mode, since this is the only option available on my fast network, a regular 1GbE network for my project and for vSAN in most cases is not enough.
Initially, my test hosts were equipped with HCA Mellanox ConnectX-4 adapters with a bandwidth of 100 Gbit / s and connected to the appropriate IB switch Mallanox SB7790. Mellanox ConnectX-4 is a hybrid adapter that can operate in both IB mode and Ethernet mode. The problem is that the existing switch can work only in IB mode, it is not able to use Ethernet. While vSphere can only Ethernet and does not support InfiniBand. A compromise option - to raise IPoIB - also did not work, because Mellanox does not make IB drivers for vSphere for ConnectX-4, only Ethernet. In order to make sure of this, I had to try installing various versions of Mellanox drivers for ESXi (MLNX-OFED-ESX), not one of them allowed the hosts to see the desired network.
The problem was solved thanks to the availability of Mellanox ConnectX-2 and ConnectX-3 2-port cards in the store (2 pieces of each model, totaling 1 piece per host), older and slower versions - 40 Gbit / s and 56 Gbit / s, respectively, for my there are more than enough experiments for vSAN. Most importantly, for these adapters there is the correct firewood under vSphere 6.2, namely - MLNX-OFED-ESX-2.4.0.0-10EM-600.0.0.2494585. Their installation on the hosts allowed them to see the InfiniBand network and communicate with each other via IPoIB at a theoretical speed of up to 40 Gbit / s.
The correct firewood in the form of a zip-archive, with the name specified above, is downloaded from the official site of Mellanox. Before installing them, you need to remove the InfiniBand drivers embedded in the hypervisor distribution from each ESXi host, the drivers in which names contain the characters "ib" and "mlx". To display the list of drivers (VIB packages) installed on the host, you need to connect to it via SSH and run the command:
esxcli software vib list At the output we get a large list, in order to discard too much and get a list with just the right packages, we’ll do the optimization:
esxcli software vib list | grep ib - display a list of packages with the characters "ib" in the name,
esxcli software vib list | grep mlx - displays a list of packages with the characters “mlx” in the name.
At the output we get the following:
[root@esxi-5:~] esxcli software vib list | grep mlx net-mlx-compat 2.4.0.0-1OEM.600.0.0.2494585 MEL PartnerSupported 2016-11-21 net-mlx4-core 2.4.0.0-1OEM.600.0.0.2494585 MEL PartnerSupported 2016-12-07 net-mlx4-en 2.4.0.0-1OEM.600.0.0.2494585 MEL PartnerSupported 2016-12-07 net-mlx4-ib 2.4.0.0-1OEM.600.0.0.2494585 MEL PartnerSupported 2016-11-21 [root@esxi-5:~] esxcli software vib list | grep ib net-ib-core 2.4.0.0-1OEM.600.0.0.2494585 MEL PartnerSupported 2016-11-21 net-ib-ipoib 2.4.0.0-1OEM.600.0.0.2494585 MEL PartnerSupported 2016-11-21 net-ib-mad 2.4.0.0-1OEM.600.0.0.2494585 MEL PartnerSupported 2016-11-21 net-ib-sa 2.4.0.0-1OEM.600.0.0.2494585 MEL PartnerSupported 2016-11-21 net-mlx4-ib 2.4.0.0-1OEM.600.0.0.2494585 MEL PartnerSupported 2016-11-21 This conclusion after removing the wrong and installing the correct firewood, it was originally different. After receiving the list of package names (extra firewood) for deletion, we form a command that allows you to delete them at once (in it, with the –n parameter, you need to list all the necessary package names as a separator), it looked like this for me:
esxcli software vib remove -n net-ib-core –n net-ib-ipoib –n net-ib-mad –n net-ib-sa –n net-mlx-compat -n net-mlx4-core –n net-mlx4-en –n net-mlx4-ib -n scsi-ib-srp -n net-ib-cm -f where: –f is the forcing delete parameter, otherwise you will have to look for the correct sequence to remove the packets one by one.
Then install the package with the correct firewood and overload the host. The process is identical to installing patches - put the zip package with drivers on the local datastor of the target host and execute the command:
esxcli software vib install –d /vmfs/volumes/local_datastore_name/update_folder_name/driver _pack_name.zip This procedure must be performed on each test infrastructure host.
Clustering hosts
After ESXi is installed on the hosts, patches and network drivers are installed on them, the VM with vCSA (and patched) is deployed, it's time to start connecting the hosts to the vCenter Server. To do this, you need to connect to the vCenter via the web console under the account of the vCenter SSO admin, create a Datacenter object, create a Cluster object in it, add ESXi hosts (4 pcs in my case) and enable the necessary services on it - HA (not necessarily, but it does not hurt, because the basic service) and vSAN (for the sake of it, everything was done).

I recommend on each host and in the Center to enable time synchronization with the NTP server, it will be more convenient to monitor performance and respond to events. It did not work to take time from our MS-AD domain controller; they are incompatible (I did not begin to edit the controller's registry in order to make friends with vSphere). Everything worked perfectly after setting up synchronization with external NTP servers from the Internet.
VSAN network setup
Network configuration at the vSphere level on my stand included the creation of 2x distributed switches (dvSwitch):
• ETH_DSwitch connected to 2 1GbE ports on each host. A VM network and a control network are connected to it.
• IPoIB_DSwitch, connected to 2 ports 40 (56) GbIPoIB on each host. A vMotion network (subnet 10.10.10.0, a group of ports - vMotion_dpg) and a network vSAN (subnet 10.10.20.0, a group of ports - VSAN_dpg) are connected to it, divided at the level of subnets and distributed groups of ports (dPG). On each host, for the specified dPGs, it is picked up via the vmkernel interface - vmk1 and vmk2, for which an IP address is set from the corresponding subnet and only the necessary traffic type is allowed - vMotion and Provisioning Trafic (vMotion_dpg), Virtual SAN Trafic (VSAN_dpg).

InfiniBand requires an external vSphere service called Subnet Manager on the network; in my test cluster, I used the OpenSM server, which was installed on a separate physical Linux machine.
Best practices for networking for vSAN 6.2 are described in the following document: VMware Virtual SAN 6.2 Network Design Guide. Due to the fact that my vSAN network was built using unmanaged IB switches, I couldn’t do any cool things like port aggregation, NIOC, I couldn’t set up the multicast correctly, just the equipment does not support. Therefore, all dvSwitch and dPG settings were left by default, both uplinks in dPG are made active.
The only tuning that could be done is to configure jumbo frames. The maximum possible MTU size that Mellanox adapters use in IPoIB mode for vSphere is 4092. In order to achieve this maximum, you need to choose the MTU size = 4092 in the dvSwitch (IPoIB_DSwitch) and vmkernel settings (all vmk under vMotion and vSAN on each host) . By default, the MTU size in OpenSM is 2044. Therefore, if you don’t increase the OpenSM MTU configuration to 4092, frames of this size will not be able to go around the network, moreover, ordinary pings will go between hosts, but productive interaction of hosts over the network will not be possible. On the detection of this nuance, I killed a lot of time, so I also consider it very important and useful.
VMware Virtual SAN 6.2 Network Design Guide, as I updated later, says that the inclusion of jumbo frames will not give much optimization for vSAN. If the network supports them, it is worth including, if not, that's okay, you can leave it at 1500.
To check if jumbo frames work correctly, you need to ping or vmkping with a large MTU size (4092 in my case) between the cluster hosts (separately for the vMotion and vSAN subnets), for this we connect to each host via SSH and try to ping the neighbors using the following command:
vmkping ( ping) -d -s MTU_size__28_ IP- where: –d denies packet segmentation, -s MTU_size_minus_28_bytes - the size of the MTU in bytes from which you want to subtract 28.
In my case for MTU = 4092, the command looks like this:
ping -d -s 4064 10.10.20.79 Network Performance Testing
To test the performance of vSAN, you need to be sure that the network is not a bottleneck and provides good bandwidth. Theoretically, vSphere shows that my IB interfaces provide 40 Gbit / s for Mellanox ConnectX-2 cards and 56 Gbit / s for ConnectX-3.
Considering that 10 Gbit / s adapters are recommended for vSAN, the performance of my cards is more than enough. It remains to verify their actual performance in practice. To do this, use the utility iperf .
There are 2 ways. The first is bad and uncomfortable, but the only one that comes to mind.
We need to deploy one or several pairs of VMs on the hosts, between which we will measure network performance. The Vmnic of these VMs must be connected to the dPG, which looks into the tested physical ports. To do this, on dvSwitch “IPoIB_DSwitch” I created a dPG called “dgp_40Gbps_VMnet” and connected it to the same physical ports (IPoIB) through which vSAN works.
On this pair of VMs, launch iperf and see the results. The problem is that the maximum bandwidth of a virtual network card that can be sent to the vSphere VM (vmxnet3) is 10 Gbit / s. Therefore, in my test, I had to create 3 pairs of VMs under win7 and run the test on them in parallel. The cumulative maximum that I was able to squeeze ~ 16 Gbit / s per IPoIB port. Already not bad.
It was possible to try to stop at one pair of server VMs, give them several vmxnet3 (say 4pcs) and do a timing between them at the guest OS level. I am not sure that this would allow combining their throughput and squeezing the theoretical 10x4 = 40Gbit / s (for 4x vmxnet3) with one VM. I didn’t check for successful implementations not googling, but I found a simpler and more elegant way.
The fact is that starting with version 6.2 vSphere assumes the availability of the service vSAN Health Service, for which the package with the iperf utility, which can be run from the command line, is added to the ESXi distribution kit, which allows measuring the performance of the vSphere network directly at the hypervisor level.
To do this, you need to connect to a pair of ESXi hosts, between which we will measure the network speed, using SSH. On each host, you must disable the ESXi firewall, for example, using the command:
esxcli network firewall set --enabled false The iperf package on ESXi is located at: / usr / lib / vmware / vsan / bin / in the iperf and iperf.copy files (just a copy).
To perform network load testing, it is necessary to execute the command on the host that is selected by the traffic premnik:
/usr/lib/vmware/vsan/bin/iperf.copy -s -B 10.10.20.79 -w 1M where: –s - means that the iperf service starts in receiver (server) mode,
-B 10.10.20.79 - means that the traffic will be received by the host interface with this IP address, in my case it is the vmkernel address for vSAN on the selected host,
-w 1M - TCP window size is set to 1MB.
On the sending host (traffic generator), we execute the command:
/usr/lib/vmware/vsan/bin/iperf -c 10.10.10.79 -t 60 -i 3 -w 1M –P 4 where: -c 10.10.10.79 - sets the address of the receiver,
-t 60 - sets the test duration in seconds,
-i 3 - update interval of the current result in seconds,
-w 1M - TCP window size is set to 1MB.
–P 4 is the number of parallel threads.
The maximum test result can be achieved by experimenting with the choice of the optimal values of the parameters –w and –P, in my case it is 1M and 4. I managed to achieve a throughput of ~ 22-27 Gbit / s per IPoIB port. Of course, this is far from 40 Gbit / s, as the vSphere web client writes for IB interfaces. Nevertheless, the practical speed limit of the network is now known and it is very solid (2.5 times higher than recommended for vSAN).
Enable vSAN cluster
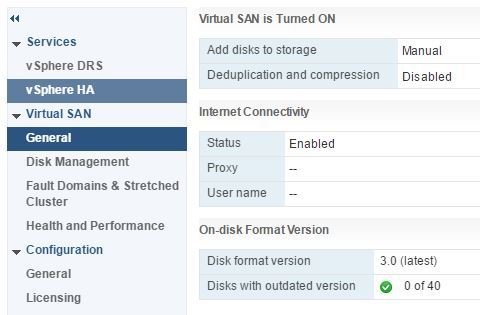
We go into the management of our cluster, selects "Enable vSAN", the mode of adding disks manually, without dedup and compression (I have a hybrid cluster).
The inclusion of vSAN took place in the “further further” dialogue mode (again, everything is simple, as for a schoolgirl), vSphere itself correctly determined which media go under flash-cache and which capacity, optimally combined them into disk groups.


Everything turned out beautifully, but not immediately. At first there were dances with a tambourine. The fact is that hypervisors on all hosts saw all 10 local media, they could be formatted in VMFS.

However, the dialogue on the creation of a vSAN-cluster saw only a part of the media from my hosts: on one all 10, on the second none, on 2x only a part, so it wasn’t possible to raise vSAN, mystic.
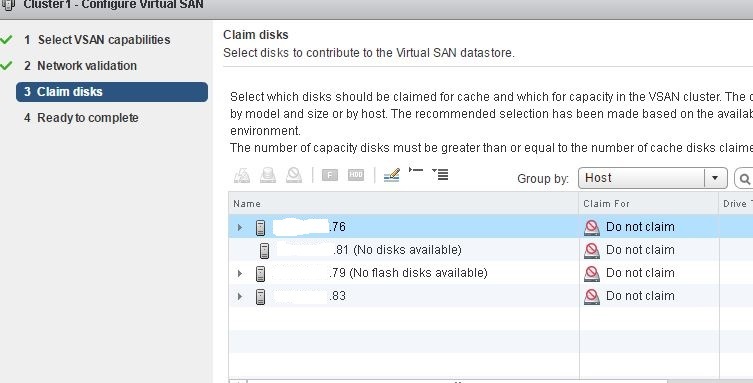
The guys from the bourgeois VMUG branch on vSAN prompted to check for the presence of left partitions on the cluster media, and they naturally were there. The problem was solved after the removal of these sections. To do this, you can use a third-party boot utility for working with partitions, and you can dwell on the command line capabilities of ESXi:
esxcli storage core device list - the command lists the host storage devices, but this list has a lot of redundant information, so you need to optimize it:
esxcli storage core device list | grep devfs | cut -f2 -d ":" - in this case, only sinks with the device name will be displayed, on one of my hosts the result is as follows:
[root@esxi-5:~] esxcli storage core device list | grep Devfs | cut -f2 -d":" /vmfs/devices/disks/naa.5000cca2450f5854 /vmfs/devices/disks/naa.5000cca2450ee00c /vmfs/devices/disks/naa.5000cca2450efa88 /vmfs/devices/disks/t10.NVMe____HUSPR3216AHP301_________________________003F1E6000CA0C00 /vmfs/devices/disks/naa.5000cca2450f56e8 /vmfs/devices/genscsi/naa.50015b2140027a7d /vmfs/devices/disks/t10.ATA_____SPCC_Solid_State_Disk___________________F4C307651C8E00015407 /vmfs/devices/disks/naa.5000cca2450f5604 /vmfs/devices/disks/naa.5000cca2450f2d2c /vmfs/devices/disks/naa.5000cca2450f6d9c /vmfs/devices/disks/naa.5000cca2450ec6d8 /vmfs/devices/disks/t10.NVMe____HUSPR3216AHP301_________________________802C1E6000CA0C00 Then we enter a command that displays the list of partitions on the drive, this needs to be done for each device:
partedUtil getptbl device_name , where: device_name is the name of the device and the list obtained above, for example:
[root@esxi-5:~] partedUtil getptbl /vmfs/devices/disks/naa.5000cca2450f5854 gpt 243201 255 63 3907029168 1 2048 6143 381CFCCC728811E092EE000C2911D0B2 vsan 0 2 6144 3907029134 77719A0CA4A011E3A47E000C29745A24 virsto 0 Here we see that there are 2 sections on this device: lines numbered 1 and 2. This is an example of outputting partitions from the HDD in the active vSAN cluster, at the time of the dances with a tambourine, there were various Windows and Linux partitions on the host media, because the nodes were used for others experiments. Actually, the media with partitions were not visible, only empty media were displayed (without partitions).
After we have learned the numbers of the partitions on the media, we proceed to remove them with the command:
partedUtil delete device_name part_num , where: part_num is the partition number issued by the previous command.
In this example, on the carrier there are 2 sections, respectively, we run the command 2 times:
partedUtil delete /vmfs/devices/disks/naa.5000cca2450f5854 1 partedUtil delete /vmfs/devices/disks/naa.5000cca2450f5854 2 And so for all carriers where there are sections. After that, the media will be visible and you can add them to the vSAN cluster.
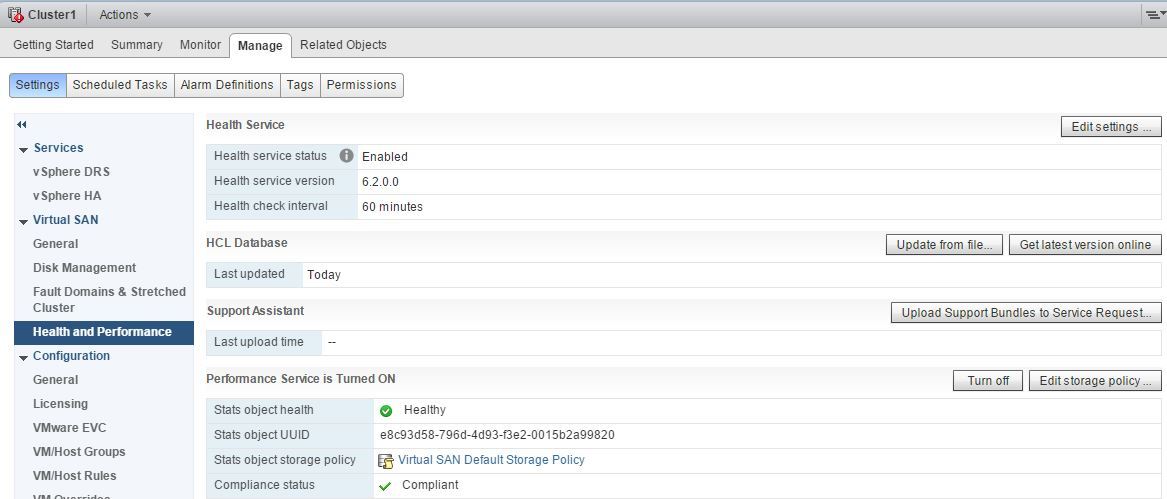
To monitor vSAN health status and monitor its performance, you should activate Health Service and Performance Service in the Manage - vSAN - Health and Performance cluster tab.
That's all, our vSAN cluster is ready for testing, VM deployment and introduction to production. Thank you for attention!
Source: https://habr.com/ru/post/318258/
All Articles