Secrets of a successful update: interface, backend, application structure
Long-awaited New Year holidays are approaching - travel time. In this regard, today we would like to tell about the work on our joint project with the company Travel And Play - Webcam World View . The application allows you to connect to the stream from video cameras installed in different parts of the world, and watch life boiling there in real time.
Great, right? It also seemed so to us, until this autumn the task was set for a new, improved version of the product. What exactly to improve was left to our discretion, so we immediately decided to leave the functionality alone: it was quite sufficient and not overloaded. But the UX component and technical performance have undergone significant revision. Read more on how we made candy from the initially good application.

')
To begin with, we analyzed the current state of affairs. As it turned out, the application had serious flaws:
“Perhaps the most inconvenience was that all the content was contained in the application itself. Such a storage method excluded the possibility of editing and updating data without updating the product itself on the market. In addition, it significantly increased the size of the application.
- The application was extremely inconvenient to use. For clarity: to view any of the streams, you had to go through 4 screens and press the button five times on the Apple TV remote.
“Such a virtual journey was available only to Apple TV users, and this is not the largest part of society.
Having understood these problems, we began to look for ways to solve them and eventually set ourselves several goals:
1) Change the interface, make it more intuitive;
2) Refine the server part so that it not only stores all of our content, but also provides statistics that would allow us to at least allocate popular and top cameras;
3) And of course, adapt the application for the iPhone and iPad, that is, to make virtual travel accessible to a much larger number of people.
Goals set - it is time to act.
Who knows best how to make a convenient and beautiful application for users of Apple devices? Of course, Apple. The solution we were looking for lay on the surface, or rather on the main screen of any Apple TV - this is about their proprietary Films application. We wanted to bring everything as close as possible to this sample, because our product has similar content, and the manufacturer's UX-solution is familiar to everyone.
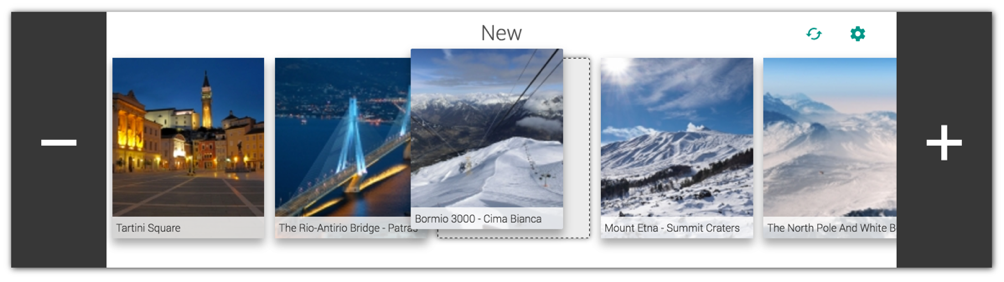
What does the user see first when he enters the Movies application? Screen with clips and top movies. In Webcam World View, we wanted to do about the same thing — all the best cameras on the main screen. Therefore, the next step was to create an analogue of the Apple carousel on the main screen.

So, we needed to get an automatically moving carousel, the elements of which would have a parallax effect. The basis was taken from the UICollectionView class.
The first step was to create a class for the cell of our future carousel:
At the moment when the focus moves to the carousel element, move the cell down to the height of the indent that we want to get in the end (given the value of ledgeHeight):
Thus, the carousel element has the effect of parallax, and when moving to focus takes the same style as the Apple carousel elements.
Then followed another task - the implementation of the movement of the carousel. For a start, we decided on what we want.
First, we decided to make a carousel looped (moving forward from the last element to the first element, and vice versa, moving backward from the first element to the last element).
Secondly, it was necessary to realize the automatic movement of the carousel after a specified period of time in case its elements would be out of focus.
To ensure the possibility of looping the carousel, we added a “buffer” of two cells that corresponded to the first and last element.
The transition through the “internal” elements was standard, as between the UICollectionView elements. The transition from the “external” elements (the first and the last) occurred with a content shift:
A simple timer was applied to the automatic movement of the carousel and, again, the content was shifted from the beginning by the required amount:
So we got a nice carousel in the style of Apple with the possibility of automatic movement.
Then we proceeded to fill the main space of the main screen.
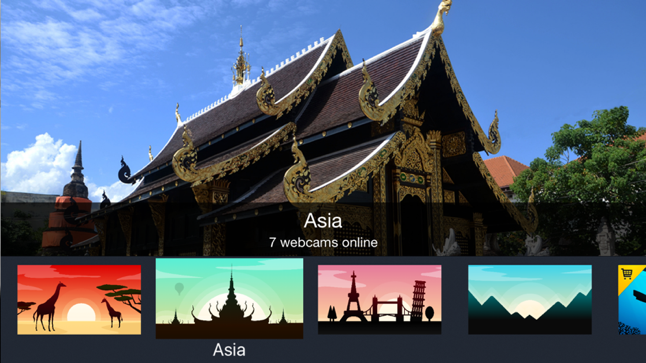
It was decided to split the content into collections, they are also “lines”, like those that we see in the “Films” application. Accordingly, the question arose: how to implement them? The problem was that we needed the ability to go through the selections (scrolling in the vertical direction) and the cameras in the selected selection (scrolling in the horizontal direction)
To solve this problem, we use a TableView, in each cell of which we have a custom CollectionView. The main controller acts as a delegate and data source:

In order to be able to distinguish between collections of different cells of a table, let's use the tag property — write the number of the table cell in which the collection is located
To set the delegate, data source, and the current collection number in the table cell, add the setCollectionViewDataSourceDelegate function:
Now it remains to call it in the table's willDisplay method:
Adding the standard delegate methods UITableView and UICollectionView, we got what we needed - the content was broken down by collections. We used the same trick with the collections in the table cells when working on the category view screen.
The implementation of the elements of other screens was standard and did not cause any problems.
So, the interface has been successfully implemented. Now it's time to talk about working on the server part of our application. Here the idea was as follows: make the application as customizable as possible using the server.
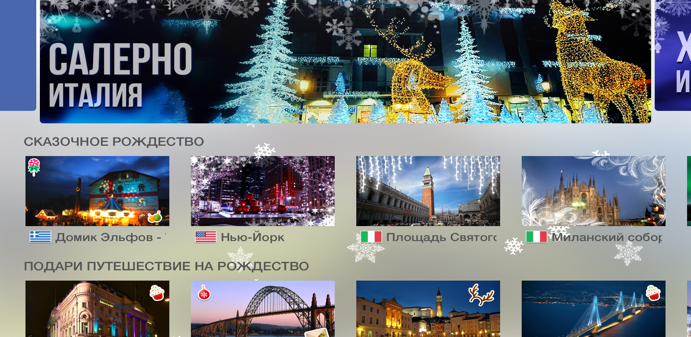
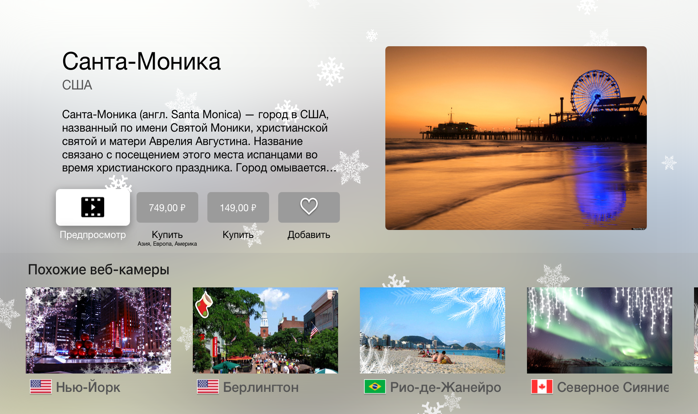
All information about each camera was collected on the server. For easy moderation of content, we wrote Admin Panel. Using this system, the moderator can customize and change the information about the cameras at any time, make the cameras paid or free, change their places and turn them off if they do not work. Any marketing ploy can be made without the participation of the developer.
Another feature of our Admin Panel is the ability to customize the appearance of the interface from the server. The application has two types of data display:
1. Carousel with the most popular cameras.
2. Rulers with cameras - groups of cameras that are lined up horizontally and combined with one idea.
When adding several cameras from the server, the moderator can combine them into lines manually or automatically, according to certain tags that are added for each camera.
If there is a need to change the displayed content or the position of the rulers, we just need to drag this or that element to the right place.
To create this block was used plugin jScrollPanel. jQuery + CSS - and no magic.
In addition, in the rulers themselves, any camera can be moved horizontally, which allows you to set the order based on the data that the moderator receives from the application (number of views, transitions on screens, etc.). All changes made at the same time will be displayed in the application.
Admin Panel allows you to identify popular cameras based on the collected statistics, automatically creates, updates them and moves them within the respective lines.
However, not all streams are always available: the servers stop working, technical work is done, sometimes the cameras are turned off for a certain time, and sometimes they stop working forever. In order not to show the user non-working streams and at the same time every day not to check all cameras for operability manually, we taught the system once a day to go around all streams in automatic mode. If the camera is not available, its work in the application is suspended, and at the same second information about this is sent to the moderator.
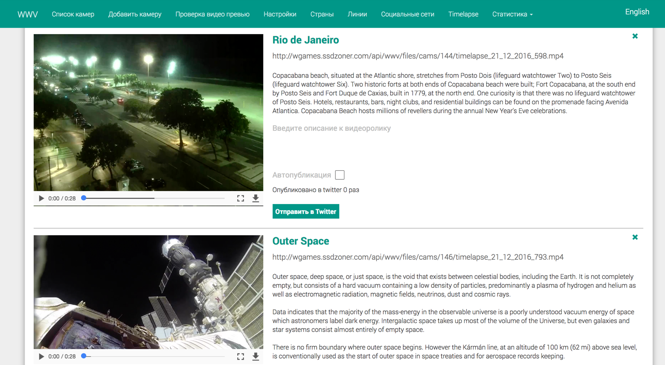
Finally, I would like to share one more solution found during the work on the latest update. Every self-respecting application has its own page on social networks . But it’s boring to put only pictures there, and the specificity of our application hints that the audience should be attracted by video content. The preview video was not suitable for several reasons. So the idea was born to make an action video for each of the streams - Timelapse.
Here is what our final recipe looks like, creating very nice things:
- We take a picture from the camera and within 24 hours hourly we record five seconds of video.
- Then we speed up the playback twice, glue all the recordings into one and get an interesting action-cutting - so, for example, in our timelaps video you can watch a charming sunset or even a whole day from the life of a tiger.
Summarize. We managed to create a system with which it is convenient to work even for a moderator who does not understand anything in programming. Now members of our team can lead a project without going into the details of development and not suffering from the need to update the application on the market each time.
As a result, we received a solid finished product for Apple TV, which solved all the tasks. The main achievement for our team was the successful implementation of the server-side and administration capabilities, the bonus was the creation of the most user-friendly interface according to the canons of UI Apple TV.
From this:

We did it:
Of course, not everything works without failures and not all plans for the server are currently implemented. The code in principle can not be perfect, so we try not to stand still, constantly working on improvements. Now we have in our plans implementation on the server of setting up not only content, but also the full visual component. How many cameras will be displayed in the line on the screen, will it be a camera or Timelapse, will there be a signature for each of the cameras or only for some? All questions to the server.
We are also thinking of improving the appearance of the Admin Panel. It cannot be said that now it is inconvenient to use or something hurts the eye, but you always want to strive for possible perfection.
We will be glad to read your reviews. That's all, thank you for your attention!
Great, right? It also seemed so to us, until this autumn the task was set for a new, improved version of the product. What exactly to improve was left to our discretion, so we immediately decided to leave the functionality alone: it was quite sufficient and not overloaded. But the UX component and technical performance have undergone significant revision. Read more on how we made candy from the initially good application.
')
To begin with, we analyzed the current state of affairs. As it turned out, the application had serious flaws:
“Perhaps the most inconvenience was that all the content was contained in the application itself. Such a storage method excluded the possibility of editing and updating data without updating the product itself on the market. In addition, it significantly increased the size of the application.
- The application was extremely inconvenient to use. For clarity: to view any of the streams, you had to go through 4 screens and press the button five times on the Apple TV remote.
“Such a virtual journey was available only to Apple TV users, and this is not the largest part of society.
Having understood these problems, we began to look for ways to solve them and eventually set ourselves several goals:
1) Change the interface, make it more intuitive;
2) Refine the server part so that it not only stores all of our content, but also provides statistics that would allow us to at least allocate popular and top cameras;
3) And of course, adapt the application for the iPhone and iPad, that is, to make virtual travel accessible to a much larger number of people.
Goals set - it is time to act.
Creating a user-friendly interface
Who knows best how to make a convenient and beautiful application for users of Apple devices? Of course, Apple. The solution we were looking for lay on the surface, or rather on the main screen of any Apple TV - this is about their proprietary Films application. We wanted to bring everything as close as possible to this sample, because our product has similar content, and the manufacturer's UX-solution is familiar to everyone.
What does the user see first when he enters the Movies application? Screen with clips and top movies. In Webcam World View, we wanted to do about the same thing — all the best cameras on the main screen. Therefore, the next step was to create an analogue of the Apple carousel on the main screen.
So, we needed to get an automatically moving carousel, the elements of which would have a parallax effect. The basis was taken from the UICollectionView class.
The first step was to create a class for the cell of our future carousel:
class TopCollectionViewCell: UICollectionViewCell { // — @IBOutlet weak var backImageView: UIImageView! override func awakeFromNib() { super.awakeFromNib() backImageView.contentMode = .scaleAspectFill backImageView.clipsToBounds = true backImageView.layer.cornerRadius = CGFloat(10.0) } override func prepareForReuse() { super.prepareForReuse() } At the moment when the focus moves to the carousel element, move the cell down to the height of the indent that we want to get in the end (given the value of ledgeHeight):
override func didUpdateFocus(in context: UIFocusUpdateContext, with coordinator: UIFocusAnimationCoordinator) { if (self.isFocused) { // , UIView.animate(withDuration: 0.2, delay: 0.0, options: .curveEaseOut, animations: { self.transform = CGAffineTransform(translationX: CGFloat(0.0), y: ledgeHeight) }, completion: nil) // self.backImageView.clipsToBounds = true self.backImageView.adjustsImageWhenAncestorFocused = true } else { // UIView.animate(withDuration: 0.2, delay: 0.0, options: .curveEaseOut, animations: { self.transform = CGAffineTransform(translationX: CGFloat(0.0), y: CGFloat(0.0)) }, completion: nil) self.backImageView.clipsToBounds = true self.backImageView.adjustsImageWhenAncestorFocused = false } } Thus, the carousel element has the effect of parallax, and when moving to focus takes the same style as the Apple carousel elements.
Then followed another task - the implementation of the movement of the carousel. For a start, we decided on what we want.
First, we decided to make a carousel looped (moving forward from the last element to the first element, and vice versa, moving backward from the first element to the last element).
Secondly, it was necessary to realize the automatic movement of the carousel after a specified period of time in case its elements would be out of focus.
To ensure the possibility of looping the carousel, we added a “buffer” of two cells that corresponded to the first and last element.
The transition through the “internal” elements was standard, as between the UICollectionView elements. The transition from the “external” elements (the first and the last) occurred with a content shift:
func jump(direction: Direction) { // direction — , let currentOffset = self.contentOffset.x var offset = CGFloat(count) * (collectionViewLayout as! Layout).totalItemWidth if case .backward = direction { offset *= -1 } self.setContentOffset(CGPoint(x: currentOffset + bffset, y: self.contentOffset.y), animated: false) } A simple timer was applied to the automatic movement of the carousel and, again, the content was shifted from the beginning by the required amount:
if let initialOffset = (self.collectionViewLayout as! Layout).offsetForItemAtIndex(index: item) { self.setContentOffset(CGPoint(x: initialOffset, y: self.contentOffset.y), animated: animated) } So we got a nice carousel in the style of Apple with the possibility of automatic movement.
Then we proceeded to fill the main space of the main screen.
It was decided to split the content into collections, they are also “lines”, like those that we see in the “Films” application. Accordingly, the question arose: how to implement them? The problem was that we needed the ability to go through the selections (scrolling in the vertical direction) and the cameras in the selected selection (scrolling in the horizontal direction)
To solve this problem, we use a TableView, in each cell of which we have a custom CollectionView. The main controller acts as a delegate and data source:
In order to be able to distinguish between collections of different cells of a table, let's use the tag property — write the number of the table cell in which the collection is located
To set the delegate, data source, and the current collection number in the table cell, add the setCollectionViewDataSourceDelegate function:
class LineTableViewCell: UITableViewCell { // @IBOutlet weak var lineNameLabel: UILabel! // @IBOutlet weak var lineCollectionView: UICollectionView! override func awakeFromNib() { super.awakeFromNib() ... } } extension LineTableViewCell { func setCollectionViewDataSourceDelegate <D: protocol<UICollectionViewDataSource, UICollectionViewDelegate>> (dataSourceDelegate: D, forRow row: Int) { lineCollectionView.delegate = dataSourceDelegate lineCollectionView.dataSource = dataSourceDelegate lineCollectionView.tag = row lineCollectionView.reloadData() } } Now it remains to call it in the table's willDisplay method:
func tableView(_ tableView: UITableView, willDisplay cell: UITableViewCell, forRowAt indexPath: IndexPath) { guard let tableViewCell = cell as? LineTableViewCell else { return } tableViewCell.setCollectionViewDataSourceDelegate(dataSourceDelegate: self, forRow: indexPath.row) } Adding the standard delegate methods UITableView and UICollectionView, we got what we needed - the content was broken down by collections. We used the same trick with the collections in the table cells when working on the category view screen.
The implementation of the elements of other screens was standard and did not cause any problems.
Server part
So, the interface has been successfully implemented. Now it's time to talk about working on the server part of our application. Here the idea was as follows: make the application as customizable as possible using the server.
All information about each camera was collected on the server. For easy moderation of content, we wrote Admin Panel. Using this system, the moderator can customize and change the information about the cameras at any time, make the cameras paid or free, change their places and turn them off if they do not work. Any marketing ploy can be made without the participation of the developer.
Another feature of our Admin Panel is the ability to customize the appearance of the interface from the server. The application has two types of data display:
1. Carousel with the most popular cameras.
2. Rulers with cameras - groups of cameras that are lined up horizontally and combined with one idea.
When adding several cameras from the server, the moderator can combine them into lines manually or automatically, according to certain tags that are added for each camera.
If there is a need to change the displayed content or the position of the rulers, we just need to drag this or that element to the right place.
To create this block was used plugin jScrollPanel. jQuery + CSS - and no magic.
In addition, in the rulers themselves, any camera can be moved horizontally, which allows you to set the order based on the data that the moderator receives from the application (number of views, transitions on screens, etc.). All changes made at the same time will be displayed in the application.
Admin Panel allows you to identify popular cameras based on the collected statistics, automatically creates, updates them and moves them within the respective lines.
However, not all streams are always available: the servers stop working, technical work is done, sometimes the cameras are turned off for a certain time, and sometimes they stop working forever. In order not to show the user non-working streams and at the same time every day not to check all cameras for operability manually, we taught the system once a day to go around all streams in automatic mode. If the camera is not available, its work in the application is suspended, and at the same second information about this is sent to the moderator.
Timelapse
Finally, I would like to share one more solution found during the work on the latest update. Every self-respecting application has its own page on social networks . But it’s boring to put only pictures there, and the specificity of our application hints that the audience should be attracted by video content. The preview video was not suitable for several reasons. So the idea was born to make an action video for each of the streams - Timelapse.
Here is what our final recipe looks like, creating very nice things:
- We take a picture from the camera and within 24 hours hourly we record five seconds of video.
- Then we speed up the playback twice, glue all the recordings into one and get an interesting action-cutting - so, for example, in our timelaps video you can watch a charming sunset or even a whole day from the life of a tiger.
Future plans
Summarize. We managed to create a system with which it is convenient to work even for a moderator who does not understand anything in programming. Now members of our team can lead a project without going into the details of development and not suffering from the need to update the application on the market each time.
As a result, we received a solid finished product for Apple TV, which solved all the tasks. The main achievement for our team was the successful implementation of the server-side and administration capabilities, the bonus was the creation of the most user-friendly interface according to the canons of UI Apple TV.
From this:
We did it:
Of course, not everything works without failures and not all plans for the server are currently implemented. The code in principle can not be perfect, so we try not to stand still, constantly working on improvements. Now we have in our plans implementation on the server of setting up not only content, but also the full visual component. How many cameras will be displayed in the line on the screen, will it be a camera or Timelapse, will there be a signature for each of the cameras or only for some? All questions to the server.
We are also thinking of improving the appearance of the Admin Panel. It cannot be said that now it is inconvenient to use or something hurts the eye, but you always want to strive for possible perfection.
We will be glad to read your reviews. That's all, thank you for your attention!
Source: https://habr.com/ru/post/318212/
All Articles