Intel Software Guard Extensions tutorial. Part 3, Design for Intel SGX
In the third part of a series of tutorials on Intel Software Guard Extensions (Intel SGX) extensions, we’ll talk about designing applications that use Intel SGX. We use the principles explored in the first part and apply them to the general concept of the example Tutorial Password Manager application, which was discussed in the second part . We will discuss the general structure of the application and the influence of Intel SGX on it; we will create a class model that will enable us to design and integrate an enclave.

For the time being, we will not write code for enclaves and enclave interfaces, but this part of the article provides sample code. A kernel version of the application that does not use Intel SGX, without a user interface, is available for download. It is accompanied by a small test program — a console application in C # —and a sample password store file.
Here is a general approach that we will use when designing the Tutorial Password Manager for Intel SGX:
')
The first step in designing an application using Intel SGX is identifying application secrets.
The secret is any information that others should not see and know. Only the user or the application for which this secret is intended should have access to the secret; access should not be granted to other users and applications regardless of their level of rights. Possible secrets include financial data, medical records, personal information, identification data, licensed media content, passwords, and encryption keys.
In Tutorial Password Manager, some items are immediately considered secrets, as shown in Table 1.
Table 1. A preliminary list of the secrets of the application.
These are obvious secrets, but we will expand this list: we will add all user account information to it, and not just user names. The revised sheet is shown in Table 2.
Table 2. The revised list of secrets of the application.
Even if passwords are hidden, account information (for example, service names, URLs) is valuable to intruders. Disclosing this data in the password manager will allow attackers to get more opportunities to hack the system. In particular, with this data, they will be able to carry out attacks directed directly at the services, possibly using social engineering techniques or password reset attacks to gain access to the owner’s account, since they know who to attack.
After identifying the secrets of the application, you should determine their sources and destinations.
In the current version of the Intel SGX, the code of the enclave is not encrypted. This means that any user who has access to the application files can disassemble and analyze them. Data that is open for viewing cannot be a secret by definition. This means that secrets cannot be statically compiled into an enclave code. The secrets of the application must come from outside the enclaves and be loaded into the enclaves when executed. In Intel SGX terminology, this is called providing secrets to the enclave.
When the source of the secret is in a component outside of the trusted computing base (TCB), it is important to reduce the vulnerability of the secret to untrusted code. (One of the main reasons for the importance of remote certification for Intel SGX is that it allows the service provider to establish a trust relationship with the Intel SGX application, and then generate an encryption key that can be used to transfer the encrypted secrets to the application, and can only decrypt them trusted enclave in the client's system.) Similar precautions are required to be observed when exporting a secret from the enclave. As a rule, application secrets should not be sent to untrusted code without prior encryption inside the enclave.
Unfortunately, in the Tutorial Password Manager we are forced to send secrets to the enclave and from the enclave, and at some point these secrets will be in plain text, without encryption. The end user will enter his credentials and password using the keyboard or touch screen and call them in the future if necessary. Account passwords should be displayed on the screen and even copied to the Windows * clipboard at the request of the user. Without this, an application that needs to be a password manager will simply not work as it should.
This means that we cannot completely eliminate vulnerable areas: we can only reduce them, and some strategy of protecting secrets will be required when they go outside the enclave in an unencrypted form.
Table 3. Secrets of the application, their sources and destinations. Possible security risks are marked with an asterisk (*).
Table 3 lists the sources and destinations of the Tutorial Password Manager secrets. Possible problems — areas in which secrets may be accessible to an untrusted code — are indicated with an asterisk (*).
After establishing the secrets should outline the boundary of the enclave. First of all, consider the flow of data secrets through the main components of the application. The boundary of the enclave should:
The data streams and the selected boundary of the Tutorial Password Manager enclave are shown in Figure. one.
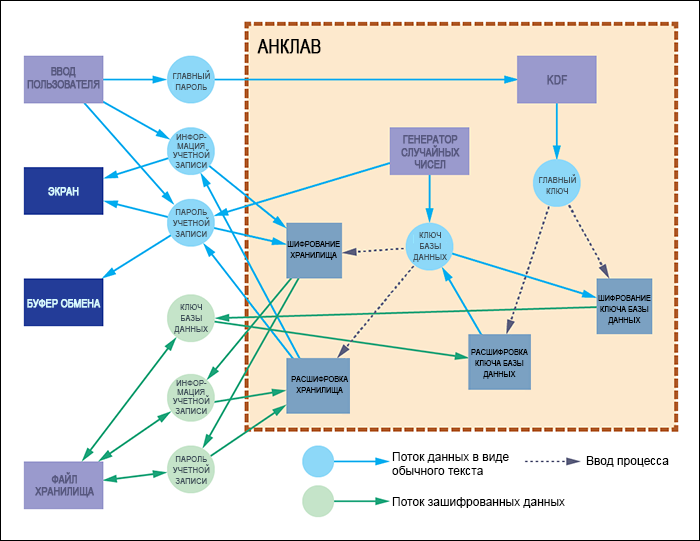
Figure 1. Secrets data streams in Tutorial Password Manager.
Application secrets are shown as circles, blue circles are secrets that exist as plain text (without encryption) at any stage of the application, and green circles are secrets encrypted by the application. The boundary of the enclave is outlined around the encryption and decryption procedures, the key generation function (KDF), and the random number generator. This solution ensures the achievement of several goals:
Unfortunately, unencrypted secrets will cross the boundary of the enclave, this can not be avoided. At a certain stage during the work of Tutorial Password Manager, the user will have to enter the password from the keyboard or copy the password to the Windows clipboard. These are insecure channels, they cannot be placed inside the enclave, and these operations are necessary for the operation of the application. Potentially, a serious problem may arise here that is complicated by the decision to create an application based on the base of the managed code.
There are no complete solutions for protecting unencrypted secrets outside the enclave. There are only strategies to reduce vulnerability. The best thing to do is to minimize the time during which information exists in a vulnerable form.
Here are general guidelines for handling sensitive data in untrusted code:
For the Tutorial Password Manager project, we will have to work with both our own and managed code. In our own code, we will allocate the wchar_t and char buffers, and with the help of SecureZeroMemory, we will clear them before releasing. In managed code, we use the .NET SecureString class.
When sending SecureString to unmanaged code, we will use helper functions from System :: Runtime :: InteropServices to send data.
When sending data in the opposite direction, from its own code to managed code, two methods can be used. If the SecureString object already exists, use the Clear and AppendChar methods to set the new value from the wchar_t string.
When creating a new SecureString object, we use a form constructor that creates a SecureString from the existing wchar_t string.
Our password manager also supports transferring passwords to the Windows clipboard. The clipboard is an insecure storage place that other users can access. Therefore, Microsoft does not recommend placing confidential data there. The purpose of the password manager is to enable users to create strong passwords that they do not need to remember. It will also be possible to create long passwords consisting of a random set of characters that would be difficult to enter manually. The clipboard provides much-needed convenience at a certain degree of risk.
To eliminate this risk, extra precautions must be taken. First of all, you need to clear the clipboard when the application is finished. This is done in the destructor of one of our own code objects.
We also set a clipboard timer. When copying the password to the clipboard, the timer is set to 15 seconds, after which the clipboard function is executed. If the timer is already running, that is, the new password is placed on the clipboard before the previous one expires, then the previous timer is canceled, and a new one is started instead.
So, when the secrets are determined and the boundaries of the enclave are outlined, it's time to think about the structure of the application, taking into account the enclave. There are strict restrictions on actions allowed inside the enclave. These constraints determine which components can be inside an enclave, which can be outside, and which may need to be divided into two parts when converting existing applications.
The most important limitation affecting the Tutorial Password Manager is that enclaves cannot perform I / O operations. The enclave can not receive text from the keyboard and display data on the screen, so all secrets - passwords and account data - must be entered into the enclave and output from it. In addition, the enclave cannot read the storage file and write data to it: the components that analyze the storage file must be separated from the components that perform physical I / O operations. This means that not only secrets will need to be transferred across the boundaries of the enclave: the file contents will also need to be transferred.

Figure 2. The class diagram in the Tutorial Password Manager.
In fig. Figure 2 shows a simplified diagram of classes for the application kernel (except for the user interface), including classes that play the role of source and destination for secrets. Note that the PasswordManagerCore class is considered the source and destination for secrets, in this scheme it interacts with the graphical user interface for the sake of simplicity. Table 4 provides a brief description of all classes and their purpose.
Table 4. Class Descriptions.
Please note that the processing of the storage file is divided into two parts: one part is devoted to input-output operations at the physical level, the other preserves the contents after reading and analyzing. It also required adding serialization and deserialization methods to the Vault object as intermediate sources and destinations for secrets. This is necessary because the VaultFile class does not have any information about the structure of the storage file, since this would require access to the encryption functions inside the enclave.
We also connected the PasswordManagerCoreNative class with the Vault class with a dotted line. As you may remember from the second part of the training course, enclaves can only be associated with functions C. These two C ++ classes cannot directly communicate with each other: they need an intermediary, which is indicated by the "Bridge Functions" block.
The diagram in fig. 2 refers to the Intel SGX code branch. The PasswordManagerCoreNative class cannot communicate directly with the Vault class, since the latter is located inside the enclave. But there is no such limitation in the code branch without using Intel SGX: PasswordManagerCoreNative can directly contain a member of the Vault class. This is the only simplification we will make in an application that does not use Intel SGX. To simplify the integration of the enclave, in the code branch without using the enclave, the processing of the enclave will be allocated to the Vault and VaultFile classes .
Another important difference between the code branches is that the encryption functions in the code using the Intel SGX are taken from the Intel SGX SDK. Code that does not use Intel SGX cannot contain these functions, so they come from the Microsoft Cryptography API: Next Generation * (CNG). This means that you need to maintain two different copies of the Crypto class: one for use in enclaves, the other for use in untrusted space. (The same will have to be done with other classes; this will be described in the fifth part.)
As mentioned above, this section provides sample code for download . The attached archive includes the source code of the main Tutorial Password Manager DLL before integration with the enclave. In other words, this is a version of the application kernel that does not use Intel SGX.
There is no user interface, but we added a simplest C # test application that performs a series of test operations. It performs two sets of tests: one creates a new storage file and performs various operations on it, the other operates with a reference storage file that is part of the source distribution. At the time of this writing, the test application requires that the test repository be located in the Documents folder, but if necessary, you can change the location in the TestSetup class.
This source code was developed in Microsoft Visual Studio * Professional 2013 as specified in the introduction to this series of tutorials . At this stage, the Intel SGX SDK is not required, but you will need a system that supports Intel's data protection technology with a secure key.
In the fourth part of the tutorial, we will develop an enclave and bridge functions. Follow the news!
For the time being, we will not write code for enclaves and enclave interfaces, but this part of the article provides sample code. A kernel version of the application that does not use Intel SGX, without a user interface, is available for download. It is accompanied by a small test program — a console application in C # —and a sample password store file.
Design for enclaves
Here is a general approach that we will use when designing the Tutorial Password Manager for Intel SGX:
')
- Identify the secrets of the application.
- Identify the suppliers and consumers of these secrets.
- Define the boundary of the enclave.
- Adapting application components for an enclave.
Identify the secrets of the application
The first step in designing an application using Intel SGX is identifying application secrets.
The secret is any information that others should not see and know. Only the user or the application for which this secret is intended should have access to the secret; access should not be granted to other users and applications regardless of their level of rights. Possible secrets include financial data, medical records, personal information, identification data, licensed media content, passwords, and encryption keys.
In Tutorial Password Manager, some items are immediately considered secrets, as shown in Table 1.
________________________________________

________________________________________


________________________________________
Table 1. A preliminary list of the secrets of the application.
These are obvious secrets, but we will expand this list: we will add all user account information to it, and not just user names. The revised sheet is shown in Table 2.
________________________________________

________________________________________


________________________________________
Table 2. The revised list of secrets of the application.
Even if passwords are hidden, account information (for example, service names, URLs) is valuable to intruders. Disclosing this data in the password manager will allow attackers to get more opportunities to hack the system. In particular, with this data, they will be able to carry out attacks directed directly at the services, possibly using social engineering techniques or password reset attacks to gain access to the owner’s account, since they know who to attack.
Identification of suppliers and consumers of application secrets
After identifying the secrets of the application, you should determine their sources and destinations.
In the current version of the Intel SGX, the code of the enclave is not encrypted. This means that any user who has access to the application files can disassemble and analyze them. Data that is open for viewing cannot be a secret by definition. This means that secrets cannot be statically compiled into an enclave code. The secrets of the application must come from outside the enclaves and be loaded into the enclaves when executed. In Intel SGX terminology, this is called providing secrets to the enclave.
When the source of the secret is in a component outside of the trusted computing base (TCB), it is important to reduce the vulnerability of the secret to untrusted code. (One of the main reasons for the importance of remote certification for Intel SGX is that it allows the service provider to establish a trust relationship with the Intel SGX application, and then generate an encryption key that can be used to transfer the encrypted secrets to the application, and can only decrypt them trusted enclave in the client's system.) Similar precautions are required to be observed when exporting a secret from the enclave. As a rule, application secrets should not be sent to untrusted code without prior encryption inside the enclave.
Unfortunately, in the Tutorial Password Manager we are forced to send secrets to the enclave and from the enclave, and at some point these secrets will be in plain text, without encryption. The end user will enter his credentials and password using the keyboard or touch screen and call them in the future if necessary. Account passwords should be displayed on the screen and even copied to the Windows * clipboard at the request of the user. Without this, an application that needs to be a password manager will simply not work as it should.
This means that we cannot completely eliminate vulnerable areas: we can only reduce them, and some strategy of protecting secrets will be required when they go outside the enclave in an unencrypted form.
| Secret | A source | Destination |
|---|---|---|
| User account passwords | User input * Password store file | User interface* Clipboard* Password store file |
| User Account Information | User input * Password store file | User interface* Password store file |
| Master password or user passphrase | User input | Key generation function |
| Password Store Master Key | Key generation function | Database key cipher |
| Password Store Encryption Key | Shaping randomly Password store file | Password vault cipher Password store file |
Table 3. Secrets of the application, their sources and destinations. Possible security risks are marked with an asterisk (*).
Table 3 lists the sources and destinations of the Tutorial Password Manager secrets. Possible problems — areas in which secrets may be accessible to an untrusted code — are indicated with an asterisk (*).
Enclosing boundary definition
After establishing the secrets should outline the boundary of the enclave. First of all, consider the flow of data secrets through the main components of the application. The boundary of the enclave should:
- Encompass a minimal set of essential components that work with the secrets of the application.
- Conclude as many secrets as you can.
- Minimize interaction with untrusted code and the number of dependencies on it.
The data streams and the selected boundary of the Tutorial Password Manager enclave are shown in Figure. one.
Figure 1. Secrets data streams in Tutorial Password Manager.
Application secrets are shown as circles, blue circles are secrets that exist as plain text (without encryption) at any stage of the application, and green circles are secrets encrypted by the application. The boundary of the enclave is outlined around the encryption and decryption procedures, the key generation function (KDF), and the random number generator. This solution ensures the achievement of several goals:
- The database / storage key used to encrypt certain application secrets (account information and passwords) is generated inside the enclave and is never transmitted outside in plain text.
- The master key is formed from the user's passphrase inside the enclave and is used to encrypt and decrypt the database / storage key. The master key is temporary and is never transmitted outside the enclave in any form.
- The database / storage key, account information and account passwords are encrypted inside the enclave using encryption keys hidden from an untrusted code (see # 1 and # 2).
Unfortunately, unencrypted secrets will cross the boundary of the enclave, this can not be avoided. At a certain stage during the work of Tutorial Password Manager, the user will have to enter the password from the keyboard or copy the password to the Windows clipboard. These are insecure channels, they cannot be placed inside the enclave, and these operations are necessary for the operation of the application. Potentially, a serious problem may arise here that is complicated by the decision to create an application based on the base of the managed code.
Secrets protection outside the enclave
There are no complete solutions for protecting unencrypted secrets outside the enclave. There are only strategies to reduce vulnerability. The best thing to do is to minimize the time during which information exists in a vulnerable form.
Here are general guidelines for handling sensitive data in untrusted code:
- When you finish working with data buffers, fill them with zeros. Use features such as SecureZeroMemory (Windows) and memzero_explicit (Linux) that are guaranteed not to be optimized by the compiler.
- Do not use C ++ Standard Template Library (STL) containers to store sensitive data. STL containers use their own memory management algorithms, making it difficult to verify that the memory allocated to an object is safely cleaned up after the object is deleted. (For some containers, you can solve this problem using custom dispensers.)
- When working with managed code, such as .NET, or with languages with automatic memory management, use storage types specifically designed to store secure data. The security of other types of storage depends on the work of the garbage collector and JIT compilation, such storage cannot be cleared and released upon request (or not at all).
- If you need to put data on the clipboard, do not forget to clear the buffer after a short time. In particular, do not allow data to remain in the buffer after the application terminates.
For the Tutorial Password Manager project, we will have to work with both our own and managed code. In our own code, we will allocate the wchar_t and char buffers, and with the help of SecureZeroMemory, we will clear them before releasing. In managed code, we use the .NET SecureString class.
When sending SecureString to unmanaged code, we will use helper functions from System :: Runtime :: InteropServices to send data.
using namespace System::Runtime::InteropServices; LPWSTR PasswordManagerCore::M_SecureString_to_LPWSTR(SecureString ^ss) { IntPtr wsp= IntPtr::Zero; if (!ss) return NULL; wsp = Marshal::SecureStringToGlobalAllocUnicode(ss); return (wchar_t *) wsp.ToPointer(); } When sending data in the opposite direction, from its own code to managed code, two methods can be used. If the SecureString object already exists, use the Clear and AppendChar methods to set the new value from the wchar_t string.
password->Clear(); for (int i = 0; i < wpass_len; ++i) password->AppendChar(wpass[i]); When creating a new SecureString object, we use a form constructor that creates a SecureString from the existing wchar_t string.
try { name = gcnew SecureString(wname, (int) wcslen(wname)); login = gcnew SecureString(wlogin, (int) wcslen(wlogin)); url = gcnew SecureString(wurl, (int) wcslen(wurl)); } catch (...) { rv = NL_STATUS_ALLOC; } Our password manager also supports transferring passwords to the Windows clipboard. The clipboard is an insecure storage place that other users can access. Therefore, Microsoft does not recommend placing confidential data there. The purpose of the password manager is to enable users to create strong passwords that they do not need to remember. It will also be possible to create long passwords consisting of a random set of characters that would be difficult to enter manually. The clipboard provides much-needed convenience at a certain degree of risk.
To eliminate this risk, extra precautions must be taken. First of all, you need to clear the clipboard when the application is finished. This is done in the destructor of one of our own code objects.
PasswordManagerCoreNative::~PasswordManagerCoreNative(void) { if (!OpenClipboard(NULL)) return; EmptyClipboard(); CloseClipboard(); } We also set a clipboard timer. When copying the password to the clipboard, the timer is set to 15 seconds, after which the clipboard function is executed. If the timer is already running, that is, the new password is placed on the clipboard before the previous one expires, then the previous timer is canceled, and a new one is started instead.
void PasswordManagerCoreNative::start_clipboard_timer() { // Use the default Timer Queue // Stop any existing timer if (timer != NULL) DeleteTimerQueueTimer(NULL, timer, NULL); // Start a new timer if (!CreateTimerQueueTimer(&timer, NULL, (WAITORTIMERCALLBACK)clear_clipboard_proc, NULL, CLIPBOARD_CLEAR_SECS * 1000, 0, 0)) return; } static void CALLBACK clear_clipboard_proc(PVOID param, BOOLEAN fired) { if (!OpenClipboard(NULL)) return; EmptyClipboard(); CloseClipboard(); } Adapting application components for an enclave
So, when the secrets are determined and the boundaries of the enclave are outlined, it's time to think about the structure of the application, taking into account the enclave. There are strict restrictions on actions allowed inside the enclave. These constraints determine which components can be inside an enclave, which can be outside, and which may need to be divided into two parts when converting existing applications.
The most important limitation affecting the Tutorial Password Manager is that enclaves cannot perform I / O operations. The enclave can not receive text from the keyboard and display data on the screen, so all secrets - passwords and account data - must be entered into the enclave and output from it. In addition, the enclave cannot read the storage file and write data to it: the components that analyze the storage file must be separated from the components that perform physical I / O operations. This means that not only secrets will need to be transferred across the boundaries of the enclave: the file contents will also need to be transferred.
Figure 2. The class diagram in the Tutorial Password Manager.
In fig. Figure 2 shows a simplified diagram of classes for the application kernel (except for the user interface), including classes that play the role of source and destination for secrets. Note that the PasswordManagerCore class is considered the source and destination for secrets, in this scheme it interacts with the graphical user interface for the sake of simplicity. Table 4 provides a brief description of all classes and their purpose.
| Class | Type of | Function |
|---|---|---|
| PasswordManagerCore | Driven by | Interaction with the graphical user interface C # and data collection for the level of its own code. |
| PasswordManagerCoreNative | Own code not trusted | Interacting with the PasswordManagerCore class. Also responsible for the conversion between Unicode and multibyte character data (this will be discussed in more detail in Part 4). |
| VaultFile | Driven by | Read storage file and write to it. |
| Storage | Own code, enclave | Storing password vault data in AccountRecord members. Deserialization of the file storage when reading, re-serialization for writing. |
| AccountRecord | Own code, enclave | Saving account information and passwords for all accounts in the user password store. |
| Crypto | Own code, enclave | Perform encryption functions. |
| Drng | Own code, enclave | The interface of the random number generator. |
Please note that the processing of the storage file is divided into two parts: one part is devoted to input-output operations at the physical level, the other preserves the contents after reading and analyzing. It also required adding serialization and deserialization methods to the Vault object as intermediate sources and destinations for secrets. This is necessary because the VaultFile class does not have any information about the structure of the storage file, since this would require access to the encryption functions inside the enclave.
We also connected the PasswordManagerCoreNative class with the Vault class with a dotted line. As you may remember from the second part of the training course, enclaves can only be associated with functions C. These two C ++ classes cannot directly communicate with each other: they need an intermediary, which is indicated by the "Bridge Functions" block.
Code branch without using Intel Software Guard Extensions
The diagram in fig. 2 refers to the Intel SGX code branch. The PasswordManagerCoreNative class cannot communicate directly with the Vault class, since the latter is located inside the enclave. But there is no such limitation in the code branch without using Intel SGX: PasswordManagerCoreNative can directly contain a member of the Vault class. This is the only simplification we will make in an application that does not use Intel SGX. To simplify the integration of the enclave, in the code branch without using the enclave, the processing of the enclave will be allocated to the Vault and VaultFile classes .
Another important difference between the code branches is that the encryption functions in the code using the Intel SGX are taken from the Intel SGX SDK. Code that does not use Intel SGX cannot contain these functions, so they come from the Microsoft Cryptography API: Next Generation * (CNG). This means that you need to maintain two different copies of the Crypto class: one for use in enclaves, the other for use in untrusted space. (The same will have to be done with other classes; this will be described in the fifth part.)
Code example
As mentioned above, this section provides sample code for download . The attached archive includes the source code of the main Tutorial Password Manager DLL before integration with the enclave. In other words, this is a version of the application kernel that does not use Intel SGX.
There is no user interface, but we added a simplest C # test application that performs a series of test operations. It performs two sets of tests: one creates a new storage file and performs various operations on it, the other operates with a reference storage file that is part of the source distribution. At the time of this writing, the test application requires that the test repository be located in the Documents folder, but if necessary, you can change the location in the TestSetup class.
This source code was developed in Microsoft Visual Studio * Professional 2013 as specified in the introduction to this series of tutorials . At this stage, the Intel SGX SDK is not required, but you will need a system that supports Intel's data protection technology with a secure key.
In further releases
In the fourth part of the tutorial, we will develop an enclave and bridge functions. Follow the news!
Source: https://habr.com/ru/post/318012/
All Articles