How not to write too much
 All programmers are faced with a boiler-plate code. Especially Android programmers. To write a template code is a thankless task and, I am sure that there is no programmer who would enjoy it. One day, I started looking for solutions. Despite the fact that the idea is quite simple: to generate the template code in a separate class and later to call this code in runtime, there were no ready solutions, and I set to work. The first version was implemented as one of the sub-modules of one of the working projects. More than two years I was pleased with this decision. It really worked and worked exactly the way I expected it. As time went on, the module was supplemented with new functions, refactored, optimized. In general, PoC could be called successful, and I decided to share the project with the community.
After 8 months of programming in the evenings, I'm on Habré with my first fast in my life. So, Jeta is a framework for generating source code built on javax.annotation.processing . Open-Source , Apache 2.0 , source code on GitHub, artifacts on jCenter, tutorials, samples, unit-tests, in general, everything is as it should be.
For clarity, let's consider a simple example. The library includes annotation @Log . It makes it easier to declare named loggers inside a class.
public class LogSample { @Log Logger logger; } So, for this class, Jeta will generate a LogSample_Metacode class with the applyLogger method:
public class LogSample_Metacode implements LogMetacode<LogSample> { @Override public void applyLogger(LogSample master, NamedLoggerProvider provider) { master.logger = (Logger) provider.getLogger(“LogSample”); } } From the example it can be seen that the @Log annotation generates code that assigns a logger with the name “LogSample” to the annotated field. It remains to implement NamedLoggerProvider which will deliver loggers from the library that is used in your project.
In addition to the implicit naming of the loggers, which, as can be seen from the example, is taken from the class name, you can specify a specific value through the annotation parameter, such as @Log(“REST”) .
This technique eliminates copy-paste strings like:
private final Logger logger = LoggerFactory.getLogger(LogSample.class); which in turn saves the project from loggers with the names of "neighbors", since programmers often forget to replace the class passed as a parameter.
Of course, this is a fairly simple example. Nevertheless, it shows the main idea of the framework - less code, more stability.
Despite the fact that the main goal of Jeta is to get rid of the template code, at the reception shown above, many useful functions are implemented, such as Dependency Injection , Event Bus , Validators , etc. It should be noted that all of them are written according to the principles of the framework - without Java Reflection and, if possible, all errors are at the compilation stage.
In this article, we also will not get rid of the fictional boiler-plate case. Instead, we write something useful, namely Data Binding (hereinafter referred to as DB). Although, there is no fundamental difference, and this article can be used as a guide for solving problems associated with getting rid of the template code.
Data Binding.
Android programmers may already be familiar with this term. Not so long ago, Google released the Data Binding Library . For those of you who are not familiar with this pattern, I am sure that it will not be difficult to understand its concept from the examples in this article. I also bring two spoilers with a few guided tours of Android and Data-Binding, respectively.
The screen, in the context of Android programming, is called Activity . This is a Java class inherited from android.app.Activity . For each activation, there is an XML file with markup called Layout . Here is an example of the Activity from the “Hello, World” application:
<?xml version="1.0" encoding="utf-8"?> <LinearLayout xmlns:android="http://schemas.android.com/apk/res/android" android:layout_width="match_parent" android:layout_height="match_parent"> <TextView android:id="@+id/text1" android:layout_width="wrap_content" android:layout_height="wrap_content" /> </LinearLayout> public class MainActivity extends Activity { @Override protected void onCreate(Bundle savedInstanceState) { super.onCreate(savedInstanceState); setContentView(R.layout.activity_main); TextView text1 = (TextView) findViewById(R.id.text1); text1.setText("Hello World!"); } } The string setContentView(R.layout.activity_main) links the activations and the layout through the R file, which is automatically generated. So, for our layout, the activity_main.xml , R-file will contain an internal layout class with an activity_main field and some unique numeric value. For TextView , to which we assigned id = text1 , this will be the internal id class and the text1 field, respectively.
Data-binding allows you to write DSL expressions inside an XML file. Here is an example from the official site developer.android.com :
<?xml version="1.0" encoding="utf-8"?> <layout xmlns:android="http://schemas.android.com/apk/res/android"> <data> <variable name="user" type="com.example.User"/> </data> <LinearLayout android:orientation="vertical" android:layout_width="match_parent" android:layout_height="match_parent"> <TextView android:layout_width="wrap_content" android:layout_height="wrap_content" android:text="@{user.firstName}"/> <TextView android:layout_width="wrap_content" android:layout_height="wrap_content" android:text="@{user.lastName}"/> </LinearLayout> </layout> So, at the right moment, we associate the user object ( com.example.User ) with the layout and data-binding automatically puts values into the corresponding components. So, the first TextView display the user's name, and the second his last name.
In this article we will write our Data-Binding, however, so far without preference, but at the end you will find a small interactive.
Before we begin, a couple of comments on Jeta.
All functions specific to android are moved to a separate library - Androjeta . It expands Jeta, which means everything that is available in Jeta, i.e. for any Java project is also available in Androjeta.
- In the terminology of the framework, the generated class is called Metacode . The class for which the meta code is generated is called Master . There is also a Controller that applies meta-code to the master, and Metasitory is a repository of links to all Metacode classes. With the help of Metasitory controllers find the desired meta-code.
1. DataBinding project
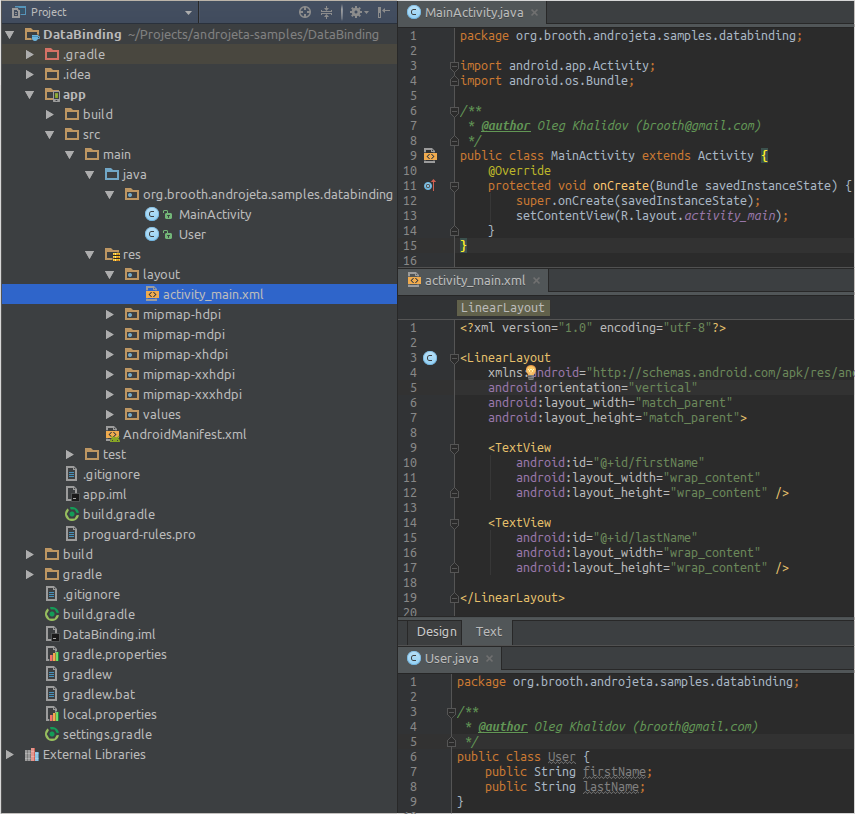
First of all, we will create the most common Android project with one activation and User pojo-class. Our task is to write the user's first and last name to the corresponding UI components via DB by the end of the article. For clarity, I will provide screenshots with the structure of the project.
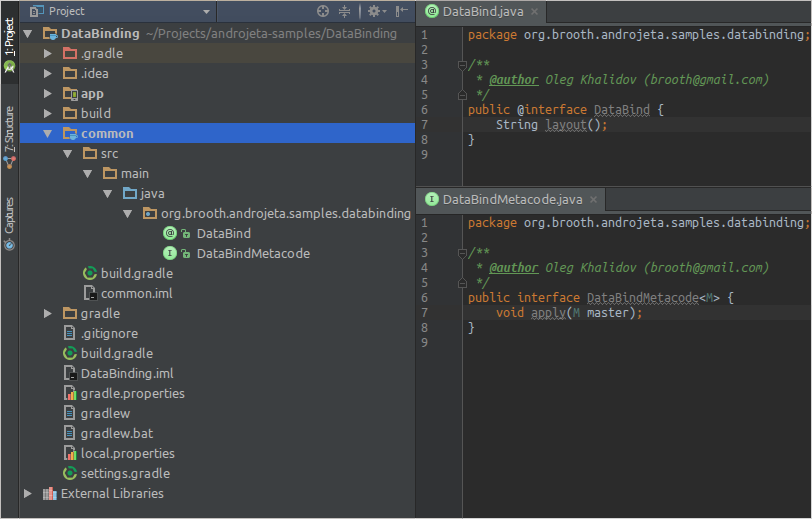
2. common module
Since the code generation occurs at the compilation stage, and all related classes are run in a separate environment, we need a module that will be available both in runtime and during code generation. I note that this is a regular Java module that will contain two files - the DataBind annotation and the DataBind Metacode interface.
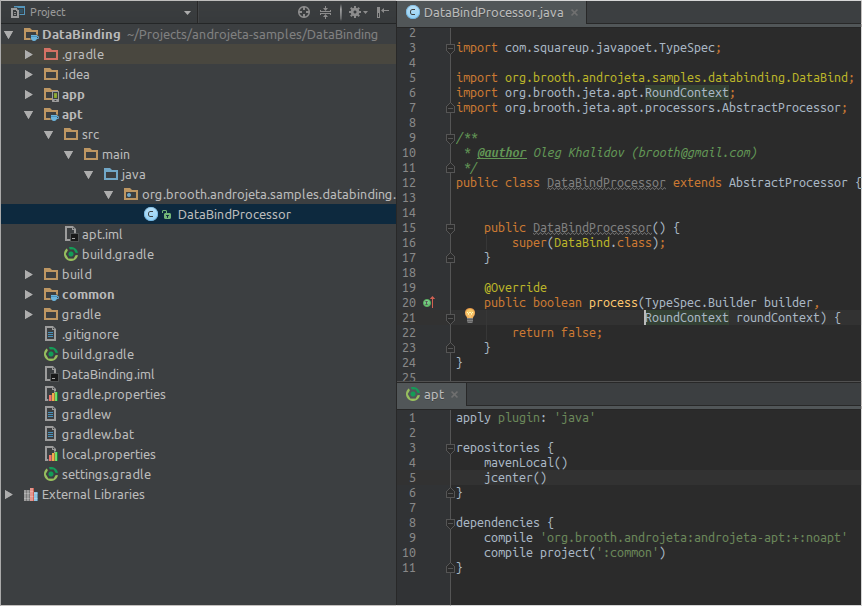
3. apt module
The apt module contains the classes necessary for code-generation. As already mentioned, this module depends on common and will be available only at the compilation stage. Like common , this is a regular Java module that will contain a single file - DataBindProcessor . It is in this class that we will process the DataBind annotation, parse the XML layout and generate the corresponding meta code. Note that the apt module also depends on org.brooth.androjeta:androjeta-apt:+:noapt , thus gaining access to the framework classes.
4. Prepare the app
Before proceeding directly to the generation of meta-code, we must first prepare our application. First, we will change our layout:
<?xml version="1.0" encoding="utf-8"?> <LinearLayout xmlns:android="http://schemas.android.com/apk/res/android" xmlns:androjeta="http://schemas.jeta.brooth.org/androjeta" android:orientation="vertical" android:layout_width="match_parent" android:layout_height="match_parent"> <TextView android:id="@+id/firstName" androjeta:setText="master.user.firstName" android:layout_width="wrap_content" android:layout_height="wrap_content" /> <TextView android:id="@+id/lastName" androjeta:setText="master.user.lastName" android:layout_width="wrap_content" android:layout_height="wrap_content" /> </LinearLayout> A small explanation: we declared our namespace with the prefix “androjeta” and added two TextView attributes androjeta:setText with DB expressions. So we can find and process these expressions in the DataBindProcessor by generating the corresponding meta code.
package org.brooth.androjeta.samples.databinding; import android.app.Activity; import android.os.Bundle; @DataBind(layout = "activity_main") public class MainActivity extends Activity { final User user = new User("John", "Smith"); @Override protected void onCreate(Bundle savedInstanceState) { super.onCreate(savedInstanceState); setContentView(R.layout.activity_main); MetaHelper.applyDataBinding(this); } } Two things are important here. First of all, we added the @DataBind annotation to the @DataBind , which we previously created in the common module. Thus, at the generation stage, Jeta will find this class and pass it to the DataBindProcessor . Second, after we set up the layout, we call MetaHelper.applyDataBind(this) . With the help of such static methods it is easier to access the meta-code. Let's create this class.
package org.brooth.androjeta.samples.databinding; import org.brooth.jeta.metasitory.MapMetasitory; import org.brooth.jeta.metasitory.Metasitory; public class MetaHelper { private static MetaHelper instance = new MetaHelper("org.brooth.androjeta.samples"); private final Metasitory metasitory; private MetaHelper(String metaPackage) { metasitory = new MapMetasitory(metaPackage); } public static void applyDataBinding(Object master) { new DataBindController<>(instance.metasitory, master).apply(); } } MetaHelper is an optional class. This is a way of organizing access to the meta-code. It serves solely as a convenience. More information about this class can be found on this page . Immediately it is important to us that the applyDataBinding method passes the work to DataBindController :
package org.brooth.androjeta.samples.databinding; import org.brooth.jeta.MasterController; import org.brooth.jeta.metasitory.Metasitory; public class DataBindController<M> extends MasterController<M, DataBindMetacode<M>> { public DataBindController(Metasitory metasitory, M master) { super(metasitory, master, DataBind.class); } public void apply() { for(DataBindMetacode<M> metacode : metacodes) metacode.apply(master); } } Let me remind you that controllers are classes that apply meta code to wizards. More information can be found on this page .
In the last step, we need to add the DataBindProcessor to the list of processors that Jeta calls to generate meta-code. To do this, in the root package of the app module ( app/src/main/java ) we will create a file jeta.properties with the contents:
processors.add = org.brooth.androjeta.samples.databinding.apt.DataBindProcessor metasitory.package = org.brooth.androjeta.samples application.package = org.brooth.androjeta.samples.databinding More information about this file and the available settings you can find on this page .
5. DataBindProcessor
I think it would be unnecessary to comment on every step of the processor, since nothing innovative they contain. It is enough to describe the main points: we are passing through the SAX parser over the XML layout, find the DB expressions and generate the corresponding Java code.
It should be noted that Jeta uses JavaPoet - Square's excellent library for generating Java code. I recommend to go through the README , if you are thinking of writing your processor. Below is the source code of DataBindProcessor :
package org.brooth.androjeta.samples.databinding.apt; import com.squareup.javapoet.ClassName; import com.squareup.javapoet.MethodSpec; import com.squareup.javapoet.ParameterizedTypeName; import com.squareup.javapoet.TypeSpec; import org.brooth.androjeta.samples.databinding.DataBind; import org.brooth.androjeta.samples.databinding.DataBindMetacode; import org.brooth.jeta.apt.ProcessingContext; import org.brooth.jeta.apt.ProcessingException; import org.brooth.jeta.apt.RoundContext; import org.brooth.jeta.apt.processors.AbstractProcessor; import org.xml.sax.Attributes; import org.xml.sax.SAXException; import org.xml.sax.helpers.DefaultHandler; import java.io.File; import java.io.FileNotFoundException; import javax.lang.model.element.Modifier; import javax.lang.model.element.TypeElement; import javax.xml.parsers.SAXParser; import javax.xml.parsers.SAXParserFactory; public class DataBindProcessor extends AbstractProcessor { private static final String XMLNS_PREFIX = "xmlns:"; private static final String ANDROID_NAMESPACE = "http://schemas.android.com/apk/res/android"; private static final String ANDROJETA_NAMESPACE = "http://schemas.jeta.brooth.org/androjeta"; private ClassName textViewClassname; private ClassName rCLassName; private String layoutsPath; private String androidPrefix; private String androjetaPrefix; private String componentId; private String componentExpression; public DataBindProcessor() { super(DataBind.class); } @Override public void init(ProcessingContext processingContext) { super.init(processingContext); layoutsPath = processingContext.processingEnv().getOptions().get("layoutsPath"); if (layoutsPath == null) throw new ProcessingException("'layoutsPath' not defined"); String appPackage = processingContext.processingProperties().getProperty("application.package"); if (appPackage == null) throw new ProcessingException("'application.package' not defined"); textViewClassname = ClassName.bestGuess("android.widget.TextView"); rCLassName = ClassName.bestGuess(appPackage + ".R"); } @Override public boolean process(TypeSpec.Builder builder, final RoundContext roundContext) { TypeElement element = roundContext.metacodeContext().masterElement(); ClassName masterClassName = ClassName.get(element); builder.addSuperinterface(ParameterizedTypeName.get( ClassName.get(DataBindMetacode.class), masterClassName)); final MethodSpec.Builder methodBuilder = MethodSpec. methodBuilder("apply") .addAnnotation(Override.class) .addModifiers(Modifier.PUBLIC) .returns(void.class) .addParameter(masterClassName, "master"); String layoutName = element.getAnnotation(DataBind.class).layout(); String layoutPath = layoutsPath + File.separator + layoutName + ".xml"; File layoutFile = new File(layoutPath); if (!layoutFile.exists()) throw new ProcessingException(new FileNotFoundException(layoutPath)); androidPrefix = null; androjetaPrefix = null; try { SAXParserFactory factory = SAXParserFactory.newInstance(); SAXParser saxParser = factory.newSAXParser(); saxParser.parse(layoutFile, new DefaultHandler() { @Override public void startElement(String uri, String localName, String qName, Attributes attributes) throws SAXException { for (int i = 0; i < attributes.getLength(); i++) { if (androidPrefix == null && attributes.getQName(i).startsWith(XMLNS_PREFIX) && attributes.getValue(i).equals(ANDROID_NAMESPACE)) { androidPrefix = attributes.getQName(i).substring(XMLNS_PREFIX.length()); continue; } if (androjetaPrefix == null && attributes.getQName(i).startsWith(XMLNS_PREFIX) && attributes.getValue(i).equals(ANDROJETA_NAMESPACE)) { androjetaPrefix = attributes.getQName(i).substring(XMLNS_PREFIX.length()); continue; } if (componentId == null && androidPrefix != null && attributes.getQName(i).equals(androidPrefix + ":id")) { componentId = attributes.getValue(i).substring("@+id/".length()); continue; } if (componentExpression == null && androjetaPrefix != null && attributes.getQName(i).equals(androjetaPrefix + ":setText")) { componentExpression = attributes.getValue(i); } } } @Override public void endElement(String uri, String localName, String qName) throws SAXException { if (componentExpression == null) return; if (componentId == null) throw new ProcessingException("Failed to process expression '" + componentExpression + "', component has no id"); methodBuilder.addStatement("(($T) master.findViewById($T.id.$L))\n\t.setText($L)", textViewClassname, rCLassName, componentId, componentExpression); componentId = null; componentExpression = null; } } ); } catch (Exception e) { throw new ProcessingException(e); } builder.addMethod(methodBuilder.build()); return false; } } 6. Usage
First, make sure everything works. To do this, execute the following command in the project directory:
./gradlew assemble If there are no errors in the output, and you see the entry:
Note: Metacode built in Xms then everything is OK, and along the path /app/build/generated/source/apt/ we will be able to see the generated code:
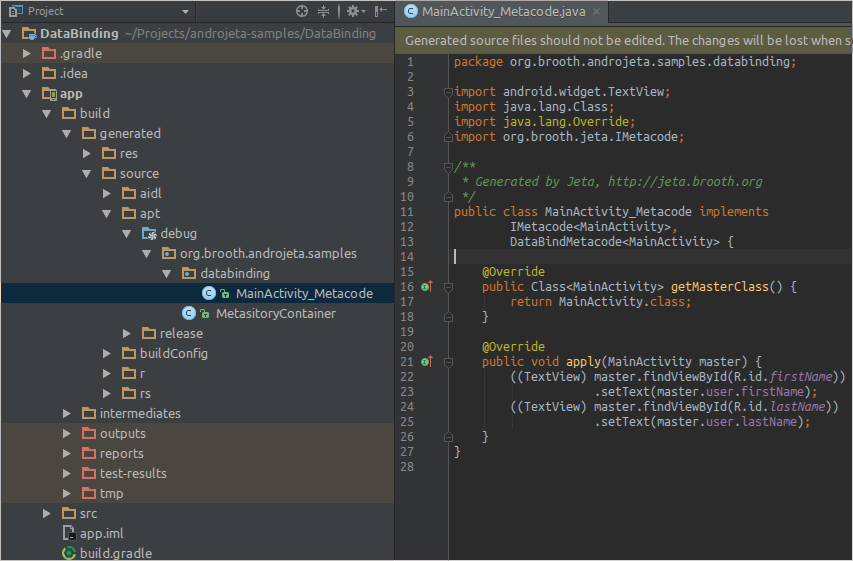
As you can see, the meta code is formatted and readable, therefore, it is easy to debug. Also, an important advantage is that all possible errors are found at the compilation stage. So, if you add @DataBind to an Activity that does not have a user field, pass an incorrect name of the layout into the parameters, or make a mistake in the DB expression, the generated code will not compile and the project will not build.
At this stage, you can start the application, and, as expected, you will see data on the user user on the screen.
7. Conclusion.
I ask you to take this example as a Proof-Of-Concept , and not as a ready-made solution. In addition, his task is to demonstrate the work of the framework, and not the fact that Jeta-DB will go live.
Actually, the promised interactive. Write in the comments what you would like to see in the Data-Binding . Perhaps you lack some capabilities in the implementation from Google. Perhaps you want to get rid of some other boiler-plate case. Also, I will be grateful for any other comments or suggestions. I, in turn, will try to choose the most interesting and implement in future versions.
Thank you for reading to the end.
Happy code-generate! :)
» Official site
" GitHub Sample Source Code
Jeta on github
» Androjeta on github
')
Source: https://habr.com/ru/post/317970/
All Articles