Telegram-bot for the system administrator
Telegram-bot for system administrators. This is by no means a finished project, there is a lot of work to be done. This is a semi-finished product and a set of techniques that each admin can file for his different tasks.
The article contains examples of several bots and examples of working with the api telegrams from powershell.
Need to run Invoke-WebRequest to
{Token} - bot token received from BotFather
{ordinal message ID} - for the first message 0 , for the subsequent number of the last + 1 . If you specify the last number, you will receive the last message with each call.
{waiting time before returning in seconds} - the time that the telegram will wait for an answer if it is not there before returning the empty structure. Suitable for creating a delay in the bot. I used 1 second latency in order to not wait for debugging.
at the output we get a JSON structure that is parsed with ConvertFrom-Json
Code Listing # 1
At the output in the object $ obj there will be a message and from whom it came
If the file is transferred, then additional parameters will be passed in the JSON structure. To get the file you need to pull out the file_id from the message, then contact the address:
The request will return a JSON structure containing the path to download. Next, download the file by reference.
Suppose that we were given a file, then the code for downloading it will look like this:
The telegram bot supports 2 markdown and html text markup modes.
Warning: br mode is not supported in html mode.
To wrap lines, use the sequence % 0A
Example of sending a message
If this code gives an error, for example, when sending a line like this:
You can use the send method more complicated:
If anyone knows how to download the file back - skinte, I will add.
The article contains examples of several bots and examples of working with the api telegrams from powershell.
It contains info how to register a bot and get a token
Before you continue, you must have a bot token to register your bot and get the token you need to find the user @BotFather and write to him. We are interested in the / newbot command, after which we need the name and name of the bot, you can write whatever you want. At the end, add _bot . When the name is chosen, BotFather will return you a token and a link to the bot for quick addition. At this bot registration bot ends.
To quickly add a bot and make it possible to quickly add it to yourself, it is best to use a special link starting with the @ symbol, you can take it in info:

')

if such a link is sent to someone, he can simply click on it to open a chat with your bot
To quickly add a bot and make it possible to quickly add it to yourself, it is best to use a special link starting with the @ symbol, you can take it in info:
')
if such a link is sent to someone, he can simply click on it to open a chat with your bot
Ready adminbots templates
Simple bot
Pros:
Minuses:
You can download a simple bot from here ; the archive contains: 1. a help with examples of text markup; 2. source
To start, you need to get a bot token from BotFather as described at the beginning of the article and write to the $ token variable of the script. Should work immediately.
Add functionality to logic function
- small - only about 300 lines
- can execute commands described in the logic function
- can receive and send messages
- can receive files
- there is a password check
- keeps log of sent commands
- can open several sessions for simultaneous work (not fully implemented. But several people can simultaneously interact
Minuses:
- too simple authorization. The password will remain in the chat on the device. Cannot distinguish devices
You can download a simple bot from here ; the archive contains: 1. a help with examples of text markup; 2. source
To start, you need to get a bot token from BotFather as described at the beginning of the article and write to the $ token variable of the script. Should work immediately.
Add functionality to logic function
Difficult bot
A plus:
The functionality that was implemented for the example:
From what has not been implemented, but I would like to:
You can download the bot from here , the archive contains:
1. help with examples of text markup;
2. configuration file config.csv ;
3. bot itself - abormot.ps1 ;
4. a set of auxiliary files;
5. list of computers for work in the text file ping-list.txt
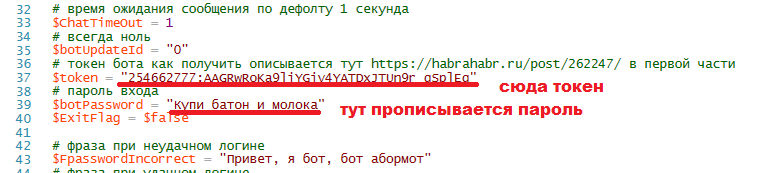
To start, you need to get a bot token from BotFather as described at the beginning of the article and set it in the config.csv configuration file. Should work immediately.

Add functionality to logic function
- Small - only about 450 lines
- Can execute commands described in logic function
- Can receive and send messages
- Can accept files
- There is a password check, it can additionally check chat_id
- Logs sent commands
- It can open several sessions for simultaneous work (not fully implemented. At the last stage, the console was screwed, if you work in it, other users will have a hang and may have a timeout kick.
The functionality that was implemented for the example:
- Can take files, puts them in daddy
- Can show files from daddy
- Can delete files from download folder.
- Can run the file for execution (via start-process )
- Shows a list of servers you are working with (just a list of names in a text file)
- Pings servers from the list and shows which ones are online.
- Disables computers from the list
- Shows users logged in to the terminal, makes a call to an external script (need to be installed on the terminal PSTerminalServices )
- Makes the user logoff on the terminal. Enter console mode and then write user names (you need to install on the PSTerminalServices terminal)
- Makes a screenshot of the computer on which it is running (but does not send it back)
- Opens the ssh session with the device on the network and switches to the command entry mode (for example, the credit and the address are hardwired into the script. To work, it requires installation on the machine with which the ssh poshSSH operation module will be managed)
From what has not been implemented, but I would like to:
- File transfer back (write who knows how to do it through powershell)
- Inadequate support for multi-user work
- Defective console mode
You can download the bot from here , the archive contains:
1. help with examples of text markup;
2. configuration file config.csv ;
3. bot itself - abormot.ps1 ;
4. a set of auxiliary files;
5. list of computers for work in the text file ping-list.txt
To start, you need to get a bot token from BotFather as described at the beginning of the article and set it in the config.csv configuration file. Should work immediately.
Add functionality to logic function
Self-service bot doing Unlock account in domain
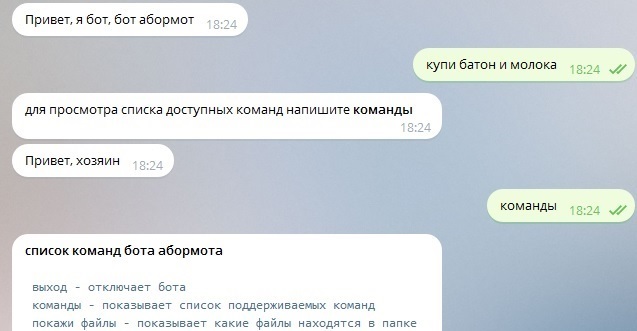
In some organizations, according to the requirements of the IB, if the password is entered incorrectly a certain number of times, then the account is locked for a certain time. To remove the lock user must call the admin. This bot is made so that it can write the name of the account and it unlocks it, but not more than 3 times a day. If the limit is exceeded, he will redirect the user to the system administrator and send an alert to him in the chat.
You can download the bot from here .
To start, you need to get a bot token from BotFather to register the token in the $ token variable. Set admin chat number to $ adminChatID . Register the address of the blast machine and credits to it:
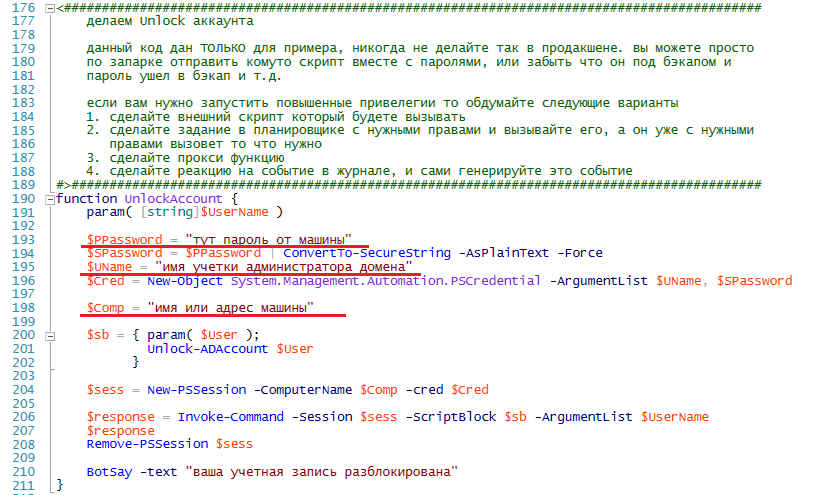
I built the unlock function in the example directly into the script, for permanent use it is better to create a reaction to the event in the log and generate this event myself. The event will run the unlock script from a place that is accessible only to admins, so you will not forget the password from the domain in the script. It is important.
You can download the bot from here .
To start, you need to get a bot token from BotFather to register the token in the $ token variable. Set admin chat number to $ adminChatID . Register the address of the blast machine and credits to it:
I built the unlock function in the example directly into the script, for permanent use it is better to create a reaction to the event in the log and generate this event myself. The event will run the unlock script from a place that is accessible only to admins, so you will not forget the password from the domain in the script. It is important.
Bot accepting files from users he knows
For example, we need to forward photos from users to the site, or simply receive files and know from whom they came and send to whom. Below is an example of a bot accepting photos from familiar users.
You can download the bot from here .
To start, you need to get the bot token from the BotFather to register the token in the $ token variable, register your chat in switch 235 lines. Should work immediately. Do not forget to add the chat you want to switch
You can download the bot from here .
To start, you need to get the bot token from the BotFather to register the token in the $ token variable, register your chat in switch 235 lines. Should work immediately. Do not forget to add the chat you want to switch
How to work with bot api
1. Accept the message
Need to run Invoke-WebRequest to
https://api.telegram.org/bot{}/getUpdates?offset={ ID }&timeout={ } {Token} - bot token received from BotFather
{ordinal message ID} - for the first message 0 , for the subsequent number of the last + 1 . If you specify the last number, you will receive the last message with each call.
{waiting time before returning in seconds} - the time that the telegram will wait for an answer if it is not there before returning the empty structure. Suitable for creating a delay in the bot. I used 1 second latency in order to not wait for debugging.
at the output we get a JSON structure that is parsed with ConvertFrom-Json
Code Listing # 1
$ChatTimeout = 1 $UpdateId = 0 $token = "bot token" $URL = "https://api.telegram.org/bot$token/getUpdates?offset=$UpdateId&timeout=$ChatTimeout" $Request = Invoke-WebRequest -Uri $URL -Method Get $content = ConvertFrom-Json $Request.content # 2 $str = $content.result | select -First 1 $str = ($str).message $props = [ordered]@{ ok = $content.ok UpdateId = ($str).update_id Message_ID = $str.message_id first_name = ($str.from).first_name last_name = ($str.from).last_name chat_id = ($str.chat).id text = $str.text } $obj = New-Object -TypeName PSObject -Property $props $obj At the output in the object $ obj there will be a message and from whom it came
2. Download file
If the file is transferred, then additional parameters will be passed in the JSON structure. To get the file you need to pull out the file_id from the message, then contact the address:
https://api.telegram.org/bot{token}/getFile?file_id={file_id } The request will return a JSON structure containing the path to download. Next, download the file by reference.
https://api.telegram.org/file/bot{token}/{file_path} Suppose that we were given a file, then the code for downloading it will look like this:
$ChatTimeout = 1 $UpdateId = 0 $token = "bot token" $Path = "c:\" ##### $URL = "https://api.telegram.org/bot$token/getUpdates?offset=$UpdateId&timeout=$ChatTimeout" $Request = Invoke-WebRequest -Uri $URL -Method Get $content = ConvertFrom-Json $Request.content # 2 $str = $content.result | select -First 1 $str = ($str).message ##### # if ( $($str.document).mime_type -eq "image/jpeg" ) { $isJPG = $true } ##### file_name # ? if ( $($str.document).file_name -ne $null ) { ### $DocFileName = ($str.document).file_name $DocFileID = ($str.document).file_id $DocFileSize = ($str.document).file_size # /getFile $URL = "https://api.telegram.org/bot$token/getFile?file_id=$DocFileID" $RequestFile = Invoke-WebRequest -Uri $URL ### $RequestFile foreach ( $JSON in $((ConvertFrom-Json $RequestFile.Content).result) ) { $FilePath = $json.file_path $URL = "https://api.telegram.org/file/bot$token/$FilePath" $FilePath = Split-Path -Leaf $FilePath $OutputFile = "$Path\$FilePath" # Invoke-WebRequest -Uri $URL -OutFile $OutputFile } } 3. Write something
The telegram bot supports 2 markdown and html text markup modes.
Warning: br mode is not supported in html mode.
Markdown markup examples
* bold text * - bold text
_italic text_ - oblique text
[text] (http://www.example.com/) - link
`inline fixed-width code` - fixed
text block
`` `text
pre-formatted fixed-width code block
`` `
_italic text_ - oblique text
[text] (http://www.example.com/) - link
`inline fixed-width code` - fixed
text block
`` `text
pre-formatted fixed-width code block
`` `
To wrap lines, use the sequence % 0A
Example of sending a message
$token = " " $hatid = "ID " $text = " habr" $payload = @{ "parse_mode" = "Markdown"; "disable_web_page_preview" = "True" } $URL = "https://api.telegram.org/bot$token/sendMessage?chat_id=$hatid&text=$text" $request = Invoke-WebRequest -Uri $URL -Method Post ` -ContentType "application/json; charset=utf-8" ` -Body (ConvertTo-Json -Compress -InputObject $payload) If this code gives an error, for example, when sending a line like this:
"$FDownload : file name is ""$($JSON.file_path)""; size $($json.file_size) kb" You can use the send method more complicated:
$token = " " $chat_id = "ID chata" $text = "" $markdown = $true $preview_mode = "True" if ($markdown) { $markdown_mode = "Markdown" } else {$markdown_mode = ""} $payload = @{ "chat_id" = $chat_id; "text" = $text "parse_mode" = $markdown_mode; "disable_web_page_preview" = $preview_mode; } $URL = "https://api.telegram.org/bot$token/sendMessaget" $request = Invoke-WebRequest -Uri $URL ` -Method Post -ContentType "application/json; charset=utf-8" ` -Body (ConvertTo-Json -Compress -InputObject $payload) If anyone knows how to download the file back - skinte, I will add.
Source: https://habr.com/ru/post/317906/
All Articles