Creating tools for researching NES games
I decided to continue the series of publications about the internal structure of NES-games, this time I will talk about the tools I use for research.
Most of what the researcher needs is already in the FCEUX emulator, which is well suited for debugging games. The documentation should thoroughly examine the Debug section, each tool from there is useful to the researcher, and the ability to use them together with each other enhances the hacker's capabilities.
However, I will not retell the documentation, but I’ll dwell on cases when the emulator’s capacity is not enough and you need to add new ones, or when there are unusual ways to find what you want in a ROM file directly, bypassing the lengthy study of the game code.
')
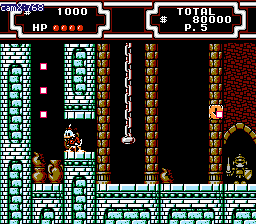
Actually, the first method, an example of which is shown in the picture for attracting attention, is the creation of auxiliary tools using the Lua script interpreter built into the emulator.
In the example above, for the study of the game (and just a cheat pass, if desired), this scripting feature is used, such as displaying images on the screen over the image drawn by the emulator .
Thus, the researcher may notice what is not available to the ordinary player, for example, in the screenshot above of the three hidden diamonds, the player can jump only to the first two, and in no way can take the third or even just guess about its existence. In "Duck stories 2" there are even such jewels that are generally placed outside the game level.
Another example of a script displaying additional data is a compass to the nearest gem in the "Book of the Jungle":
Naturally, the visualization of information from the RAM or ROM games is not the only possibility of scripts.
Another frequently used feature is logging what is happening in the game code , for example, a script template for dumping unzipped data immediately after unpacking it (for SMD games, but the principle is also applicable for NES).
Well, no one forbids creating full-fledged utilities on the Lua-scripts , such as the TasEditor keystroke editor already included in the emulator.
Also, in my opinion, the idea of partial rewriting of the script code when the game data is patched on the fly to modify the gameplay is undervalued. Proof-of-concept of such a script that modifies enemies in New Ghostbusters 2:
However, for complex processing of a particular game or creating new hack methods, it is worth thinking about using the following method.
There is a place where fantasies about various topics that are not related to the study of games, such as adding achievements to emulators, a 3d render or improved graphics , can be roamed around, but I will try to keep within the scope of the article.
One of the directions for expanding the emulator in order to improve the possibilities for reverse engineering is to push as many of its internal capabilities as possible into the Lua library . In the second article of the cycle, I already showed how by prokidydka all a couple of new functions, the opportunity to make a universal (suitable for the study of any game) tool for research.

Another simple and useful example that is still missing in the latest version of the emulator is the possibility of modification from the PPU memory script .
A modification of the emulator can also be used to embed an editor for a particular game with the ability to launch it on the fly and check the changes made:
The previous two categories of modifications related to the dynamic analysis of the game during its execution. However, most of the research is a static analysis of the game's ROM file (or dumps of any data from it).
The main program for such code analysis is the interactive IDA disassembler. It supports 6502 assembler, but it requires both a plug-in to properly load files in the nes format , and a set of scripts to automate routine actions to convert the downloaded file into combed code. A set of scripts specific to the study of NES-games compiled here .
The IDA scripts themselves can be written in the built-in command language idc or python , in any case it is best to open them with a text editor and learn, in most cases it helps to better understand the commands of the IDA itself, which will be useful in working with it and learn how to write such scripts yourself . This is very useful when you need to spend a few hundred of the same type of action, such as combining bytes into pointers or selecting arrays according to some rules.
IDA is a good code analysis tool, so good that some game research gurus even think that only it is enough to research and change games. However, even having a game that was parsed before the compiled and commented source codes on a game, it is difficult to modify the game data - levels, graphics cards, character animations. Unfortunately, the format of the game data is often very different from game to game, so creating universal tools suitable for most games is quite difficult.
The storage format of graphic banks (the lowest graphics storage level) is standard for all NES games, so there are many tile card editors , however, among them I did not find a single library that would allow rendering these tiles in my application.
With such programs you can edit graphics tiles in games with the presence of CHR-ROM - whole banks of graphics. In other games, CHR-RAM is used - the video memory of the tiles in them is read out in parts from the bank with data and code and is copied into the video memory (sometimes with quite clever ways, but it’s rather better to talk about them in the article about data compression).
At a higher level, the games are so different that there are practically no general editing programs, the maximum is editors covering several games on one engine. I will write about my attempts to make a universal level editor at the end of the article, but in the meantime I’ll give some more general ideas on how to find data in games and utilities that implement these ideas.
As an implementation language, I use python for the fact that it is possible to quickly and easily test a guess, sometimes even directly in interactive mode.
Actually, just about this idea was the second article of the cycle - if we go through all possible options for changing one byte in ROM and see how it affects the screen, then it can help clarify the internal structure of the game. After that, it is even possible to create a simple version of the game editor - you need to prepare a set of top-level picture blocks from which the screen is built, without going to the end, how these pictures themselves are constructed from the ROM data and display an array of these pictures detected by this method.
You can also go from the other side.
The background that is displayed on the screen is specified by an array of indexes of video memory tiles at a fixed PPU address — for NES, there are 4 screen pages that can be displayed on the screen in various ways, depending on the PPU settings. It doesn't matter what will be on the screen, it is enough just to capture any loaded page for analysis.
The first screen (Name Table) is located at PPU $ 2000- $ 23BF. Its contents in the FCEUX emulator can be viewed in the Debug → Name Table Viewer window:
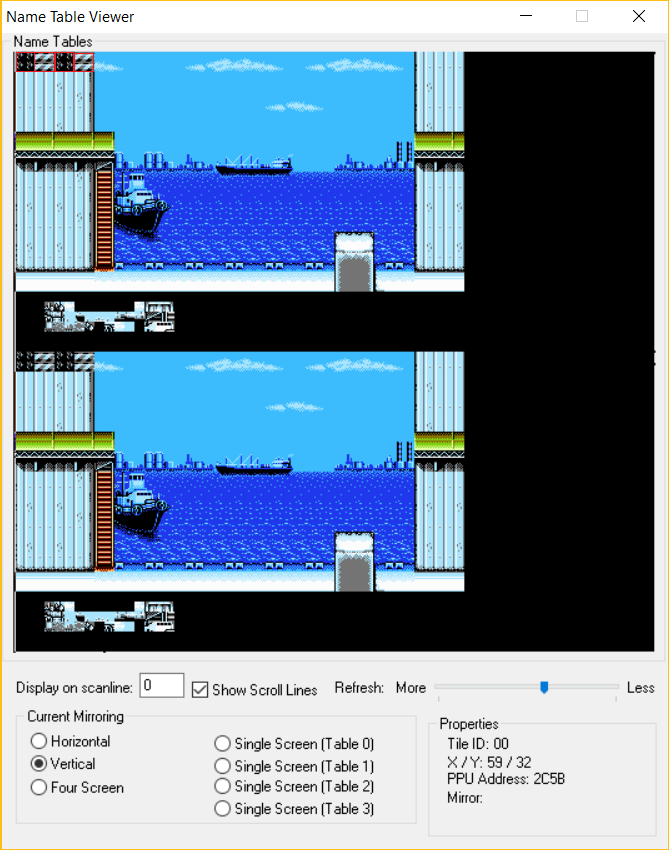
Also in the form of bytes in the Debug → Hex Editor, View → PPU Memory window (go to $ 2000).
Here you can also dump the entire video memory, which is useful for us to analyze ( File → Dump to File → PPU Memory ).
This is just an array of 960 indexes of small video memory tiles of 8x8 pixels in size. At the same time, after the reverse of a large number of games, it is known that game screens are often described by larger blocks, for example, 16x16 or 32x32 pixels. Thus, if we assume a certain block size (for a start, we will try the most standard - 2x2 tiles, highlighted with a red frame in the screenshot), then we can split the data from the screen page into sections, each of which will contain a description of one block.
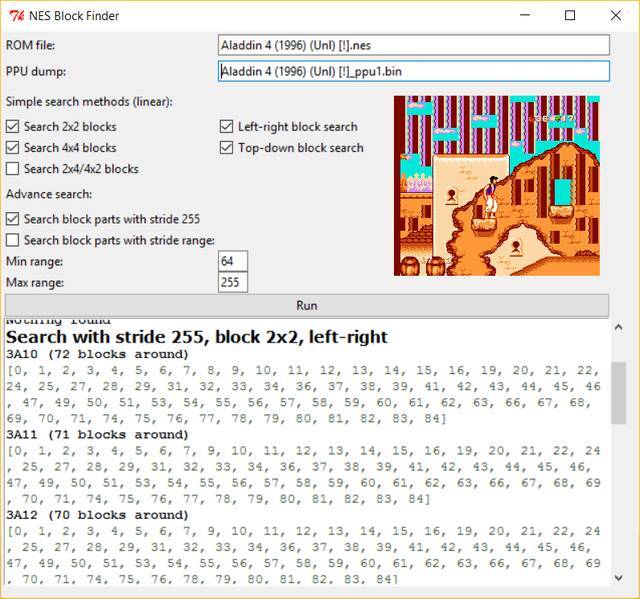
So it turns out a list of all the blocks that are present on the screen. Moreover, we have “clean” descriptions of blocks, without information about sprites of characters (sprites are drawn in a different way), and independent of animation (background animations are almost always made using palette changes or the video memory itself, the tile numbers in the Name Table remain unchanged). However, we do not know the number of blocks.
We have a description of the blocks on the screen, but we do not know their order of storage in ROM. Nevertheless, we can with some probability assume exactly where the description of the blocks is located. The algorithm for this is as follows:
1. Pass through the ROM and mark up all the addresses at which a block is detected, while keeping its number (the real number may be different, it is important for us to note only the differences between the blocks from each other).
2. Find the region in ROM in which the largest number of DIFFERENT blocks is found. This is most likely the very description of the blocks.
https://gist.github.com/spiiin/500262e8d9da86f10a093bbb41833360
Thus, we can find blocks of 2x2 in games in which they are stored sequentially.
This is not bad, but there is a way to drastically improve the results of the algorithm. The fact is that there is a limited number of basic block sizes and ways of storing them in ROM, and we can sort them all out.
The main block sizes are 2x2, 4x2, 2x4 and 4x4, but if necessary, other dimensions are easy to add.
With the method of storing them in ROM, it is a little trickier, the blocks can be stored both linearly and arrays broken into parts ( Structure of Arrays , abbreviated SoA), i.e. First, an array of only the first parts of the blocks is stored in ROM, followed by arrays with the following parts. Most often such arrays are stored one after another, while the gap between the beginnings of arrays is equal to the number of blocks. In order to find such SoA arrays in ROM, we need to find out their length, which can be done by enumerating all the options (quite often 256 blocks are used in games, so it’s worth starting the check with this number and decreasing it gradually).
All this looks quite complicated, because we rely only on the probability that the game uses a certain type of blocks, but in practice the utility finds blocks in 80-90% of tested games!
https://github.com/spiiin/NesBlockFinder
In addition, it allows you to weed out games with an unusual structure (non-block), to study them more closely.
The FCEUX emulator is able to mark each instruction during emulation, which bytes were interpreted as code and which as data (menu Debug → Code / Data Logger ... ). This feature is useful by itself and tightly integrated with other emulator debugging capabilities — try turning on this mode and see how other debugging windows have changed. However, I want to tell about her one particular application. If you save two such cdl-files, one BEFORE performing the action being studied, and the other immediately AFTER it is completed, the difference between the two such files will show only the data (or code) that was used during the execution of the action. With proper clipping, you can find the necessary data, just by correctly choosing two points in time between the measured events.
The file format is quite simple , as is the comparison script , but it can bring a lot of benefits, you can build a separate debugging methodology on it.
This topic can not be opened in a couple of paragraphs, and it will be too simplified in the context of only NES-games, so it deserves a separate article.
Actually, initially this program was created to display the levels in the game Chip & Dale ( C hip A nd D ale Editor ), then, upon request, it was converted into an editor and eventually acquired support from other Capcom games (Darkwing Duck, Duck Tales 1-2 "," Tale Spin "," Little Mermaid ").
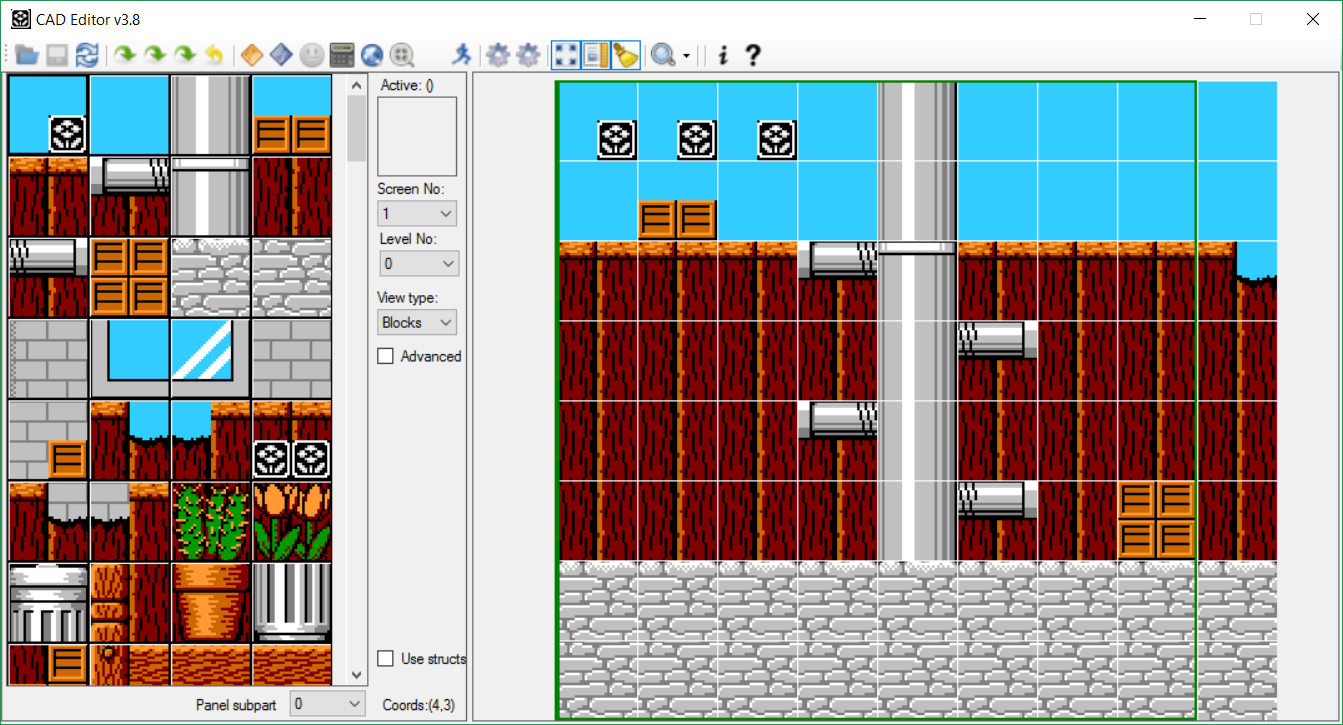
Later it also became clear that the principles of block-level construction in these games are very similar to the ways of organizing levels from many other games, but the devil is in the details - minor differences in each game require you to describe the internal structures of the editor as flexibly as possible so that using combinations of these structures describe the format of the levels for games for which it was not originally intended, without changing the kernel of the editor itself.
The feature with which the universality of the editor is ensured - the so-called configs of games . These are script files in C #, which describe how to load data of a particular game. Why C #? The editor has already been written in this language and this made it possible to easily transfer the code from the kernel to the configs without changing it, which would have to be done if a more classical scripting language like Lua was used.
Using a full-fledged language instead of a simple settings file allows you to define your own functions for loading and saving data of any desired complexity in configs. Scripts are plain text files, which allows users to create their own configs, if necessary, without recompiling the editor, using existing configs as templates. Included with the editor are about 500 configs for 60 different games, about 100 of them are made by users of the editor without my participation, for games, some of which I have never even played:
However, at the moment, despite attempts to make a universal editor, there are games that cannot be described without modifying the editor itself (however, many games can already be added). To collect information about such games with an unusual structure, I went a little further and started using the editor itself as a library for Python to examine the format of games before adding them to the editor and test the correctness of understanding the level of construction of a particular game. I implemented this in the form of Jupyter notebooks, due to the fact that it is convenient in them to write code interactively, so to document it .
Composing a large game structure from base tiles and building an entire level as a result of a puzzle resembles assembling a puzzle of thousands of pieces, and gives the same pleasure when, finally, each piece is in its place.
In the next article there will not be such an abundance of technical information and I will give examples of assembling the levels of games with a non-standard structure or using unusual modifications of the standard block architecture. You can also name the game on the NES in the comments, the level format of which is interesting to you, perhaps I will explore it too.
Most of what the researcher needs is already in the FCEUX emulator, which is well suited for debugging games. The documentation should thoroughly examine the Debug section, each tool from there is useful to the researcher, and the ability to use them together with each other enhances the hacker's capabilities.
However, I will not retell the documentation, but I’ll dwell on cases when the emulator’s capacity is not enough and you need to add new ones, or when there are unusual ways to find what you want in a ROM file directly, bypassing the lengthy study of the game code.
')
Using Lua Scripts
Actually, the first method, an example of which is shown in the picture for attracting attention, is the creation of auxiliary tools using the Lua script interpreter built into the emulator.
In the example above, for the study of the game (and just a cheat pass, if desired), this scripting feature is used, such as displaying images on the screen over the image drawn by the emulator .
Thus, the researcher may notice what is not available to the ordinary player, for example, in the screenshot above of the three hidden diamonds, the player can jump only to the first two, and in no way can take the third or even just guess about its existence. In "Duck stories 2" there are even such jewels that are generally placed outside the game level.
Another example of a script displaying additional data is a compass to the nearest gem in the "Book of the Jungle":
Naturally, the visualization of information from the RAM or ROM games is not the only possibility of scripts.
Another frequently used feature is logging what is happening in the game code , for example, a script template for dumping unzipped data immediately after unpacking it (for SMD games, but the principle is also applicable for NES).
Well, no one forbids creating full-fledged utilities on the Lua-scripts , such as the TasEditor keystroke editor already included in the emulator.
Also, in my opinion, the idea of partial rewriting of the script code when the game data is patched on the fly to modify the gameplay is undervalued. Proof-of-concept of such a script that modifies enemies in New Ghostbusters 2:
However, for complex processing of a particular game or creating new hack methods, it is worth thinking about using the following method.
Modification of emulator source code
There is a place where fantasies about various topics that are not related to the study of games, such as adding achievements to emulators, a 3d render or improved graphics , can be roamed around, but I will try to keep within the scope of the article.
One of the directions for expanding the emulator in order to improve the possibilities for reverse engineering is to push as many of its internal capabilities as possible into the Lua library . In the second article of the cycle, I already showed how by prokidydka all a couple of new functions, the opportunity to make a universal (suitable for the study of any game) tool for research.
Another simple and useful example that is still missing in the latest version of the emulator is the possibility of modification from the PPU memory script .
A modification of the emulator can also be used to embed an editor for a particular game with the ability to launch it on the fly and check the changes made:
Scripts for static game code analysis
The previous two categories of modifications related to the dynamic analysis of the game during its execution. However, most of the research is a static analysis of the game's ROM file (or dumps of any data from it).
The main program for such code analysis is the interactive IDA disassembler. It supports 6502 assembler, but it requires both a plug-in to properly load files in the nes format , and a set of scripts to automate routine actions to convert the downloaded file into combed code. A set of scripts specific to the study of NES-games compiled here .
The IDA scripts themselves can be written in the built-in command language idc or python , in any case it is best to open them with a text editor and learn, in most cases it helps to better understand the commands of the IDA itself, which will be useful in working with it and learn how to write such scripts yourself . This is very useful when you need to spend a few hundred of the same type of action, such as combining bytes into pointers or selecting arrays according to some rules.
Tools for static game data analysis
IDA is a good code analysis tool, so good that some game research gurus even think that only it is enough to research and change games. However, even having a game that was parsed before the compiled and commented source codes on a game, it is difficult to modify the game data - levels, graphics cards, character animations. Unfortunately, the format of the game data is often very different from game to game, so creating universal tools suitable for most games is quite difficult.
Tile Card Editors
The storage format of graphic banks (the lowest graphics storage level) is standard for all NES games, so there are many tile card editors , however, among them I did not find a single library that would allow rendering these tiles in my application.
With such programs you can edit graphics tiles in games with the presence of CHR-ROM - whole banks of graphics. In other games, CHR-RAM is used - the video memory of the tiles in them is read out in parts from the bank with data and code and is copied into the video memory (sometimes with quite clever ways, but it’s rather better to talk about them in the article about data compression).
At a higher level, the games are so different that there are practically no general editing programs, the maximum is editors covering several games on one engine. I will write about my attempts to make a universal level editor at the end of the article, but in the meantime I’ll give some more general ideas on how to find data in games and utilities that implement these ideas.
As an implementation language, I use python for the fact that it is possible to quickly and easily test a guess, sometimes even directly in interactive mode.
Corrupt ROM
Actually, just about this idea was the second article of the cycle - if we go through all possible options for changing one byte in ROM and see how it affects the screen, then it can help clarify the internal structure of the game. After that, it is even possible to create a simple version of the game editor - you need to prepare a set of top-level picture blocks from which the screen is built, without going to the end, how these pictures themselves are constructed from the ROM data and display an array of these pictures detected by this method.
Block Search
You can also go from the other side.
The background that is displayed on the screen is specified by an array of indexes of video memory tiles at a fixed PPU address — for NES, there are 4 screen pages that can be displayed on the screen in various ways, depending on the PPU settings. It doesn't matter what will be on the screen, it is enough just to capture any loaded page for analysis.
The first screen (Name Table) is located at PPU $ 2000- $ 23BF. Its contents in the FCEUX emulator can be viewed in the Debug → Name Table Viewer window:
Also in the form of bytes in the Debug → Hex Editor, View → PPU Memory window (go to $ 2000).
Here you can also dump the entire video memory, which is useful for us to analyze ( File → Dump to File → PPU Memory ).
This is just an array of 960 indexes of small video memory tiles of 8x8 pixels in size. At the same time, after the reverse of a large number of games, it is known that game screens are often described by larger blocks, for example, 16x16 or 32x32 pixels. Thus, if we assume a certain block size (for a start, we will try the most standard - 2x2 tiles, highlighted with a red frame in the screenshot), then we can split the data from the screen page into sections, each of which will contain a description of one block.
So it turns out a list of all the blocks that are present on the screen. Moreover, we have “clean” descriptions of blocks, without information about sprites of characters (sprites are drawn in a different way), and independent of animation (background animations are almost always made using palette changes or the video memory itself, the tile numbers in the Name Table remain unchanged). However, we do not know the number of blocks.
We have a description of the blocks on the screen, but we do not know their order of storage in ROM. Nevertheless, we can with some probability assume exactly where the description of the blocks is located. The algorithm for this is as follows:
1. Pass through the ROM and mark up all the addresses at which a block is detected, while keeping its number (the real number may be different, it is important for us to note only the differences between the blocks from each other).
2. Find the region in ROM in which the largest number of DIFFERENT blocks is found. This is most likely the very description of the blocks.
https://gist.github.com/spiiin/500262e8d9da86f10a093bbb41833360
Thus, we can find blocks of 2x2 in games in which they are stored sequentially.
This is not bad, but there is a way to drastically improve the results of the algorithm. The fact is that there is a limited number of basic block sizes and ways of storing them in ROM, and we can sort them all out.
The main block sizes are 2x2, 4x2, 2x4 and 4x4, but if necessary, other dimensions are easy to add.
With the method of storing them in ROM, it is a little trickier, the blocks can be stored both linearly and arrays broken into parts ( Structure of Arrays , abbreviated SoA), i.e. First, an array of only the first parts of the blocks is stored in ROM, followed by arrays with the following parts. Most often such arrays are stored one after another, while the gap between the beginnings of arrays is equal to the number of blocks. In order to find such SoA arrays in ROM, we need to find out their length, which can be done by enumerating all the options (quite often 256 blocks are used in games, so it’s worth starting the check with this number and decreasing it gradually).
All this looks quite complicated, because we rely only on the probability that the game uses a certain type of blocks, but in practice the utility finds blocks in 80-90% of tested games!
https://github.com/spiiin/NesBlockFinder
In addition, it allows you to weed out games with an unusual structure (non-block), to study them more closely.
CDL file comparison
The FCEUX emulator is able to mark each instruction during emulation, which bytes were interpreted as code and which as data (menu Debug → Code / Data Logger ... ). This feature is useful by itself and tightly integrated with other emulator debugging capabilities — try turning on this mode and see how other debugging windows have changed. However, I want to tell about her one particular application. If you save two such cdl-files, one BEFORE performing the action being studied, and the other immediately AFTER it is completed, the difference between the two such files will show only the data (or code) that was used during the execution of the action. With proper clipping, you can find the necessary data, just by correctly choosing two points in time between the measured events.
The file format is quite simple , as is the comparison script , but it can bring a lot of benefits, you can build a separate debugging methodology on it.
Compressors / Decompressors
This topic can not be opened in a couple of paragraphs, and it will be too simplified in the context of only NES-games, so it deserves a separate article.
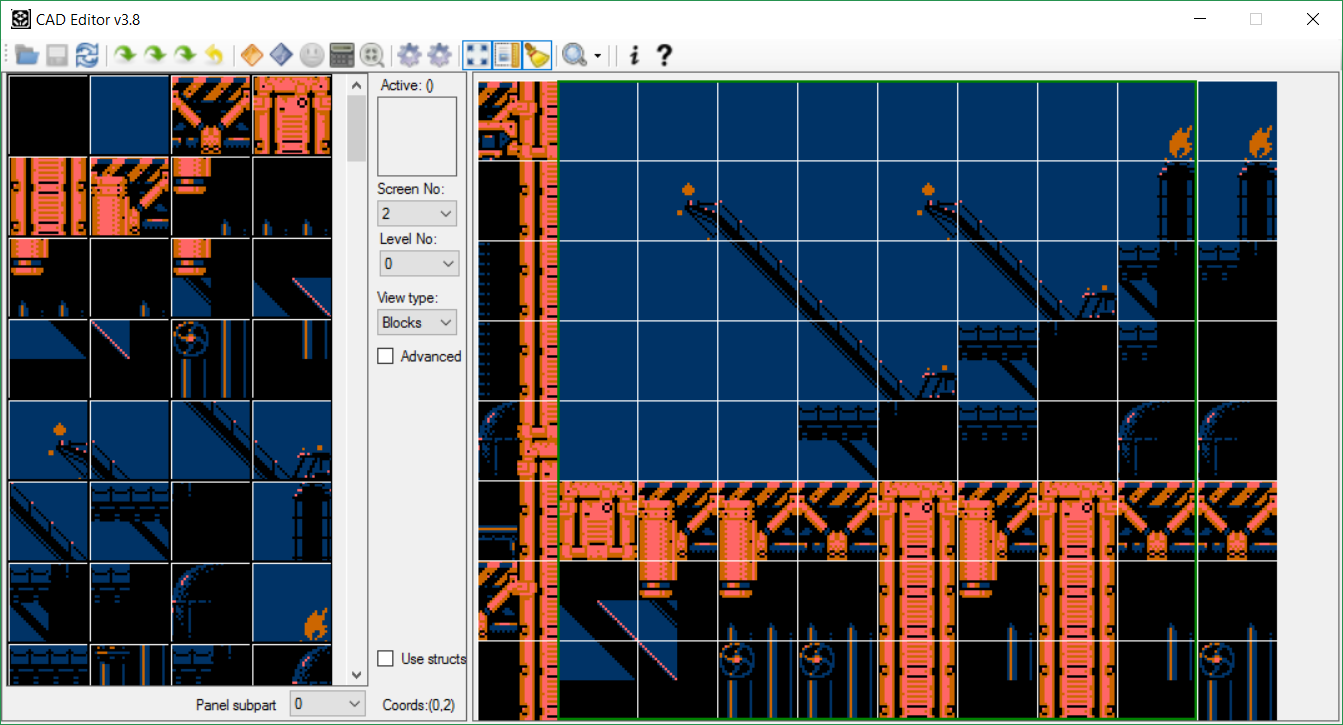
Universal level editor CadEditor
Actually, initially this program was created to display the levels in the game Chip & Dale ( C hip A nd D ale Editor ), then, upon request, it was converted into an editor and eventually acquired support from other Capcom games (Darkwing Duck, Duck Tales 1-2 "," Tale Spin "," Little Mermaid ").
Later it also became clear that the principles of block-level construction in these games are very similar to the ways of organizing levels from many other games, but the devil is in the details - minor differences in each game require you to describe the internal structures of the editor as flexibly as possible so that using combinations of these structures describe the format of the levels for games for which it was not originally intended, without changing the kernel of the editor itself.
The feature with which the universality of the editor is ensured - the so-called configs of games . These are script files in C #, which describe how to load data of a particular game. Why C #? The editor has already been written in this language and this made it possible to easily transfer the code from the kernel to the configs without changing it, which would have to be done if a more classical scripting language like Lua was used.
Using a full-fledged language instead of a simple settings file allows you to define your own functions for loading and saving data of any desired complexity in configs. Scripts are plain text files, which allows users to create their own configs, if necessary, without recompiling the editor, using existing configs as templates. Included with the editor are about 500 configs for 60 different games, about 100 of them are made by users of the editor without my participation, for games, some of which I have never even played:
However, at the moment, despite attempts to make a universal editor, there are games that cannot be described without modifying the editor itself (however, many games can already be added). To collect information about such games with an unusual structure, I went a little further and started using the editor itself as a library for Python to examine the format of games before adding them to the editor and test the correctness of understanding the level of construction of a particular game. I implemented this in the form of Jupyter notebooks, due to the fact that it is convenient in them to write code interactively, so to document it .
Composing a large game structure from base tiles and building an entire level as a result of a puzzle resembles assembling a puzzle of thousands of pieces, and gives the same pleasure when, finally, each piece is in its place.
In the next article there will not be such an abundance of technical information and I will give examples of assembling the levels of games with a non-standard structure or using unusual modifications of the standard block architecture. You can also name the game on the NES in the comments, the level format of which is interesting to you, perhaps I will explore it too.
Source: https://habr.com/ru/post/317796/
All Articles