Development for Sailfish OS: working with notifications on the example of a note taking application
Hello! This article is a continuation of a series of articles devoted to the development of applications for the Sailfish OS mobile platform. At this time, it will be about the application for keeping notes, allowing the user to store records, tag them, add images, photos, reminders, and synchronize with the Evernote account.
We start the article with an extensive description of the user interface of the application , and then move on to the technical details .
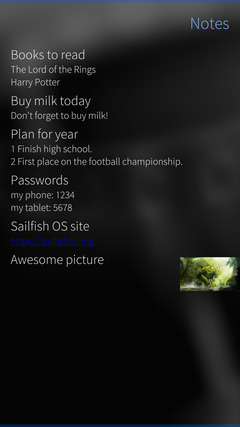
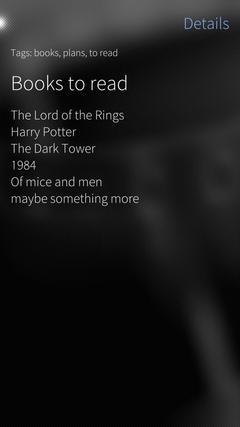
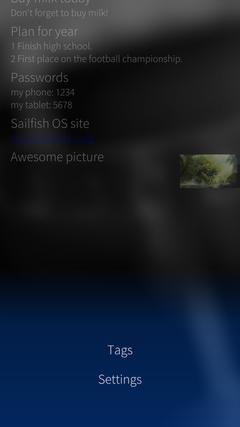
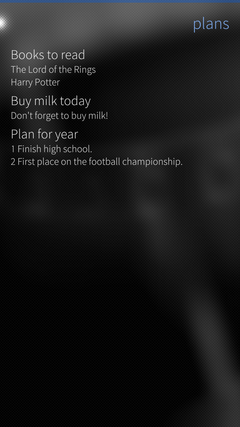
The main screen of the application is a list of user entries, where each item in the list displays the title of the note, its description (or part of it, if the description does not fit completely), as well as the image, if it is added. List items also have a context menu that allows you to delete a note or open a dialog to edit it. And by clicking on the list item opens a screen showing all the information about this note.
Let's talk in detail about the user interface of the application. The main screen of the application is a list of user entries, where each item in the list displays the title of the note, its description (or part of it, if the description does not fit completely), as well as the image, if it is added. List items also have a context menu that allows you to delete a note or open a dialog to edit it. And by clicking on the list item opens a screen showing all the information about this note.
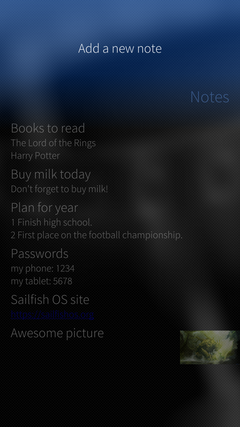
The main screen of the application also contains the elements PullDownMenu and PushUpMenu . In PullDownMenu there is only one menu item that opens a dialog for adding a new note. There are two items in PushUpMenu : the first one opens the window with a list of all tags, the second one - the settings window.
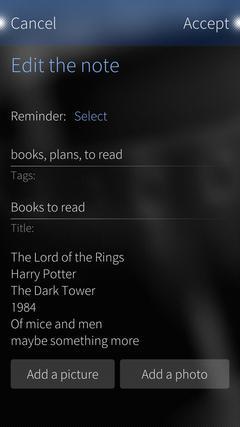
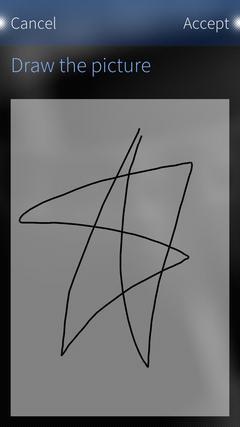
The dialog for adding / editing notes contains text fields for entering tags, title and description, as well as buttons for adding an image, photo and reminder. Clicking on the “Add a picture” button opens a dialog that allows the user to draw or write something on the screen and add this image to the note. And by clicking on the “Add a photo” button, the camera of the device opens and by clicking on the screen, a photo, like the image, is added to the note.
The button for adding a reminder opens a dialog that allows you to set the date and time of the reminder using the standard components DatePickerDialog and TimePickerDialog .
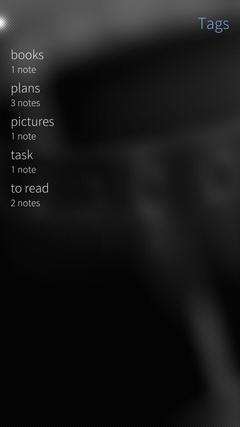
The "Tags" screen is a list of all tags added to notes. By clicking on the tag in the list, we will get to the screen containing only entries marked with this tag. All manipulations with notes (viewing information, editing, deleting and adding new ones) are available to us from this screen too.
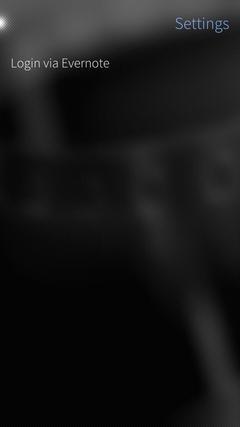
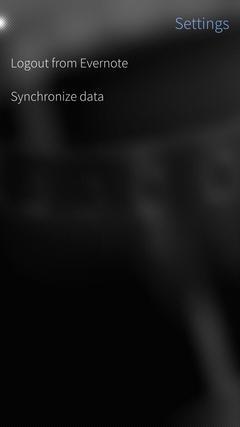
The settings screen contains one item “Login via Evernote”, which, after performing authorization, changes to two items: “Logout from Evernote” and “Synchronize data”. The first allows you to log out of your Evernote account and disable data synchronization, and the second allows you to start the synchronization process manually. Also, synchronization starts automatically when data changes.
In this article, it was decided to focus on working with notifications in Sailfish OS. Sailfish SDK provides the Nemo QML Plugin Notifications plugin to work with notifications. The plugin contains two classes:
')
The Notification class allows you to create notification instances that can be used to communicate with Lipstick Notification Manager using D-Bus. About what D-Bus is and how to work with it we already wrote in one of the previous articles . Be sure to check it out if you have not already done so.
Notifications are generated using some parameters. We list the main ones:
You can read about all notification parameters in the official documentation , and below is an example of creating a notification in QML.
By code, it is easy to understand that by clicking on the described button, the publish () method is called. The publish () method publishes our notification in the Notification Manager and displays the device on the screen.
As mentioned above, we can customize the actions associated with the notification. An example that suggests itself is to open the application by clicking on the notification. Notifications work through D-Bus, so the first thing we need is to create our own D-Bus service. To do this, we first add the dbus directory to the project root and create a file with the extension * .service with the following content:
We recommend using one name for the name of the service (the Name parameter) and the name of the file itself in order to avoid further confusion. Also note that the Exec parameter uses the paths to the * .desktop file of your project and the application itself on the device, here instead of “example” you should use the name of the project.
Next, you need to register the path to the D-Bus service in the * .pro file.
And also in the * .spec file.
To be able to associate an action with a notification with an application, you must create a DBusAdaptor . DBusAdaptor is an object that provides the ability to interact with the D-Bus service.
The service and iface properties are the name of the D-Bus service registered by us, and the path property is the path to the service object in the device file system. Of particular interest is the xml property. It describes the contents of the service, namely the name of the method that can be called and its arguments. Here we use the trigger () function as a service method, which takes a string as input and outputs it to the console, and also opens the application by calling the activate () method on the ApplicationWindow object.
Now we need to associate our action with the created notification. The RemoteActions property of the Notification class will help us with this.
In remoteActions, we describe the service , path and iface parameters for communicating with the D-Bus service. The method parameter is the name of the service method, and in the arguments property we give the list of parameters for the method. And that is all. Now, by clicking on the notification, the D-Bus service method will be called, which opens the application.
One feature of working with notifications is that to display them when the application is closed, you need an active daemon that manages the service registered in the D-Bus. Because after closing the service will be unregistered. This is written in the Sailfish FAQ .
To implement the work with notifications in the application, we used the C ++ class Notification . The notifications in the application consist of the title and description of the note, to which a reminder has been added, therefore we are only interested in the following class properties: summary , body , previewSummary and previewBody . Of course, we are also interested in the publish () method.
To manage notifications, we created the NotificationManager class, which contains two methods, publishNotification () and removeNotification () . The first is needed to create and display a reminder, the second - to delete a reminder.
It is worth noting that the Notification class does not provide the ability to set the time for displaying a notification, the publish () method displays a notification at exactly the moment when it (the method) was called. We solved this problem by using a timer (of the QTimer class) to control when the notification is displayed. And since there may be several reminder notes, there should be several such timers as well. Therefore, a hash ( QHash ) was created in the NotificationManager class, the key of which is the id of the note in the database, and the value is the QTimer .
Let us consider in more detail the implementation of the publishNotification () method. As arguments, it takes the id of the note in the database, the title and description of the notification, as well as the date and time when the notification should be shown.
First of all, the method creates a new timer and connects its timeout () signal with the slot described by the lambda function. In the lambda function, a notification is created and configured, as well as a call to the publish () method. After the notification has been shown, we stop our timer. Also, the publishNotification () method checks if a timer with such a record id has already been added to our hash, and if so, removes it from the hash. Next, start the timer and set how long (in milliseconds) it should stop and add a new timer to the hash.
The removeNotification () method looks much simpler. As a parameter, it takes only the id of the note for which you want to delete the notification. The method checks that the timer with the given id is already in the hash with the timers, and if so, it stops the timer and removes it from the hash.
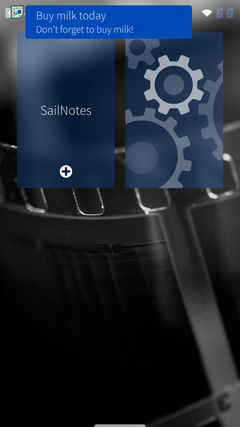
As a result, an application with wide functionality was created that allows you to store notes with images, tags and reminders and synchronize them with Evernote. The application was published in the app store Jolla Harbor called SailNotes and is available for download to everyone. Sources of the application are available on GitHub .
Technical issues can also be discussed on the Sailfish OS Russian-speaking community channel in a Telegram or VKontakte group .
The author: Ivan Shchitov
We start the article with an extensive description of the user interface of the application , and then move on to the technical details .
Application Description
The main screen of the application is a list of user entries, where each item in the list displays the title of the note, its description (or part of it, if the description does not fit completely), as well as the image, if it is added. List items also have a context menu that allows you to delete a note or open a dialog to edit it. And by clicking on the list item opens a screen showing all the information about this note.
Let's talk in detail about the user interface of the application. The main screen of the application is a list of user entries, where each item in the list displays the title of the note, its description (or part of it, if the description does not fit completely), as well as the image, if it is added. List items also have a context menu that allows you to delete a note or open a dialog to edit it. And by clicking on the list item opens a screen showing all the information about this note.
 |  |
The main screen of the application also contains the elements PullDownMenu and PushUpMenu . In PullDownMenu there is only one menu item that opens a dialog for adding a new note. There are two items in PushUpMenu : the first one opens the window with a list of all tags, the second one - the settings window.
 |  |
The dialog for adding / editing notes contains text fields for entering tags, title and description, as well as buttons for adding an image, photo and reminder. Clicking on the “Add a picture” button opens a dialog that allows the user to draw or write something on the screen and add this image to the note. And by clicking on the “Add a photo” button, the camera of the device opens and by clicking on the screen, a photo, like the image, is added to the note.
 |  |
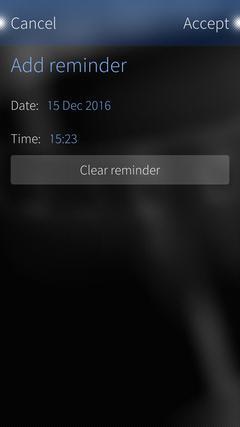
The button for adding a reminder opens a dialog that allows you to set the date and time of the reminder using the standard components DatePickerDialog and TimePickerDialog .
The "Tags" screen is a list of all tags added to notes. By clicking on the tag in the list, we will get to the screen containing only entries marked with this tag. All manipulations with notes (viewing information, editing, deleting and adding new ones) are available to us from this screen too.
 |  |
The settings screen contains one item “Login via Evernote”, which, after performing authorization, changes to two items: “Logout from Evernote” and “Synchronize data”. The first allows you to log out of your Evernote account and disable data synchronization, and the second allows you to start the synchronization process manually. Also, synchronization starts automatically when data changes.
 |  |
Nemo QML Plugin Notifications
In this article, it was decided to focus on working with notifications in Sailfish OS. Sailfish SDK provides the Nemo QML Plugin Notifications plugin to work with notifications. The plugin contains two classes:
')
- QML class Notification for creating notifications inside QML code;
- C ++ class Notification for creating notifications inside C ++ code.
The Notification class allows you to create notification instances that can be used to communicate with Lipstick Notification Manager using D-Bus. About what D-Bus is and how to work with it we already wrote in one of the previous articles . Be sure to check it out if you have not already done so.
Notifications are generated using some parameters. We list the main ones:
- appIcon - the path to the application icon that will be displayed along with the notification itself;
- appName - the name of the application, in addition to the notification icon, can display it;
- summary - notification header displayed in the notification panel;
- previewSummary - notification header displayed in the notification banner at the top of the screen;
- body - the “body” of the notification, its description displayed in the notification panel;
- previewBody - description of the notification displayed in the notification banner;
- itemCount - the number of notifications displayed by a single item. For example, one notification can display up to 4 missed calls if itemCount is 4;
- timestamp - the timestamp of the event with which the notification is connected, does not affect the creation of the notification itself and is not the time when the notification will be shown;
- remoteActions - a list of objects with the properties “name”, “service”, “path”, “iface”, “method”, “displayName”, “icon” and “arguments”; defines possible actions by clicking on the created notification. Read more about remoteActions below.
You can read about all notification parameters in the official documentation , and below is an example of creating a notification in QML.
Button { Notification { id: notification appName: "Example App" appIcon: "/usr/share/example-app/icon-l-application" summary: "Notification summary" body: "Notification body" previewSummary: "Notification preview summary" previewBody: "Notification preview body" itemCount: 5 timestamp: "2013-02-20 18:21:00" remoteActions: [{ "name": "default", "service": "com.example.service", "path": "/com/example/service", "iface": "com.example.service", "method": "trigger" "arguments": [ "argument 1" ] }] } onClicked: notification.publish() } By code, it is easy to understand that by clicking on the described button, the publish () method is called. The publish () method publishes our notification in the Notification Manager and displays the device on the screen.
As mentioned above, we can customize the actions associated with the notification. An example that suggests itself is to open the application by clicking on the notification. Notifications work through D-Bus, so the first thing we need is to create our own D-Bus service. To do this, we first add the dbus directory to the project root and create a file with the extension * .service with the following content:
[D-BUS Service] Interface=/com/example/service Name=com.example.service Exec=/usr/bin/invoker --type=silica-qt5 --desktop-file=example.desktop -s /usr/bin/example We recommend using one name for the name of the service (the Name parameter) and the name of the file itself in order to avoid further confusion. Also note that the Exec parameter uses the paths to the * .desktop file of your project and the application itself on the device, here instead of “example” you should use the name of the project.
Next, you need to register the path to the D-Bus service in the * .pro file.
... dbus.files = dbus/com.example.service.service dbus.path = /usr/share/dbus-1/services/ INSTALLS += dbus ... And also in the * .spec file.
... %files %{_datadir}/dbus-1/services ... To be able to associate an action with a notification with an application, you must create a DBusAdaptor . DBusAdaptor is an object that provides the ability to interact with the D-Bus service.
DBusAdaptor { service: 'com.example.service' iface: 'com.example.service' path: '/com/example/service' xml: ' <interface name="com.example.service">\n' + ' <method name="trigger">\n' + ' <arg name="param" type="s" access="readwrite"/>\n"' + ' </method">\n' + ' </interface>\n' function trigger(param) { console.log('param:', param); __silica_applicationwindow_instance.activate(); } } The service and iface properties are the name of the D-Bus service registered by us, and the path property is the path to the service object in the device file system. Of particular interest is the xml property. It describes the contents of the service, namely the name of the method that can be called and its arguments. Here we use the trigger () function as a service method, which takes a string as input and outputs it to the console, and also opens the application by calling the activate () method on the ApplicationWindow object.
Now we need to associate our action with the created notification. The RemoteActions property of the Notification class will help us with this.
Button { Notification { ... remoteActions: [{ "name": "default", "service": "com.example.service", "path": "/com/example/service", "iface": "com.example.service", "method": "trigger" "arguments": [ "argument 1" ] }] } onClicked: notification.publish() } In remoteActions, we describe the service , path and iface parameters for communicating with the D-Bus service. The method parameter is the name of the service method, and in the arguments property we give the list of parameters for the method. And that is all. Now, by clicking on the notification, the D-Bus service method will be called, which opens the application.
One feature of working with notifications is that to display them when the application is closed, you need an active daemon that manages the service registered in the D-Bus. Because after closing the service will be unregistered. This is written in the Sailfish FAQ .
Work with notifications in the application
To implement the work with notifications in the application, we used the C ++ class Notification . The notifications in the application consist of the title and description of the note, to which a reminder has been added, therefore we are only interested in the following class properties: summary , body , previewSummary and previewBody . Of course, we are also interested in the publish () method.
 | 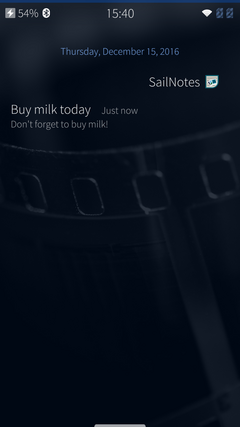 |
To manage notifications, we created the NotificationManager class, which contains two methods, publishNotification () and removeNotification () . The first is needed to create and display a reminder, the second - to delete a reminder.
It is worth noting that the Notification class does not provide the ability to set the time for displaying a notification, the publish () method displays a notification at exactly the moment when it (the method) was called. We solved this problem by using a timer (of the QTimer class) to control when the notification is displayed. And since there may be several reminder notes, there should be several such timers as well. Therefore, a hash ( QHash ) was created in the NotificationManager class, the key of which is the id of the note in the database, and the value is the QTimer .
class NotificationManager : public QObject { Q_OBJECT public: explicit NotificationManager(QObject *parent = 0); Q_INVOKABLE void publishNotification(const int noteId, const QString &summary, const QString &body, QDateTime dateTime); Q_INVOKABLE void removeNotification(const int noteId); private: QHash<int, QTimer*> timers; }; Let us consider in more detail the implementation of the publishNotification () method. As arguments, it takes the id of the note in the database, the title and description of the notification, as well as the date and time when the notification should be shown.
First of all, the method creates a new timer and connects its timeout () signal with the slot described by the lambda function. In the lambda function, a notification is created and configured, as well as a call to the publish () method. After the notification has been shown, we stop our timer. Also, the publishNotification () method checks if a timer with such a record id has already been added to our hash, and if so, removes it from the hash. Next, start the timer and set how long (in milliseconds) it should stop and add a new timer to the hash.
void NotificationManager::publishNotification(const int noteId, const QString &summary, const QString &body, QDateTime dateTime) { QTimer *timer = new QTimer(); connect(timer, &QTimer::timeout, [summary, body, timer](){ Notification notification; notification.setSummary(summary); notification.setBody(body); notification.setPreviewSummary(summary); notification.setPreviewBody(body); notification.publish(); timer->stop(); }); if (this->timers.contains(noteId)) removeNotification(noteId); timer->start(QDateTime::currentDateTime().secsTo(dateTime) * 1000); this->timers[noteId] = timer; } The removeNotification () method looks much simpler. As a parameter, it takes only the id of the note for which you want to delete the notification. The method checks that the timer with the given id is already in the hash with the timers, and if so, it stops the timer and removes it from the hash.
void NotificationManager::removeNotification(const int noteId) { if (this->timers.contains(noteId)) { this->timers.value(noteId)->stop(); this->timers.remove(noteId); } } Conclusion
As a result, an application with wide functionality was created that allows you to store notes with images, tags and reminders and synchronize them with Evernote. The application was published in the app store Jolla Harbor called SailNotes and is available for download to everyone. Sources of the application are available on GitHub .
Technical issues can also be discussed on the Sailfish OS Russian-speaking community channel in a Telegram or VKontakte group .
The author: Ivan Shchitov
Source: https://habr.com/ru/post/317738/
All Articles