Create your own “Neural Patterns” with the help of Deep Learning.
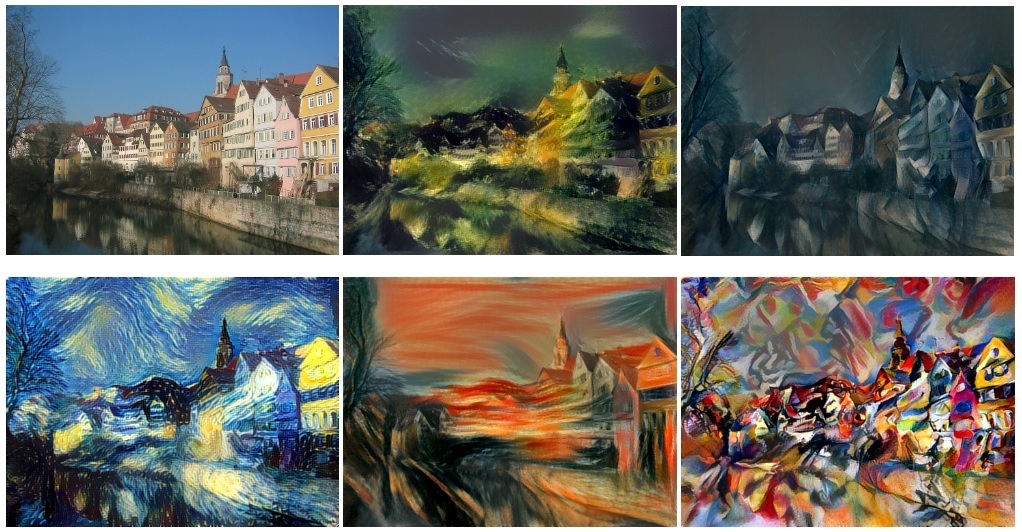
Neural networks can do a lot of different things. They can understand our voices, recognize images and translate speech, but do you know what else they can draw? The image above shows some of the generated neural drawing results.
Today I am going to introduce you to how this is done. First of all, make sure you have an updated copy of Ubuntu (14.04 - the one that I used). You need to have several gigs of free space on the hard disk and in RAM, at least at least 6 GB (more RAM for the most output permissions). To run Ubuntu as a virtual machine, you can use Vagrant along with VirtualBox.
Make sure you have git installed. To download and install git, simply open a terminal and execute:
')
$ sudo apt-get install git Step 1: Install torch7
Torch is a scientific computing framework with broad support for machine learning algorithms. Torch is the main Torch7 package where data structures for multidimensional tensors and mathematical operations for them are defined. Additionally, it provides many utilities for accessing files, serializing objects of arbitrary types, and other useful utilities.
Run these commands in a terminal (you may need to use sudo for them):
$ cd ~/ $ curl -s https://raw.githubusercontent.com/torch/ezinstall/master/install-deps | bash $ git clone https://github.com/torch/distro.git ~/torch --recursive $ cd ~/torch; ./install.sh Now we need to update our environment variables, run:
$ source ~/.bashrc Step 2: Install the loadcaffe
Run in terminal:
$ sudo apt-get install libprotobuf-dev protobuf-compiler $ luarocks install loadcaffe Or, if you have problems, try this:
$ git clone git@github.com:szagoruyko/loadcaffe.git $ ~/torch/install/bin/luarocks install loadcaffe/loadcaffe-1.0–0.rockspec Step 3: Install the neural-style
This is the torch-implementation of the Neural Algorithm of Artistic Style by Leon A. Gatis, Alexander S. Ecker and Matthias Betge. The specification represents an algorithm for combining the content of one image with the style of another image using convolutional neural networks.
First clone neural-style with github:
$ cd ~/ $ git clone https://github.com/jcjohnson/neural-style.git Next, download the neural network models:
$ cd neural-style $ sh models/download_models.sh Step 4: Launch
Now make sure that you have at least 6 GB of RAM (if you are using a virtual machine, be sure to allocate enough memory for it). Then check if the neural style works with this command:
$ th neural_style.lua -gpu -1 -print_iter 1 Notice that you are doing this in CPU mode; running in GPU mode is beyond the scope of this article.
To see instructions on how to use the neural style, run:
$ th neural_style.lua ? Now let's run the test command to make sure that the neural styles work. First, make sure that you are in the neural network directory, if you followed all the instructions above, you should be in ~ / neural-network, now run:
th neural_style.lua -style_image examples/inputs/starry_night.jpg -content_image examples/inputs/golden_gate.jpg -gpu -1 -image_size 256 Notice, I entered a smaller image size so that the processing ended faster. When the command is completed, the output file, with the standard name out.png, will be located in the same directory.
Result

golden_gate.jpg

starry_night.jpg

out.png
Source: https://habr.com/ru/post/317622/
All Articles