How to centrally and remotely install software on PCs and mobile devices in a company

The effectiveness of the company, as well as its security, is directly dependent on the software used on workstations, servers and mobile devices of its employees. On the other hand, “redundant” software can distract employees from performing their duties, as well as create additional security risks. How can the required software be centrally and remotely installed using RMM solutions?
Consider the example of Panda Systems Management
')
Why do we need centralized software installation
Perhaps the answer to this question is obvious: in order to significantly simplify and speed up the process of installing the required software on corporate servers and workstations, as well as mobile devices of company employees. For employees to use exactly the software that they really need to perform their duties. But there are still issues of managing updates and software patches in order to, first of all, close new vulnerabilities.
Naturally, all these issues are quite relevant for any enterprise, because in one degree or another they influence the efficiency of its work, and, consequently, its competitiveness. Thus, centralized and remote software installation contributes to more efficient operation not only of the IT department, but of the entire company.
RMM service for centralized software installation
For the automated solution of numerous IT problems, there are special complex RMM solutions designed for remote and centralized monitoring, maintenance and support of corporate networks. The class of RMM-solutions include cloud service Panda Systems Management.
We have already talked about this cloud service as a whole, and also talked about its use for monitoring corporate networks and managing mobile devices , but today we decided to talk about centralized software installation.
The Panda Systems Management server can automatically and remotely install software on all managed devices (workstations, servers and some mobile devices). This allows the administrator to be sure that all managed devices have the software that employees need to work, and he does not need to remotely connect to each device separately to install the required program.
Automatic software deployment also helps an administrator maintain a level of protection against software vulnerabilities (Java, Adobe, etc.), which can significantly reduce the risk of infection and loss of confidential corporate data.
So today we will tell:
1. Requirements and software deployment procedure
2. Various examples of software implementation
3. Optimization of communication channel bandwidth
4. Installing software on iOS devices
You can register a trial version of Panda Systems Management on the website for free and test the service in your IT environment.
How to quickly implement the solution in your IT environment can be found in our previous review article .
Requirements
Software deployment and installation is a process that is performed using application components for Windows, Linux, and Mac platforms. It is also possible to install applications on smartphones and tablets with iOS, which we will discuss at the end of this article.
Like scripts and components for monitoring, application components contain a small script that, for this task, guides the installation process to install a set of files and / or programs.
To install groups of files or programs on users' devices, it is necessary to create a separate component for each such group.
The procedure for deploying and installing software packages
In general, the usual procedure consists of four steps:
Step 1. Identify the devices on which to install the software
The procedure for finding devices on which the required programs or necessary files are not installed will differ depending on whether Panda Systems Management can audit the programs installed on the device or not.
If the installed software appears in the list of installed programs that is stored in the operating system, this software will also be displayed in the Panda Systems Management software audit reports. Thus, you can create a filter to filter devices that already have this software installed.
If the software does not have an installer, and therefore is not shown in the list of installed programs, or it is a single document, configuration files, etc., then Panda Systems Management will not be able to filter devices that already have these files, and therefore the installation script should carry out appropriate checks.
Step 2. Generating the component for software installation
To do this, in general, you must perform the following steps.
1. Start the task of distributing the component to be installed on the local Panda Systems Management agents installed on the required devices.
You can run this task on a schedule by setting it to a specific date and time when the user will not work on his device to minimize the impact on performance.
2. Collect data with installation results to check for possible errors.
After the process is completed, the system will collect possible error codes and / or messages that will show the installation result in the management console.
This task can have four final statuses:
• Success : The installation task was completed without error. The script returns the code Errorlevel 0.
• Success - Warning : The installation task was completed with some minor errors. The script returns the Errorlevel 0 code and the corresponding message that will be displayed in the management console.
• Error : The installation task was not completed. The script returns the code Errorlevel 1.
• Error-Warning : The installation task was not completed. The script returns the Errorlevel 1 code and the corresponding message that will be displayed in the management console.
Installation examples
To demonstrate the capabilities of a centralized software installation, below we give four examples:
• Implementing self-installing software
• Software implementation without installer
• Deploying documents and files using a scripting language
• Deploying documents and files without using a scripting language
The procedures described in this chapter, as well as the third-party utilities and script languages used, are only examples, and they may be different. Panda Systems Management is a fairly flexible solution, and it can be adapted to the tools that the administrator can feel most comfortable using.
Example 1. The introduction of self-installing software
In this example, we will try to centrally and remotely install the dotNetFx40_Full_x86_x64.exe package for the Microsoft .NET 4.0 framework on those devices on which it is not yet installed.
Due to the fact that the Microsoft .NET 4.0 Framework is a program that appears in the list of installed programs stored in the operating system of the device, we will use a filter to select those devices on which this package is not yet installed.
The installation package is a self-extracting .EXE file that allows using the / q / norestart parameters to install in stealth mode and prevent device reboot, and therefore we will not need any additional special training.
Step 1. Select the devices to install the package on.
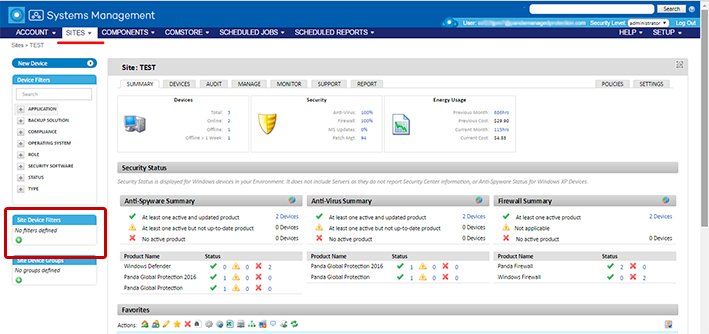
To select the devices on which you want to install this package, you must use a device filter. To do this, in the Panda Systems Management management console, open the required site (project) in the Sites section, and then in the left column in the Sites Devices Filters block, click the plus sign to add the required filter:
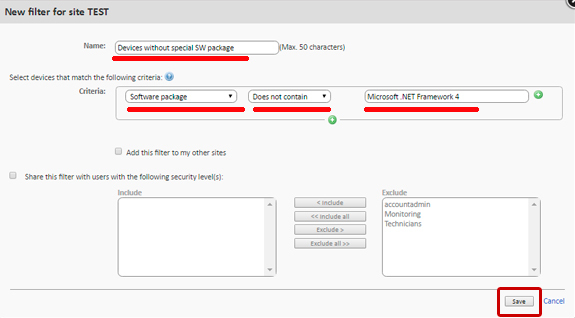
As a result, a window will open to add a device filter, in which you must specify the filter name, selection criteria (Software package, Does not contain, Microsoft .NET Framework 4) and click the Save button:
Now in the Sites Devices Filters block a customized filter has been added, when clicked, you can get a list of devices that meet the selection criteria.
By the way, sometimes when specifying the name of a software package in the filter criteria, it is necessary to know exactly which identification string corresponds to this package (especially in the case of some specific software). In this case, you will need to find a device in the device list (you can also use various filters) on which this package is already installed, open this device from the list, select the Audit tab and enable the Software option.

Step 2. Create a software installation component.
This can be done quite easily: in the control console, in the main menu, select the Components section, click the New component button. As a result, a window will open to add the component. In the Category list, select Applications . Specify the name of the component and its brief description (if necessary) and click the Save button.

After that, you will immediately see a window with editing the parameters of this component. In this window, you must make the following changes:
• In the upper left corner, you can click the asterisk to add this component to your favorites. In this case, the star icon will turn yellow, and the component itself will appear in the list of components.
• Specify the scripting language used by selecting the corresponding value in the Install command list. In this case, the value is Batch .
• Paste script code.
• Add the file with the package you want to install.
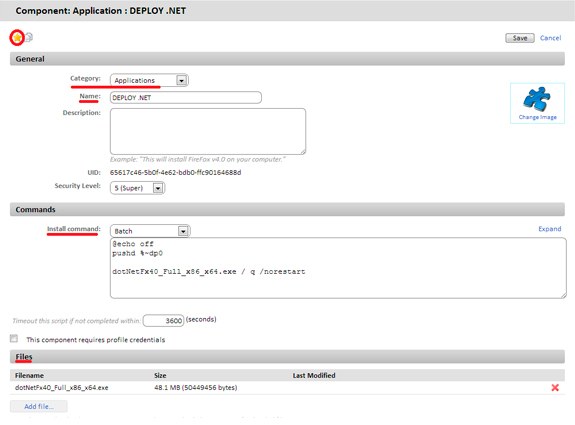
In this script, in fact, one line, which runs the installation package with the appropriate parameters for a hidden installation.
Step 3. Run the task to deploy the software package to the agents of the required devices
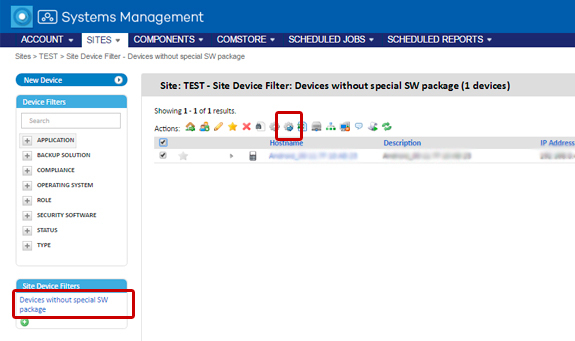
In this case, you will need to re-open your site (project), in the left column in the Sites Devices Filters block, click on the filter created earlier to get the list of required devices where you need to install the package. Then select the required devices from the list (and most likely all devices) and in the action bar click the button to quickly launch the task (if necessary, you can also schedule the task to be executed for a certain time by clicking the button to the left of this button).
As a result, a window will open in which you need to select the required component and click the OK button.

Step 4. Check the results for possible problems.
Check the result in the section Scheduled Jobs -> Completed Jobs .
Also a good way to check the installation results is to run the pre-configured device filter again to make sure that no devices with uninstalled software are left. In the same case, if some devices appear in the given list of devices, then by them it will be possible to check for an installation error.
The audit data of the software installed on the devices is synchronized with the management console every 24 hours, so if no day has passed since installing the software, the list of installed software on the Audit tab will not be updated. However, you can manually update the list of installed software using the Request device audit button in the action pane.

Example 2. Software implementation without installer
Many programs contain a simple executable file without an appropriate installer, which generates the necessary structure in the Start menu, icons on the desktop, or corresponding entries in the list of installed programs on the computer (for example, in Control Panel - Programs and Features). Such types of programs can be installed, for example, simply by running this executable file. However, in this case, Panda Systems Management will not be able to provide a correct audit of the programs installed on the PC, since such programs will not appear in the list of installed programs stored in the operating system of the device.
For this reason, third-party utilities are often used, which allow you to generate an MSI package with all the programs you add, creating all the necessary groups in the Start menu, as well as icons on the user's desktop to simplify access to the program.
In our example, we will use the Advanced Installer utility, the free version of which allows us to easily generate MSI installers.
To download the free version of the Advanced Installer, visit
To generate the installer, follow these steps:
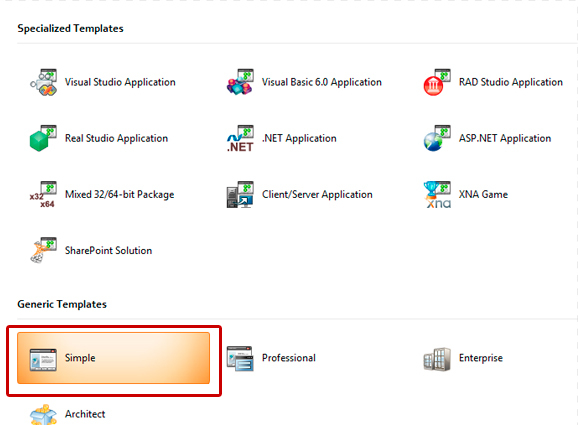
1. Install this utility on your PC, run it and select the free Simple template.
2. In the Product Details section, enter the installer basic data: Product Name (product name), Product Version (product version) and Company Name (company name)

3. Add the programs and files you need to install, as well as the icons you need to create. This can be done on the Files and Folders tab.


4. At the end of this process, click Build , after which the MS package will be generated in the selected folder:

After the installation package is generated, you need to perform the same steps to create a component for installation and to deploy it, as described in the example above (Deploying self-installing software), with the exception of the Batch script, since in this case, the command to install will be slightly different.
The MSIEXEC utility allows you to use the / qn option to start a hidden installation.
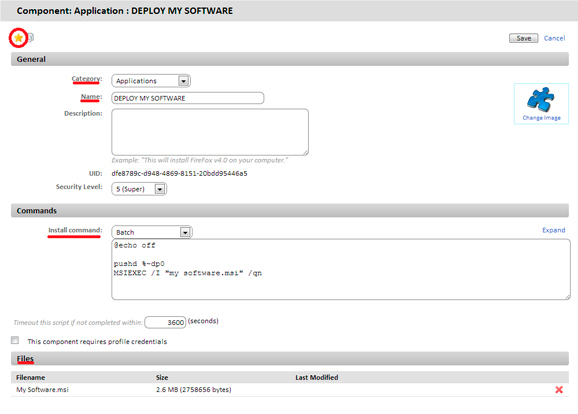
When creating a component (see the order of creation in the previous example), in the Category list, select Applications . In the component editing window, do the following:
• In the upper left corner, click on the star to add this component to your favorites. In this case, the star icon will turn yellow, and the component itself will appear in the list of components.
• Specify the scripting language used by selecting the corresponding value in the Install command list. In this case, the value is Batch .
• Paste the script code indicating the MSIEXEC utility that runs the generated MSI package (in our example, this is the My Software.msi file)
• Add the My Software.msi package file you want to install.
Example 3. Embedding documents and files using a scripting language
In this example, we need to embed three Word documents in a folder located in the root directory of the user's device. The full script code can be viewed in this file . So, to solve the task, you must perform the following steps:
Step 1. Select the devices to install the package on.
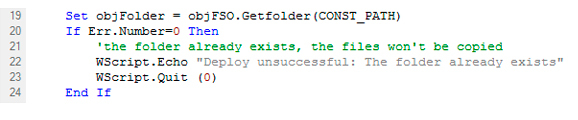
Since in this example, Panda Systems Management cannot track the status of the hard disk on the user's device at the system file level, the installation script will be deployed on all devices on the site, and the script (lines 19-24) will check if a folder containing documents exists, or not.
If the folder does not exist, it will be created (line 28), after which the documents will be moved to it (lines 30-32), and the message will be sent via the standard output (line 37).

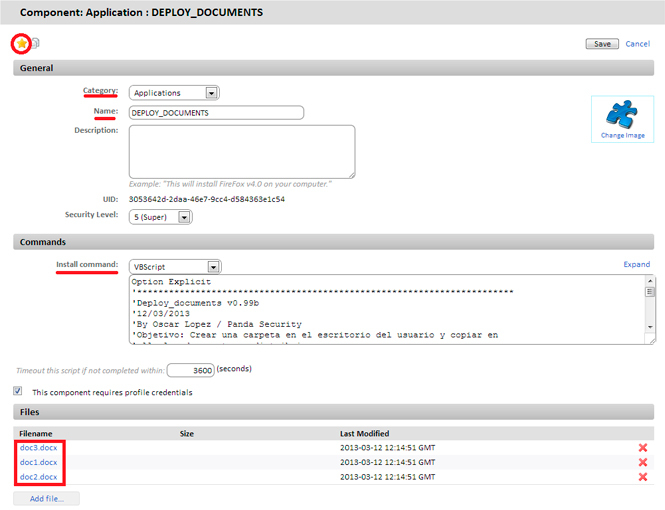
Step 2. Create a software installation component.
As always, in this step you need to create an application component for which you need to specify a script and bind these three Word documents.
In the Post-Conditions block you can specify text lines that the management console will interpret as a warning:

The example shows that if the standard output ( Resource: stdout ) contains ( Qualifier: is found in ), then the result of running the Deploy unsuccessful script will be displayed as a warning.
Step 3. Run the task to deploy the software package to the agents of the required devices
In the management console at the desired site (project), select the devices on which you want to embed these three Word documents in the device list, and then click the Quick job or Job icon in the action bar to create the corresponding task.
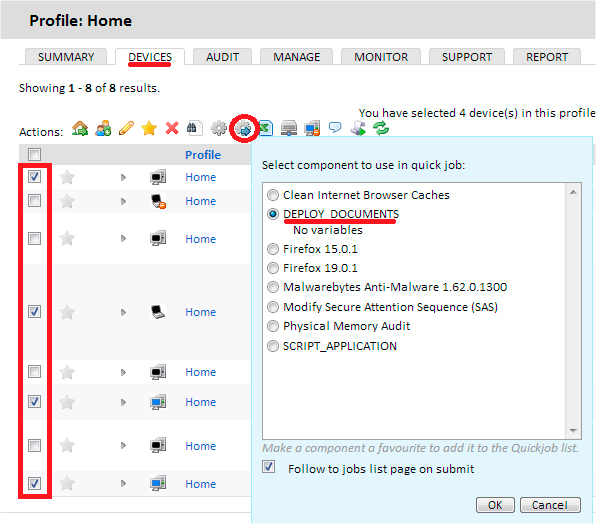
If you need to embed documents on all computers in different sites (projects), then you can select these sites at the level of your account in the Panda Systems Management management console.
Step 4. Check the results for possible problems.
In our example, the script has three output conditions:
• Success : Files are copied to the desired folder without any errors (lines 30-32). Ends with ErrorLevel0 (line 38).
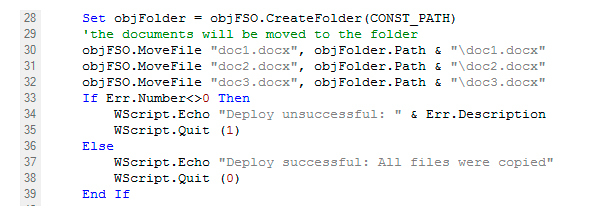
• Error : When copying files, an error occurs. Ends with ErrorLevel1 (line 35).
• Success - Warning : The folder already exists, so no files were copied. Ends with ErrorLevel0 (line 23) and generates the Deploy unsuccessful string, which the management console interprets as a warning, which was configured in the Post-Conditions block in step 3.

After the task is started, it will appear in the Scheduled Jobs -> Active Jobs section.
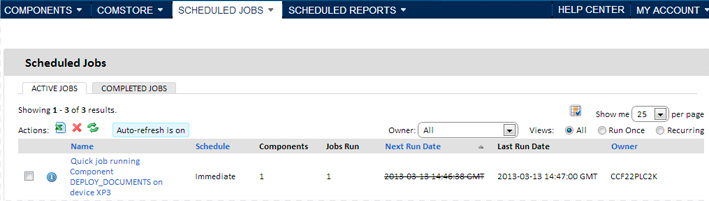
On the Completed Jobs tab you can see the result of the task, which will be marked in red if the result contains an error, orange - if there is a warning, or green - if the task has been successfully completed.

The Stdout and Stderror icons show a copy of the standard output and standard error generated by the script.
In addition, this tab contains an icon panel that allows you to run various actions:
• The Actions icons set groups icons that allow you to rerun the task, reload the page to update the status of the tasks, or download the standard output or error to the file
• Views filter allows you to filter tasks by status
Example 4. Embedding documents and files without using a scripting language
The installation script can be greatly simplified if preliminary checks are not required or if you do not need to generate alerts in the management console.
In this example, you need to embed 3 documents that were used in the previous example, but in this example, instead of creating the folder structure from the script itself, a self-extracting EXE package was created that contains the archived documents and the necessary folder structure. This EXE package can be created using various utilities, for example, WinRar.
To download the free version of WinRar, go to the site.
In this example, a self-extracting EXE file was created with the following characteristics:
• It works in hidden mode (Silent).
• The required content folder is automatically created in C: \.
• If the folder already exists, its content will be overwritten without warning.
It is important to create a self-extracting file that runs in hidden mode, i.e. it will not show dialogs and will not require user intervention .
Just in case, let's take a look at the steps to create a self-extracting installation file using WinRar.
Step 1: Prepare a folder with the documents you want to embed.
Create the root folder ACME Documents, in which put all the files, folders and subfolders that you want to embed.
Step 2: Generate the executable file.
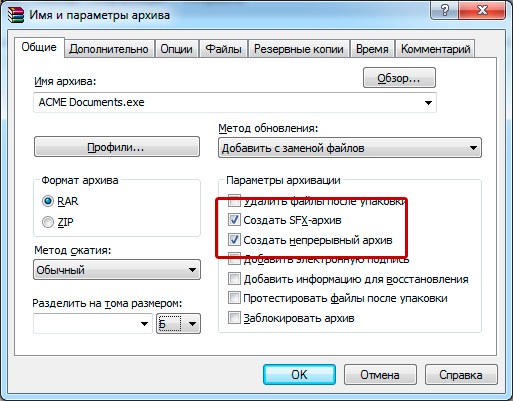
In the WinRar program when creating an ACME Documents archive on the General tabEnable the Create SFX archive and Create continuous archive options .
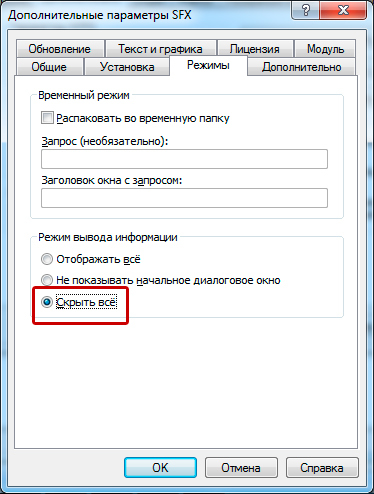
Now you need to configure the archive in stealth mode. To do this, go to the Additional tab and click the SFX Parameters button ...

In the Advanced SFX Parameters window, select the Modes tab and in the Information display mode block, select the Hide all option .
In the same window, select the General tab and specify the path to unpack where the folder should be created.

And select the Update tab., in which you must specify that all files, if they already exist on the PC, will be overwritten without additional requests to the user.

After that, click OK . As a result, an EXE package ( ACME Documents.exe ) with the required parameters will be created .
After generating the package, you must perform all the standard steps for selecting devices, creating a component, running a task and checking the results of its execution.
Pay attention to the parameters that must be used when creating a component:
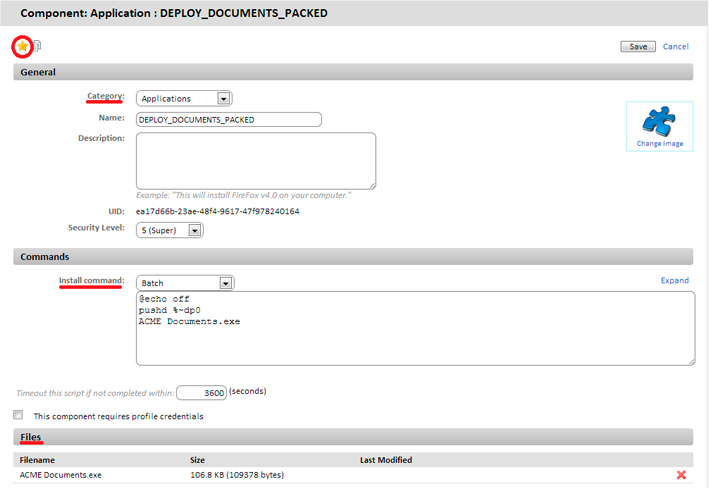
When creating a component (see the order of creation in the previous examples), in the Category list , select Applications. In the component editing window, do the following:
• In the upper left corner, click the star to add this component to your favorites. In this case, the star icon will turn yellow, and the component itself will appear in the list of components.
• Specify the scripting language used by selecting the corresponding value in the Install command list . In this case, the value is Batch .
• Paste the script code.
• Add the file with the ACME Documents.exe package that you want to embed.
As a result, the script will launch a self-extracting archive that will create a folder in the root of drive C with the entire internal structure, overwriting any existing content, if such a folder already exists.
Link Bandwidth Optimization
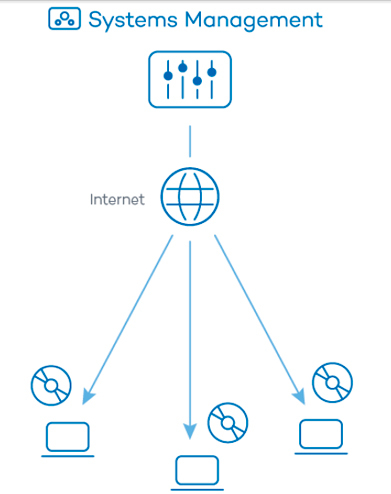
The local agent installed on each device checks the Panda Systems Management server for available downloads and updates every 60 seconds. In the event that a local agent has what to download or download, then Panda Systems Management launches this download individually for each agent. In this case, if the installation package has a size of 50 MB, and the network consists of 50 devices, then the total traffic when downloading will be 2.5 GB.
To reduce the total size of download traffic, one of the network devices can act as a repository / cache. In this case, only this device will download the package from the Server, and then distribute it to all the required network devices.
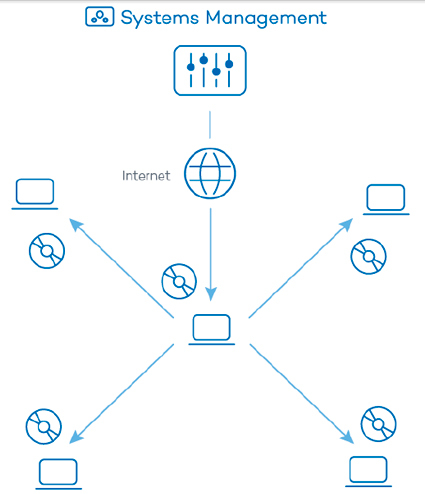
To assign the repository / cache role to the selected device, you need to find this device in the Panda Systems Management management console and on the page with detailed information on this device, in the action pane, click the Add / Remove as local cache icon .
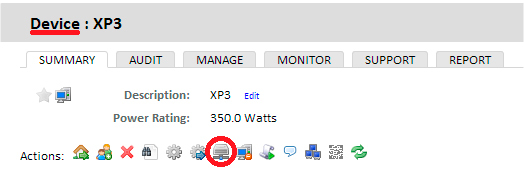
As a result, the selected device will download and distribute components and installation packages to devices in the local network, which will significantly speed up the process of remote software installation and significantly reduce the load on the communication channel bandwidth.
Remote software installation on iOS devices
The cloud RMM service of Panda Systems Management allows you to remotely and centrally install the required software on mobile devices (tablets and smartphones) running iOS. In this case, the installation procedure differs from the above procedure, since These devices have certain limitations related to the source of downloadable software (Apple Store).
Remote software installation on Android devices is not yet supported.
Requirements for installing applications on iOS devices
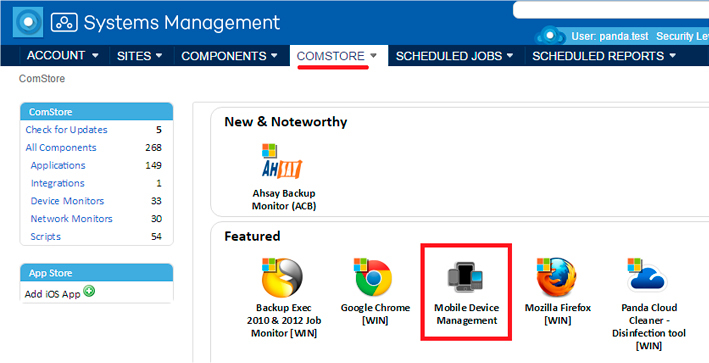
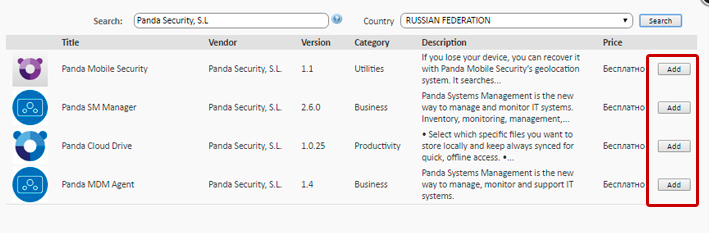
To be able to download applications to iOS devices, you first need to download the Mobile Device Management component from ComStore . Do not forget that you will need to upload your Apple Push Notification certificate. How to do this - we wrote in the previous article on mobile device management . After that, you can add the applications required for deployment to the Application List . To do this, in the main menu of the management console, select the ComStore section and in the left column of the window in the App Store block, click on the plus sign icon to access the application selection window.

In the window that opens, you need to specify the country of the user and enter the name of the application in the text box. Click the Search button to search for applications with its name, general description and cost.

For the required applications, click the Add button to add them to the Application List .
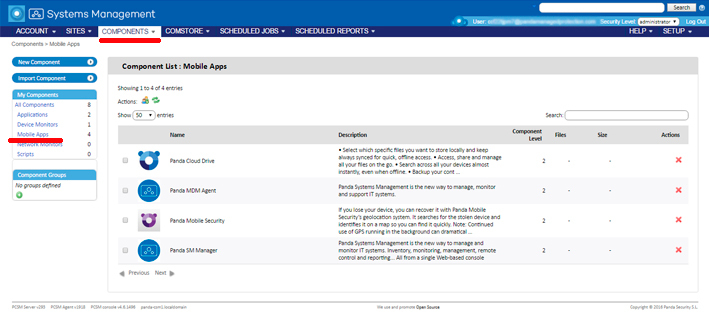
After that, the selected components will appear in the list of components of mobile applications in the main menu Components :
Installing iOS applications from the application list
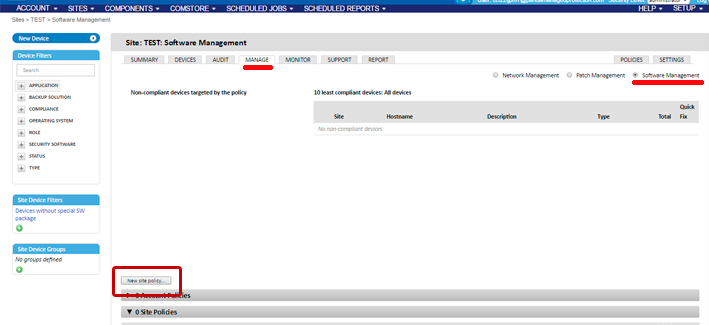
After you have added the required applications to the list of applications, you will need to create a software management policy to implement them on iOS devices. To do this, open the required site (project), profile or the entire account in the management console, click the Manage tab , select the Software Management option and click the New site policy ... button (or the corresponding button if the entire account or profile is selected).
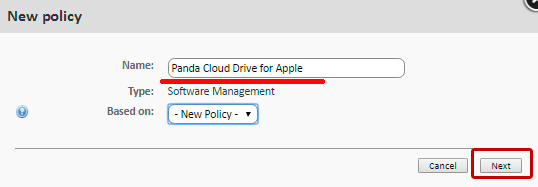
In the window that opens, specify the name of the policy and click Next .
Then in the policy editing window, select the devices to which you want to apply this policy by clicking the Add a target button.... and also select the applications that need to be installed by clicking on the Add an app ... button .
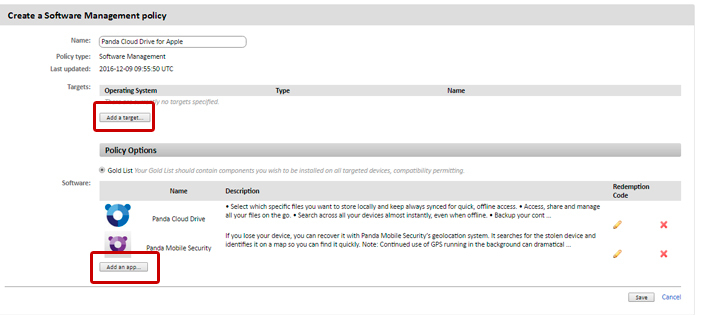
After you have added applications, and if any of them are paid, click on the icon with a yellow pencil in this application to enter the corresponding Redemption code.

When you finish editing the policy, click the Save button . After that, this policy will be displayed in the list of policies. Click on her button Push changes to send customized applications to the selected device policy.

In the event that the iOS device is turned off at the moment when you press the Push changes button , such a device will appear in the blockNon-Compliant Devices . To make these changes automatically apply after such a device becomes available again, click the green arrow icon.
Conclusion
In this article, we looked at 4 standard situations of remote and centralized software installation (packages, files) on the required Windows, Linux, Mac devices, and also described how you can remotely and centrally install applications on iOS mobile devices. To solve these problems, we used the cloud RMM-service Panda Systems Management .
And we have considered fairly simple cases. Obviously, scripts can be much more complicated. For example, installing the required software image on new devices, scheduled software reinstallation when changing the operating system, or some other conditions that can trigger the corresponding tasks for remote and centralized software installation as triggers.
As you can see, the more computers and devices in the IT network, the more indispensable will be the tool of such a remote and centralized installation. It allows you to automate this task and significantly save the IT specialist time to implement software.
Modern RMM solutions are effective tools for solving such problems. And, by the way, many more others :)
Do more by doing less!
Source: https://habr.com/ru/post/317390/
All Articles