Set up Swashbuckle (Swagger) for WebAPI
Who ever tested your WebAPI knows tools such as Postman or Advanced REST (extensions for Chrome). These tools are convenient for everyone, except that they are not able to find out for themselves which models the API accepts, which gives and does not provide information about all possible endpoints. This inconvenience is solved by the Swashbuckle package, which builds in the project the generation of Swagger specifications and UI. Under the cut, briefly, how to fasten it to the project and some details regarding authorization and work with “overloaded” endpoints.
Swashbuckle is a NuGet package that integrates the auto-generation of information about nodes in WebAPI in accordance with the OpenAPI specification. This specification is, de facto, a standard, as there was no WSDL. For installation, four simple steps are required.
Everything. Next, you need to describe the methods of API, response codes and customize further.
When deploying WebAPI in production, there may be a problem with the fact that the XML file is missing. The release build does not include them by default, but you can get around this by editing the csproj file. It is necessary to add
')
Another problem lurks those who hide their API behind a proxy. The solution is not universal, but it works in my case. The proxy adds heders to the request, by which we will find out what the endonit URL for the client should be.
The returned HTTP Status Codes can be added in two ways: using XML comments and using attributes.
It should be remembered that XML comments take precedence over attributes. The latter will be ignored if two methods are simultaneously used for the same method. Also, if XML comments are used, then all code is necessary, including 200 (OK), and the returned model cannot be specified. Therefore, using SwaggerResponse is preferable, since He is devoid of these shortcomings. When the endpoint returns another code, for example, 201 (Created), instead of the default 200, the first one needs to be removed with the
For the lazy, it is possible to add common codes (for example, 400 (BadRequest) or 401 (Unauthorized)) to all methods at once. To do this, you need to implement the IOperationFilter interface and register such a class using c.OperationFilter <T> () ;.
If the AuthorizeAttribute is used, Swashbuckle will build the UI, but the requests will not pass. There are several ways to provide this information:
The authorization embedded in the browser will be available out of the box if the attribute and filter are used:
Having added them to the WebAPI configuration, the browser will offer to enter data for authentication at the time of the request. The difficulty here is that resetting this data is not as convenient and quick as entering.
Another way is more convenient in this regard, since provides a special form. To enable the built-in authentication form in the package, do the following:
After that, you can use this form of authorization, and the entered data will be used for all requests.

Parameters can send data not only to body and query, but also to header. In this case, it will be necessary to enter a hash.
By injecting your JavaScript, you can also send data in a request header. To do this, do the following:
Now this data will be added as a header to each request. In general, using this JS code, you can send any heders, as I understood. The key parameter, which is equal to “basic” in the example, must be unique so that the JS error does not pop up at the time of sending the request.
In some cases, non-authorization headers may be mandatory. For example, heder with customer information. Usually, a message handler is embedded in the WebAPI pipeline, namely, it is implemented by the DelegatingHandler and is registered in the WebAPI configuration
WebAPI allows you to create several action methods for one endpoint, the call of which depends on the request parameters.
Such methods are not supported by Swagger by default and the UI will generate an error 500: Not supported by Swagger 2.0: Multiple operations with path 'api / <URL>' and method '<METHOD>'. See the config setting - \ "ResolveConflictingActions \" for a potential workaround.
As advised in the message, you should resolve the situation yourself and there are several options:
The first and second methods are implemented using the
The third method is more cardinal and is a departure from the OpenAPI specification. You can display all endpoints with parameters:
To do this, you need to change the method of generating a Swagger document using an IDocumentFilter and generate a description yourself.
In life, this method is rarely needed, so we dig even deeper. Another way that I would recommend only to those who are interested in Swashbuckle internals is to replace the SwaggerGenerator. This is done in line
After that, you need to find a place
We fasten to the project
Swashbuckle is a NuGet package that integrates the auto-generation of information about nodes in WebAPI in accordance with the OpenAPI specification. This specification is, de facto, a standard, as there was no WSDL. For installation, four simple steps are required.
- Installing from NuGet with
Install-Package Swashbuckle - We include XML documentation in project settings
- In the
SwaggerConfig.csfile that is created with the package installation, we uncomment the linec.IncludeXmlComments(GetXmlCommentsPath()); - In the implementation of the
GetXmlCommentsPath()method, we write thereturn string.Format(@"{0}\bin\BookStoreApiService.XML", AppDomain.CurrentDomain.BaseDirectory);
Everything. Next, you need to describe the methods of API, response codes and customize further.
Nuances of Deploy WebAPI
When deploying WebAPI in production, there may be a problem with the fact that the XML file is missing. The release build does not include them by default, but you can get around this by editing the csproj file. It is necessary to add
<ExcludeXmlAssemblyFiles>false</ExcludeXmlAssemblyFiles> in the PropertyGroup of the project and the file will remain in bin/ .')
Another problem lurks those who hide their API behind a proxy. The solution is not universal, but it works in my case. The proxy adds heders to the request, by which we will find out what the endonit URL for the client should be.
Example of recognizing URL for proxy
// SwaggerConfig.cs c.RootUrl(req => ComputeClientHost(req)); // public static string ComputeClientHost(HttpRequestMessage req) { var authority = req.RequestUri.Authority; var scheme = req.RequestUri.Scheme; // , if (req.Headers.Contains("X-Forwarded-Host")) { // var xForwardedHost = req.Headers.GetValues("X-Forwarded-Host").First(); var firstForwardedHost = xForwardedHost.Split(',')[0]; authority = firstForwardedHost; } // , if (req.Headers.Contains("X-Forwarded-Proto")) { var xForwardedProto = req.Headers.GetValues("X-Forwarded-Proto").First(); xForwardedProto = xForwardedProto.Split(',')[0]; scheme = xForwardedProto; } return scheme + "://" + authority; } Add Response Codes
The returned HTTP Status Codes can be added in two ways: using XML comments and using attributes.
Examples of adding status codes
/// <response code="404">Not Found</response> [SwaggerResponse(HttpStatusCode.NotFound, Type = typeof(Model), Description = "Not Found: no such endpoint")] It should be remembered that XML comments take precedence over attributes. The latter will be ignored if two methods are simultaneously used for the same method. Also, if XML comments are used, then all code is necessary, including 200 (OK), and the returned model cannot be specified. Therefore, using SwaggerResponse is preferable, since He is devoid of these shortcomings. When the endpoint returns another code, for example, 201 (Created), instead of the default 200, the first one needs to be removed with the
[SwaggerResponseRemoveDefaults] attribute.For the lazy, it is possible to add common codes (for example, 400 (BadRequest) or 401 (Unauthorized)) to all methods at once. To do this, you need to implement the IOperationFilter interface and register such a class using c.OperationFilter <T> () ;.
An example of the Apply method to add some code list.
HttpStatusCode[] _codes; // public void Apply(Operation operation, SchemaRegistry schemaRegistry, ApiDescription apiDescription) { // if (operation.responses == null) operation.responses = new Dictionary<string, Response>(); foreach (var code in _codes) { var codeNum = ((int)code).ToString(); var codeName = code.ToString(); // if (!operation.responses.ContainsKey(codeNum)) operation.responses.Add(codeNum, new Response { description = codeName }); } } WebAPI and Swashbuckle Authorization
The text below discusses several options for implementing Basic authorization. But the package supports others.
If the AuthorizeAttribute is used, Swashbuckle will build the UI, but the requests will not pass. There are several ways to provide this information:
- via browser built-in authorization
- through the built-in form of authorization in the package
- via operation parameters
- via javascript
Built in Browser
The authorization embedded in the browser will be available out of the box if the attribute and filter are used:
// Basic Authorization attributes config.Filters.Add(new AuthorizeAttribute()); config.Filters.Add(new BasicAuthenticationFilter()); // IAuthenticationFilter Having added them to the WebAPI configuration, the browser will offer to enter data for authentication at the time of the request. The difficulty here is that resetting this data is not as convenient and quick as entering.
Integrated Login Form in Swashbuckle
Another way is more convenient in this regard, since provides a special form. To enable the built-in authentication form in the package, do the following:
- as above enable attribute and filter for authentication
- in the Swagger settings, uncomment the
c.BasicAuth("basic").Description("Basic HTTP Authentication");stringc.BasicAuth("basic").Description("Basic HTTP Authentication"); - Add a special IOperationFilter that adds information about this to the
c.OperationFilter<MarkSecuredMethodsOperationFilter>();nodesc.OperationFilter<MarkSecuredMethodsOperationFilter>();
Implement the Apply method of this filter
public void Apply(Operation operation, SchemaRegistry schemaRegistry, ApiDescription apiDescription) { var filterPipeline = apiDescription.ActionDescriptor.GetFilterPipeline(); // check if authorization is required var isAuthorized = filterPipeline .Select(filterInfo => filterInfo.Instance) .Any(filter => filter is IAuthorizationFilter); // check if anonymous access is allowed var allowAnonymous = apiDescription.ActionDescriptor.GetCustomAttributes<AllowAnonymousAttribute>().Any(); if (isAuthorized && !allowAnonymous) { if (operation.security == null) operation.security = new List<IDictionary<string, IEnumerable<string>>>(); var auth = new Dictionary<string, IEnumerable<string>> { {"basic", Enumerable.Empty<string>()} }; operation.security.Add(auth); } } After that, you can use this form of authorization, and the entered data will be used for all requests.
Authorization by Parameter and JS Code
The following two methods should be considered as examples of working with an IOperationFilter and injecting your JavaScript.
Parameters can send data not only to body and query, but also to header. In this case, it will be necessary to enter a hash.
Adding such a parameter
operation.parameters.Add(new Parameter { name = "Authorization", @in = "header", // , description = "Basic U3dhZ2dlcjpUZXN0", // Basic Swagger:Test required = true, // type = "string" }); By injecting your JavaScript, you can also send data in a request header. To do this, do the following:
- add js file as embedded resource
- in the Swagger configuration, uncomment the line and specify your file as the resource name:
c.InjectJavaScript(thisAssembly, "assembly.namesapce.swagger-basic-auth.js"); - write in the file like this:
swaggerUi.api.clientAuthorizations.add("basic", new SwaggerClient.ApiKeyAuthorization("Authorization", "Basic U3dhZ2dlcjpUZXN0", "header"));
Now this data will be added as a header to each request. In general, using this JS code, you can send any heders, as I understood. The key parameter, which is equal to “basic” in the example, must be unique so that the JS error does not pop up at the time of sending the request.
For example, JS sending heders to Swagger
swaggerUi.api.clientAuthorizations.add("custom1", new SwaggerClient.ApiKeyAuthorization("X-Header-1", "value1", "header")); swaggerUi.api.clientAuthorizations.add("custom2", new SwaggerClient.ApiKeyAuthorization("X-Header-2", "value2", "header")); swaggerUi.api.clientAuthorizations.add("custom3", new SwaggerClient.ApiKeyAuthorization("X-Header-3", "value3", "header")); We work with Mandatory Hederas
In some cases, non-authorization headers may be mandatory. For example, heder with customer information. Usually, a message handler is embedded in the WebAPI pipeline, namely, it is implemented by the DelegatingHandler and is registered in the WebAPI configuration
config.MessageHandlers.Add(new MandatoryHeadersHandler()); . In this case, Swagger will stop showing something, because requests to him will not pass, because Handler forbids them. Out of the box, this is not solved at all, so it is necessary to provide this case in your handler. Those. in case of request to the swagger URL, skip it. And further, adding headers with JS, as described above, will help.Endpoints with Overloaded Methods
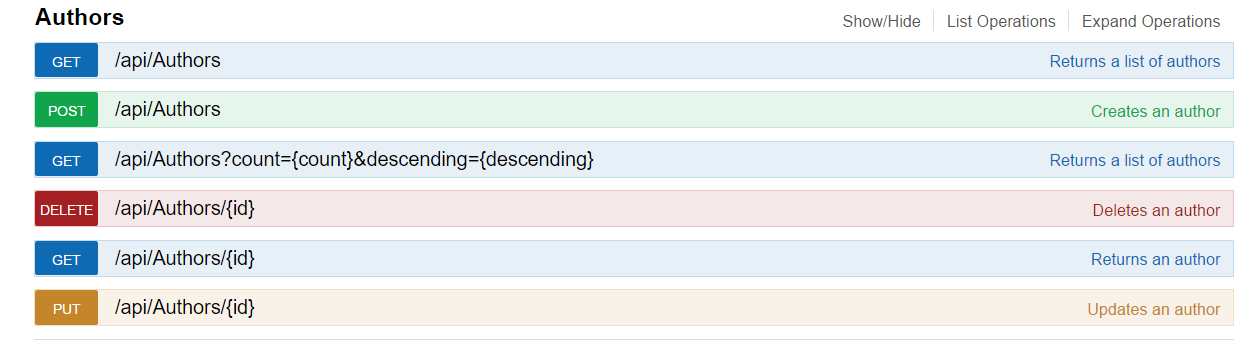
WebAPI allows you to create several action methods for one endpoint, the call of which depends on the request parameters.
[ResponseType(typeof (IList<Model>))] public IHttpActionResult Get() {...} [ResponseType(typeof (IList<Model>))] public IHttpActionResult Get(int count, bool descending) {...} Such methods are not supported by Swagger by default and the UI will generate an error 500: Not supported by Swagger 2.0: Multiple operations with path 'api / <URL>' and method '<METHOD>'. See the config setting - \ "ResolveConflictingActions \" for a potential workaround.
As advised in the message, you should resolve the situation yourself and there are several options:
- select only one method
- make one method with all parameters
- change document generation
The first and second methods are implemented using the
c.ResolveConflictingActions(Func<IEnumerable<ApiDescription>, ApiDescription> conflictingActionsResolver) . The essence of the method is to take several conflicting methods and return one.An example of how to combine all parameters
return apiDescriptions => { var descriptions = apiDescriptions as ApiDescription[] ?? apiDescriptions.ToArray(); var first = descriptions.First(); // var parameters = descriptions.SelectMany(d => d.ParameterDescriptions).ToList(); first.ParameterDescriptions.Clear(); // foreach (var parameter in parameters) if (first.ParameterDescriptions.All(x => x.Name != parameter.Name)) { first.ParameterDescriptions.Add(new ApiParameterDescription { Documentation = parameter.Documentation, Name = parameter.Name, ParameterDescriptor = new OptionalHttpParameterDescriptor((ReflectedHttpParameterDescriptor) parameter.ParameterDescriptor), Source = parameter.Source }); } return first; }; // , .. IsOptional getter public class OptionalHttpParameterDescriptor : ReflectedHttpParameterDescriptor { public OptionalHttpParameterDescriptor(ReflectedHttpParameterDescriptor parameterDescriptor) : base(parameterDescriptor.ActionDescriptor, parameterDescriptor.ParameterInfo) { } public override bool IsOptional => true; } Cardinal Way
The third method is more cardinal and is a departure from the OpenAPI specification. You can display all endpoints with parameters:
To do this, you need to change the method of generating a Swagger document using an IDocumentFilter and generate a description yourself.
In life, this method is rarely needed, so we dig even deeper. Another way that I would recommend only to those who are interested in Swashbuckle internals is to replace the SwaggerGenerator. This is done in line
c.CustomProvider(defaultProvider => new NewSwaggerProvider(defaultProvider)); . To do this, you can do this:- create your class MySwaggerGenerator: ISwaggerProvider
- in the Swashbuckle repository on GitHub find SwaggerGenerator.cs ( it's here )
- copy the GetSwagger method and other related methods to your
- duplicate internal variables and initialize them in the constructor of your class
- register in swagger configuration
Initialization of internal variables
private readonly IApiExplorer _apiExplorer; private readonly IDictionary<string, Info> _apiVersions; private readonly JsonSerializerSettings _jsonSerializerSettings; private readonly SwaggerGeneratorOptions _options; public MultiOperationSwaggerGenerator(ISwaggerProvider sp) { var sg = (SwaggerGenerator) sp; var privateFields = sg.GetType().GetFields(BindingFlags.Instance | BindingFlags.NonPublic); _apiExplorer = privateFields.First(pf => pf.Name == "_apiExplorer").GetValue(sg) as IApiExplorer; _jsonSerializerSettings = privateFields.First(pf => pf.Name == "_jsonSerializerSettings").GetValue(sg) as JsonSerializerSettings; _apiVersions = privateFields.First(pf => pf.Name == "_apiVersions").GetValue(sg) as IDictionary<string, Info>; _options = privateFields.First(pf => pf.Name == "_options").GetValue(sg) as SwaggerGeneratorOptions; } After that, you need to find a place
var paths = GetApiDescriptionsFor(apiVersion).... This is where the paths are created. For example, to get what in the example, you need to replace GroupBy () with .GroupBy(apiDesc => apiDesc.RelativePath) .Literature
- Swagger example
- RESTful Web API specification formats
- Customize Swashbuckle-generated API definitions
- Swagger object schema
- Authentication Filters in ASP.NET Web API 2
- A WebAPI Basic Authentication Authorization Filter
- Customize Authentication Header in SwaggerUI using Swashbuckle
- HTTP Message Handlers in ASP.NET Web API
- Managing Action Conflicts in ASP.Net 5 with Swashbuckle
- Tutorial swagger project at github
Source: https://habr.com/ru/post/317338/
All Articles