Implementing NSTouchBar on Swift
Recently, Apple introduced the world to a new line of MacBook Pro. And one of the features of the new version was that the top row of system buttons in it was deleted - or rather, replaced by a multitouch screen. Developers this innovation should be interesting in the first place, because the panel highlighted the area that you can use in your own applications. Apple has even provided an API for its use. In this article, we will tell and show how we mastered the capabilities of the NSTouchBar. We subsequently applied this knowledge in the update of MaCleaner .

To begin with, let's see what the NSTouchBar is.

')
Application Region is, actually, that part which is taken away under needs of the application. This is where everything that is necessary for its correct operation will be displayed.
Control Strip - system panel. Here, the developer is closed the entrance - we can neither modify our objects, nor somehow modify it. Here are the buttons that were previously in place of the NSTouchBar - changing the brightness, volume, and others.
System Button - system button
In order to implement NSTouchBar support in your projects, it is not necessary to have a new MacBookPro with a touchbar. Xcode has its simulator, which is called via Window> Show Touch Bar. However, you can use it only if your Xcode version is at least 8.1, and at the system - 10.12.1, and with a build no lower than 16B2657.
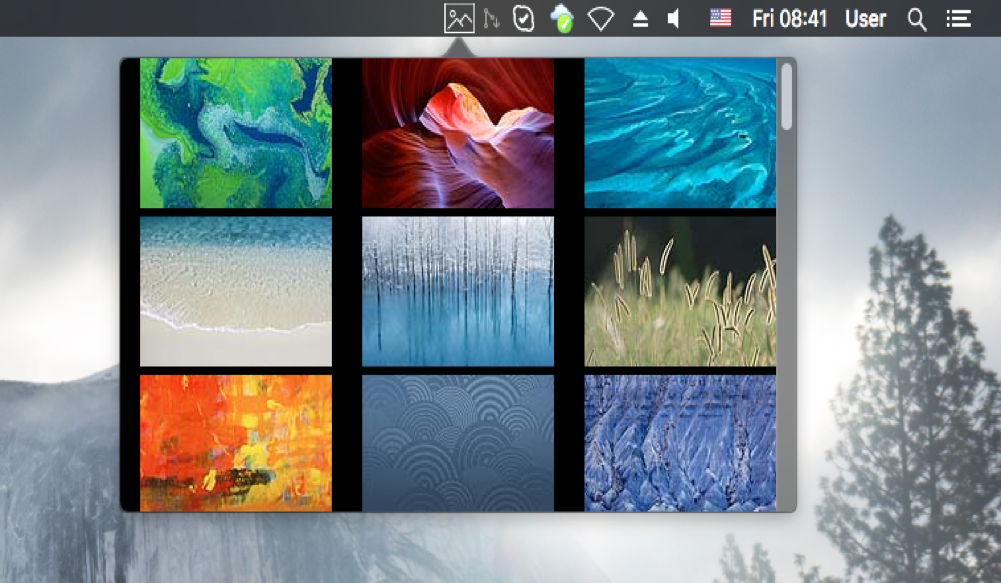
So, you worked hard and wrote a wonderful application - it hangs in the status bar, shows the system design of the desktop in a pop-up window and changes it to the look that the user chooses. It all looks like this:
If you are on fire with this wonderful application, you can download the version without NSTouchBar here and work on it with us.
Now we introduce support for NSTouchBar in our project. First, let's connect NSTouchBar and display “Hello World!” In it. Add the following extension to our MainPopoverController:
In the makeTouchBar () method, we create an NSTouchBar object and specify its delegate. Each NSTouchBar and each NSTouchBarItem must have unique identifiers. Therefore, we prescribe an identifier for our NSTouchBar, then we specify the identifiers of the objects that we put in it, and finally, we set the order in which the objects are displayed. Now add a method that will fill our NSTouchBar with objects:
In this method, you can fill in the NSTouchBar as you please. For this example, we created a NSCustomTouchBarItem and put an NSTextField in it with the text “Hello World!”. Now it's time to launch the project and enjoy our exclusive NSTouchBar! Run - and ...

Where is our “Hello World!”? And the thing is this. In order for us to generate the NSTouchBar in the MainPopoverController, at least one object in the popover must receive focus. In our popover there are two objects - NSView itself and CollectionView. In NSView (and CollectionView), acceptsFirstResponder always returns false by default - so when we start the application, the focus is not placed on any object, which means that the NSTouchBar is not generated. We will get out of the situation as follows: create our NSView and override acceptsFirstResponder so that it returns true.
Let's try to start the application after using this class in our popover and see what happened:

Our NSTouchBar has finally revealed itself to the world, and even greeted this world. Now we need to implement NSTouchBar applicable to the functionality of our application. We want to place in the NSTouchBar all the pictures from our collection so that when clicking on a picture, the application sets it as the background for the desktop. Since there is not enough space for the entire gallery in NSTouchBar, we will use scrollable NSScrubber. First, let's change the method that fills our NSTouchBar objects so that it uses the NSScrubber.
In order to populate an NSScrubber with objects, you must subscribe to an NSScrubberDataSource; to handle clicking on a specific object from it - on NSScrubberDelegate, and in order to specify the size of the object (and in NSTouchBar, the maximum height of the object is 30, otherwise the object will be cropped) - on NSScrubberFlowLayoutDelegate.
As a result, add the following extension for our MainPopoverController:
The first method returns the number of objects in the NSScrubber. The second one generates an object for a specific position in NSScrubber (in our case, these are pictures for the desktop). The third one handles clicking on an object in NSScrubber and puts the selected picture on the desktop. Well, the fourth method returns the size of the object in NSScrubber.
Now when you start our NSTouchBar has the following form:

Now we have a working NSTouchBar in the application, which can change the design of the desktop. Using the same algorithm, you can implement support for the touchbar in more complex projects, which we plan to do in the future.
Thank you for your attention and good luck with the new wonder from Apple!
To begin with, let's see what the NSTouchBar is.
')
Application Region is, actually, that part which is taken away under needs of the application. This is where everything that is necessary for its correct operation will be displayed.
Control Strip - system panel. Here, the developer is closed the entrance - we can neither modify our objects, nor somehow modify it. Here are the buttons that were previously in place of the NSTouchBar - changing the brightness, volume, and others.
System Button - system button
In order to implement NSTouchBar support in your projects, it is not necessary to have a new MacBookPro with a touchbar. Xcode has its simulator, which is called via Window> Show Touch Bar. However, you can use it only if your Xcode version is at least 8.1, and at the system - 10.12.1, and with a build no lower than 16B2657.
So, you worked hard and wrote a wonderful application - it hangs in the status bar, shows the system design of the desktop in a pop-up window and changes it to the look that the user chooses. It all looks like this:
If you are on fire with this wonderful application, you can download the version without NSTouchBar here and work on it with us.
Now we introduce support for NSTouchBar in our project. First, let's connect NSTouchBar and display “Hello World!” In it. Add the following extension to our MainPopoverController:
@available(OSX 10.12.1, *) extension MainPopoverController : NSTouchBarDelegate { override open func makeTouchBar() -> NSTouchBar? { let touchBar = NSTouchBar() touchBar.delegate = self touchBar.customizationIdentifier = NSTouchBarCustomizationIdentifier("My First TouchBar") touchBar.defaultItemIdentifiers = [NSTouchBarItemIdentifier("HelloWorld")] touchBar.customizationAllowedItemIdentifiers = [NSTouchBarItemIdentifier("HelloWorld")] return touchBar } } In the makeTouchBar () method, we create an NSTouchBar object and specify its delegate. Each NSTouchBar and each NSTouchBarItem must have unique identifiers. Therefore, we prescribe an identifier for our NSTouchBar, then we specify the identifiers of the objects that we put in it, and finally, we set the order in which the objects are displayed. Now add a method that will fill our NSTouchBar with objects:
func touchBar(_ touchBar: NSTouchBar, makeItemForIdentifier identifier: NSTouchBarItemIdentifier) -> NSTouchBarItem? { switch identifier { case NSTouchBarItemIdentifier("HelloWorld"): let customViewItem = NSCustomTouchBarItem(identifier: identifier) customViewItem.view = NSTextField(labelWithString: "Hello World!") return customViewItem default: return nil } } In this method, you can fill in the NSTouchBar as you please. For this example, we created a NSCustomTouchBarItem and put an NSTextField in it with the text “Hello World!”. Now it's time to launch the project and enjoy our exclusive NSTouchBar! Run - and ...
Where is our “Hello World!”? And the thing is this. In order for us to generate the NSTouchBar in the MainPopoverController, at least one object in the popover must receive focus. In our popover there are two objects - NSView itself and CollectionView. In NSView (and CollectionView), acceptsFirstResponder always returns false by default - so when we start the application, the focus is not placed on any object, which means that the NSTouchBar is not generated. We will get out of the situation as follows: create our NSView and override acceptsFirstResponder so that it returns true.
class MainPopoverView: NSView { override var acceptsFirstResponder: Bool { get { return true } } } Let's try to start the application after using this class in our popover and see what happened:
Our NSTouchBar has finally revealed itself to the world, and even greeted this world. Now we need to implement NSTouchBar applicable to the functionality of our application. We want to place in the NSTouchBar all the pictures from our collection so that when clicking on a picture, the application sets it as the background for the desktop. Since there is not enough space for the entire gallery in NSTouchBar, we will use scrollable NSScrubber. First, let's change the method that fills our NSTouchBar objects so that it uses the NSScrubber.
func touchBar(_ touchBar: NSTouchBar, makeItemForIdentifier identifier: NSTouchBarItemIdentifier) -> NSTouchBarItem? { switch identifier { case NSTouchBarItemIdentifier("HelloWorld"): let scrubberItem = NSCustomTouchBarItem(identifier: identifier) let scrubber = NSScrubber() scrubber.scrubberLayout = NSScrubberFlowLayout() scrubber.register(NSScrubberImageItemView.self, forItemIdentifier: "ScrubberItemIdentifier") scrubber.mode = .free scrubber.selectionBackgroundStyle = .roundedBackground scrubber.delegate = self scrubber.dataSource = self scrubberItem.view = scrubber return scrubberItem default: return nil } } In order to populate an NSScrubber with objects, you must subscribe to an NSScrubberDataSource; to handle clicking on a specific object from it - on NSScrubberDelegate, and in order to specify the size of the object (and in NSTouchBar, the maximum height of the object is 30, otherwise the object will be cropped) - on NSScrubberFlowLayoutDelegate.
As a result, add the following extension for our MainPopoverController:
@available(OSX 10.12.1, *) extension MainPopoverController: NSScrubberDataSource, NSScrubberDelegate, NSScrubberFlowLayoutDelegate { func numberOfItems(for scrubber: NSScrubber) -> Int { return wardrobe.wallpapers.count } func scrubber(_ scrubber: NSScrubber, viewForItemAt index: Int) -> NSScrubberItemView { let itemView = scrubber.makeItem(withIdentifier: "ScrubberItemIdentifier", owner: nil) as! NSScrubberImageItemView itemView.image = wardrobe.wallpapers[index].picture return itemView } func scrubber(_ scrubber: NSScrubber, didSelectItemAt index: Int) { scrubber.selectedIndex = -1 if let screen = NSScreen.main() { do { try NSWorkspace.shared().setDesktopImageURL( wardrobe.wallpapers[index].url, for: screen, options: [:]) } catch { print(error) } } } func scrubber(_ scrubber: NSScrubber, layout: NSScrubberFlowLayout, sizeForItemAt itemIndex: Int) -> NSSize { return NSSize(width: 60, height: 30) } } The first method returns the number of objects in the NSScrubber. The second one generates an object for a specific position in NSScrubber (in our case, these are pictures for the desktop). The third one handles clicking on an object in NSScrubber and puts the selected picture on the desktop. Well, the fourth method returns the size of the object in NSScrubber.
Now when you start our NSTouchBar has the following form:
Now we have a working NSTouchBar in the application, which can change the design of the desktop. Using the same algorithm, you can implement support for the touchbar in more complex projects, which we plan to do in the future.
Thank you for your attention and good luck with the new wonder from Apple!
Source: https://habr.com/ru/post/317232/
All Articles