What's new in Windows Server 2016 Failover Clustering
The author of the article is Roman Levchenko ( www.rlevchenko.com ), MVP - Cloud and Datacenter Management
Hello! Most recently, the global availability of Windows Server 2016 was announced, which means that you can start using the new version of the product in your infrastructure right now. The list of innovations is quite extensive and we have already described some of them ( here and here ), but in this article we will examine high-availability services, which, in my opinion, are the most interesting and used (especially in virtualization environments).

Cluster OS Rolling upgrade
Cluster migration in previous versions of Windows Server causes significant downtime due to the unavailability of the original cluster and the creation of a new based on the updated OS on the nodes, followed by the migration of roles between clusters. Such a process carries increased requirements for personnel qualifications, certain risks and uncontrolled labor costs. This fact is especially true for CSP or other customers who have time limits on the unavailability of services within the SLA. It is not necessary to describe what a significant violation of SLA means for a resource provider
')
Windows Server 2016 corrects the situation through the possibility of combining Windows Server 2012 R2 and Windows Server 2016 on the nodes within the same cluster during its upgrade (Cluster OS Rolling Upgrade (hereafter CRU)).

From the name, you can guess that the cluster migration process consists mainly in a phased reinstallation of the OS on the servers, but let's talk about this in more detail later.
We first define the list of "buns" that the CRU provides:
- The complete absence of downtime when upgrading clusters WS2012R2 Hyper-V / SOFS. For other cluster roles (for example, SQL Server), their unavailability is possible (less than 5 minutes), which is necessary for practicing a one-time failover.
- No need for additional hardware. As a rule, the cluster is built from taking into account the possible unavailability of one or several nodes. In the case of a CRU, the inaccessibility of nodes will be planned and phased. Thus, if a cluster can safely survive the temporary absence of at least 1 of the nodes, then no additional nodes are required to reach the zero-downtime. If you plan to upgrade multiple nodes at once (this is supported), then you need to plan in advance for the load distribution between the available nodes.
- Creating a new cluster is not required. CRU uses the current CNO.
- The transition process is reversible (until the cluster level is raised).
- Support In-Place Upgrade. But, it is worth noting that the recommended option for updating cluster nodes is a complete WS2016 installation without saving data (clean-os install). In the case of In-Place Upgrade, verification of the full functionality is required after upgrading each of the nodes (event logs, etc.).
- CRU is fully supported by VMM 2016 and can be automated additionally via PowerShell / WMI.
CRU process using the example of a 2-node Hyper-V cluster:
- A preliminary backup of the cluster (DB) and running resources is recommended. The cluster must be in a healthy state, the nodes are available. If necessary, you should correct the existing problems before the migration and pause the backup tasks before starting the transition.

- Update Windows Server 2012 R2 cluster nodes using Cluster Aware Updating (CAU) or manually via WU / WSUS.
- With a configured CAU, it is necessary to temporarily disable it to prevent its possible impact on the placement of roles and the state of the nodes during the transition.

- CPUs on the nodes must have SLAT support to support the execution of virtual machines in WS2016. This condition is mandatory.
- At one of the nodes we perform the transfer of roles (drain roles) and exclusion from the cluster (evict):

- After excluding the node from the cluster, we perform the recommended full WS2016 installation (clean OS install, Custom: Install Windows only (advanced) )

- After reinstallation, return the network settings back *, update the node and install the necessary roles and components. In my case, the Hyper-V role and, of course, Failover Clustering are required.
New-NetLbfoTeam -Name HV -TeamMembers tNIC1,tNIC2 -TeamingMode SwitchIndependent -LoadBalancingAlgorithm DynamicAdd-WindowsFeature Hyper-V, Failover-Clustering -IncludeManagementTools -RestartNew-VMSwitch -InterfaceAlias HV -Name VM -MinimumBandwidthMode Weight -AllowManagementOS 0
* Switch Embedded Teaming can be used only after the completion of the transition to WS2016. - Add a node to the appropriate domain.
Add-Computer -ComputerName HV01 -DomainName domain.com -DomainCredential domain\rlevchenko - We return the node to the cluster. The cluster will start working in mixed mode supporting the functionality of WS2012R2 without supporting the new features of WS2016. It is recommended to complete the update of the remaining nodes within 4 weeks.

- Moving the cluster roles back to the HV01 node to redistribute the load.
- Repeat steps (4-9) for the remaining node (HV02).
- After upgrading nodes to WS2016, you need to raise the functional level (Mixed Mode - 8.0, Full - 9.0) of the cluster to complete the migration.
PS C: \ Windows \ system32> Update-ClusterFunctionalLevel
Hvcl.
Warning: You cannot undo this operation. Do you want to continue?
[Y] Yes [A] Yes to All [N] No [L] No to All [S] Suspend [?] Help (default is Y): a
Name
- hvcl - (optional and with caution) Upgrade the VM configuration version to incorporate new Hyper-V features. A shutdown of the VM is required and preliminary backup is desirable. The VM version in 2012R2 is 5.0, in 2016 RTM is 8.0. The example shows the command to update all VMs in the cluster:
Get-ClusterGroup|? {$_.GroupType -EQ "VirtualMachine"}|Get-VM|Update-VMVersion
List of VM versions supported by 2016 RTM:
Cloud witness
In any cluster configuration, it is necessary to take into account the peculiarities of Witness placement to provide additional voice and total quorum. Witness in 2012 R2 can be built on the basis of a common external file share or disk available to each of the cluster nodes. Let me remind you that the need for Witness configuration is recommended for any number of nodes, starting from 2012 R2 (dynamic quorum).
In Windows Server 2016, a new model of quorum configuration based on Cloud Witness is available to provide the ability to build DRs based on Windows Server and other scenarios.
Cloud Witness uses Microsoft Azure resources (Azure Blob Storage, via HTTPS, ports on the nodes must be available) to read / write service information, which changes when the status of cluster nodes changes. The blob file is named according to the cluster's unique identifier - therefore, one Storage Account can be provided to several clusters at once (1 blob file per cluster as part of the automatically created msft-cloud-witness container). The requirements for the size of cloud storage are minimal to ensure witness work and does not require large expenditures on its support. The same placement in Azure eliminates the need for a third site in the configuration of Stretched Cluster and solutions for its disaster recovery.

Cloud Witness can be used in the following scenarios:
- To ensure DR cluster located in different sites (multi-site).
- Clusters without shared storage (Exchange DAG, SQL Always-On and others).
- Guest clusters running both in Azure and on-premises.
- Storage Clusters with or without shared storage (SOFS).
- Clusters within a workgroup or in different domains (new WS2016 functionality).
The process of creating and adding Cloud Witness is quite simple:
- Create a new Azure Storage Account (Locally-redundant storage) and in the account properties copy one of the access keys.

- Run the Quorum Configuration Wizard and select Select the Quorum Witness - Configure a Cloud Witness.

- Enter the name of the created storage account and insert the access key.

- After successfully completing the configuration wizard, Witness will appear in Core Resources.

- Blob file in container:

For simplicity, you can use PowerShell:
Workgroup and Multi-Domain Clusters
In Windows Server 2012 R2 and earlier versions, global requirements must be met before creating the cluster: the nodes must be members of the same domain. The Active Directory Detached cluster, presented in 2012 R2, has a similar requirement and does not simplify it in a significant way.
In Windows Server 2016, it is possible to create a cluster without binding to AD within a workgroup or between nodes that are members of different domains. The process is similar to creating a deattached cluster in 2012 R2, but it has some features:
- Supported only within the WS2016 environment.
- Requires the role of failover clustering.
Install-WindowsFeature Failover-Clustering -IncludeManagementTools - At each node, you must create a user with a membership in the Administrators group or use the built-in account. record Password and username must be identical.

net localgroup administrators cluadm /add
If the error “Requested Registry access is not allowed” appears, you need to change the value of the LocalAccountTokenFilterPolicy policy.New-ItemProperty -Path HKLM:\SOFTWARE\Microsoft\Windows\CurrentVersion\Policies\System -Name LocalAccountTokenFilterPolicy -Value 1 - Primary DNS -suffix on the nodes must be defined.

- Cluster creation is supported through both PowerShell and GUI.
New-Cluster -Name WGCL -Node rtm-1,rtm-2 -AdministrativeAccessPoint DNS -StaticAddress 10.0.0.100 - As Witness it is possible to use only Disk Witness or Cloud Witness described earlier. File Share Witness, unfortunately, is not supported.
Supported usage scenarios:
| Role | Support status | Comment |
|---|---|---|
| SQL Server | Supported by | It is recommended to use SQL Server built-in authentication. |
| File server | Supported, but not recommended | No Kerberos authentication, which is basic for SMB |
| Hyper-v | Supported, but not recommended | Only Quick Migration is available. Live Migration not supported |
| Message Queuing (MSMQ) | Not supported | MSMQ requires ADDS |
Virtual Machine Load Balancing / Node Fairness
Dynamic optimization, available in VMM, partially migrated to Windows Server 2016 and provides basic load balancing across nodes in automatic mode. To move resources, Live Migration and Heuristics are used, based on which the cluster decides to balance every 30 minutes or not:
- Current% of memory usage on the node.
- The average CPU load in the 5 minute interval.
The maximum allowable load values are determined by the value of AutoBalancerLevel :
get-cluster| fl *autobalancer* AutoBalancerMode : 2 AutoBalancerLevel : 1 | AutoBalancerLevel | Aggressiveness balancing | Comment |
|---|---|---|
| 1 (default) | Low | To carry out balancing when loading a node more than 80% on one of the heuristics |
| 2 | Medium | When loading more than 70% |
| 3 | High | When loading more than 60% |
The balancer parameters can be defined in the GUI (cluadmin.msc). By default, the Low level of aggressiveness and the constant balancing mode are used.

For verification, I use the following parameters:
AutoBalancerLevel: 2
(Get-Cluster).AutoBalancerLevel = 2 AutoBalancerMode: 2
(Get-Cluster).AutoBalancerMode = 2 We simulate the load first on the CPU (about 88%) and then on the RAM (77%). Since the average level of aggressiveness is determined when making a decision about balancing, and our values for loading above a certain value (70%) virtual machines on a loaded node must move to a free node. The script waits for the moment of live migration and displays the elapsed time (from the starting point of loading to the node until the VM is migrated).
In the case of a heavy load on the CPU, the balancer moved more than 1 VM, with a RAM-1 load, the VM was moved within the designated 30 minute interval, during which the node load was checked and the VM was transferred to other nodes to achieve <= 70% of resource utilization.

When using VMM, built-in balancing on nodes is automatically disabled and replaced with a more recommended balancing mechanism based on Dynamic Optimization, which allows you to fine-tune the mode and interval for optimization.
Virtual machine start ordering
Changing the logic of starting a VM within a cluster in 2012 R2 is based on the concept of priorities (low, medium, high), the task of which is to ensure the inclusion and availability of more important VMs before launching the rest of the "dependent" VMs. This is usually required for multi-tier services built, for example, based on Active Directory, SQL Server, IIS.
To increase functionality and efficiency, Windows Server 2016 adds the ability to define dependencies between VMs or VM groups to decide whether to start them correctly using Set or clusters of clusters. Mainly aimed at use in conjunction with VM, but can be used for other cluster roles.

For example, use the following script:
1 VM Clu-VM02 is an application dependent on Active Directory availability running on Wirth. Clu-VM01 machine . A VM Clu-VM03 , in turn, depends on the availability of the application, located on the VM Clu-VM02.
Create a new set using PowerShell:

VM with Active Directory:
PS C: \> New-ClusterGroupSet -Name AD -Group Clu-VM01
Name: AD
GroupNames: {Clu-VM01}
ProviderNames: {}
StartupDelayTrigger: Delay
StartupCount: 4294967295
IsGlobal: False
StartupDelay: 20
Application:
New-ClusterGroupSet -Name Application -Group Clu-VM02
Application dependent service:
New-ClusterGroupSet -Name SubApp -Group Clu-VM03
Add dependencies between the sets:
Add-ClusterGroupSetDependency -Name Application -Provider AD
Add-ClusterGroupSetDependency -Name SubApp -Provider Application
If necessary, you can change the set parameters using Set-ClusterGroupSet . Example:
Set-ClusterGroupSet Application -StartupDelayTrigger Delay -StartupDelay 30 StartupDelayTrigger determines the action to be taken after the start of the group:
- Delay - wait 20 seconds (by default). Used with StartupDelay.
- Online - wait for the availability status of the group in set.
StartupDelay - delay time in seconds. 20 seconds by default.
isGlobal - defines the need to start a set before starting other sets of cluster groups (for example, set with Active Directory VM groups should be globally available and, therefore, start before other collections).
Let's try to start VM Clu-VM03:
Active Directory accessibility wait on Clu-VM01 (StartupDelayTrigger - Delay, StartupDelay - 20 seconds)

After starting Active Directory, the dependent application is launched on Clu-VM02 (StartupDelay is used at this stage as well).

And the last step is to launch the VM Clu-VM03 itself.

VM Compute / Storage Resiliency
In Windows Server 2016, new modes of operation of nodes and VMs appeared to increase their resilience in scenarios of problem interaction between cluster nodes and to prevent complete unavailability of resources due to reaction to “small” problems before the emergence of more global (proactive) actions.
Isolation Mode (Isolated)
On the HV01 node, the clustering service suddenly became unavailable, i.e. the node has problems of intra-cluster interaction. In this scenario, the node is placed in the Isolated (ResiliencyLevel) state and temporarily excluded from the cluster.

The virtual machines on the isolated node continue to run * and become Unmonitored (i.e., the cluster service does not “care” about VM data).

* When executing VMs on SMB: Online status and correct execution (SMB does not require “cluster identity” for access). In the case of the block type of VM storage, the Paused Critical status disappears due to the unavailability of Cluster Shared Volumes for the isolated node.
If the node during ResiliencyDefaultPeriod (by default 240 seconds) does not return the clustering service to the system (in our case), then it will move the node to the Down status.
Quarantine mode (Quarantined)
Suppose that the HV01 node successfully returned the clustering service to its working state, left the Isolated mode, but within an hour the situation repeated 3 or more times (QuarantineThreshold). In this scenario, the WSFC will place the node in quarantine mode (Quarantined) for 2 hours (QuarantineDuration) and move the VM of this node to a known "healthy" one.


If we are sure that the source of the problems has been eliminated, we can put the node back into the cluster:

It is important to note that no more than 25% of cluster nodes can be in quarantine at a time.
For customization, use the above parameters and cmdlet Get-Cluster:
(Get-Cluster). QuarantineDuration = 1800 Storage resiliency
In previous versions of Windows Server, working off the inaccessibility of r / w operations for virt. disk (loss of connection to the storage) is primitive - the VMs are shutting down and a cold boot is required at the subsequent start. In Windows Server 2016, when such problems occur, the VM switches to the Paused-Critical (AutomaticCriticalErrorAction) status, having previously “frozen” its operating state (its unavailability will remain, but there will be no unexpected shutdown).
When the connection is restored during the timeout (AutomaticCriticalErrorActionTimeout, 30 minutes by default), the VM exits paused-critical and becomes available from the “point” when the problem was identified (analogy - pause / play).
If the timeout is reached before the storage returns, the VM will turn off (turn off action)

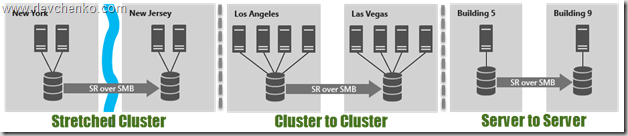
Site-Aware / Stretched Clusters and Storage Replica
A topic that deserves a separate post, but we will try to briefly get acquainted right now.
Previously, we were advised to use third-party solutions (a lot of $) to create fully distributed clusters (ensuring SAN-to-SAN replication). With the advent of Windows Server 2016, reducing the budget by several times and increasing unification when building such systems becomes a reality.
Storage Replica allows synchronous (!) And asynchronous replication between any storage systems (including Storage Spaces Direct) and supporting any workloads — is the basis of multi-site clusters or a full DR-solution. SR is available only in the Datacenter edition and can be used in the following scenarios:
Using SR within a distributed cluster, especially the presence of automatic failover and close work with site-awareness, which was also presented in Windows Server 2016. Site-Awarieness allows you to define cluster groups of nodes and link them to a physical location (site fault domain / site) for forming custom failover policies, storing Storage Spaces Direct data and VM distribution logic. In addition, it is possible to link not only at the site level, but also to lower levels (node, rack, chassis).

New-ClusterFaultDomain –Name Voronezh –Type Site –Description “Primary” –Location “Voronezh DC” New-ClusterFaultDomain –Name Voronezh2 –Type Site –Description “Secondary” –Location “Voronezh DC2” New-ClusterFaultDomain -Name Rack1 -Type Rack New-ClusterFaultDomain -Name Rack2 -Type Rack New-ClusterFaultDomain -Name HPc7000 -type Chassis New-ClusterFaultDomain -Name HPc3000 -type Chassis Set-ClusterFaultDomain –Name HV01 –Parent Rack1 Set-ClusterFaultDomain –Name HV02 –Parent Rack2 Set-ClusterFaultDomain Rack1,HPc7000 -parent Voronezh Set-ClusterFaultDomain Rack2,HPc3000 -parent Voronezh2 

This approach within the multi-site cluster carries the following advantages:
- Failover testing initially occurs between nodes within the domain Fault. If all nodes in the Fault Domain are unavailable, then only move to another.
- Draining Roles (role migration under maintenance mode, etc.) checks whether it is possible to move to the site first within the local site and only then moves them to another.
- CSV balancing (redistribution of cluster disks between nodes) will also strive to work out within the framework of the native fault-domain / site.
- VMs will try to be located in the same site as their dependent CSVs. If CSV migrates to another site, then VM after 1 minute will begin its migration to the same site.
Additionally, using site-awareness logic, it is possible to define a “parent” site for all newly created VMs / roles:
(Get-Cluster).PreferredSite = < > Or set up more granularly for each cluster group:
(Get-ClusterGroup -Name ).PreferredSite = < > Other innovations
- Support Storage Spaces Direct and Storage QoS.
- Resizing shared vhdx for guest clusters without downtime, support for Hyper-V replication and res. copy at the host level.
- Improved performance and scaling of CSV Cache with support for tiered spaces, direct storage spaces and deduplication (give dozens of GB of RAM under the cache - no problem).
- Changes in the formation of cluster logs (information about the time zone, etc.) + active memory dump (a new alternative for full memory dump) to simplify diagnosing problems.
- A cluster can now use multiple interfaces within the same subnet. Configuring different subnets on the adapters is not required for cluster identification. Adding occurs automatically.
This completes our overview tour of the new WSFC features within Windows Server 2016. I hope that the material turned out to be useful. Thanks for reading and comments.
Have a great day!
Source: https://habr.com/ru/post/316928/
All Articles