PyQt4 - Widget Location Management
An important part of programming is the control of the location of elements. Location management is how we place widgets on a form. There are two ways: using absolute positioning (absolute positioning) or using layout classes (layout classes).
Absolute positioning
The programmer indicates the position and size of each widget in pixels. When you use absolute location you need to understand several things:
the size and position of the widget does not change when the window is resized
the application may look different on different platforms
changing the font in your application may spoil the layout
if you decide to change the layout, you must repeat it completely, which takes a lot of time
We simply call the move () method to change the position of the widgets, in our case it is QLabel. We arrange them according to the X and Y coordinates. The origin of the coordinate system is in the upper left corner of the window. The coordinate X grows from right to left, and Y from top to bottom.

Box Layout (did not come up with the translation)
Layout management using layout classes is more flexible and practical. This is the preferred location for widgets. Simple layout classes are QHBoxLayout and QVBoxLayout. They position the widgets horizontally and vertically.
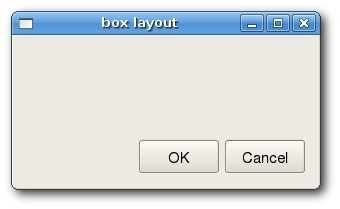
Imagine that we want to place two buttons in the lower right corner of the form. To create such a layout, we will use one horizontal and one vertical box. We will get the required space by adding a stretch factor.
Here we create two QPushButton buttons.
Create a horizontal layout and add a stretching factor for both buttons.
Create a vertical layout.
And at the end we set the main layout for the window.
QGridLayout
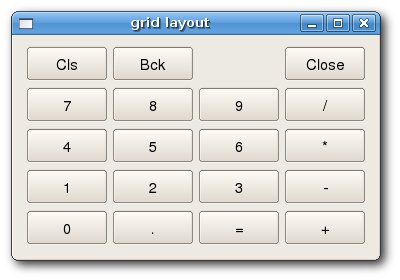
The most universal class of layouts is the layout of the table. This layout divides the space into rows and columns. To create it, use the QGridLayout class.
In our example, we create a table of buttons. Leave one cell empty by adding one QLabel widget.
Here we create the layout table.
To add a widget to a table, we need to call the addWidget () method, passing the widget as well as the row and column numbers as arguments.
')
Widgets can span multiple rows or columns and in the following example we will show this.
Create a layout table and specify the distance between the widgets.
If we add a widget to the layout, we can specify how many rows or columns it merges. In our case, reviewEdit combines 5 lines.

Absolute positioning
The programmer indicates the position and size of each widget in pixels. When you use absolute location you need to understand several things:
the size and position of the widget does not change when the window is resized
the application may look different on different platforms
changing the font in your application may spoil the layout
if you decide to change the layout, you must repeat it completely, which takes a lot of time
#!/usr/bin/python
import sys
from PyQt4 import QtGui

class Absolute(QtGui.QWidget):
def __init__(self, parent=None):
QtGui.QWidget.__init__(self, parent)

self.setWindowTitle('Communication')

label = QtGui.QLabel('Couldn\'t', self)
label.move(15, 10)

label = QtGui.QLabel('care', self)
label.move(35, 40)

label = QtGui.QLabel('less', self)
label.move(55, 65)

label = QtGui.QLabel('And', self)
label.move(115, 65)

label = QtGui.QLabel('then', self)
label.move(135, 45)

label = QtGui.QLabel('you', self)
label.move(115, 25)

label = QtGui.QLabel('kissed', self)
label.move(145, 10)

label = QtGui.QLabel('me', self)
label.move(215, 10)

self.resize(250, 150)

app = QtGui.QApplication(sys.argv)
qb = Absolute()
qb.show()
sys.exit(app.exec_())
We simply call the move () method to change the position of the widgets, in our case it is QLabel. We arrange them according to the X and Y coordinates. The origin of the coordinate system is in the upper left corner of the window. The coordinate X grows from right to left, and Y from top to bottom.
Box Layout (did not come up with the translation)
Layout management using layout classes is more flexible and practical. This is the preferred location for widgets. Simple layout classes are QHBoxLayout and QVBoxLayout. They position the widgets horizontally and vertically.
Imagine that we want to place two buttons in the lower right corner of the form. To create such a layout, we will use one horizontal and one vertical box. We will get the required space by adding a stretch factor.
#!/usr/bin/python

import sys
from PyQt4 import QtGui

class BoxLayout(QtGui.QWidget):
def __init__(self, parent=None):
QtGui.QWidget.__init__(self, parent)

self.setWindowTitle('box layout')

ok = QtGui.QPushButton("OK")
cancel = QtGui.QPushButton("Cancel")

hbox = QtGui.QHBoxLayout()
hbox.addStretch(1)
hbox.addWidget(ok)
hbox.addWidget(cancel)

vbox = QtGui.QVBoxLayout()
vbox.addStretch(1)
vbox.addLayout(hbox)

self.setLayout(vbox)

self.resize(300, 150)

app = QtGui.QApplication(sys.argv)
qb = BoxLayout()
qb.show()
sys.exit(app.exec_())
ok = QtGui.QPushButton("OK")
cancel = QtGui.QPushButton("Cancel")
Here we create two QPushButton buttons.
hbox = QtGui.QHBoxLayout()
hbox.addStretch(1)
hbox.addWidget(ok)
hbox.addWidget(cancel)
Create a horizontal layout and add a stretching factor for both buttons.
vbox = QtGui.QVBoxLayout()
vbox.addStretch(1)
vbox.addLayout(hbox)
Create a vertical layout.
self.setLayout(vbox)
And at the end we set the main layout for the window.
QGridLayout
The most universal class of layouts is the layout of the table. This layout divides the space into rows and columns. To create it, use the QGridLayout class.
#!/usr/bin/python

import sys
from PyQt4 import QtGui

class GridLayout(QtGui.QWidget):
def __init__(self, parent=None):
QtGui.QWidget.__init__(self, parent)

self.setWindowTitle('grid layout')

names = ['Cls', 'Bck', '', 'Close', '7', '8', '9', '/',
'4', '5', '6', '*', '1', '2', '3', '-',
'0', '.', '=', '+']
grid = QtGui.QGridLayout()
j = 0
pos = [(0, 0), (0, 1), (0, 2), (0, 3),
(1, 0), (1, 1), (1, 2), (1, 3),
(2, 0), (2, 1), (2, 2), (2, 3),
(3, 0), (3, 1), (3, 2), (3, 3 ),
(4, 0), (4, 1), (4, 2), (4, 3)]

for i in names:
button = QtGui.QPushButton(i)
if j == 2:
grid.addWidget(QtGui.QLabel(''), 0, 2)
else: grid.addWidget(button, pos[j][0], pos[j][1])
j = j + 1

self.setLayout(grid)

app = QtGui.QApplication(sys.argv)
qb = GridLayout()
qb.show()
sys.exit(app.exec_())
In our example, we create a table of buttons. Leave one cell empty by adding one QLabel widget.
grid = QtGui.QGridLayout()
Here we create the layout table.
if j == 2:
grid.addWidget(QtGui.QLabel(''), 0, 2)
else:
grid.addWidget(button, pos[j][0], pos[j][1])
To add a widget to a table, we need to call the addWidget () method, passing the widget as well as the row and column numbers as arguments.
')
Widgets can span multiple rows or columns and in the following example we will show this.
#!/usr/bin/python

import sys
from PyQt4 import QtGui

class GridLayout2(QtGui.QWidget):
def __init__(self, parent=None):
QtGui.QWidget.__init__(self, parent)

self.setWindowTitle('grid layout')

title = QtGui.QLabel('Title')
author = QtGui.QLabel('Author')
review = QtGui.QLabel('Review')

titleEdit = QtGui.QLineEdit()
authorEdit = QtGui.QLineEdit()
reviewEdit = QtGui.QTextEdit()

grid = QtGui.QGridLayout()
grid.setSpacing(10)

grid.addWidget(title, 1, 0)
grid.addWidget(titleEdit, 1, 1)

grid.addWidget(author, 2, 0)
grid.addWidget(authorEdit, 2, 1)

grid.addWidget(review, 3, 0)
grid.addWidget(reviewEdit, 3, 1, 5, 1)

self.setLayout(grid)
self.resize(350, 300)

app = QtGui.QApplication(sys.argv)
qb = GridLayout2()
qb.show()
sys.exit(app.exec_())
grid = QtGui.QGridLayout()
grid.setSpacing(10)
Create a layout table and specify the distance between the widgets.
grid.addWidget(reviewEdit, 3, 1, 5, 1)
If we add a widget to the layout, we can specify how many rows or columns it merges. In our case, reviewEdit combines 5 lines.
Source: https://habr.com/ru/post/31687/
All Articles