Custom Video Recorder for iOS applications
 Camera application for iPhone / iPad is very convenient to use. The user can easily switch from photographing mode to video. In the video mode, the shooting time and only one button (Start / Stop) is shown. Unfortunately, when using the standard UIImagePickerController, there is no way to control the number of frames per second and some other parameters. I will show how to use the AVFoundation framework to access more advanced camera settings, such as frames per second, video quality, recording duration, video file size. The user will immediately see the video on the screen in the quality in which it will be saved.
The main object that will allow me to record video:
AVCaptureSession // In addition, I will need:
AVCaptureVideoPreviewLayer // , AVCaptureDevice // / AVCaptureDeviceInput // / AVCaptureSession AVCaptureMovieFileOutput // AVCaptureSession Design can be stored in a xib file or storyboard. Using Autolayout and Constraints in the designer, you can ensure that all panels are automatically stretched, the buttons are centered (left or right). Our VideoRecorderController will have three modes of operation:
')
- Ready to shoot: AVCaptureSession is running, on-screen video from the camera in real time, but recording does not go.
On the bottom panel, the Cancel button is active - canceling a shot, the Start button is also active - the start of the recording, the Use Video button is hidden.
The top panel shows the recording time - 00:00. After clicking the Cancel button, the delegate of the video shoot triggers the method - (void) videoRecorderDidCancelRecordingVideo. After pressing the Start button, go to the next mode. - Shooting: AVCaptureSession is running, on the screen is a video from the camera in real time, while recording video to a file. Instead of the Start button, the Stop button appears on the bottom panel - the end of the recording, the Cancel button is hidden, the Use Video button is also hidden. The top panel shows the current recording time - 00:22. After pressing the Stop button, recording stops, go to the next mode.
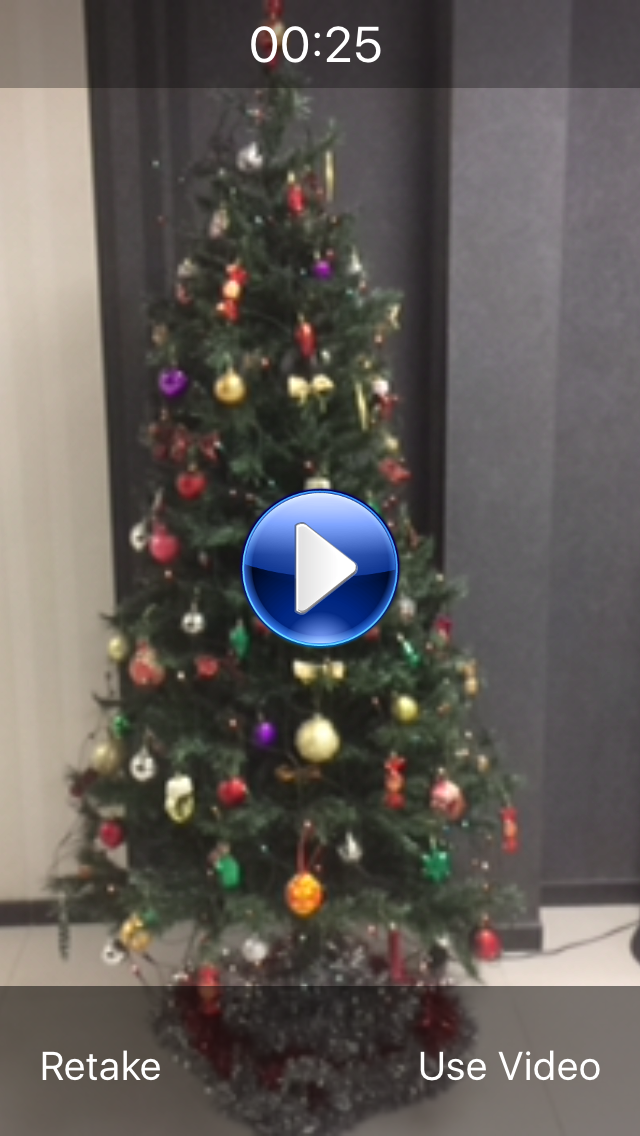
- Shooting is complete: AVCaptureSession is stopped, the last frame of the captured video is displayed on the screen, video recording to the file is completed. A Play Video button appears in the center of the screen.
On the bottom panel, instead of the Cancel button, the Retake button appears - reshoot the video, the Use Video button appears, the Start button is hidden.
The top panel shows the video recording duration - 00:25.
After clicking the Play Video button, the footage is viewed through AVPlayer.
After clicking Retake, we return to the first mode.
After clicking the Use Video button, the delegate of the video shoot triggers the method - (void) videoRecorderDidFinishRecording VideoWithOutputURL: (NSURL *) outputURL.
Three modes of operation - screens
 |  |  |
In the header file, I need to describe the video delegate protocol to handle the cancellation of the video and the successful completion of the video.
This is how the VideoRecorderController.h header file will look
#import <UIKit/UIKit.h> #import <Foundation/Foundation.h> #import <CoreMedia/CoreMedia.h> #import <AVFoundation/AVFoundation.h> #import <AudioToolbox/AudioToolbox.h> #import <AVKit/AVKit.h> @protocol VideoRecorderDelegate <NSObject> // , - (void)videoRecorderDidFinishRecordingVideoWithOutputPath:(NSString *)outputPath; // , - (void)videoRecorderDidCancelRecordingVideo; @end @interface VideoRecorderController : UIViewController @property (nonatomic, retain) NSString *outputPath; // @property (nonatomic, assign) id<VideoRecorderDelegate> delegate; @end In the implementation file VideoRecorderController.m, I set several constants for video recording and describe the properties and methods that need to be bound in the interface designer. I will also need:
- AVCaptureSession video capture session
- video output file AVCaptureMovieFileOutput
- AVCaptureDeviceInput video input device
- layer to display live video AVCaptureVideoPreviewLayer
- timer and time for the recording time indicator
Implementation file VideoRecorderController.m - variable declaration
#import "VideoRecorderController.h" #define TOTAL_RECORDING_TIME 60*20 // #define FRAMES_PER_SECOND 30 // #define FREE_DISK_SPACE_LIMIT 1024 * 1024 // () #define MAX_VIDEO_FILE_SIZE 160 * 1024 * 1024 // () #define CAPTURE_SESSION_PRESET AVCaptureSessionPreset352x288 // #define BeginVideoRecording 1117 // #define EndVideoRecording 1118 // @interface VideoRecorderController () <AVCaptureFileOutputRecordingDelegate> { BOOL WeAreRecording; // , AVCaptureSession *CaptureSession; AVCaptureMovieFileOutput *MovieFileOutput; AVCaptureDeviceInput *VideoInputDevice; } // @property (retain) IBOutlet UILabel *timeLabel; // @property (retain) IBOutlet UIButton *startButton; // Start / Stop @property (retain) IBOutlet UIImageView *circleImage; // Start @property (retain) IBOutlet UIButton *cancelButton; // Cancel @property (retain) IBOutlet UIButton *useVideoButton; // Use Video @property (retain) IBOutlet UIView *bottomView; // @property (retain) IBOutlet UIButton *playVideoButton; // Play Video - (IBAction)startStopButtonPressed:(id)sender; // Start / Stop - (IBAction)cancel:(id)sender; // Cancel - (IBAction)useVideo:(id)sender; // Use Video - (IBAction)playVideo:(id)sender; // Play Video @property (retain) AVCaptureVideoPreviewLayer *PreviewLayer; // @property (retain) NSTimer *videoTimer; @property (assign) NSTimeInterval elapsedTime; @end After you have completed the viewDidLoad method, you must perform the following steps:
- set the path to the outputPath video file and delete the previous entry
- add a handler to the output of the application in the background UIApplicationDidEnterBackgroundNotification
- initialize AVCapture session
- find the default AVCaptureDevice video device and create an AVCaptureDeviceInput video input device
- Before you add a video input device, you must call
[CaptureSession beginConfiguration] method - then add a video entry device to the AVCaptureSession
- after adding a video input device, be sure to call the [CaptureSession commitConfiguration] method
- find the default AVCaptureDevice audio device, create an AVCaptureDeviceInput audio input device and add this device to the AVCaptureSession session
- create a layer AVCaptureVideoPreviewLayer, which will display the video in real time, bind it to the session AVCaptureSession, stretch this layer, full screen while maintaining the proportions (the edges of the frame do not fall on the screen)
- recalculate the size of the AVCaptureVideoPreviewLayer layer depending on the orientation of the device and send this layer to the background so that all the panels and control buttons are displayed on top of it
- initialize video output to the AVCaptureMovieFileOutput file
- set the frame rate per second, the maximum length of the video in seconds
- set the maximum video length in bytes
- set the minimum free disk space in bytes
- add video output to file in AVCaptureSession
- set video quality for AVCaptureSession
- finally set the correct orientation of the AVCaptureMovieFileOutput video output file and the AVCaptureVideoPreviewLayer video viewing layer
When you switch to another application, if the video is on, it will stop. After you have completed the viewWillAppear method, you have to start the AVCaptureSession session, the live video starts to be displayed on the screen. But if there was a transition to this screen after watching the video, then there is no need to run AVCaptureSession - there should be a check that there is no video file.
VideoRecorderController.m implementation file - loading View Controller
@implementation VideoRecorderController - (void)viewDidLoad { [super viewDidLoad]; self.outputPath = [[NSString alloc] initWithFormat:@"%@%@", NSTemporaryDirectory(), @"output.mov"]; [self deleteVideoFile]; [[NSNotificationCenter defaultCenter] addObserver: self selector: @selector(applicationDidEnterBackground:) name: UIApplicationDidEnterBackgroundNotification object: nil]; CaptureSession = [[AVCaptureSession alloc] init]; AVCaptureDevice *VideoDevice = [AVCaptureDevice defaultDeviceWithMediaType:AVMediaTypeVideo]; if (VideoDevice) { NSError *error = nil; VideoInputDevice = [AVCaptureDeviceInput deviceInputWithDevice:VideoDevice error:&error]; if (!error) { [CaptureSession beginConfiguration]; if ([CaptureSession canAddInput:VideoInputDevice]) { [CaptureSession addInput:VideoInputDevice]; } [CaptureSession commitConfiguration]; } } AVCaptureDevice *audioDevice = [AVCaptureDevice defaultDeviceWithMediaType:AVMediaTypeAudio]; NSError *error = nil; AVCaptureDeviceInput *audioInput = [AVCaptureDeviceInput deviceInputWithDevice:audioDevice error:&error]; if (audioInput) { [CaptureSession addInput:audioInput]; } [self setPreviewLayer:[[AVCaptureVideoPreviewLayer alloc] initWithSession:CaptureSession]]; [self.PreviewLayer setVideoGravity:AVLayerVideoGravityResizeAspectFill]; [self setupLayoutInRect:[[[self view] layer] bounds]]; UIView *CameraView = [[UIView alloc] init]; [[self view] addSubview:CameraView]; [self.view sendSubviewToBack:CameraView]; [[CameraView layer] addSublayer:self.PreviewLayer]; MovieFileOutput = [[AVCaptureMovieFileOutput alloc] init]; CMTime maxDuration = CMTimeMakeWithSeconds(TOTAL_RECORDING_TIME, FRAMES_PER_SECOND); MovieFileOutput.maxRecordedDuration = maxDuration; MovieFileOutput.maxRecordedFileSize = MAX_VIDEO_FILE_SIZE; MovieFileOutput.minFreeDiskSpaceLimit = FREE_DISK_SPACE_LIMIT; if ([CaptureSession canAddOutput:MovieFileOutput]) { [CaptureSession addOutput:MovieFileOutput]; } if ([CaptureSession canSetSessionPreset:CAPTURE_SESSION_PRESET]) { [CaptureSession setSessionPreset:CAPTURE_SESSION_PRESET]; } [self cameraSetOutputProperties]; } - (void)applicationDidEnterBackground:(UIApplication *)application { if (WeAreRecording) { [self stopRecording]; } } - (void)viewWillAppear:(BOOL)animated { [super viewWillAppear:animated]; if (![[NSFileManager defaultManager] fileExistsAtPath:self.outputPath]) { WeAreRecording = NO; [CaptureSession startRunning]; } } Screen rotation is allowed only if the session is running and recording is not yet in progress. Before turning the screen, it is necessary to recalculate the screen size depending on the orientation. After rotation, you need to set the correct orientation of the AVCaptureMovieFileOutput video output file and the AVCaptureVideoPreviewLayer video viewing layer.
Implementation file VideoRecorderController.m - cornering
- (BOOL)shouldAutorotate { return (CaptureSession.isRunning && !WeAreRecording); } - (UIInterfaceOrientationMask)supportedInterfaceOrientations { return (UIInterfaceOrientationMaskPortrait | UIInterfaceOrientationMaskLandscape | UIInterfaceOrientationMaskPortraitUpsideDown); } - (void)viewWillTransitionToSize:(CGSize)size withTransitionCoordinator:(id<UIViewControllerTransitionCoordinator>)coordinator { [self setupLayoutInRect:CGRectMake(0, 0, size.width, size.height)]; [super viewWillTransitionToSize:size withTransitionCoordinator:coordinator]; [coordinator animateAlongsideTransition:^(id<UIViewControllerTransitionCoordinatorContext> context) { } completion:^(id<UIViewControllerTransitionCoordinatorContext> context) { [self cameraSetOutputProperties]; }]; } // // viewWillTransitionToSize, iOS 7 - (void)didRotateFromInterfaceOrientation:(UIInterfaceOrientation)fromInterfaceOrientation { [self setupLayoutInRect:[[[self view] layer] bounds]]; [self cameraSetOutputProperties]; } // - (void)setupLayoutInRect:(CGRect)layoutRect { [self.PreviewLayer setBounds:layoutRect]; [self.PreviewLayer setPosition:CGPointMake(CGRectGetMidX(layoutRect), CGRectGetMidY(layoutRect))]; } // - (void)cameraSetOutputProperties { AVCaptureConnection *videoConnection = nil; for ( AVCaptureConnection *connection in [MovieFileOutput connections] ) { for ( AVCaptureInputPort *port in [connection inputPorts] ) { if ( [[port mediaType] isEqual:AVMediaTypeVideo] ) { videoConnection = connection; } } } if ([videoConnection isVideoOrientationSupported]) { if ([UIApplication sharedApplication].statusBarOrientation == UIInterfaceOrientationPortrait) { self.PreviewLayer.connection.videoOrientation = AVCaptureVideoOrientationPortrait; [videoConnection setVideoOrientation:AVCaptureVideoOrientationPortrait]; } else if ([UIApplication sharedApplication].statusBarOrientation == UIInterfaceOrientationPortraitUpsideDown) { self.PreviewLayer.connection.videoOrientation = AVCaptureVideoOrientationPortraitUpsideDown; [videoConnection setVideoOrientation:AVCaptureVideoOrientationPortraitUpsideDown]; } else if ([UIApplication sharedApplication].statusBarOrientation == UIInterfaceOrientationLandscapeLeft) { self.PreviewLayer.connection.videoOrientation = AVCaptureVideoOrientationLandscapeLeft; [videoConnection setVideoOrientation:AVCaptureVideoOrientationLandscapeLeft]; } else { self.PreviewLayer.connection.videoOrientation = AVCaptureVideoOrientationLandscapeRight; [videoConnection setVideoOrientation:AVCaptureVideoOrientationLandscapeRight]; } } } By pressing the Start / Stop button, the recording will start if the recording is not yet in progress. If the recording is already in progress, the recording will be stopped. By pressing the Cancel button, the video delegate method VideoRecorderDidCancelRecordingVideo is triggered. By pressing the Retake button, the timer is reset, the names of the buttons change, the Use Video button is hidden, the video capture session starts again. By pressing the Use Video button, the video delegate method videoRecorderDidFinishRecordingVideoWithOutputPath is triggered, to which you must transfer the path to the video file. When you click the Play Video button, the footage is shown using AVPlayer. When the video timer is activated, the time indicator on the top panel is updated. The delegate method of the video recording file is triggered if the file size has reached the maximum allowed value or the recording time has reached the maximum set. At this point, recording stops.
Implementation file VideoRecorderController.m - handling of button presses, delegate method AVCaptureFileOutputRecordingDelegate
- (IBAction)startStopButtonPressed:(id)sender { if (!WeAreRecording) { [self startRecording]; } else { [self stopRecording]; } } - (IBAction)cancel:(id)sender { if ([CaptureSession isRunning]) { if (self.delegate) { [self.delegate videoRecorderDidCancelRecordingVideo]; } } else { self.circleImage.hidden = NO; self.startButton.hidden = NO; self.useVideoButton.hidden = YES; [self.cancelButton setTitle:@"Cancel" forState:UIControlStateNormal]; self.timeLabel.text = @"00:00"; self.elapsedTime = 0; [CaptureSession startRunning]; } } - (IBAction)useVideo:(id)sender { if (self.delegate) { [self.delegate videoRecorderDidFinishRecordingVideoWithOutputPath:self.outputPath]; } } - (IBAction)playVideo:(id)sender { if ([[NSFileManager defaultManager] fileExistsAtPath:self.outputPath]) { NSURL *outputFileURL = [[NSURL alloc] initFileURLWithPath:self.outputPath]; AVPlayer *player = [AVPlayer playerWithURL:outputFileURL]; AVPlayerViewController *controller = [[AVPlayerViewController alloc] init]; [self presentViewController:controller animated:YES completion:nil]; controller.player = player; controller.allowsPictureInPicturePlayback = NO; [player play]; } } // - (void)startRecording { // AudioServicesPlaySystemSound(BeginVideoRecording); WeAreRecording = YES; [self.cancelButton setHidden:YES]; [self.bottomView setHidden:YES]; [self.startButton setImage:[UIImage imageNamed:@"StopVideo"] forState:UIControlStateNormal]; self.timeLabel.text = @"00:00"; self.elapsedTime = 0; self.videoTimer = [NSTimer scheduledTimerWithTimeInterval:1 target:self selector:@selector(updateTime) userInfo:nil repeats:YES]; // , , [self deleteVideoFile]; // NSURL *outputURL = [[NSURL alloc] initFileURLWithPath:self.outputPath]; [MovieFileOutput startRecordingToOutputFileURL:outputURL recordingDelegate:self]; } - (void)deleteVideoFile { NSFileManager *fileManager = [NSFileManager defaultManager]; if ([fileManager fileExistsAtPath:self.outputPath]) { NSError *error = nil; if ([fileManager removeItemAtPath:self.outputPath error:&error] == NO) { // } } } // - (void)stopRecording { // AudioServicesPlaySystemSound(EndVideoRecording); WeAreRecording = NO; [CaptureSession stopRunning]; self.circleImage.hidden = YES; self.startButton.hidden = YES; [self.cancelButton setTitle:@"Retake" forState:UIControlStateNormal]; [self.cancelButton setHidden:NO]; [self.bottomView setHidden:NO]; [self.startButton setImage:[UIImage imageNamed:@"StartVideo"] forState:UIControlStateNormal]; // [self.videoTimer invalidate]; self.videoTimer = nil; // [MovieFileOutput stopRecording]; } - (void)updateTime { self.elapsedTime += self.videoTimer.timeInterval; NSInteger seconds = (NSInteger)self.elapsedTime % 60; NSInteger minutes = ((NSInteger)self.elapsedTime / 60) % 60; self.timeLabel.text = [NSString stringWithFormat:@"%02ld:%02ld", (long)minutes, (long)seconds]; } - (void)captureOutput:(AVCaptureFileOutput *)captureOutput didFinishRecordingToOutputFileAtURL:(NSURL *)outputFileURL fromConnections:(NSArray *)connections error:(NSError *)error { if (WeAreRecording) { [self stopRecording]; } BOOL RecordedSuccessfully = YES; if ([error code] != noErr) { // , , // , id value = [[error userInfo] objectForKey:AVErrorRecordingSuccessfullyFinishedKey]; if (value != nil) { RecordedSuccessfully = [value boolValue]; } } if (RecordedSuccessfully) { // , Use Video self.useVideoButton.hidden = NO; } } - (void)viewDidUnload { [super viewDidUnload]; CaptureSession = nil; MovieFileOutput = nil; VideoInputDevice = nil; } @end Here you can find the source code of my project and try how the application works.
References to sources:
Source: https://habr.com/ru/post/316862/
All Articles