Testing UWP applications using Appium

At the moment, UWP applications are used as a solution for testing through the Coded UI interface. But if you have an application for several platforms, in this case you will have to write tests for each platform separately.
In 2016, the possibility of testing UWP applications using Appium was announced. To do this, a driver was created called Windows Application Driver (WinAppDriver).
Selenium , which uses the WebDriver API , was created to automatically test web applications. Appium is actually Selenium for Apps.
You can test using Appium and WinAppDriver not only with UWP, but also with Win32 applications (for some reason, they don’t mention .NET, but you can also test them). To me, as usual, UWP applications are most interesting.
')
Installing WinAppDriver
Download the latest release from the release page on GitHub
After installation, the WinAppDriver.exe executable file will be located in the C: \ Program Files (x86) \ Windows Application Driver directory, by running which you can start the service

You can also install Appium, which will interact with WinAppDriver, but you need to install WinAppDriver anyway. WinAppDriver should be installed along with Appium, but at the time of this writing there are still some overlays, so you have to install it separately. Just in case, let's leave under the spoiler how to install Appium on a Windows machine.
How to install Appium on Windows 10 using the npm package manager
To work with Appium, Node.js version 6.0 or higher and npm version 3.5 and higher are required.
You can check the version of Node.js using the console command
Npm version
You can download the Node.js installer from the official site.
When installed, npm is installed

If the installed versions are higher than the minimum required, then the following command can be used to start the installation (the command line should be run as administrator):
Now you can run appium on the command line and get the following message:

You can check the version of Node.js using the console command
node –vNpm version
npm –vYou can download the Node.js installer from the official site.
When installed, npm is installed
If the installed versions are higher than the minimum required, then the following command can be used to start the installation (the command line should be run as administrator):
npm install –g appiumNow you can run appium on the command line and get the following message:
Creating an application project for testing
Let's create a simple UWP application that we will immediately test. Let the application perform some simple operation, for example, squaring a number. The source code of the demo application is nowhere easier.
In MainPage.xaml add:
<StackPanel Orientation="Vertical" Background="{ThemeResource ApplicationPageBackgroundThemeBrush}"> <TextBlock Margin="0,25,0,0" TextAlignment="Center"> :</TextBlock> <TextBox AutomationProperties.Name="txtNumber" x:Name="txtNumber" Margin="0,5,0,0" FontSize="18" Width="150"> </TextBox> <TextBlock Margin="0,25,0,0" TextAlignment="Center">:</TextBlock> <TextBox AutomationProperties.Name="txtResult" x:Name="txtResult" TextAlignment="Center" FontSize="18" Width="150"> </TextBox> <Button AutomationProperties.Name="btnGetSquare" x:Name="btnGetSquare" Margin="0,20,0,0" HorizontalAlignment="Center" Click="btnGetSquare_Click"> </Button> </StackPanel> And MainPage.xaml.cs is only one event:
private void btnGetSquare_Click(object sender, RoutedEventArgs e) { double n = Convert.ToDouble(txtNumber.Text); txtResult.Text = (n * n).ToString(); } From the manifest we need to save the Package family name. It is necessary to write a test.
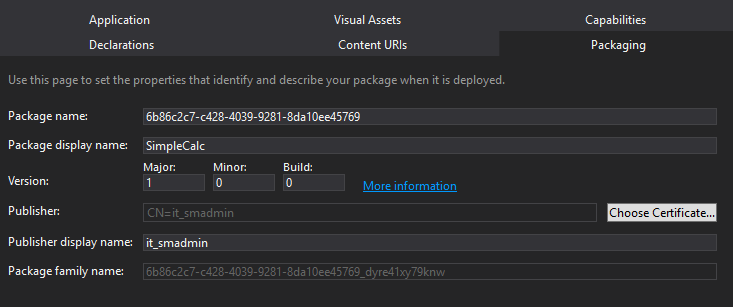
The same value can be taken from the file vs.appxrecipe, which is located in the Debug / AppX folder. The value is contained within the RegisteredUserModeAppID.
Before testing the application, you need to deploy it. Here is the application turned out:

Using the inspect.exe utility, which is located in the C: \ Program Files (x86) \ Windows Kits \ 10 \ bin \ x86 directory, you can define the names of the elements to be used in the test.
Having launched the application that needs to be tested, you can either select any control you are interested in in the tree or even just click on the control in the application window itself. We obtain approximately the following information:

The following values are commonly used to search for an item: ClassName and Name. With the IOs driver, you can use the search element by its AutomationId.
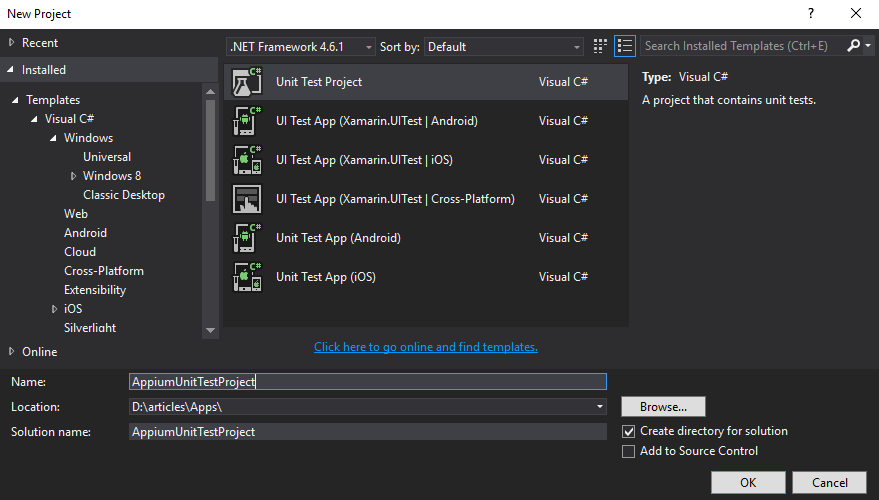
Creating an automated testing project
In Visual Studio, create a project like Unit Test
In the NuGet package manager, we find and install Appium.WebDriver along with the dependent packages necessary for its operation.
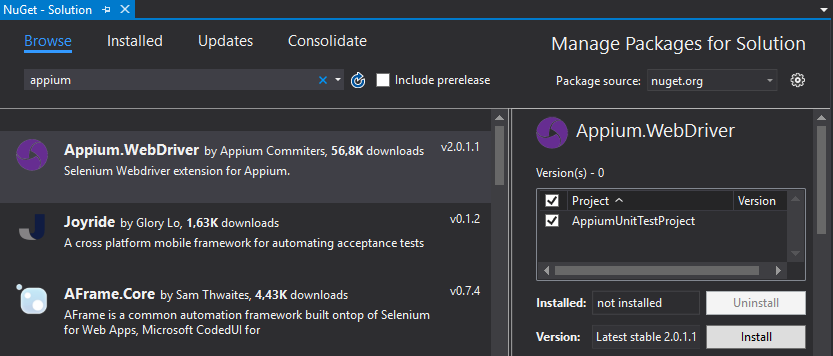
RemoteWebDriver can be used to work with the UWP application, and IOSDriver can be used. Most likely, after the final release, some third driver will appear specifically for the Windows platform. Windows Namespace must be included in the Appium .NET Driver NuGet package.
We write the test code. In this case, it may be:
[TestClass] public class UnitTest1 { protected const string AppDriverUrl = "http://127.0.0.1:4723"; protected static RemoteWebDriver AppSession; [ClassInitialize] public static void Setup(TestContext context) { DesiredCapabilities cap = new DesiredCapabilities(); cap.SetCapability("app", "6b86c2c7-c428-4039-9281-8da10ee45769_dyre41xy79knw!App"); AppSession = new RemoteWebDriver(new Uri(AppDriverUrl), cap); Assert.IsNotNull(AppSession); } [ClassCleanup] public static void TestsCleanup() { AppSession.Dispose(); AppSession = null; } [TestMethod] public void MakeOperation() { AppSession.FindElementByName("txtNumber").Clear(); AppSession.FindElementByName("txtNumber").SendKeys("5"); AppSession.Manage().Timeouts().ImplicitlyWait(TimeSpan.FromSeconds(1)); AppSession.FindElementByName("btnGetSquare").Click(); AppSession.Manage().Timeouts().ImplicitlyWait(TimeSpan.FromSeconds(1)); RemoteWebElement txtResultTextElement; txtResultTextElement = AppSession.FindElementByName("txtResult") as RemoteWebElement; Assert.IsNotNull(txtResultTextElement); Assert.AreEqual("25", txtResultTextElement.Text); AppSession.Quit(); } } If IOSDriver is used, the initialization code is changed to the following:
protected const string AppDriverUrl = "http://127.0.0.1:4723"; protected static IOSDriver<IOSElement> AppSession; [ClassInitialize] public static void Setup(TestContext context) { DesiredCapabilities cap = new DesiredCapabilities(); cap.SetCapability("app", "6b86c2c7-c428-4039-9281-8da10ee45769_dyre41xy79knw!App"); AppSession = new IOSDriver<IOSElement>(new Uri(AppDriverUrl), cap); Assert.IsNotNull(AppSession); } As you can see, the changes are minimal. MakeOperation test code remains the same.
Additionally, you can (and if you start Appium, you even need to) specify the platform and device:
cap.SetCapability("platformName", "Windows"); cap.SetCapability("deviceName", "WindowsPC"); If you run WinAppDriver, then the URL string:
protected const string AppDriverUrl = "http://127.0.0.1:4723"; Well, if you launched Appium, then:
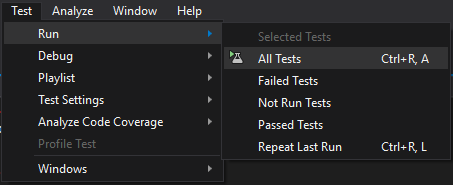
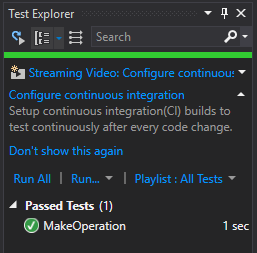
protected const string AppDriverUrl = "http://127.0.0.1:4723/wd/hub"; Run the run test. You can do this:
And if everything is correct, we get:
Small animation of the automated process:

Finally, I will give a standard example of working with a Win32 application:
DesiredCapabilities cap = new DesiredCapabilities(); cap.SetCapability("app", @"C:\Windows\System32\notepad.exe"); AppSession = new RemoteWebDriver(new Uri("http://127.0.0.1:4723"), cap); AppSession.FindElementByClassName("Edit").SendKeys(" Appium!"); This example opens the notepad and enters the text. To test a .NET application, it is also sufficient to set the path to the executable file.
A couple of links:
Page on GitHub
Official documentation page: Windows Application UI Testing
Source: https://habr.com/ru/post/316858/
All Articles