PyQt4 - Introduction
PyQt4 is a toolkit for developing GUI applications. It is a mixture of the Python programming language (Python) and the Qt library. Qt is one of the most powerful libraries on this planet. If not the most powerful. The official site of PyQt www.riverbankcomputing.co.uk is designed by Phil Thompson.
PyQt4 is a set of Python modules. It contains over 300 classes and nearly 6,000 functions and methods. This is a multiplatform toolkit. It works on all major operating systems, including Unix, Windows and MacOS.
Starting with the PyQt4 version, the GPL is available for all supported platforms.
Since the toolkit contains a large number of classes, they are distributed in several modules.

The QtCore module contains the core of non-gui functionality. This module is used to work with time, files and folders, various types of data, streams, URLs, mime types, process flows. The QtGui module contains graphical components and related classes. This includes, for example, buttons, windows, status bars, toolbars, scroll bars, images (bitmap), colors, fonts, etc. The QtNetwork module contains classes for network programming. These classes allow you to write TCP / IP and UDP clients and servers. They make network programming easier and more accessible. The QtXml module contains classes for working with xml files. It provides SAX and DOM API implementations. The QtSvg module provides classes for displaying the contents of SVG files. Scalable vector graphics (SVG) is a language for describing two-dimensional graphics and graphic applications in XML. The QtOpenGL module is used to build 3D and 2D graphics using the OpenGL library. The module allows seamless integration of QtGui and OpenGL libraries. The QtSql module contains classes for working with databases.
Simple example
The code for this example is very brief. It only displays a small window. However, we can do a lot with it. We can resize it. Throw open the whole screen. Minimize. This requires a fairly large code. Someone has already written this functionality. Because it is repeated in most applications, there is no need to write this code again. Thus it is hidden from the programmer. PyQt high-level toolkit. If we wrote for a low-level tulkit, the following example would be much more.
#!/usr/bin/python
# simple.py

import sys
from PyQt4 import QtGui

app = QtGui.QApplication(sys.argv)

widget = QtGui.QWidget()
widget.resize(250, 150)
widget.setWindowTitle('simple')
widget.show()

sys.exit(app.exec_())

import sys
from PyQt4 import QtGui
We connect the necessary modules. The main GUI widgets are in the QtGui library.
app = QtGui.QApplication(sys.argv)
Each PyQt4 application must create a Qapplication object. This object is located in the QtGui module. The sys.argv parameter is a list of command line arguments. Python scripts can be run from the console, and with the help of arguments we can control the launch of the application.
widget = QtGui.QWidget()
Qwidget is the base class for all user interface objects for PyQt4. We use the standard constructor for Qwidget, which has no parent. A widget that has no parent is a window.
widget.resize(250, 150)
The resize () method resizes the widget. In this case, 250 pixels in width and 150 in height.
widget.setWindowTitle('simple')
Here we set the window title to simple.
widget.show()
The show () method displays a window on the screen.
sys.exit(app.exec())
At the end, we run the main application loop. From here begins the processing of events. The application receives events from the window system and distributes them to widgets. When the loop ends, and if we call the exit () method, then our window (main widget) will be destroyed. The sys.exit () method guarantees a clean exit. The environment will be informed about how the application has ended.
Are you surprised why the exec_ () method is written with an underscore? This is done because exec is a Python keyword.

Application icon
The program icon is just a small image that is usually displayed in the upper left corner of the header. In the following example, we will show how to do this on PyQt4. We will also introduce some new methods.
#!/usr/bin/python
# icon.py

import sys
from PyQt4 import QtGui

class Icon(QtGui.QWidget):
def __init__(self, parent=None):
QtGui.QWidget.__init__(self, parent)

self.setGeometry(300, 300, 250, 150)
self.setWindowTitle('Icon')
self.setWindowIcon(QtGui.QIcon('icons/web.png'))

app = QtGui.QApplication(sys.argv)
icon = Icon()
icon.show()
sys.exit(app.exec_())
In the previous example, the code was procedural. Python supports both procedural and object-oriented programming styles. Programming on PyQt4 assumes OOP programming.
class Icon(QtGui.QWidget):
def __init__(self, parent=None):
QtGui.QWidget.__init__(self, parent)
The three most important things about object-oriented programming are classes, data, and methods. Here we create a new Icon class. The Icon class is inherited from the QtGui.QWidget class. This means that we have to call two constructors: first, for the Icon class and, second, for the inherited class.
self.setGeometry(300, 300, 250, 150)
self.setWindowTitle('Icon')
self.setWindowIcon(QtGui.QIcon('icons/web.png'))
All three classes are inherited from the QtGui.QWidget class. The setGeometry () method does two things: it determines the position of the window and its dimensions. The first two parameters are the coordinates along the X and Y axes, respectively. The third sets the width of the window, and the fourth height. The last method setWindowIcon () sets the program icon. To do this, we create a QIcon object. The path to the icon file is passed as a parameter.

')
Tooltip
We can create a tooltip for any widget.
#!/usr/bin/python
# tooltip.py

import sys
from PyQt4 import QtGui
from PyQt4 import QtCore

class Tooltip(QtGui.QWidget):
def __init__(self, parent=None):
QtGui.QWidget.__init__(self, parent)

self.setGeometry(300, 300, 250, 150)
self.setWindowTitle('Tooltip')

self.setToolTip('This is a QWidget widget')
QtGui.QToolTip.setFont(QtGui.QFont('OldEnglish', 10))

app = QtGui.QApplication(sys.argv)
tooltip = Tooltip()
tooltip.show()
app.exec_()
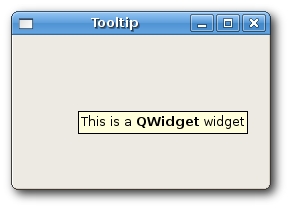
In this example, we show a hint for a Qwidget widget.
self.setToolTip('This is a QWidget widget')
To create a tooltip, call the setToolTip () method. You can use html tags for formatting.
QtGui.QToolTip.setFont(QtGui.QFont('OldEnglish', 10))
Because the usual QtoolTip does not look the best way, we changed it.
Closing the window
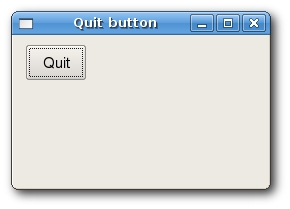
The most obvious way to close a window is to click on the close button in the window title. In the following example, we will show how you can programmatically close the window. To do this, we briefly touch the signals and slots.
QPushButton(string text, QWidget parent = None)
This is the QPushButton constructor, which we will use in our example. The text parameter is the text that will be displayed on the button, the parent is the widget on which we will place the button. In our case, this is Qwidget.
#!/usr/bin/python
# quitbutton.py

import sys
from PyQt4 import QtGui, QtCore

class QuitButton(QtGui.QWidget):
def __init__(self, parent=None):
QtGui.QWidget.__init__(self, parent)

self.setGeometry(300, 300, 250, 150)
self.setWindowTitle('Icon')

quit = QtGui.QPushButton('Close', self)
quit.setGeometry(10, 10, 60, 35)
self.connect(quit, QtCore.SIGNAL('clicked()'),
QtGui.qApp, QtCore.SLOT('quit()'))

app = QtGui.QApplication(sys.argv)
qb = QuitButton()
qb.show()
sys.exit(app.exec_())
quit = QtGui.QPushButton('Close', self)
quit.setGeometry(10, 10, 60, 35)
We create a button and place it on the widget as well as we placed the widget on the screen.
self.connect(quit, QtCore.SIGNAL('clicked()'),
QtGui.qApp, QtCore.SLOT('quit()'))
The event handling system in PyQt4 is built on a signal and slot mechanism. If we click on the button, the clicked () signal will be sent. The slot can be either a PyQt4 slot or any other possible Python language. The QtCore.QObject.connect () method connects the signal and the slot. In our case, the slot is a predefined slot in PyQt4.
Message box
Usually, when you click on the close button in the title bar, the widget closes. Sometimes we need to change this action. For example, if we have a file open in the editor with which we made some changes. In this case, we show the user a message to confirm the selected action.
#!/usr/bin/python
# messagebox.py

import sys
from PyQt4 import QtGui

class MessageBox(QtGui.QWidget):
def __init__(self, parent=None):
QtGui.QWidget.__init__(self, parent)

self.setGeometry(300, 300, 250, 150)
self.setWindowTitle('message box')

def closeEvent(self, event):
reply = QtGui.QMessageBox.question(self, 'Message',
"Are you sure to quit?", QtGui.QMessageBox.Yes, QtGui.QMessageBox.No)

if reply == QtGui.QMessageBox.Yes:
event.accept()
else:
event.ignore()

app = QtGui.QApplication(sys.argv)
qb = MessageBox()
qb.show()
sys.exit(app.exec_())
When we close the widget, a QCloseEvent event is generated. To change the behavior of the widget, we need to change the QCloseEvent event handler.
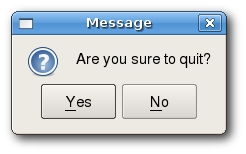
reply = QtGui.QMessageBox.question(self, 'Message',
"Are you sure to quit?", QtGui.QMessageBox.Yes, QtGui.QMessageBox.No)
We display a message with two buttons “Yes” and “No”. The first line ('Message') is displayed in the window title, the second is the message text. The return value is stored in the reply variable.
if reply == QtGui.QMessageBox.Yes:
event.accept()
else:
event.ignore()
Here we check the return value: if we click on the “yes” button, we accept the standard handler, otherwise we ignore the closing.
PS: To be continued ...
Source: https://habr.com/ru/post/31684/
All Articles