Xamarin Modular Application
In this article, you will learn about interesting problems and their solutions that arose in the process of developing a "designer" of applications built on a modular architecture in the company Notissimus . The project is under active development, so we will be happy to hear your opinion in the comments, and we also invite you to the final in 2016 metap for Xamarin developers. All interested in asking under the cat.

Further narration will be conducted on behalf of the authors.
Formulation of the problem
What does the customer want?
The client is capricious, therefore the requirements for the final product (application) will be different for each. However, you can highlight common Wishlist:
- customize the functionality for themselves;
- edit or completely replace the design;
- own the source code;
- be able to continue development in your / other team.
These four Wishlist does not change from client to client, but they can appear / disappear. After defining the women you need to understand what they mean to a simple programmer:
- modularity - you need a basic project with additions in the form of plug-ins;
- customization flexibility - it should be possible to redefine business logic and UI modules;
- licensing and protection of the source code - it must be necessary, since it is planned to transfer the source to the side.
Solution scheme
Having defined our tasks, we decided to use the following scheme:
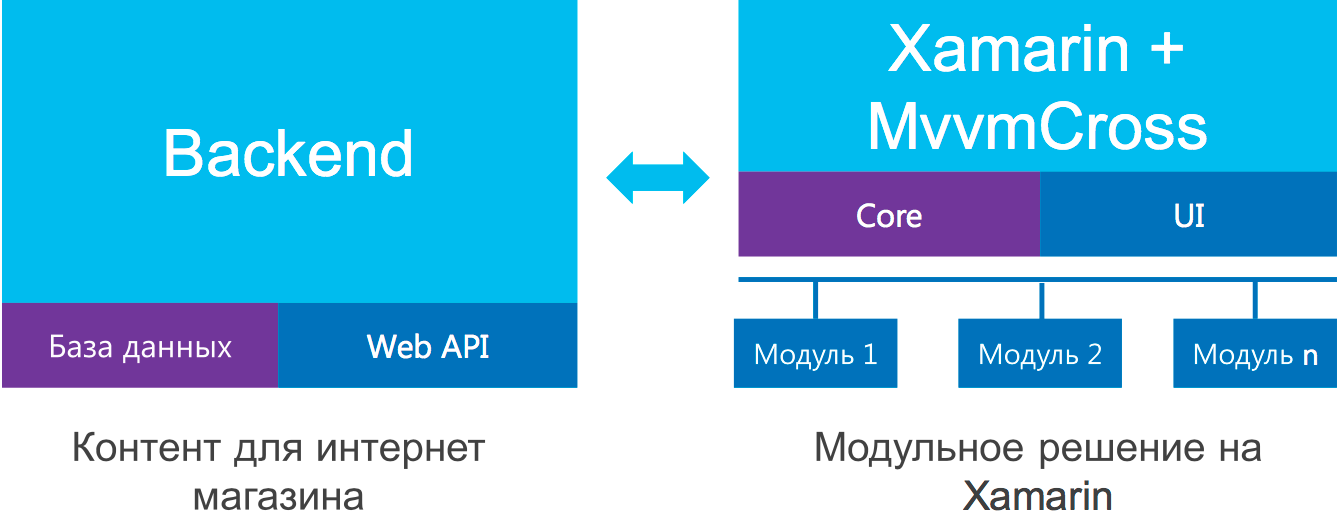
Solution Architecture
Base modules
What are the basic modules? First, it is a kind of architectural unit, consisting of three main elements: API, Core and UI. Secondly, this is a structure completely independent of nothing, except the fundamental Base project, which gathers all the groundwork and basic elements for quickly assembling and connecting new modules (for example, a project to simplify working with the API, * LookupService, wrapper over DB, base ViewModel'i, base classes for UIViewController'ov, etc.). Thus, at the heart of each module lies one or another part or parts of the fundamental Base module.
Examples of basic modules are:
- authorization module and display information about the user;
- chat module;
- Favorite module;
- contact module;
- navigation module *;
- other…
The navigation module is * because it is not a basic module in its pure form, since the logic of processing this navigation on the UI layer strongly depends on the selected type of navigation (menu, or tab, or something else) and the entry point to the application also depends starting ViewModel with which the application starts.
Top level modules
These are the modules that depend on the business segment for which the project is being developed. The reasons why it was decided to separate them into a separate layer are obvious, but we still list them:
- base layer modules are unloaded and become truly universal - there is no need to install various crutches for the required interaction between modules;
- it is possible to refer from one module to another, since these modules belong to one segment, inside it they are completely universal and can be reused;
- we get the opportunity to write only the logic that is required for this particular segment - we unload the modules and the application: we keep small size and speed of work.
Examples of such modules are:
- directory module;
- cart module and checkout;
- stock and news module;
- store address module;
- other…
It is necessary to add goods to the basket from the catalog module and the implementation of this through additional wrappers without a direct link to the basket module cannot be called a convenient way.
Run Project
This is the project with which you can interact with the client or its developer. He contains:
- links to all connected modules and packages required for operation;
- a set of graphics used in the design of the application;
- font set;
- color palette;
- typing with localization;
- set of client settings.
What can a regular user do with this project, guided by the specification:
- change icons / pictures;
- change fonts;
- change texts;
- change colors.
What a developer can do with this project:
- same as user;
- change settings in configs;
- replace any part of the logic in the connected modules (for example, change the type of navigation);
- add additional modules.
Module architecture
API
This is the Portable Class Library - a library (project) code in which it can be executed on any platform, be it iOS or Android. Standard API project contains such elements as:
- Model'i received from the server and used in Core;
- Service'y, inside which there is a call to certain API methods;
- "Registrar" of all services contained in the project.
public interface IAuthService { /// <summary> /// e-mail /// </summary> /// <returns> </returns> /// <param name="email">E-mail</param> /// <param name="password"></param> Task<string> SignIn(string email, string password); /// <summary> /// e-mail . /// </summary> /// <returns> </returns> /// <param name="email">E-mail</param> /// <param name="socialTypeName"> . </param> /// <param name="additionalFields"> </param> Task<string> SignInSocial(string email, string socialTypeName, Dictionary<string, object> additionalFields = null); /// <summary> /// e-mail /// </summary> /// <returns> </returns> /// <param name="email">E-mail</param> /// <param name="password"></param> /// <param name="additionalFields"> </param> Task<string> SignUp(string email, string password, Dictionary<string, object> additionalFields = null); /// <summary> /// /// </summary> /// <returns> </returns> /// <param name="email">E-mail</param> Task<string> RecoveryPassword(string email); /// <summary> /// /// </summary> /// <param name="token"> </param> Task SignOut(string token); } public class AuthService : BaseService, IAuthService { #region IAuthService implementation public async Task<string> SignIn(string email, string password) { return await Post<string>(SIGN_IN_URL, ToStringContent(new { email, password })); } public async Task<string> SignInSocial(string email, string socialTypeName, Dictionary<string, object> additionalFields = null) { return await Post<string>(SIGN_IN_SOCIAL_URL, ToStringContent(new { email, socialTypeName, additionalFields })); } public async Task<string> SignUp(string email, string password, Dictionary<string, object> additionalFields = null) { return await Post<string>(SIGN_UP_URL, ToStringContent(new { email, password, additionalFields })); } public async Task<string> RecoveryPassword(string email) { return await Post<string>(RECOVERY_PASSWORD_URL, ToStringContent(new { email })); } public Task SignOut(string token) { return Post(SIGN_OUT_URL, ToStringContent(new { token })); } #endregion } After adding a service to a project, additional actions are not required to register it, the “registrar” does everything himself thanks to the following lines:
CreatableTypes() .EndingWith("Service") .AsInterfaces() .RegisterAsLazySingleton(); Core
It is also a PCL project, fully built on the use of the opportunities that MvvmCross provides us with. A standard Core project contains the following elements:
- a set of ViewModels — abstractions of screens in which there can only be: implementations of the ICommand interface, simple properties and methods of navigation;
- VmServices are services tied to specific ViewModels and contain all the business logic. Each such service performs strictly one function, for example:
public interface IMenuVmService { public IEnumerable BuildItemsFromJsonConfig(); } public class MenuVmService : IMenuVmService { public IEnumerable BuildItemsFromJsonConfig() { ... } } - Model'i - additional models used in Core and sometimes in the UI (for example, models used in the construction of dialogues and notifications for the user). The most common model in Core is the set of objects with which the database works;
- Service'es are specific services, as a rule, these are either services for working with a database, or only declared service interfaces (the platform has such a service, for example,
IDeviceService, which receives information about the current device); - Messages are messages used for interaction between unrelated parts of the Core (for example, to alert one ViewModel about action in another) or to transfer parameters from the UI layer to the Core and vice versa.
Before starting the development, we discussed that most of the logic in Core can be redefined and each can be replaced completely with your implementation. And if everything is clear with the replacement of services via IoC, then with the replacement of ViewModels, everything is not obvious. There was a question: “how to implement it?”. The answer was the implementation of the ViewModelLookupService .
ViewModelLookupService
This is a service that allows the ViewModel interface to register its implementation. The principle is similar to IoC, only ViewModelLookupService does not work with VM instances. How, then, does navigation take place? The point is that the VM method ShowViewModel () takes in the type of VM that you want to display. Thus, when registering a view of a model in a service, full information about the type of VM interface and the type of VM implementation is taken and stored in the service. When accessing the service to obtain a registered implementation, it accesses the stored data and returns the type of implementation back.
This gives us the opportunity to set our model implementations in configs. Example:
... "items": [ { "icon":"res:Images/Menu/catalog.png", "name":"", "type":"AppRopio.ECommerce.Products.Core.ViewModels.IProductsViewModel", "default":true }, { "icon":"res:Images/Menu/basket.png", "name":"", "type":"AppRopio.ECommerce.Basket.Core.ViewModels.IBasketViewModel", "badge":true }, { "icon":"res:Images/Menu/history.png", "name":" ", "type":"AppRopio.ECommerce.OrdersHistory.Core.ViewModels.IOrdersHistoryViewModel" }, { "icon":"res:Images/Menu/favorites.png", "name":"", "type":"AppRopio.ECommerce.Favorites.Core.ViewModels.IFavoritesViewModel" } ] ... Thus, you can set a list element: name, type of VM'ki, which you should try to get from ViewModelLookupService when you click on an element and call up navigation logic, as well as set a badge on the item and designate one of the items as the start screen.
Thanks to the introduction of the ViewModelLookupService all VM's have got their own interface - it also allows you not to lose the possibility of replacing the logic when you bind a VM to the UI layer. Also registration of implementations of your ViewModels in the ViewModelLookupService is a prerequisite for each module.
RouterService
In fact, with navigation from the Menu module through the ViewModelLookupService not so simple. After implementing this mechanism, we thought that the navigation module should not have an explicit binding to the type being navigated, and also should be able to perform some logic before navigating to a menu item (for example, the menu can have the Personal Account or Order History item, access to which must be blocked before user authorization). Therefore, it was decided to develop a mechanism for RouterService.
RouterService is a service that manages navigation by type of VM interface. Call it occurs as follows:
protected void OnItemSelected(IMenuItemVM item) { if (!RouterService.NavigatedTo(item.Type)) MvxTrace.Trace(MvvmCross.Platform.Platform.MvxTraceLevel.Error, "NavigationError: ", $"Can't navigate to ViewModel of type {item.Type}"); } To handle a navigation event on any type, a module needs to register its implementation IRouterSubscriber for this type in IRouterSubscriber , which contains only two methods:
public interface IRouterSubscriber { bool CanNavigatedTo(string type); void FailedNavigatedTo(string type); } The first is called inside the RouterService.NavigatedTo(...) method if a item.Type been registered with the item.Type type. The second, if the first method returned false or any error occurred during other stages of navigation.
When implementing the first method, the subscriber is obliged to process the type that came to him, perform the required checks and, if they pass, obtain a registered type of model implementation from ViewModelLookupService and navigate to it, otherwise it is necessary to return false . There are no limitations when implementing FailedNavigatedTo(...) .
Thus, the navigation processing to key points was removed from the Menu module and allowed to navigate to any ViewModel'i and perform any logic (for example, when tapping on a menu item, you need to navigate not to the screen, but to open the company’s website)
Ui
The layer consists of two types of projects:
- iOS Class Library;
- Android Class Library.
Each of the projects necessarily contains:
- implementation of platform services interfaces;
- user interfaces - screens built by abstractions - ViewModel'yam.
We will look at the implementation of platform services a bit later, the implementation of user interfaces is no different from what you are doing now, so let's take a closer look at using the various client settings of the application.
There are two types of settings:
- configurations - affect the operation of Core and the interaction logic inside and between modules (for example, the above configuration of the Menu module);
- thematic - affect the rendering of various components in the UI module layer.
The settings file itself is a .json document. Settings are loaded once into special services that start when the module starts. Configuring settings are loaded into Core into ConfigServices, thematic ones are loaded into UI in ThemeServices. The procedure for downloading json from a file is fairly standard, with the exception that Core is PCL, that is, there are no tools for working with files (see. NET Standard 2.0). This led to the introduction of a special service ISettingsService , the implementation of which is located in the UI layer of the fundamental Base module, which allows the logic to load information about the settings without problems.
Stages of developing a new module and connecting it to the existing system
Before developing a new module, you will need to purchase and download the source codes of its application from the client’s personal account. Thus, you will have a solution with two running projects (for iOS and for Android) with the already created architecture and the selected settings. Now we will consider only the creation of a photo gallery module from scratch for an existing iOS application. The module will receive images from the device’s camera, send them to the server, save to an album, and display them in the collection.
Creation of architecture
First, for convenience, create a new Solution Folder, call it Photogallery. After that, we consistently add three projects to this folder:
- Portable Library - Photogallery.API;
- Portable Library - Photogallery.Core;
- iOS Class Library - Photogallery.iOS.
Remove automatically created MyClass.cs and add the following links to projects:
- Photogallery.API - Base.API;
- Photogallery.Core - Base.Core + Photogallery.API;
- Photogallery.iOS - Base.iOS + Base.Core + Base.API + Photogallery.Core + Photogallery.API;
- XamarinMeetUp.iOS - Base.iOS + Base.Core + Base.API + Photogallery.iOS + Photogallery.Core + Photogallery.API.
It is also necessary to connect the MvvmCross package from NuGet to each project.
Add API service
When photographing our plugin will send photos to a server to save history (or, for example, to publish). To do this, you need to add a project to the API, which will perform this work. Create a Services folder in the project and add an IPhotoService interface to IPhotoService in which we describe the required functionality.
public interface IPhotoService { Task SendPhoto(byte[] photoData); } Now we will write the service implementation:
public class PhotoService : BaseService, IPhotoService { private const string PHOTO_URL = "photo"; #region IPhotoService implementation public async Task SendPhoto(byte[] photoData) { await Post(PHOTO_URL, new ByteArrayContent(photoData)); } #endregion } Thanks to the implementation of the BaseService in the Base.API project of the Base module, the request for the required URL is executed in just one line. Similarly, you can add an implementation of the method of receiving photos from the server. The API entry point is taken from the settings in the running project and is used as the URL prefix for all requests. If, for some reason, the implementation of the Post (...) method does not suit you, you can contact the query service directly.
To make the service work, it remains to register it. To do this, create an App class in the API project and write the following code in it:
public class App : MvxApplication { public override void Initialize() { CreatableTypes() .EndingWith("Service") .AsInterfaces() .RegisterAsLazySingleton(); } } Here in the Initialize method, we automatically register all services in the API as Lazy singletones for their subsequent call from the Core part.
Creating a ViewModel and Service
For this module we will create a simple VM, which will contain only a list of photos received from the user and a button for adding a new photo to it. In the Core project, we create the ViewModels folder, inside it the Photogallery folder and add a new interface IPhotogalleryViewModel and a new class PhotogalleryViewModel , which we inherit from the interface and from BaseViewModel .
Add the following lines to IPhotogalleryViewModel interface:
ObservableCollection<IPhotoItemVM> Items { get; set; } ICommand AddPhotoCommand { get; } Items - the list of displayed photos; AddPhotoCommand - adding a new photo to the collection.
Downloading all the photos and the logic of receiving a new photo will be in the service that implements the interface:
public interface IPhotogalleryVmService { Task<ObservableCollection<IPhotoItemVM>> LoadItems(); Task<IPhotoItemVM> GetPhotoFromUser(); } VmService will, for receiving a new photo, contact the camera service of the device, the implementation of which will be on each platform, and, for downloading photos from the album, to the album service.
public interface ICameraService { Task<byte[]> TakePhoto(); } public interface IPhotoAlbumService { Task<List<byte[]>> LoadPhotosFrom(string albumName); } It remains only to register the available services in Core and ViewModel'i (registration of viewmode occurs for the possibility of their subsequent replacement). Everything happens by analogy with the API - an App.cs is created in which the Initialize method is redefined as follows:
public override void Initialize() { (new API.App()).Initialize(); CreatableTypes() .EndingWith("Service") .AsInterfaces() .RegisterAsLazySingleton(); var vmLookupService = Mvx.Resolve<IViewModelLookupService>(); vmLookupService.Register<IPhotogalleryViewModel>(typeof(PhotogalleryViewModel)); } Elaboration of a simple layout on iOS and implementation of platform services
First, we implement all platform services. Let's start with the camera service. Create a Services folder in the iOS project and add the CameraService to it:
public class CameraService : ICameraService { public Task<byte[]> TakePhoto() { throw new NotImplementedException(); } } public async Task<byte[]> TakePhoto() { var mediaFile = await CrossMedia.Current.TakePhotoAsync( new StoreCameraMediaOptions { DefaultCamera = CameraDevice.Rear }); var stream = mediaFile.GetStream(); var bytes = new byte[stream.Length]; await stream.ReadAsync(bytes, 0, (int)stream.Length); PHAssetCollection assetCollection = null; var userCollection = PHAssetCollection.FetchAssetCollections(PHAssetCollectionType.Album, PHAssetCollectionSubtype.Any, null); if (userCollection != null) assetCollection = userCollection.FirstOrDefault(nsObject => (nsObject as PHAssetCollection).LocalizedTitle == ALBUM_NAME) as PHAssetCollection; if (assetCollection == null) { string assetCollectionIdentifier = string.Empty; PHPhotoLibrary.SharedPhotoLibrary.PerformChanges(() => { var creationRequest = PHAssetCollectionChangeRequest.CreateAssetCollection(ALBUM_NAME); assetCollectionIdentifier = creationRequest.PlaceholderForCreatedAssetCollection.LocalIdentifier; }, (bool success, NSError error) => { assetCollection = PHAssetCollection.FetchAssetCollections(new[] { assetCollectionIdentifier }, null).firstObject as PHAssetCollection; PHPhotoLibrary.SharedPhotoLibrary.PerformChanges(() => { var assetChangeRequest = PHAssetChangeRequest.FromImage(UIImage.LoadFromData(NSData.FromArray(bytes))); var assetCollectionChangeRequest = PHAssetCollectionChangeRequest.ChangeRequest(assetCollection); assetCollectionChangeRequest.AddAssets(new[] { assetChangeRequest.PlaceholderForCreatedAsset }); }, (bool s, NSError e) => { }); }); } else { PHPhotoLibrary.SharedPhotoLibrary.PerformChanges(() => { var assetChangeRequest = PHAssetChangeRequest.FromImage(UIImage.LoadFromData(NSData.FromArray(bytes))); var assetCollectionChangeRequest = PHAssetCollectionChangeRequest.ChangeRequest(assetCollection); assetCollectionChangeRequest.AddAssets(new[] { assetChangeRequest.PlaceholderForCreatedAsset }); }, (bool success, NSError error) => { }); } return bytes; } We also add a service for working with photo albums:
public class PhotoAlbumService : IPhotoAlbumService { public Task<List<byte[]>> LoadPhotosFrom(string albumName) { throw new NotImplementedException(); } } public Task<List<byte[]>> LoadPhotosFrom(string albumName) { var photos = new List<byte[]>(); var tcs = new TaskCompletionSource<List<byte[]>>(); var userCollection = PHAssetCollection.FetchAssetCollections(PHAssetCollectionType.Album, PHAssetCollectionSubtype.Any, null); if (userCollection != null) { var meetUpAssetCollection = userCollection.FirstOrDefault(nsObject => (nsObject as PHAssetCollection).LocalizedTitle == "Xamarin MeetUp") as PHAssetCollection; if (meetUpAssetCollection != null) { var meetUpPhotoResult = PHAsset.FetchAssets(meetUpAssetCollection, null); if (meetUpPhotoResult.Count > 0) meetUpPhotoResult.Enumerate((NSObject element, nuint index, out bool stop) => { var asset = element as PHAsset; PHImageManager.DefaultManager.RequestImageData(asset, null, (data, dataUti, orientation, info) => { var bytes = data.ToArray(); photos.Add(bytes); if (index == (nuint)meetUpPhotoResult.Count - 1) tcs.TrySetResult(photos); }); stop = index == (nuint)meetUpPhotoResult.Count; }); else return new Task<List<byte[]>>(() => photos); } } else return new Task<List<byte[]>>(() => photos); return tcs.Task; } Do not forget to add the keys NSCameraUsageDescription and NSPhotoLibraryUsageDescription .
To make a screen, add a View folder to the project, create a Photogallery folder in it and add a PhotogalleryViewController . Add two elements to the Interface Builder on PhotogalleryViewController - UICollectionView and UIButton and create UICollectionView and UIButton for them, respectively. Now we can bind them in the BindControls method:
protected override void BindControls() { _photoCollection.RegisterNibForCell(PhotogalleryCell.Nib, PhotogalleryCell.Key); var dataSource = new MvxCollectionViewSource(_photoCollection, PhotogalleryCell.Key); var set = this.CreateBindingSet<PhotogalleryViewController, IPhotogalleryViewModel>(); set.Bind(dataSource).To(vm => vm.Items); set.Bind(_addPhotoBtn).To(vm => vm.AddPhotoCommand); set.Apply(); _photoCollection.DataSource = dataSource; _photoCollection.ReloadData(); } Now our module is fully operational, it remains only to connect it to the main project.
Connecting a new module to the main project
To connect our module, you must perform six steps:
The first . Add a PluginLoader class to the Core project, which will start the initialization of App.cs.
public class PluginLoader : IMvxPluginLoader { public static readonly PluginLoader Instance = new PluginLoader(); private bool _loaded; public void EnsureLoaded() { if (_loaded) return; new App().Initialize(); var manager = Mvx.Resolve<IMvxPluginManager>(); manager.EnsurePlatformAdaptionLoaded<PluginLoader>(); MvxTrace.Trace("Auth plugin is loaded"); _loaded = true; } } The second . Add a plugin class to the UI, in which the ViewController and platform services will be registered.
public class Plugin : IMvxPlugin { public void Load() { var viewLookupService = Mvx.Resolve<IViewLookupService>(); viewLookupService.Register<IPhotogalleryViewModel, PhotogalleryViewController>(); Mvx.RegisterSingleton<ICameraService>(() => new CameraService()); Mvx.RegisterSingleton<IPhotoAlbumService>(() => new PhotoAlbumService()); } } Third Add the XMU_PhotogalleryPluginBootstrap class to the project being XMU_PhotogalleryPluginBootstrap .
public class XMU_PhotogalleryPluginBootstrap : MvxLoaderPluginBootstrapAction<PluginLoader, Photogallery.iOS.Plugin> { } Fourth . Register navigation on the photo gallery from the menu in the config.
{ "icon":"res:Images/Menu/photo.png", "name":"", "type":"Photogallery.Core.ViewModels.Photogallery.IPhotogalleryViewModel" } Fifth Add handling event navigation to Core plugin.
public class PhotogalleryRouterSubscriber : MvxNavigatingObject, IRouterSubscriber { private string VM_TYPE = (typeof(IPhotogalleryViewModel)).FullName; public override bool CanNavigatedTo(string type) { return type == VM_TYPE ? ShowViewModel(LookupService.Resolve(type)) : false; } public override void FailedNavigatedTo(string type) { //nothing } } The sixth . And register it in App.cs.
var routerService = Mvx.Resolve<IRouterService>(); routerService.Register<IPhotogalleryViewModel>(new PhotogalleryRouterSubscriber()); Run our project and make sure everything works as planned.
Conclusion
We reviewed the main points when working with our platform. The main thoughts that I wanted to convey:
- You are not limited by anything;
- Try MvvmCross;
- Be innovative.
The discussion of the thoughts that appeared in the process of reading is suggested to be moved to the comments. Thanks for reading!
About the authors
 Maxim Evtukh - Developer of mobile applications on the Xamarin framework in the NOTISSIMUS company. In mobile development since 2013. In his spare time, he studies the issue of improving MvvmCross and supporting GitHub controls for implementing new Material Design guides.
 Denis Kretov - Technical Director at NOTISSIMUS. Specializes in the development of mobile applications for online stores, as well as solutions based on iBeacon.
Other articles from our Xamarin blog can be found at #xamarincolumn .
')
Source: https://habr.com/ru/post/316714/
All Articles