A practical guide to VR design
The network has tons of tutorials and blogs about design for virtual reality. But you do not have enough time to study them all and highlight the most useful information. So I decided to share my notes on VR. This is not the final form of the article, it will be supplemented with the development of technologies and approaches. Feedback is also welcome.
Content
Memo for beginners
Are you new to VR? This short (1-1.5 hours) guide will help you navigate the most important things. Unfortunately, without direct access to the VR-system will not be able to get a complete picture. The most accessible and popular platforms require an Android smartphone. I recommend taking one where you can run Daydream . If you try to learn VR without first trying Daydream, you just lose time. Discussing VR is like dancing about architecture. First you need to get an empirical foundation on which to build subsequent training.
')
Fundamental design principles (~ 20 minutes)
The Google Cardboard Design Lab app for Android is the best way to learn the fundamental principles of good VR design, as they appear today.
Reflections on ergonomics and process (~ 20 minutes)
Mike Elgar highlights important points related to ergonomics in VR. Different approaches are proposed to think about design decisions, about the team process of creating design and documentation.
Additional information (~ 30 minutes)
Finally, take a look at the truly creative research done by the Daydream Labs team. It is divided into three parts: interaction, immersion, social communication. These experiments allow us to imagine the amount of work needed to create a truly mature design approaches. A lot of work.
x. Coda
So, welcome to the design for VR. Before continuing, I want to note that most of the information presented above relates to applications based on the presence of the user (presence-dependent), this is the sphere of entertainment and games. At the risk of being a captain, I’ll emphasize:
There are fundamental differences between presence-dependent applications and task-focused applications.
The user interface created for the game will never satisfy the needs of the application to increase productivity. I think that at the stage of development of the industry, the erroneous application of different approaches will be the main source of inconvenience when working with VR applications.
Basic principles
- Virtual reality is a way to gain new experience and opportunities.
- Sessions of 30 minutes.
- It is best to use VR applications at home in a comfortable environment.
(Taken from Designing for Daydream , Google I / O 2016)
- Optimize performance. It is extremely important to keep the frame rate stable and above 60 fps. Otherwise, you risk tempering users. Our vestibular apparatus is a very capricious device. So be sure to discuss with your team the aesthetics of the limitations of your virtual world. Lowering quality for greater stability is better than vice versa. A good example is the PlayStation VR, which has a low resolution but delivers 120 fps.
- Convenience in priority. In VR , the Fitts law works in full. Make sure that users can save movement: combine actions that are often performed together (for example, scrolling forward / backward), snap objects to the grid, and so on. From the very beginning, decide how best to use your application - standing or sitting, whether you want to rotate 360 degrees.
- The main thing is ease of learning. There are no rules yet on how people should interact with things in VR, so you can make small interface simplifications. In any situation, the user should receive clear feedback; interaction features are best explained with practical examples, and not with text. Key application concepts need to be explained in a timely manner. One of the best examples is the Land's End game, it's incredibly easy to learn to play, and all instructions are given in a single text string.
- Avoid excessive literalness. Most of this decade has passed under the sign of skevomorphism. Many developers instinctively want to make it so that everything in VR is like in the real world. But we do not need to recreate every little thing of everyday life. In virtuality, you do not need to make as much effort to open a can. Where this is useful, you can use real-world benchmarks, but do not abandon the advantages of the flexibility of physics and the nature of the VR environment.
- Sound design is critical. Its role is difficult to overestimate, and for most developers, this situation is very unusual. Users will not perform several tasks in VR at once (for the time being), and will definitely not act simultaneously in VR and the real world. Their attention will be fully absorbed by the digital world and the task they are performing at the moment. Therefore, competent sound design will help them navigate and focus on solving the current problem. This is another key way to give users feedback.
“Hearing is a type of vision that immediately gives a complete picture of the scene.”
Alex Faaborg (Google), Voices VR, episode # 423
Camera (User field of view)
- Do not attach objects to the camera.
If you cannot turn away from something, it causes discomfort. It's as if you had dirt on the glasses. - Do not accelerate or slow down the camera.
It must always move at the same speed. Acceleration and deceleration also cause discomfort. Follow these rules: forward> backward, up / down> stretch left / right, fast camera movements> soft camera rotations. - Try to keep the usual distance from the floor to the eyes.
Is the man tall or short? Think about the differences in the review between a small child and a tall adult. This task is greatly facilitated by the presence of position tracking systems in space. But if they are not available to you, then think over the solution of this problem in advance.
Positioning:
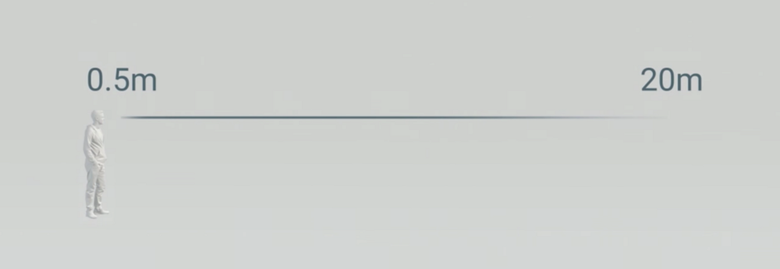
The ideal distance range for placing interface elements, according to Mike Elger.
It is inconvenient for a person to focus on objects closer than half a meter. And everything that is further than 20 meters loses the effect of depth, "three-dimensionality". The screens and optics of modern VR devices best allow you to focus in the range of 2-10 meters.
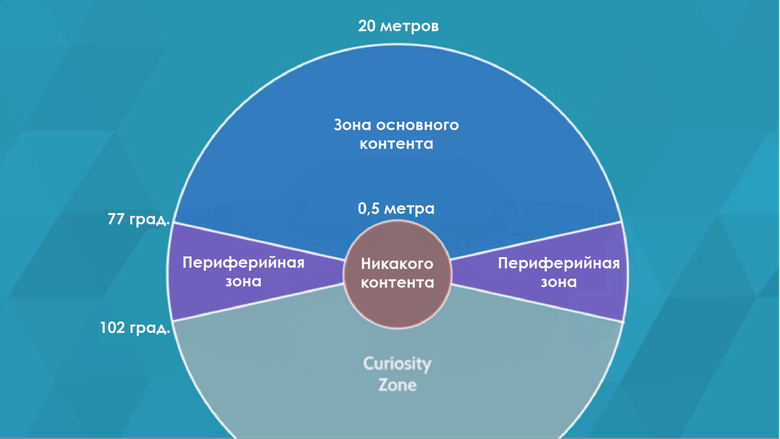
Layout of the placement of different types of content, according to Mike Elger.
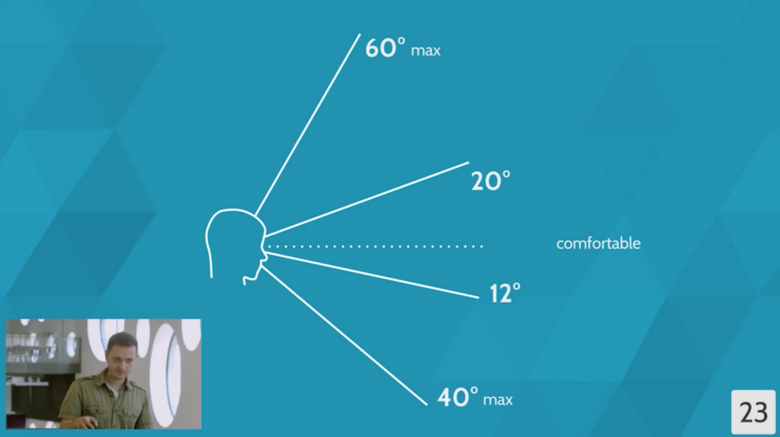
Alex Chu, a Samsung developer, conducted research and found the optimal ranges of head movement:
- Left / right: comfort - up to 30 °, maximum - 55 °.
- Up: comfort - up to 20 °, maximum - 60 °.
- Down: comfort - up to 12 °, maximum - 40 °.

Interaction:
- It is necessary to implement the guidance on the object and the active state. In VR, nothing looks uniquely available for interaction, so you need to provide some kind of indicator that shows when you hover that something can be done with the object. Sound indication also helps well, especially for active states.
Motion:
- Avoid lateral movement near close / large objects, as well as high speeds. If you need to move, use short / slow moves towards and away from the camera. This greatly reduces the chance of nausea in the user.
- Avoid quick access to the user. In real life, when something quickly approaches your face, you instinctively pull in your head or squat. It is unlikely that you want your users to experience this, especially in the case of practical applications.
- Move the user carefully. If you need to move a user in three-dimensional space (in fact, this is a camera movement), then avoid high acceleration, use only linear motion. It is best to instantly move from place to place ("teleport"). Follow these rules: forward> backward, up / down> stretch left / right, fast camera movements> soft camera rotations.
Guidance Indicators:
- Must be rendered at the same distance with the content on which the user focuses.
- Indicators must have guidance and activation states.
- In most cases, it is enough to display them only nearby or on top of an interactive entity.
Text:
- The bigger the better.
- Avoid text on a white and glowing background.
- Since modern devices display about 13 pixels per angle degree, the text should be about ~ 1.5 ° high. Or about 20 pixels for most modern displays.
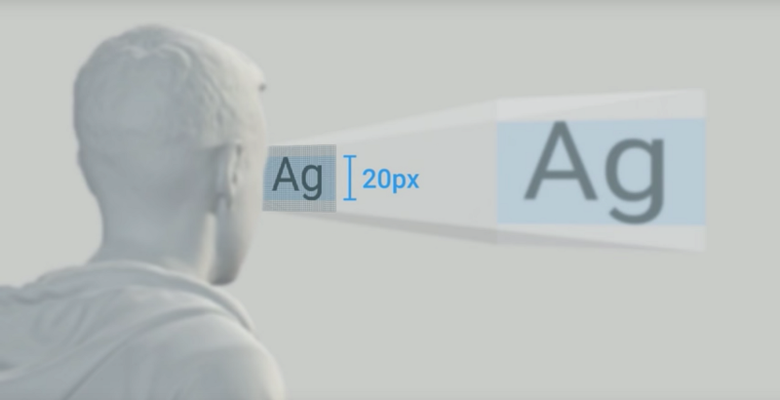
Text size can be calculated using the following formula. We will not analyze it here, perhaps soon there will be a convenient tool for such calculations.

Wednesday
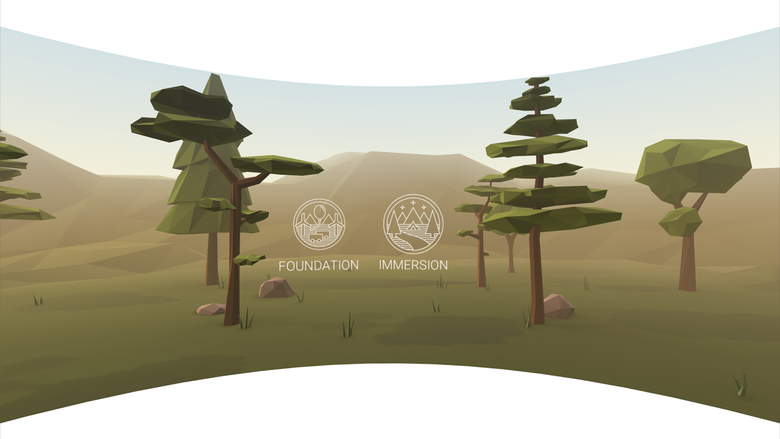
The foundation:
- Place users on a secure surface. In the literal sense. The user should have a feeling that he is on something strong.
- Bound around important content. The environment should be designed to direct the user’s gaze towards important content.
Orientation:
- By default, orient the user in the direction of the most important object of interest. Often you have to move a user from one scene to another. In such cases, be sure to orient it by default to face the new scene.
- Use sound, light, and color to control the user's attention. Cinema teaches that motion, contrast and color are the best ways to get attention. But in VR, the user can simply stand with his back to the necessary elements. Ideally, the likelihood should be reduced, but if this cannot be avoided, then it is best to draw attention with sound so that the user turns in the right direction.
Sky / Background:
Three-dimensional environments need the sky, this is equivalent to the background. Usually it is performed in the form of a sphere (with a panoramic texture, projected equidistantly or in some other way) or a cube (with a texture stretched on the edge). More information can be gleaned from Tessa Chang's excellent materials:
Creating skyboxes in VR: How to transfer real-world physics to VR design techniques
The process of creating a design
The process of creating a design in VR requires numerous experiments.
Alex Chu, Samsung Developer Conference:
Adapt your familiar process. Do more, plan less.
- Controversial issues are solved on mock-ups.
- Layouts, gray box and prototypes.
- Advanced drawing methods.
- Iteration is preferable: design, development, test, repetition.
- Make a draft of the simplest functionality and hone it.
- Your assumptions are wrong. Test more often.
- Use other disciplines and techniques.
- Cinema, architecture, construction, decoration, games ...
Watch this video from the Google VR team (23: 00–34: 00), it tells about the approach to the process of creating the design of VR products used in Daydream Labs:
- Sketches by hand.
This is the only two-dimensional stage in your process of creating a template design and interaction. - Volumetric layouts.
Transfer your ideas to VR as soon as possible to test the comfort of your 3D models. You can simplify your task and use two-dimensional textures to denote interface elements. Do not test on the laptop screen - all tests are carried out only on VR devices. Probably at the earliest stages it is worth using the “gray box” technique, when the draft of the layout is built from primitive monochromatic geometric shapes, in the image of prototyping two-dimensional interfaces. When you bring to the mind the comfort of the layout, you can begin to improve its accuracy. - Custom tests.
Test as early and often as possible on real users. It is important to test on a variety of people, not only on those who have experience using VR. It is desirable that your application is for someone the first experience of communicating with virtual reality.
Instruments
A set of design tools for VR is in its very early stage of development. There is no one-stop solution for implementing a clear design process, in which all tools work together and complement each other. So get ready to plunge into technical details, a lot of boring ahead.
Prototyping and layout
90% of your design work, especially at the beginning, will be associated with prototyping. So I suggest you a list of the tools I found, successful and not so good.
Note: the list is far from exhaustive. I do not have HTC Vive glasses, for which there are excellent tools for creating a design, for example, Tilt Brush . For Oculus there is Medium and Quill. Unity and Unreal engines have the ability to create working environments for "room-based" (room-scale) VR-platforms, which are also in the process of release.
Great tools
I have not yet found anything that can be attributed to this category. Hope this will change soon.
There is an article dedicated to the latest news about Unity.
The launch is expected at the end of the year.
Good tools
- A-Frame : a library for quickly modeling simple interactive scenes in VR. Created in Mozilla based on ThreeJS . Very useful, very easy to learn. Undoubtedly, the best prototyping tool for small teams with universal responsibilities. Disadvantage: in the case of smartphones, the delay level is too high so that you can confidently test on users.
- Dayframe : my small template project to speed prototyping for Daydream VR. He uses web sockets paired with a spare smartphone to emulate a Daydream controller.
- Unity : an engine for creating full-fledged cross-platform VR projects. Quite complicated compared to previous tools, but much more functional and powerful. It is sufficient for most production-tasks, so it is advisable to create highly realistic prototypes on it. Difficult to learn.
Less good tools
- Sketch-to-VR : A simple plugin that lets you sketch your ideas into Sketch and quickly export them to the A-Frame scene. In my experience, it is of little use to imagine the final look, because these are just images projected onto a cylindrical surface. If you have a well-developed intuition about what works and what does not, then you can use this plugin as a first step to create a scene outline. Although he deprives her of the lion's share of the dynamics.
- FramerJS VRComponent : if you are familiar with FramerJS, the best scripting tool for prototyping, you can start creating prototypes for VR in a familiar environment. The main (and fatal) flaw: the stereo camera is not yet supported here, so you cannot test it in a real VR. Hope to fix it soon.
Modeling
Sometimes you need to quickly generate a model. In any applications, there are simplest geometric shapes (cubes, spheres, and so on), but they are not always sufficient. In my experience, the most convenient format for porting is .obj. Here is a list of good modeling tools you can start with:
- MagicaVoxel : a very handy modeling process in the style of Lego / Minecraft. Models are created using voxels.
- TinkerCAD : allows you to quickly generate simple composite three-dimensional shapes.
- Blender : more difficult to learn, but allows you to create really complex objects.
- SketchUp : a well-known editor. You will need an additional plugin to create .obj.
Many ready-made models are on the network. Surely more will begin to appear soon.
- Sketchfab : a great library of VR content that can be viewed in WebVR. Today it is Flickr in the world of 3D content.
- Thingiverse : mostly models for 3D printing, but there are a lot of “regular” ones. We'll have to convert from .stl to .obj.
- Unity / Unreal resource repositories.
User Testing
So, you have an idea. How to test it on users? So far, only one specialized VR platform is available: Fishbowl VR . You will have to manually configure something, although you first want to receive:
- Shooting users from the outside when they use your product so that you can see how they move while doing so.
- Synchronous video of what they see in the VR device.
Some companies have developed complexes of the so-called “hybrid reality” (Mixed Reality), video recording with a real person is being introduced into the virtual world. But for now this is a rather complicated process, it is well written here .
Vocabulary
Equipment
HMD: Head Mounted Display, Virtual Reality Helmet / Goggles.
Motion tracking systems
Tracked: in the tracked system, not only the orientation of the head is known, but also the position of the VR device in space. This allows you to tilt your head to the side and forward / back, as well as squat and stand on tiptoe.
Room scale: A “room” system that uses a large enough tracked space in which the user can move freely. In other words, you can walk around the room.
Inside out tracking: “tracking the opposite.” Used in HMD.
Optics
Display: VR device screen. Today, all systems use LCD screens with a pixel density of at least 400 ppi.
Lenses: All HMDs use lenses that are mounted in front of the displays so that users can focus on the image.
Barrel distortion : for correction of images created by lenses, the engine generates an image with barrel distortion. As a result, the image looks clearer.
IPD, Inter-pupilary distance : interpupillary distance. Used to estimate the distance between human eyes. This is an individual parameter that affects the stereoscopic effect, which creates the illusion of depth.
FOV, Field of view : display field of view in degrees, vertically and horizontally.
Units
PPD: Pixels per degree : pixels per degree. When printing, we use DPI (dots per inch), screens evaluate to PPI (pixels per inch), and VR uses PPD. Knowing this option for each platform, you can make better and more realistic designs.
Meters : in virtual scenes, everything is measured in meters. This is true for WebVR (and therefore for A-frame), Unity and Unreal. No feet.
Image refresh rate
VR uses the following parameters: “Frame Rate” (Software Rate), “Refresh Rate” (Refresh Rate) for the display, and “Sampling Rate” to track the position in space, movement, and orientation of the device and controllers.
Frame rate: minimum 60 fps, ideally 120 fps . How many frames per second the application draws. This is not a constant, the parameter is strongly dependent on the processor and the graphics chip. But you need to strive to ensure that on any device your product delivers at least 60 frames. But today there is a serious problem with VR on Android browsers - Chrome limits the frequency to 30 frames.
Refresh rate: minimum 60 Hz, ideally 120 Hz . How many times per second the image on the display is updated. All modern VR platforms provide minimal value. This parameter can be used to determine which smartphones will not be supported by your application.
Sample rate: minimum ~ 100 Hz, ideally 1000+ Hz . How many times per second is the position in space read. The low value of this parameter is one of the main causes of nausea when using VR. All modern platforms provide minimal value. In the iPhone 6s, the IMU (inertial measurement unit, incertial measurement unit) has a maximum sampling rate of 100 Hz. Android-smartphone has a wide variation. On top of that, in Chrome for Android, the sampling rate is lowered, so that with fast movements you can quickly sway.
“Time to photons” (Time to Photons / Motion to Photons): minimum 50 ms, 20 ms recommended, ideally 2 ms. The combination of frame rates, updates and sampling gives us a value that can be called a general system delay, or “time to photons”: this is the gap between the user's action and the display of his result on the display. If it is more than 50 ms, it may cause disorientation. A delay of 2 or less milliseconds is no longer noticed.
Platforms
The process of adaptation, FOV, resolution, frame rates / updates and input methods are fundamentally different from platform to platform. Below, I have provided important information and links to official manuals.
Systems without binding
Such systems do not have cables, all calculations are performed in the smartphone, which also acts as a display.
Google daydream
One of the most developed and accessible platforms. I think she will get widespread popularity. SDK is available.
Manuals: Developer Review
Release date: November 10, 2016
Marketplace: Android Play Store
OS: Android (for Daydream compatible smartphones)
Management: turn of the head, not traced controller with three degrees of freedom, the trackpad with two buttons
FOV: ~ 90 °
Daydream is the best system without reference.
Cardboard
I think that the Cardboard VR will be quickly supplanted by other, much more practical, cheaper solutions. On the other hand, this is still the only iOS-oriented VR platform, so it cannot be ignored.
Manuals: Cardboard Design Lab (Android App) , Designing for Cardboard
Release date: constant incremental releases of the application and the construction itself
Marketplace: iOS App Store, Android Play Store
OS: iOS / Android
Control: turn the head, one button HMD
FOV: 85–100 °
Gear vr
Given the level of integration Daydream, it is difficult to imagine that the combination of smartphone + headband holder Gear VR will retain its value. At the same time, the system gives access to all Oculus Exclusive content.
Manuals: UI + Management and Navigation
Release date: November 27, 2015 (new release is expected in the fourth quarter of 2016)
Marketplace: Oculus Store
OS: Android (limited to Samsung Galaxy series phones)
Control: turn the head, cross + one capacitive button on the HMD (in the new version - the button "back" and "home")
FOV: 96–101 °
Systems with binding and tracking
These are more powerful solutions than uncoupled systems that track positioning. But they are more expensive, require some preparation of the room and are equipped with an external cable, which can be stepped on.
HTC Vive ("room"!)
This is the best option among systems with reference and position tracking. A great tool for developing the design of VR products, a top-end system for professionals. The user base is quite small, mostly - game projects.
Release date: April 5, 2016
Marketplace: Steam
OS: Android
Management: Tracked Controllers
FOV: 110 °
Vive - the best system with a binding. Previously, I gave this title Rift, but as a "room" solution, it seems to work, is still unstable.
Oculus Rift ("room"?)
It takes about the same market share as Vive, but the quality is worse and a bit cheaper. If you need a system like Rift, then take the Vive. The only difference is access to content that is not related to the choice of a VR platform for practical applications or as a design tool.
Manuals: UI + Management and Navigation
Release date: November 27, 2015
Marketplace: Oculus Store
OS: Windows
Management: touch (tracked controllers are available from October 2016), gamepad (I think its support will decrease after the release of Touch)
FOV: 110 °
Playstation VR
At the moment, this system is like a dice. This is the weakest product among the systems with tracking and linking, for a significantly cheaper one and has the largest installation base - today more than 40 million PS4 are sold. It will probably be a hit product, but it is unlikely to be interesting in addition to games and entertainment.
Manuals: ...
Release date: October 13, 2016
Marketplace: ...
OS: Playstation
Management: gamepad, monitored controllers. Note: Sony recently announced that every application must support gamepads, which complicates development.
FOV: 100 °
Other resources
From product design to virtual reality. Personal experience and introduction to VR
- UX to VR : A comprehensive list of videos, articles, and code sources that will help you in learning and research. From here I took most of the tools for this article.
- Approaches to design in virtual reality : a good article is a basic article about the principles of design in VR. More academic approach, lots of information.
- Voices of VR : almost daily issues about the VR industry. Some of them contain a lot of up-to-date design information about the immersion experience.
Source: https://habr.com/ru/post/316566/
All Articles