Moving to Swift 3 using the migratory “robot” in Xcode 8.1 and 8.2
It is already known that
Xcode 8.2 will be the latest release that supports the transition version of Swift 2.3 . Therefore, we need to urgently think about migrating to Swift 3 .I want to share some experiences of such migration on the example of applications related to the Stanford course “Developing iOS 9 Apps with Swift” , both demonstration (there are 12 of them) and those obtained as a result of completing the Tasks of this training course (there are 6 of them with options). They are all of different complexity, but there are also drawing, and multithreading, displaying images using
ScrollView , working with the Twitter server, and Core Data database, working with the Cloud Kit cloud service, and Map Kit . And all this was written in Swift 2.2 ( stanford.edu ), and I needed to transfer all applications to Swift 3 . A summary of the Stanford course lectures in Russian can be found on the About Stanford Lectures website, and the code for Swift 2.3 on Github and for Swift 3 on Github .If you decide to migrate to
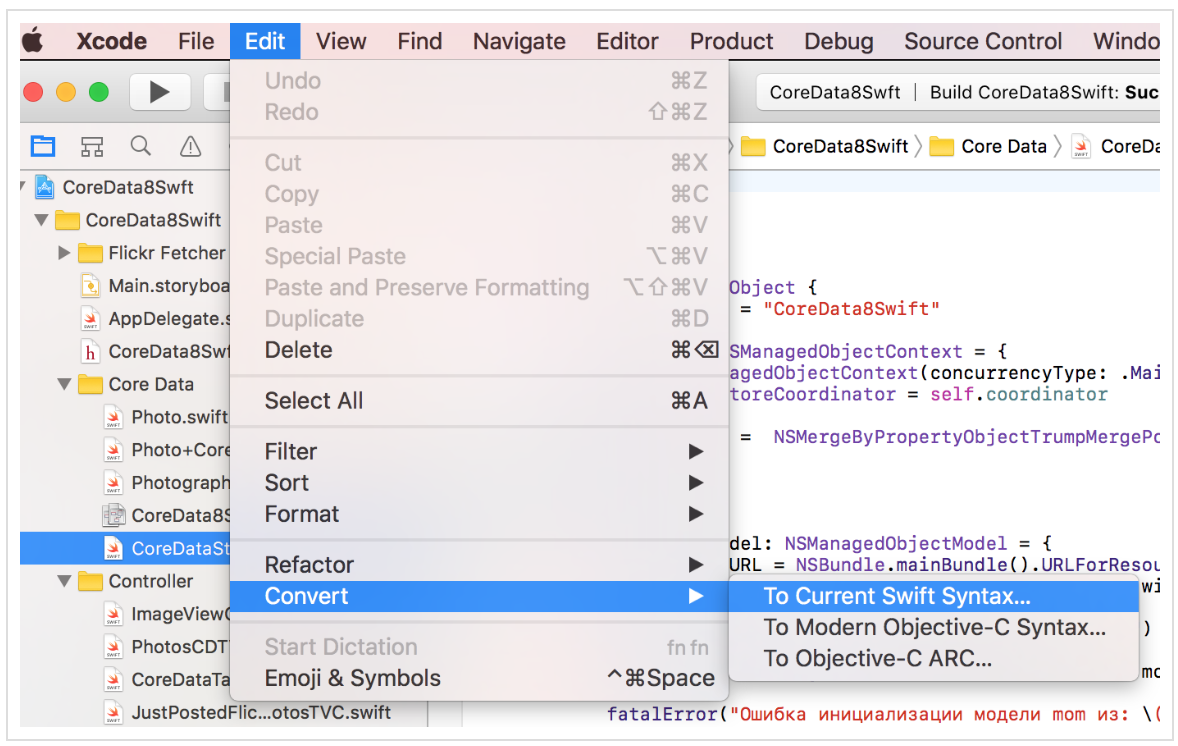
Swift 3 , then in Xcode 8 you need to run the migration tool (a kind of “robot”) using the menu Edit → Convert → to Current Swift Syntax :')
Next, you are offered a map of the differences between the
Swift 2 source code and the Swift 3 code that generated this “robot”: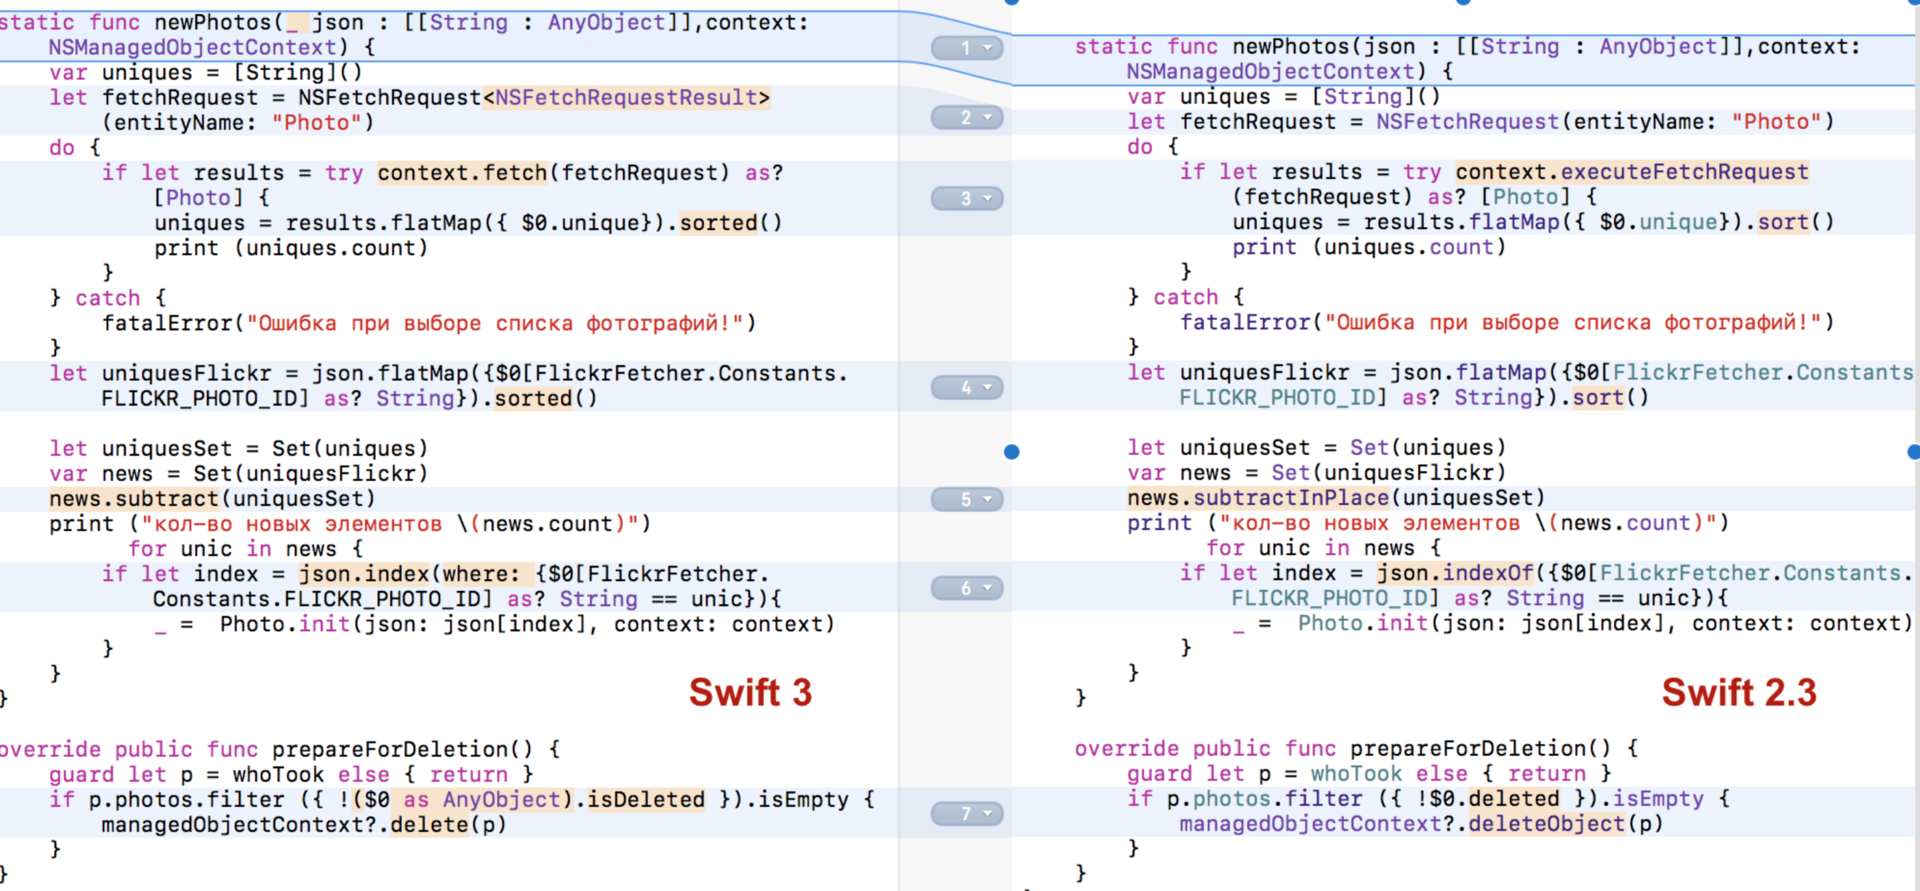
I must say that the migration “robot” in
Xcode 8.1 and Xcode 8.2 works perfectly compared to the initial version in Xcode 8.0 , with which I had to start. The new migration “robot” is inventive and very reasonable. Using the example of this map of differences, it is possible to study perfectly the changes that certain syntactic constructions underwent in Swift 3 . The migration “robot” does a great job of replacing names, method signatures and properties, transforming, if necessary, previously common properties in Generic (for example, NSFetchRequest , which is not Generic in Swift 2 , but is in Swift 3 ). It can replace the whole code with whole “patterns”, for example, singleton, if it was executed by old means using dispatch_once(&onceToken) .Below I will show examples of this. The migration "robot" operates according to the principle of "do no harm" and wherever possible, it tries to maintain the efficiency of the existing code, even inserting additional code. You should look at these changes very carefully and include in the list those places whose code is incomprehensible to you or seems to be ineffective and less readable. Let's call this a list of tasks to clarify the code.
If you agree with the proposed "robot" transformations, then you save them and work on. But, as expected, the migration “robot” does only part of the work to get the compiled code in
Swift 3 . In applications, 2-3 errors and 3-4 warnings remain. Therefore, your next step will be to open the “errors and warnings” navigator (if any) and examine them all one by one: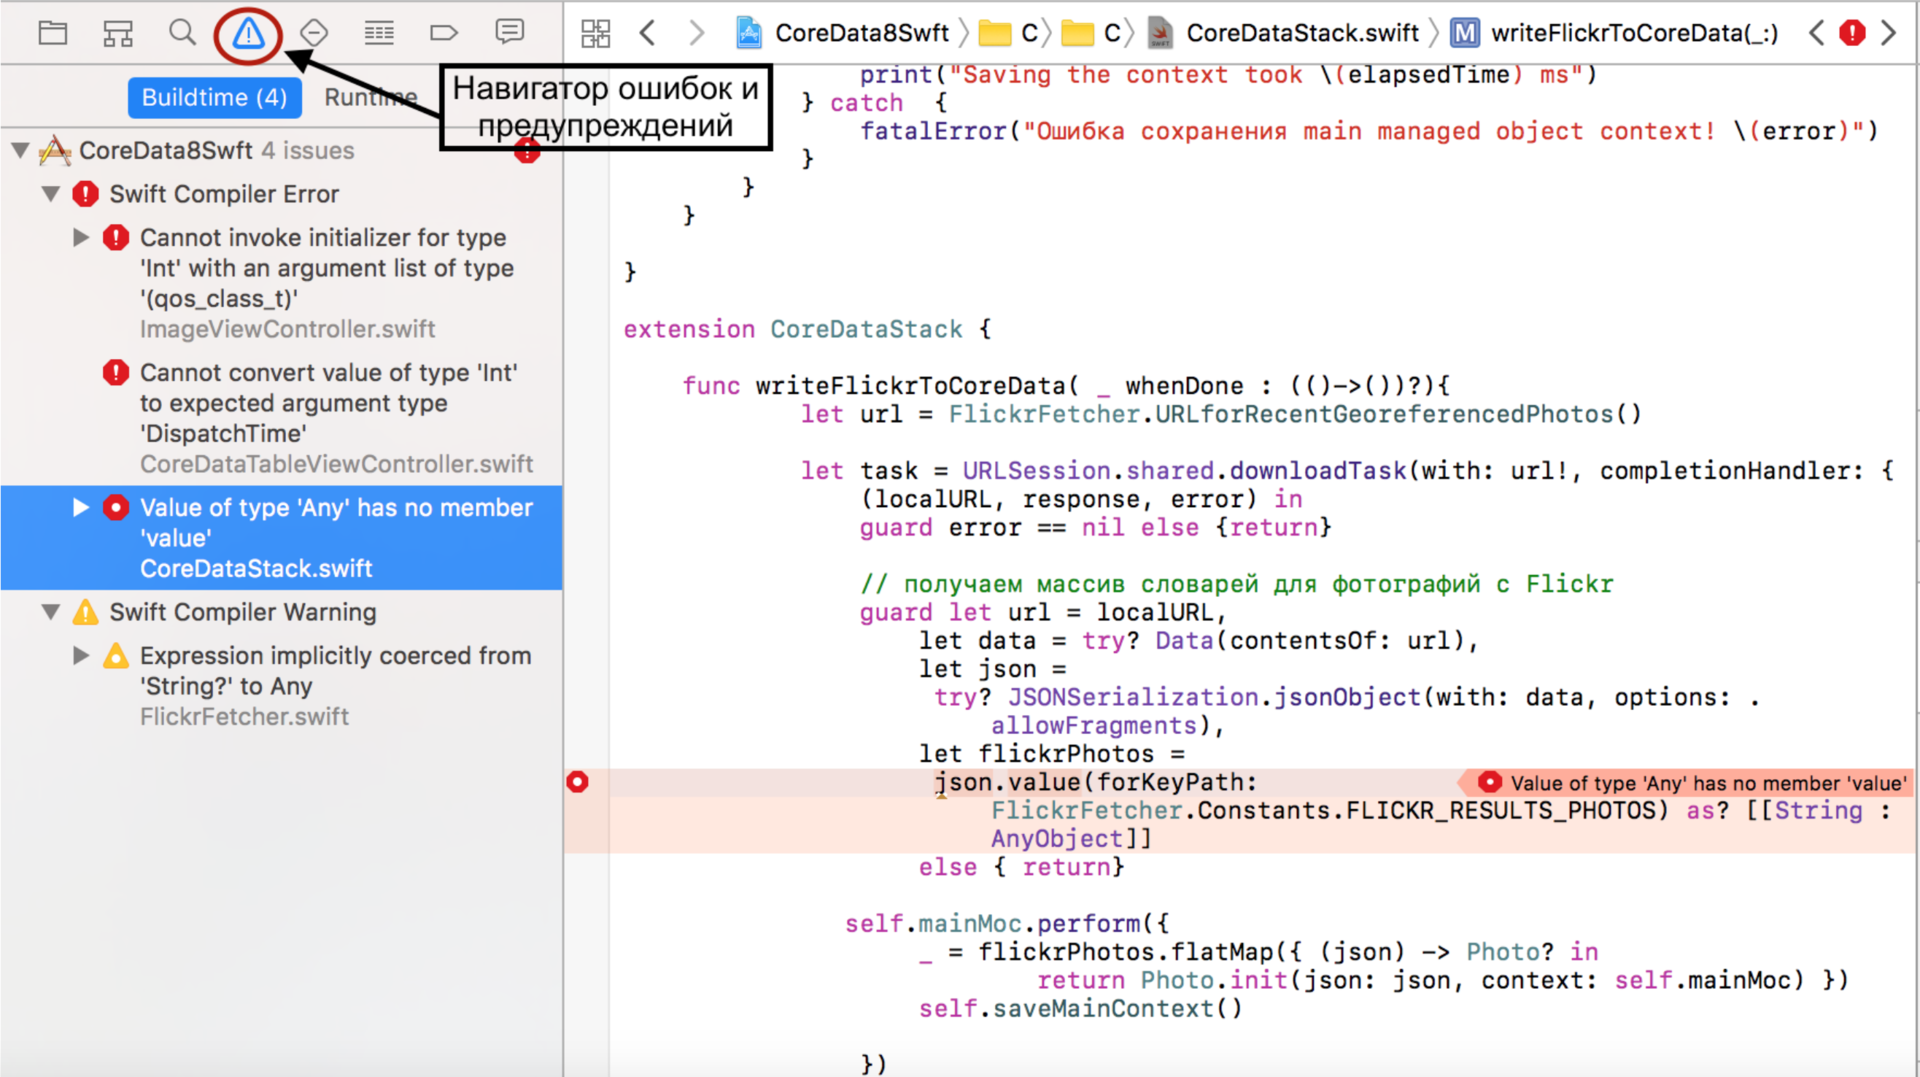
For most errors and warnings, solutions are suggested, and basically these are the right solutions:

We need to do a “casting type” for the
json variable, which in Swift 3 is represented by a “robot” as Any , although we work with it as with a reference variable. The result is:
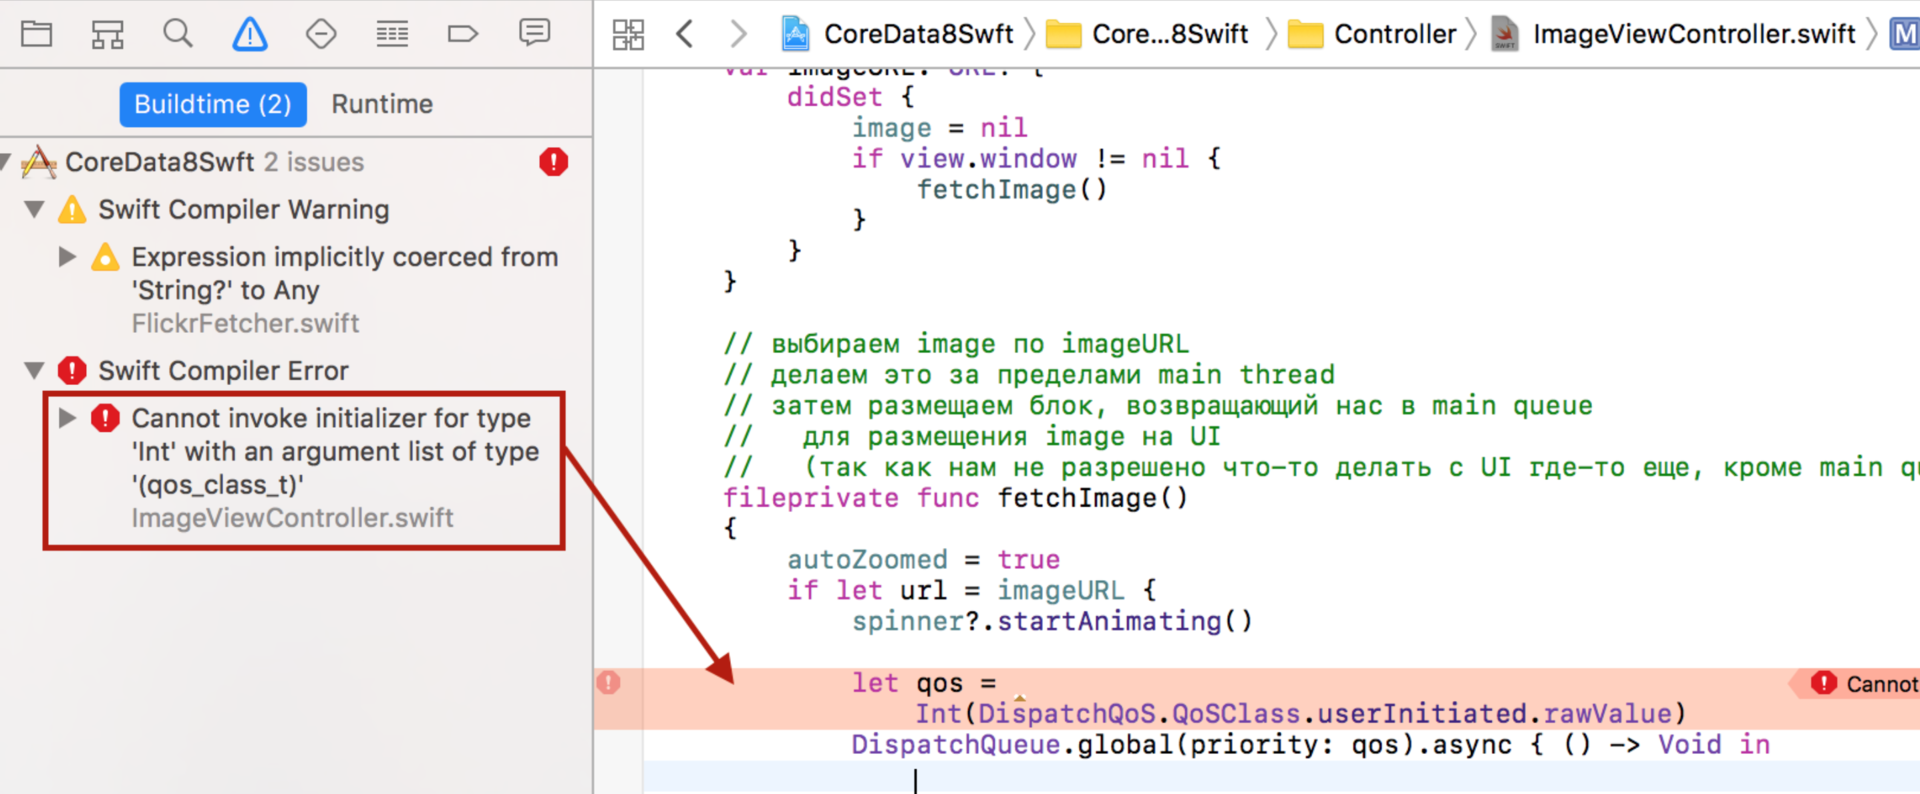
But sometimes you have to correct mistakes. Immediately after the work of the migration “robot”, we have an error during the initialization of the “parallel” queue (this case is considered in more detail below):
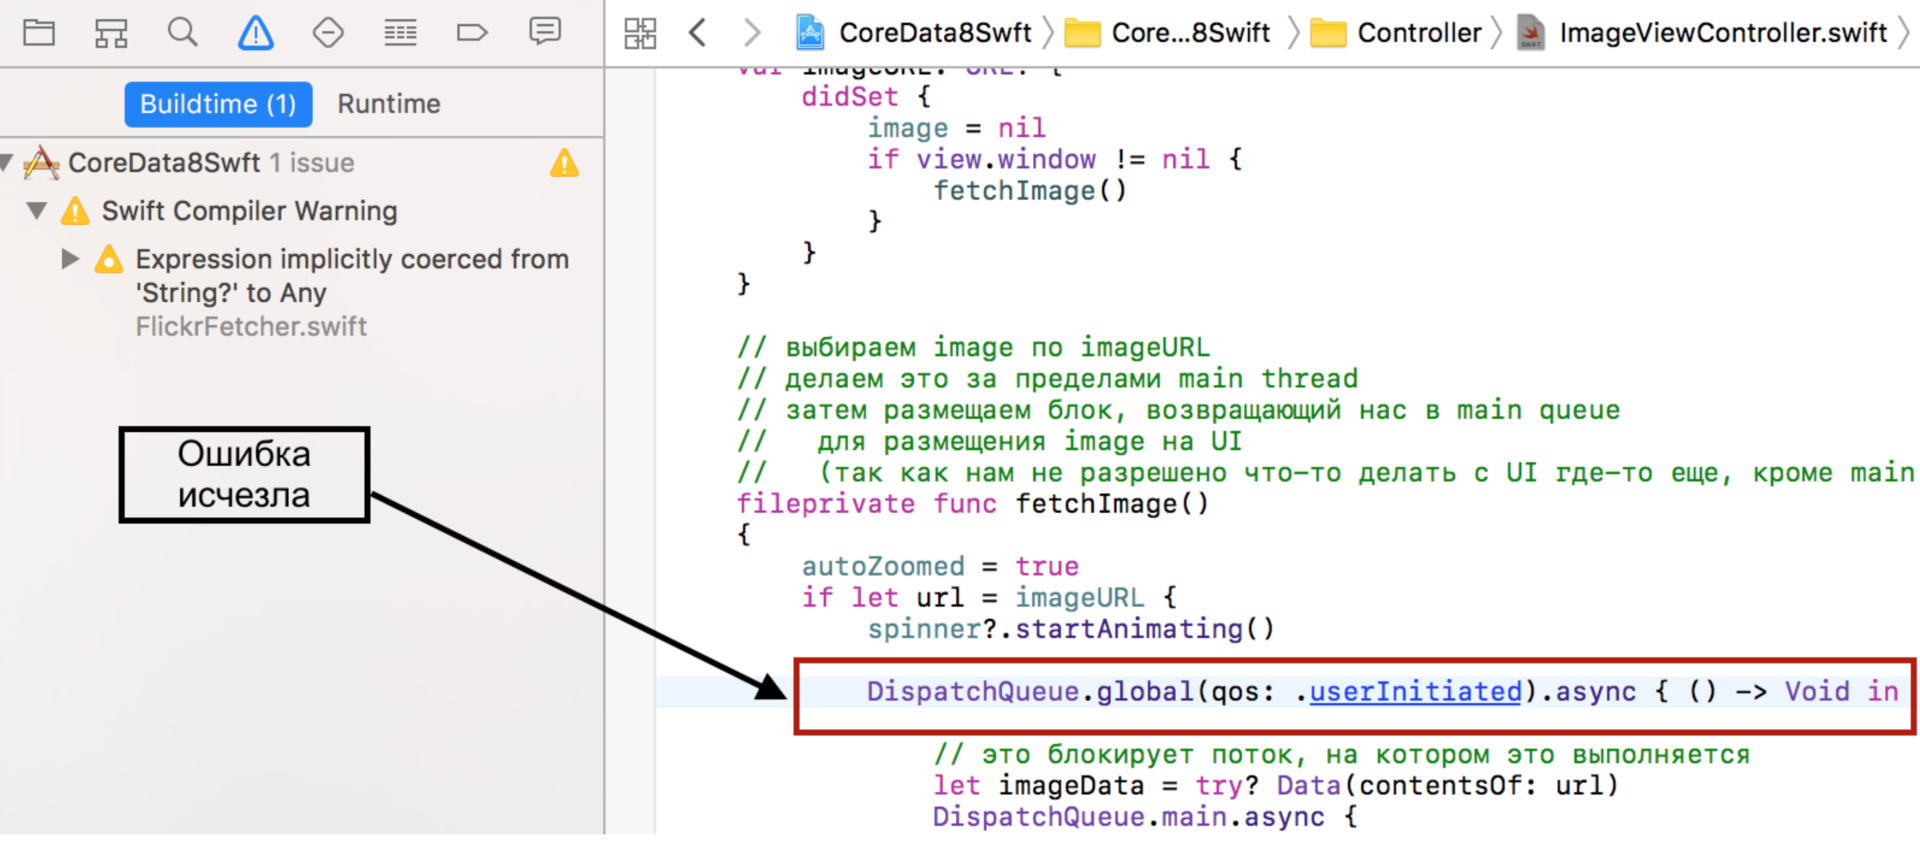
Instead of two lines with an error, we add one line with the correct code:
Sometimes you are offered several solutions to a problem, and you can choose any:
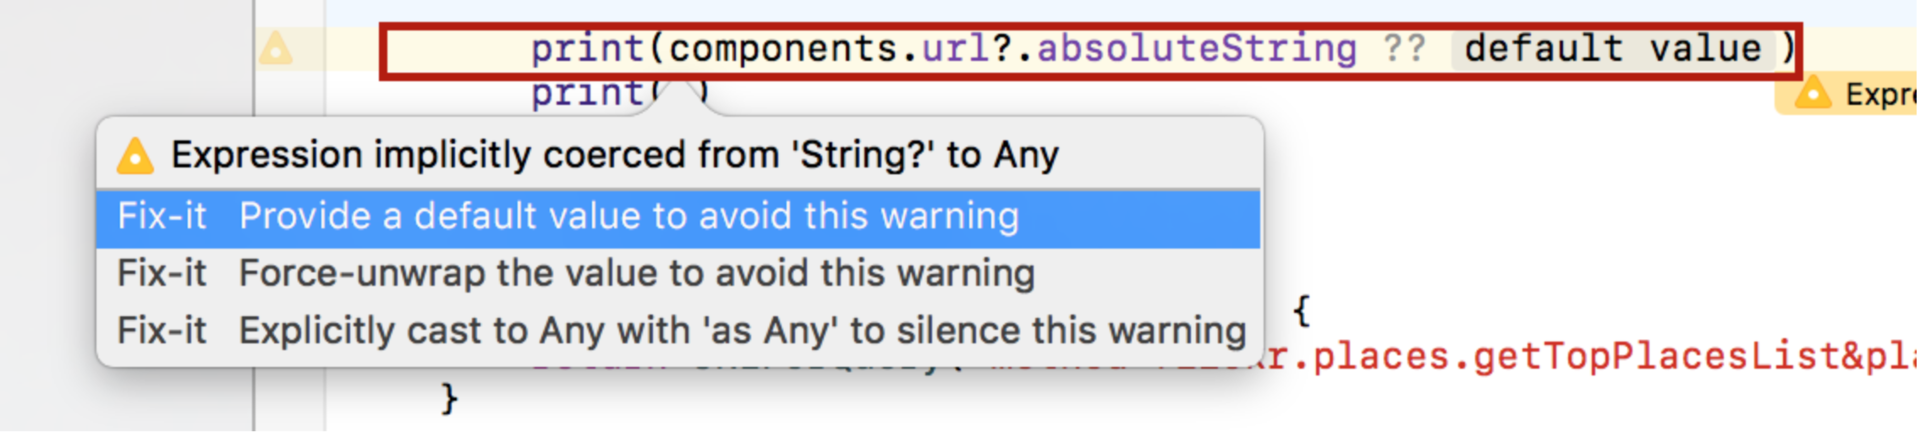
We are informed that implicitly will force the conversion of a
String? in Any . This can be corrected in three ways and thus remove this warning:- provide default value
- force the “unwrap”
Optionalvalue, - implement an explicit "casting" in
Anywith the codeas Any.
We prefer the first option and will use the empty string "" if the expression is
nil :
In general, migration is an excellent opportunity to take a broader look at your code and, possibly, improve it.
As a result of working with the list of errors and warnings, you managed to compile the application and run a test sample. This is a very important stage of migration.
Now you can focus on the task list for refining the code you compiled when viewing the map of the differences between the two versions:
Swift 2 and Swift 3 . All this code is technically correct, but it can be either redundant or inefficient or lead to execution errors. Some of these situations are of a general nature, and some are highly dependent on the specifics of your application.I will share some of them that I had to deal with when migrating applications to the “Developing iOS 9 Apps with Swift” course.
1. You need to return the access level fileprivate back to private .
In the process of migration to
Swift 3 all private access levels are replaced with the new fileprivate access fileprivate , because the private in Swift 2 made fileprvate .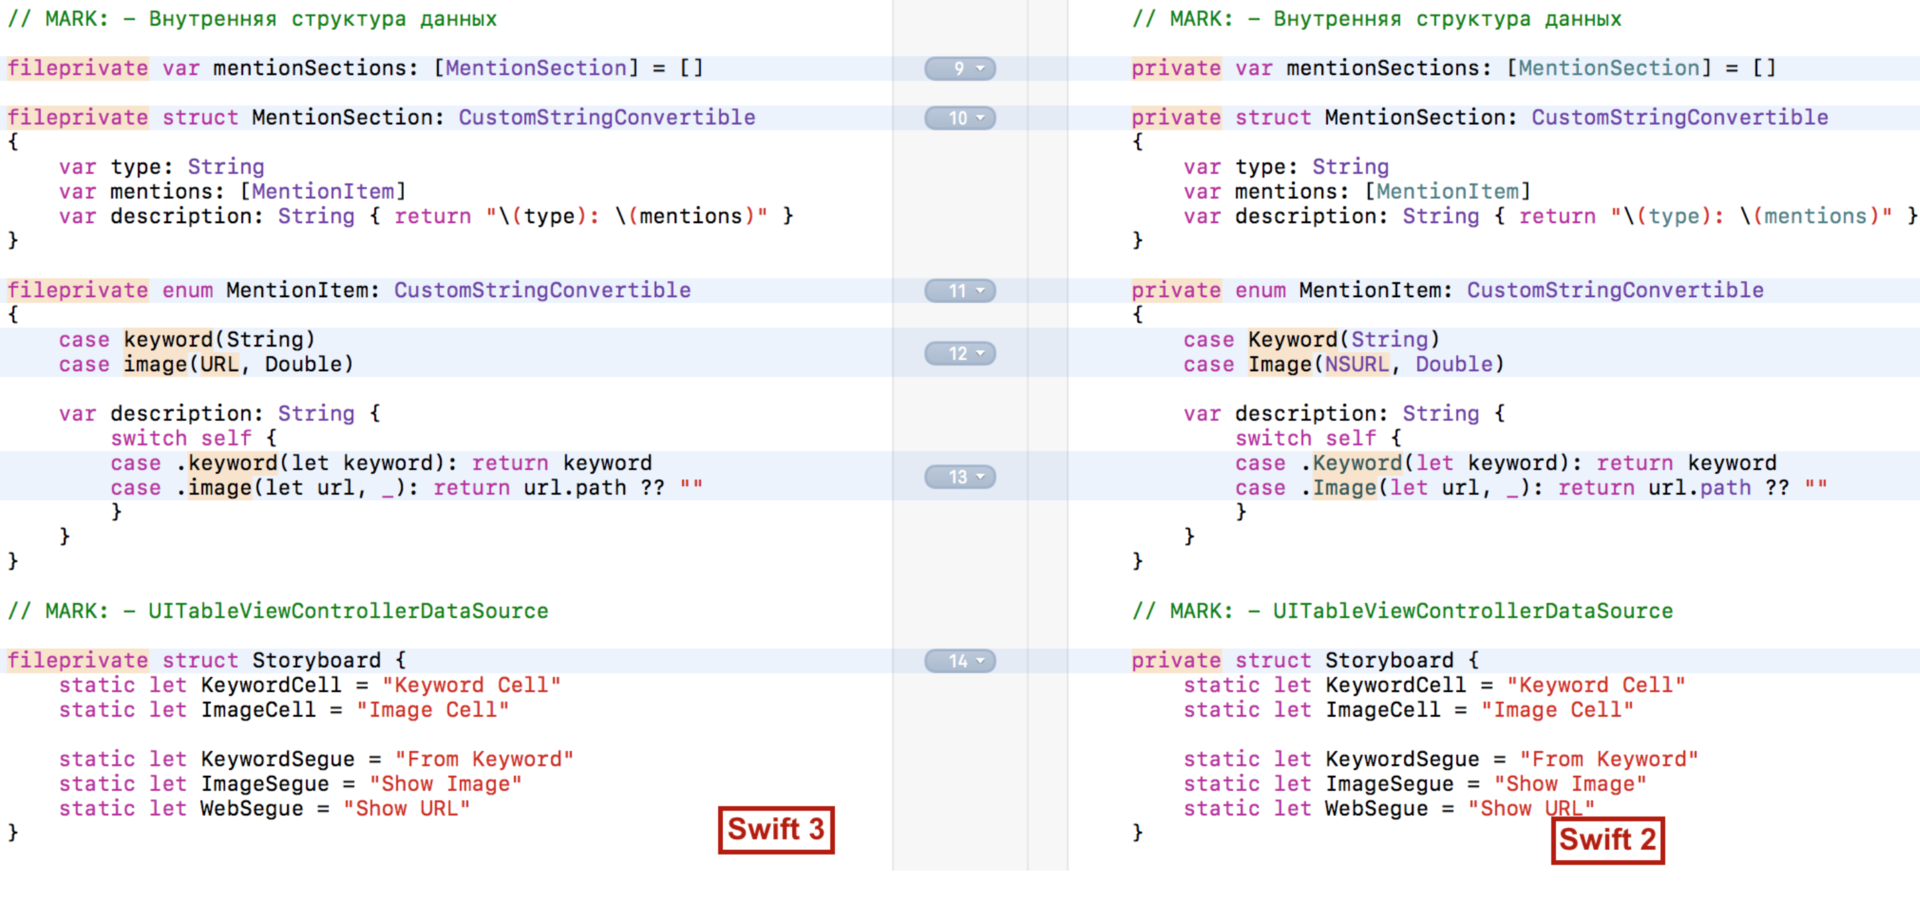
The migration “robot” operates according to the principle “do no harm”, so it replaced all old
private with new fileprivate , that is, expanded the scope of access to private variables and methods.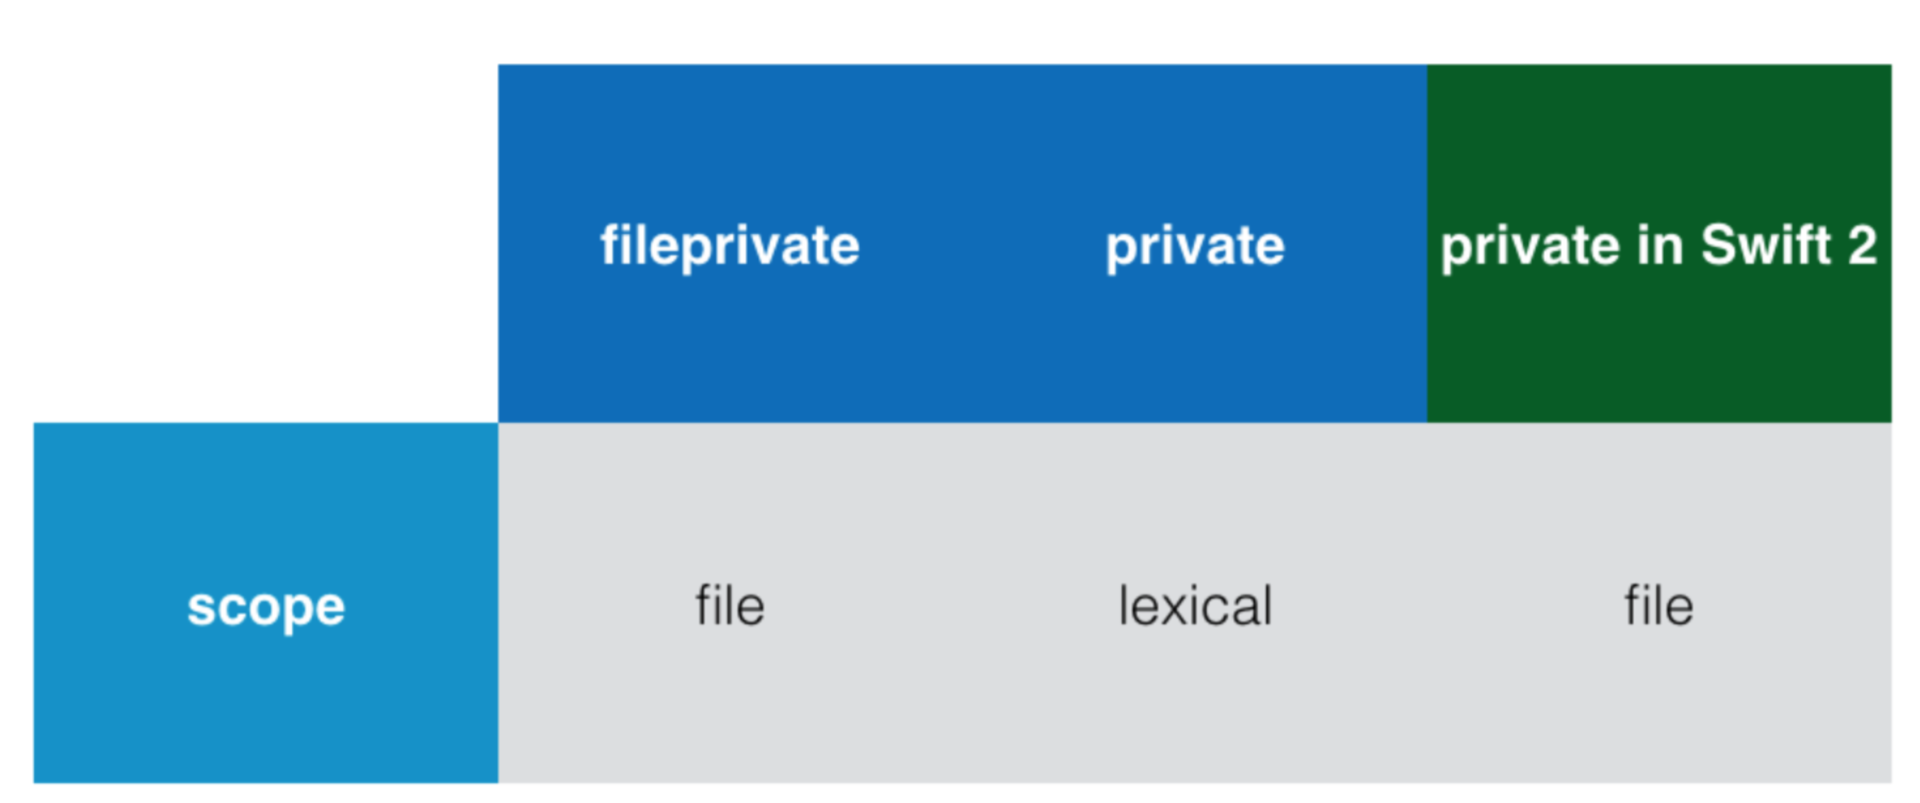
In most cases, this is an unnecessary precaution, and we don’t need a
fileprivate access level at all, but you have to solve it yourself in your development team and fix it manually.If you are developing a framework , then the migration “robot” in
Swift 3 will replace all public access levels that were in Swift 2 with a new access level open . This applies only to classes.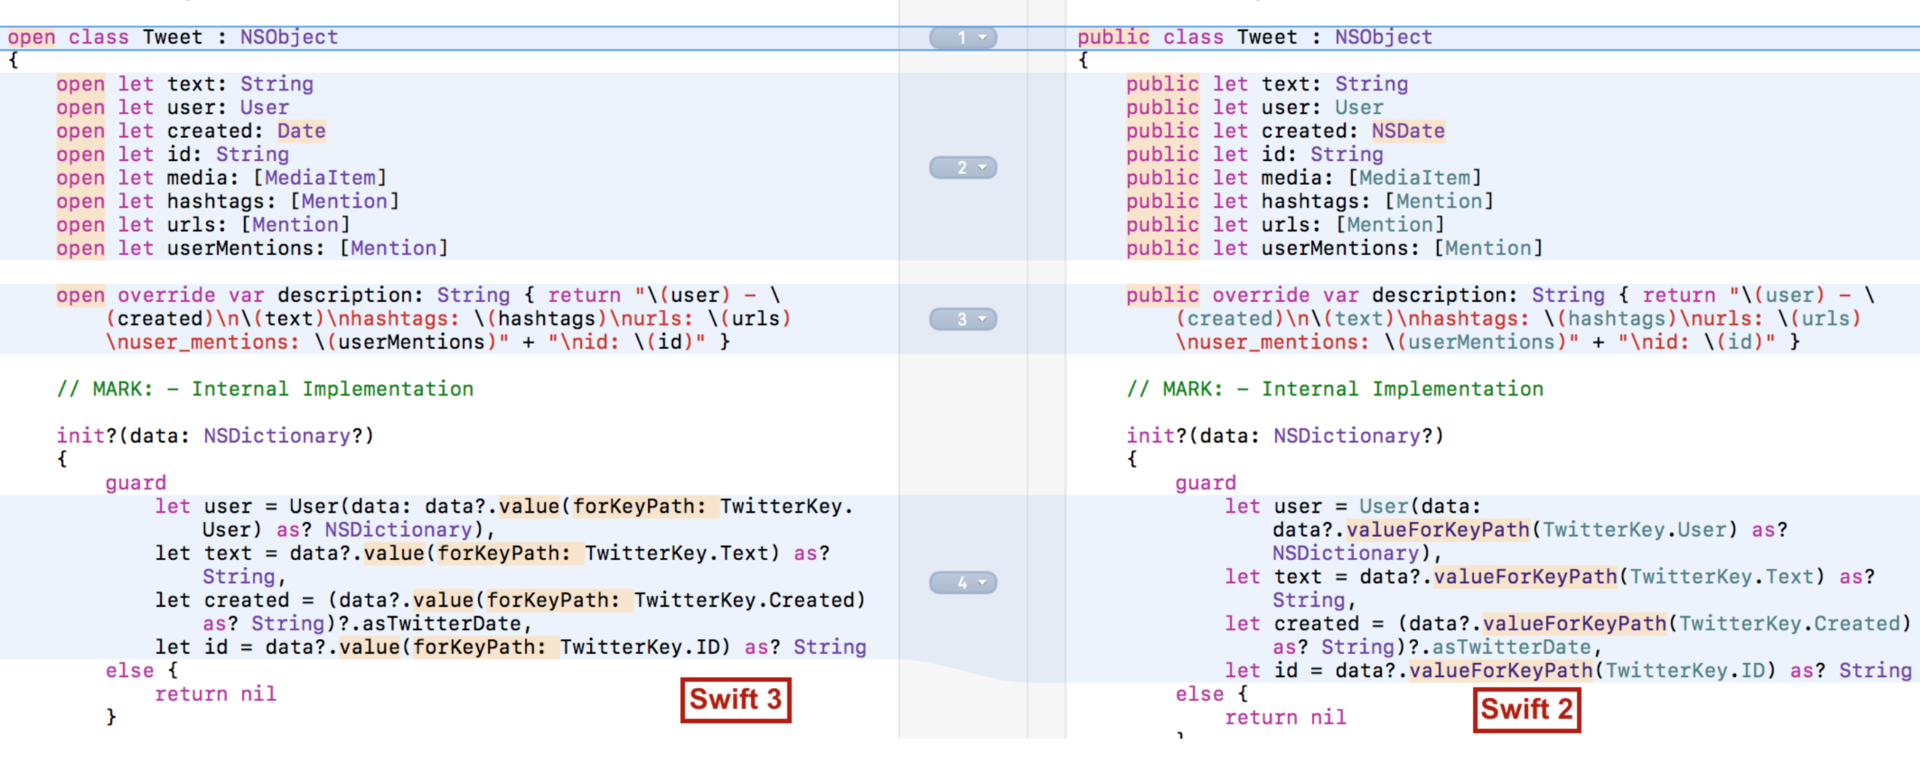
In
Swift 3 :openclass is available and may have subclasses outside the module in which it is defined. Properties and methods of theopenclass are available and can be overridden outside the module in which the class is defined.publicclass is available, but cannot have subclasses outside the module in which it is defined. The properties and methods of thepublicclass are available, but cannot be overridated outside the module in which the class is defined.
Thus, the
open access level is what was public in previous versions of Swift , and the public access level is more limited. Chris Lattner said in SE-0177: Allow distinguishing between public access and public overridability that in Swift 3 , the access level open simply more public than public . You can also see the SE-0025 Scoped Access Level .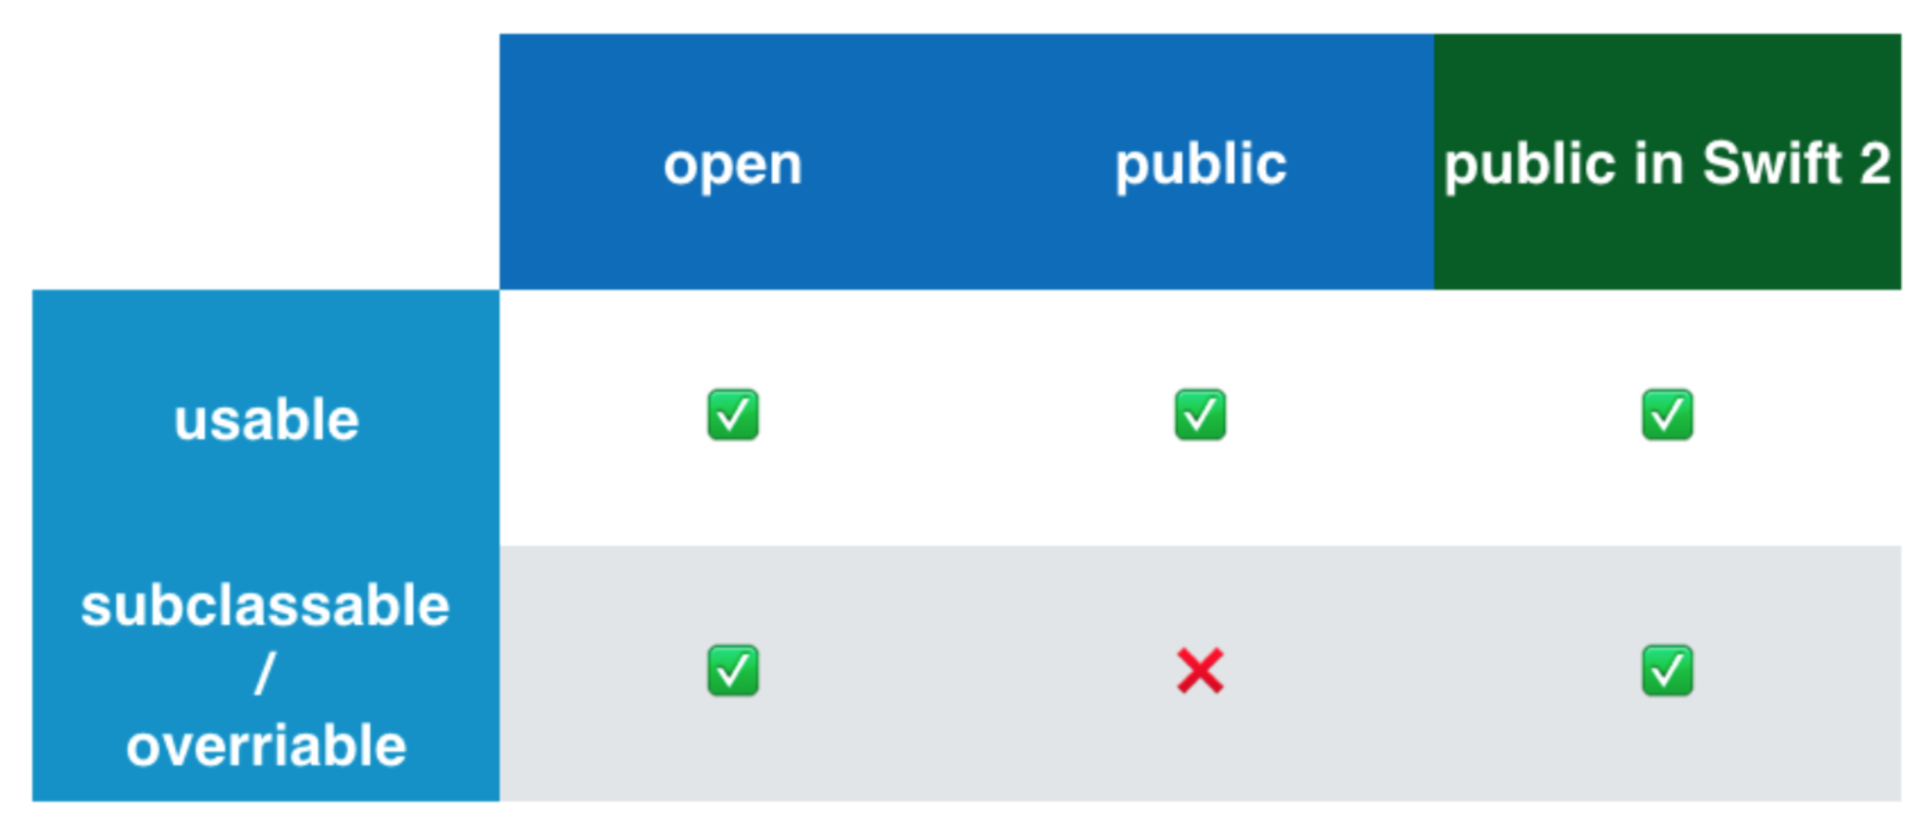
When migrating frameworks to
Swift 3 we will not return the access level open back to public . Here we are all happy.In general, the hierarchy of access levels in
Swift 3 is arranged in descending order:open → public → internal → fileprivate → private2. You cannot compare Optional values in Swift 3 .
When automatically migrating from
Swift 2 to Swift 3 sometimes code appears in front of some classes: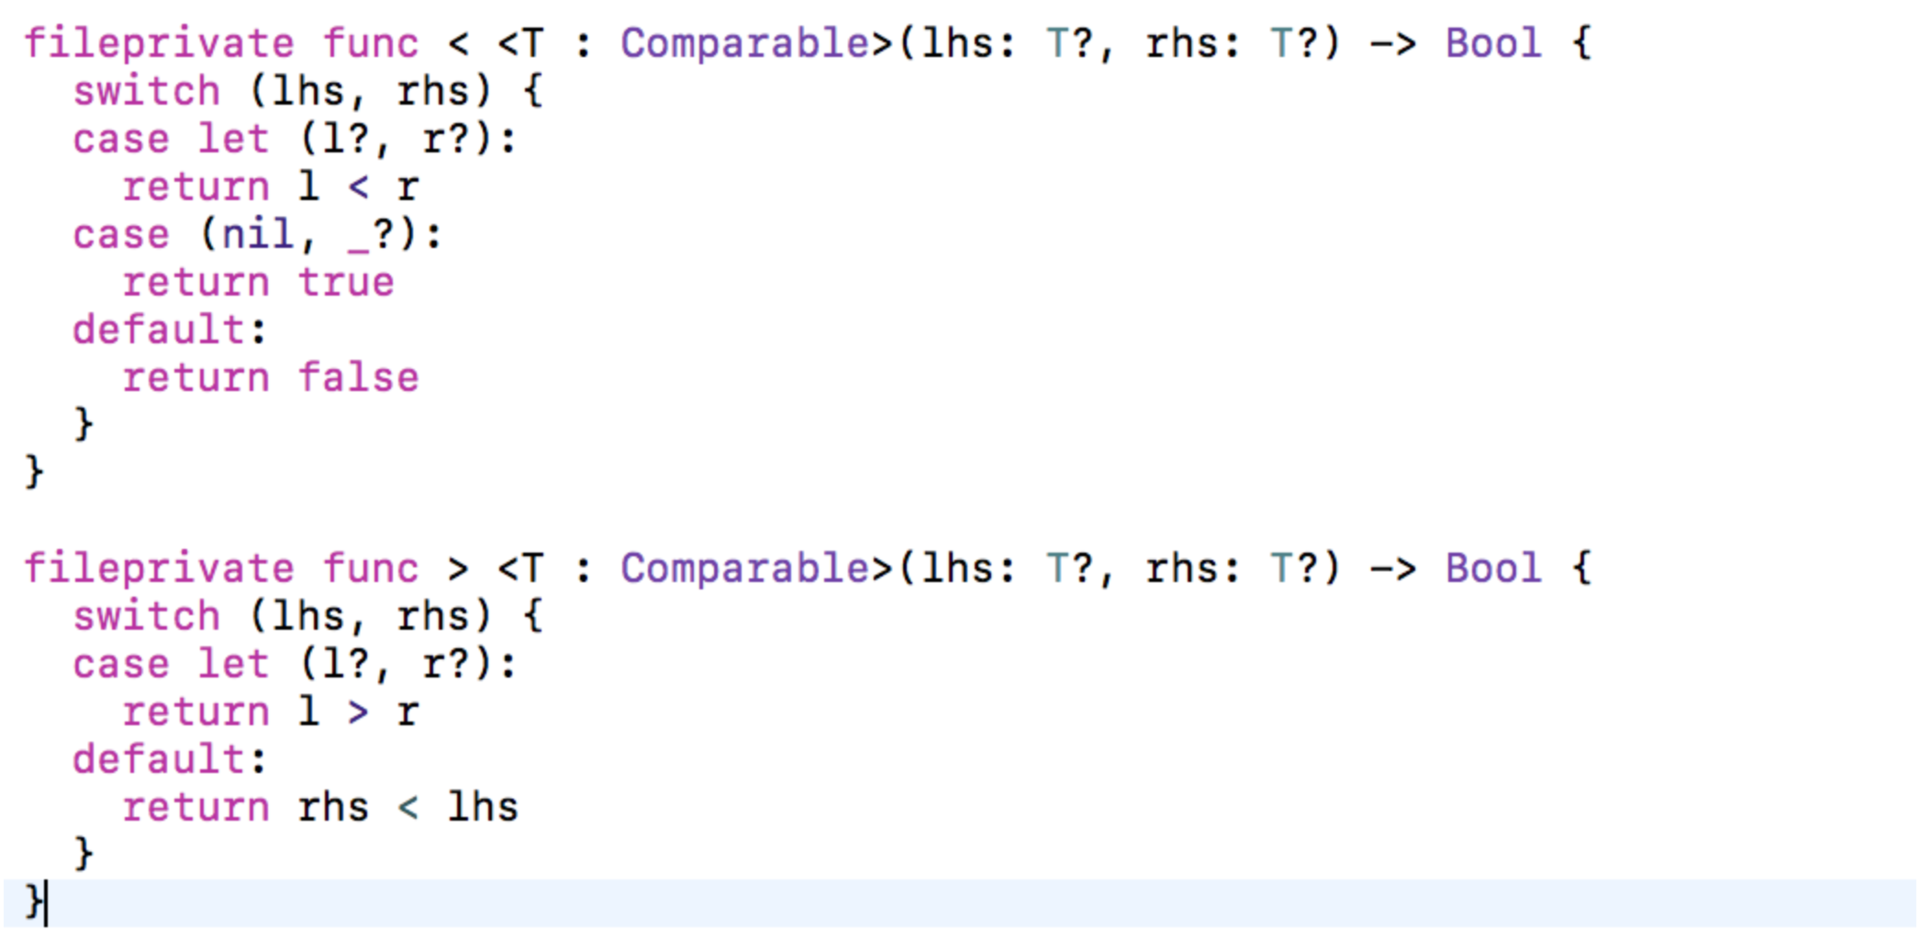
The fact is that in
Swift 2 it was possible to compare Optional values, for example, thus:or so:
In
Swift 3 this option was removed ( SE-0121 - Remove Optional Comparison Operators ) and to preserve this code in Swift 3 migration “robot” adds the above code, which, of course, is convenient at the initial stage of switching to Swift 3 , but not nicely, as if you encounter comparison of Optional values in several classes located in separate files, then the above code will be added many times. This code must be removed, the problem will immediately be identified, and the problem must be solved on the spot. First, we get rid of Optional using the if let syntax, and then we make the necessary comparison. For example:or so:
3. Swift 3 does not provide automatic compatibility (bridging) of numbers with NSNumber .
In
Swift 2 many types, if necessary, were automatically combined (“bridging”) with instances of some NSObject NSObject , for example, String in NSString , or Int , Float , ... in NSNumber . In Swift 3 you will have to do this conversion explicitly ( SE -0072 Fully eliminate implicit bridging conversions from Swift ). For example, in Swift 2 we had code to convert a number to a string:In
Swift 3 after the migration "robot" we get the error:We are required to explicitly convert
Double to NSNumber , and we can use two conversion methods — using the as operator:or using the
NSNumber initializer:4. “Robot” does not know how to convert parallel queues, but it works great with dispatch_once
For example, the usual “pattern” of asynchronous code execution on a
QOS_CLASS_USER_INITIATED parallel queue with the subsequent transition to the main queue to display data on the UI on Swift 2 looks like this: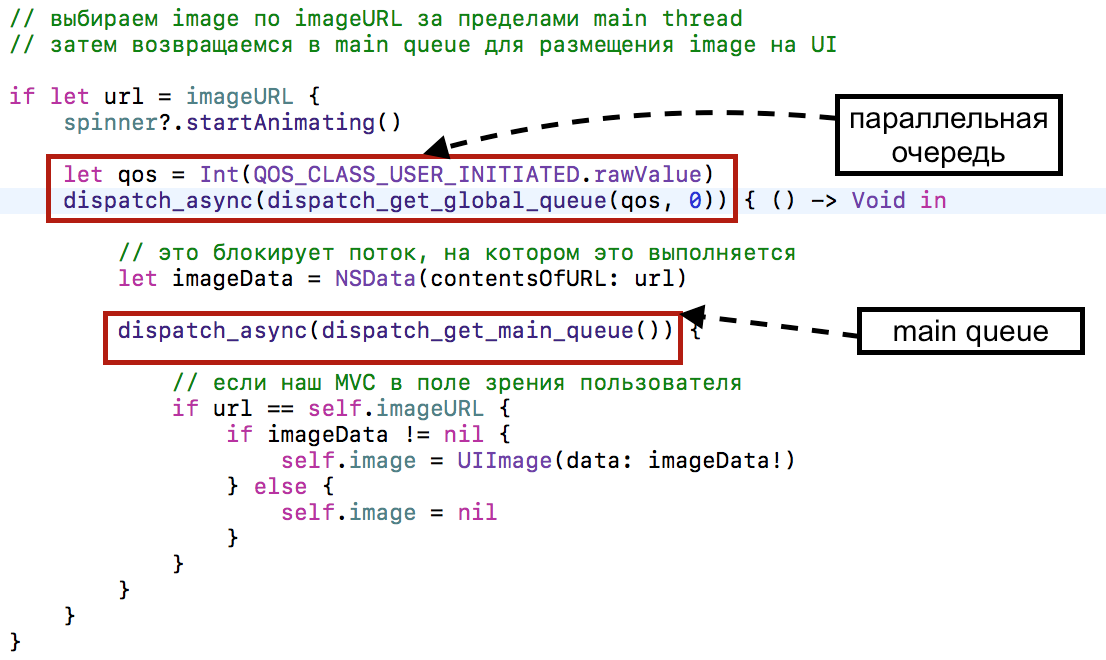
The migration robot "converts this code into an error code and offers a
global(priority: qos) function global(priority: qos) , which will be abolished in iOS 10 :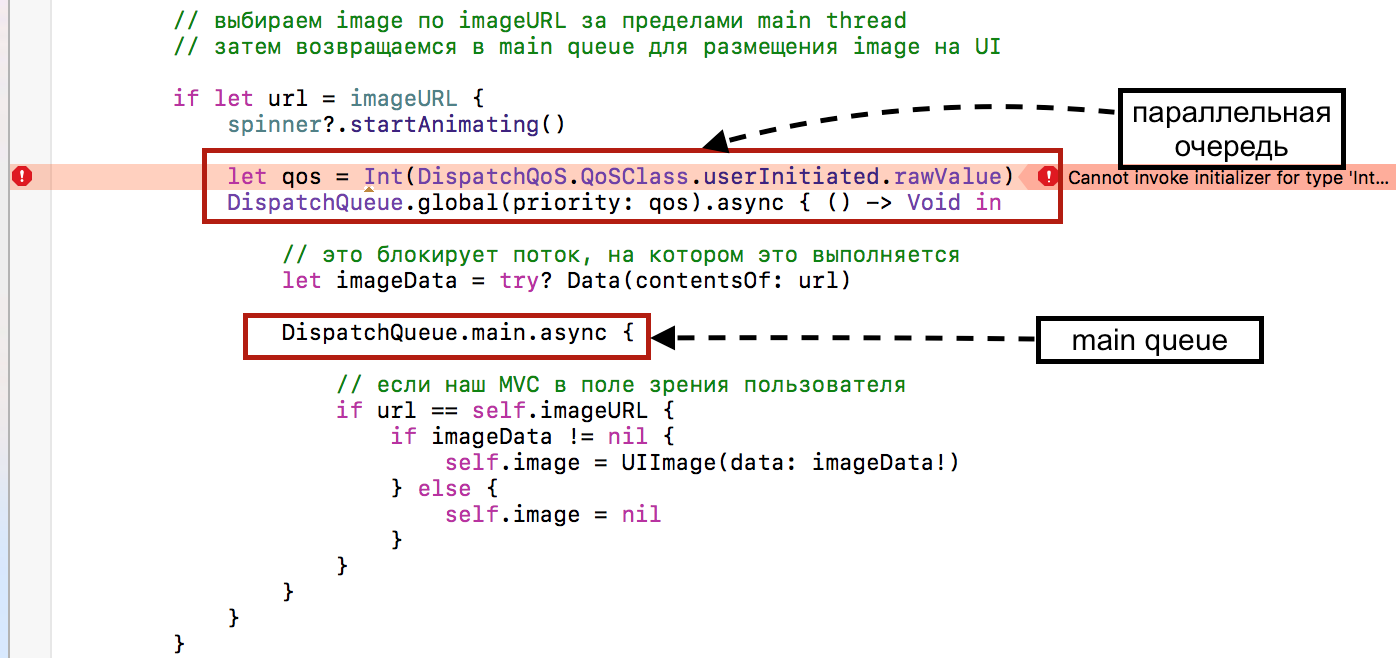
In order to remove this error, we need to use another function -
global (qos: .userInitiated) :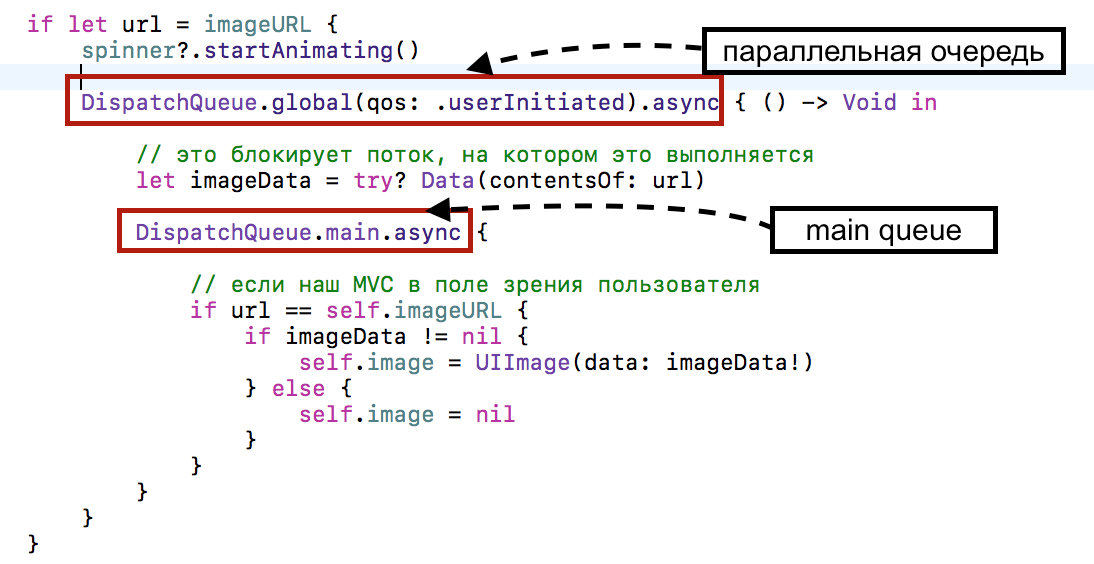
But the migration "robot" does an excellent job with
dispatch_once , which is abolished in Swift 3 , and it should be replaced with either a global, or a static variable or a constant.Here's what the code looks like for a one-time initialization of the background queue when fetching data from the Flickr.com server in
Swift 2 :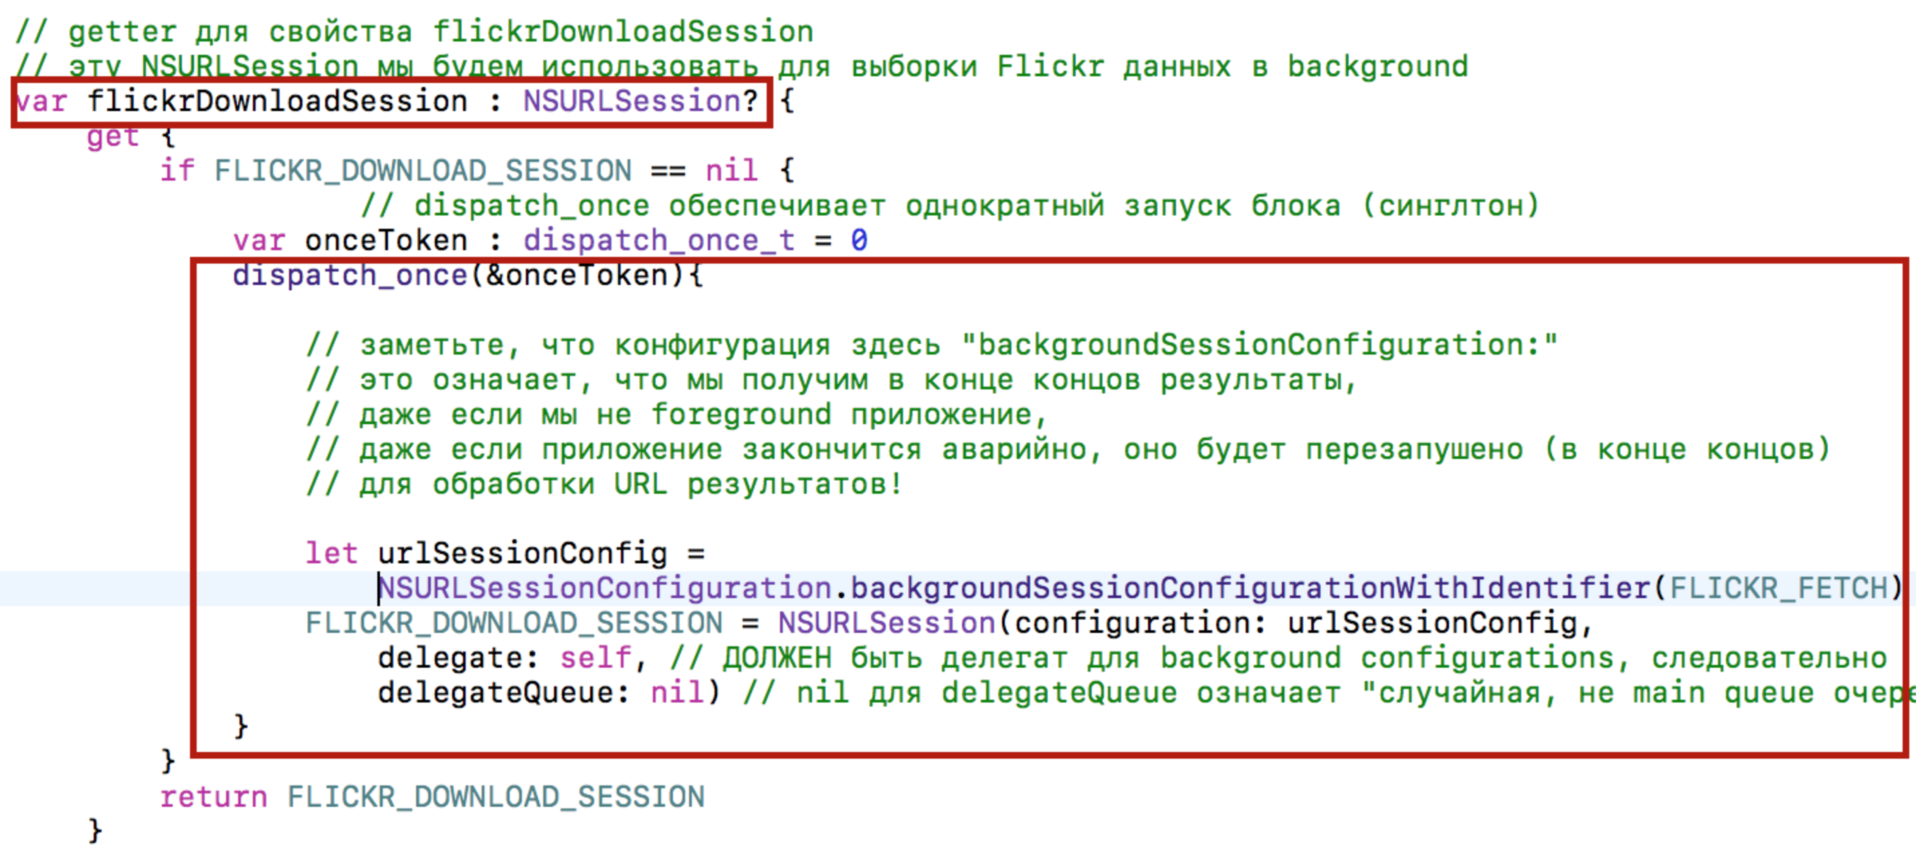
And this is the code in
Swift 3 after the work of the migration “robot”: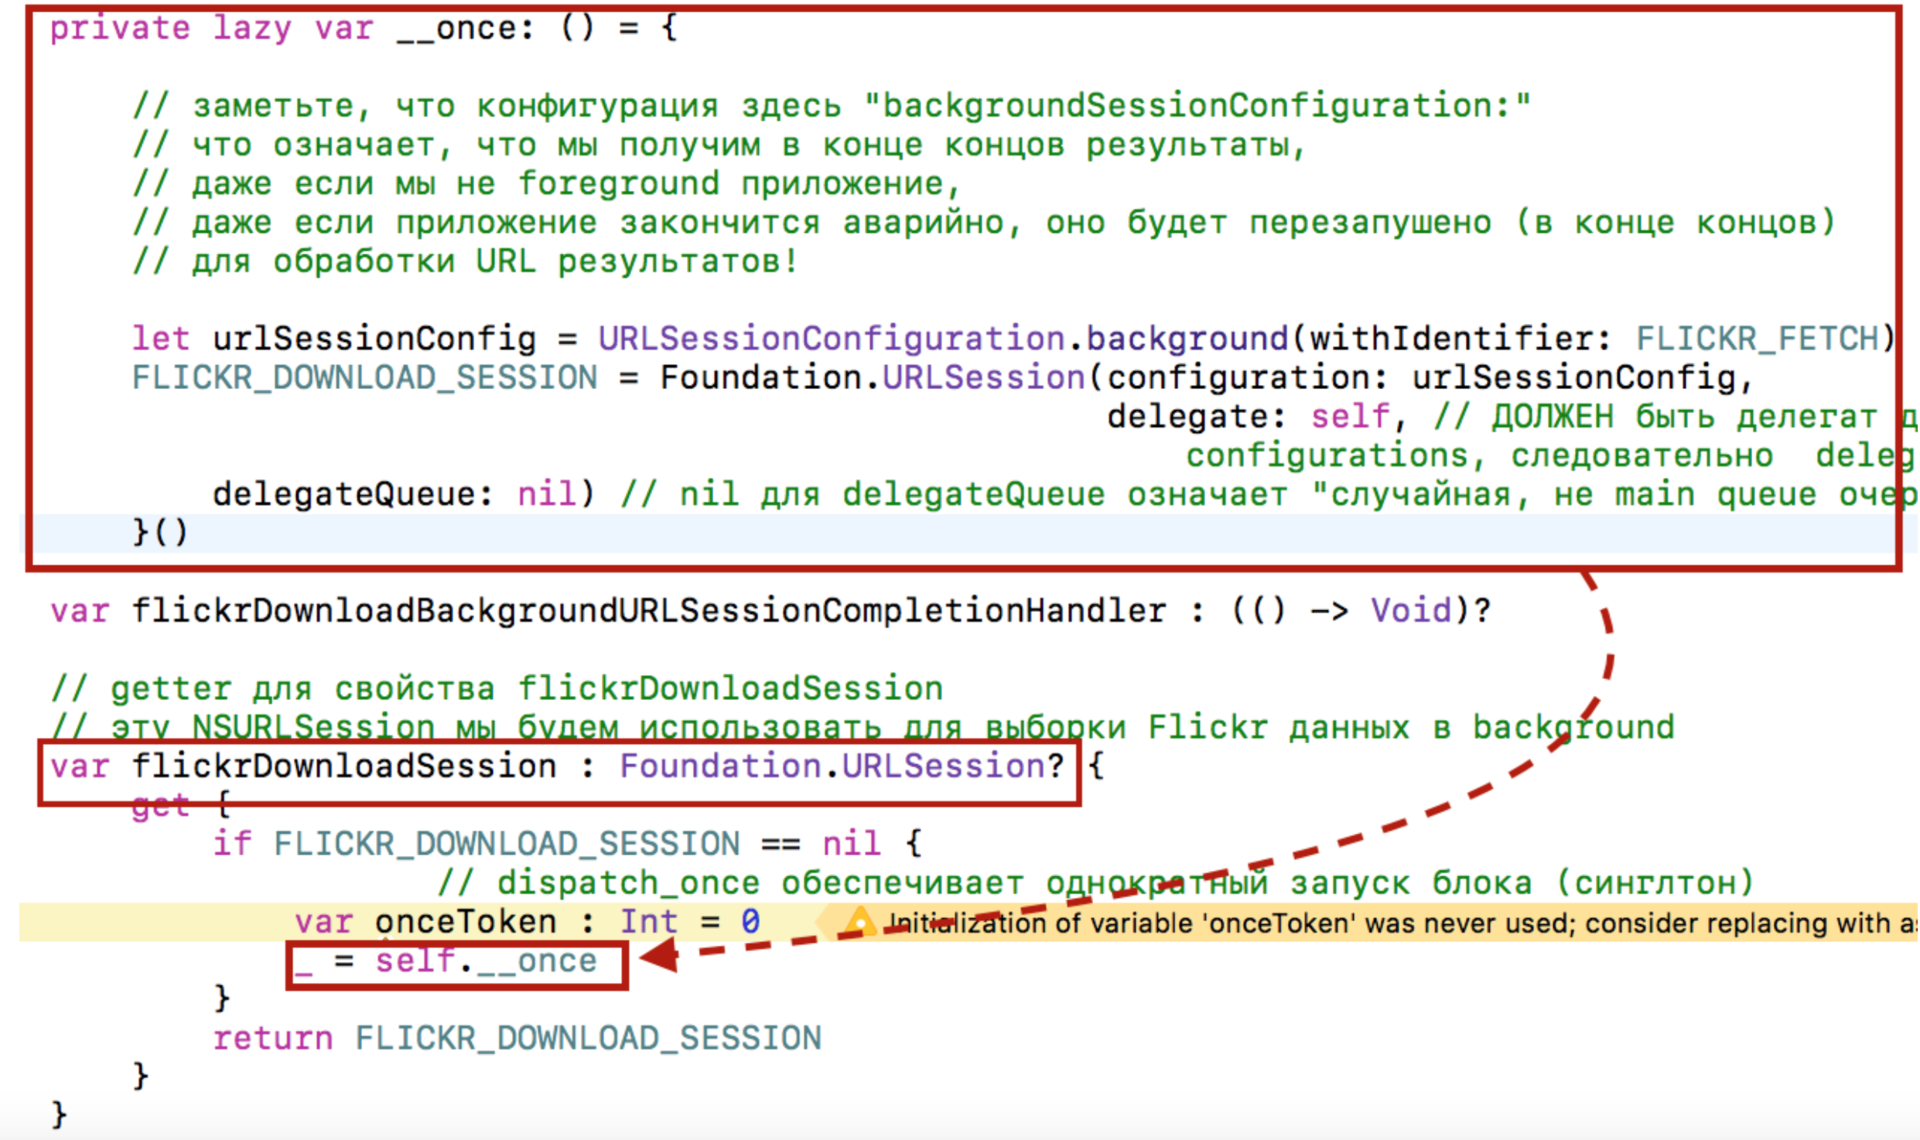
You see that the “robot” took out the inside of the singleton and designed it in the form of a
lazy variable __once , which is represented as a performed closure, and we are warned that the variable onceToken not used. It really is no longer needed, and we remove this line: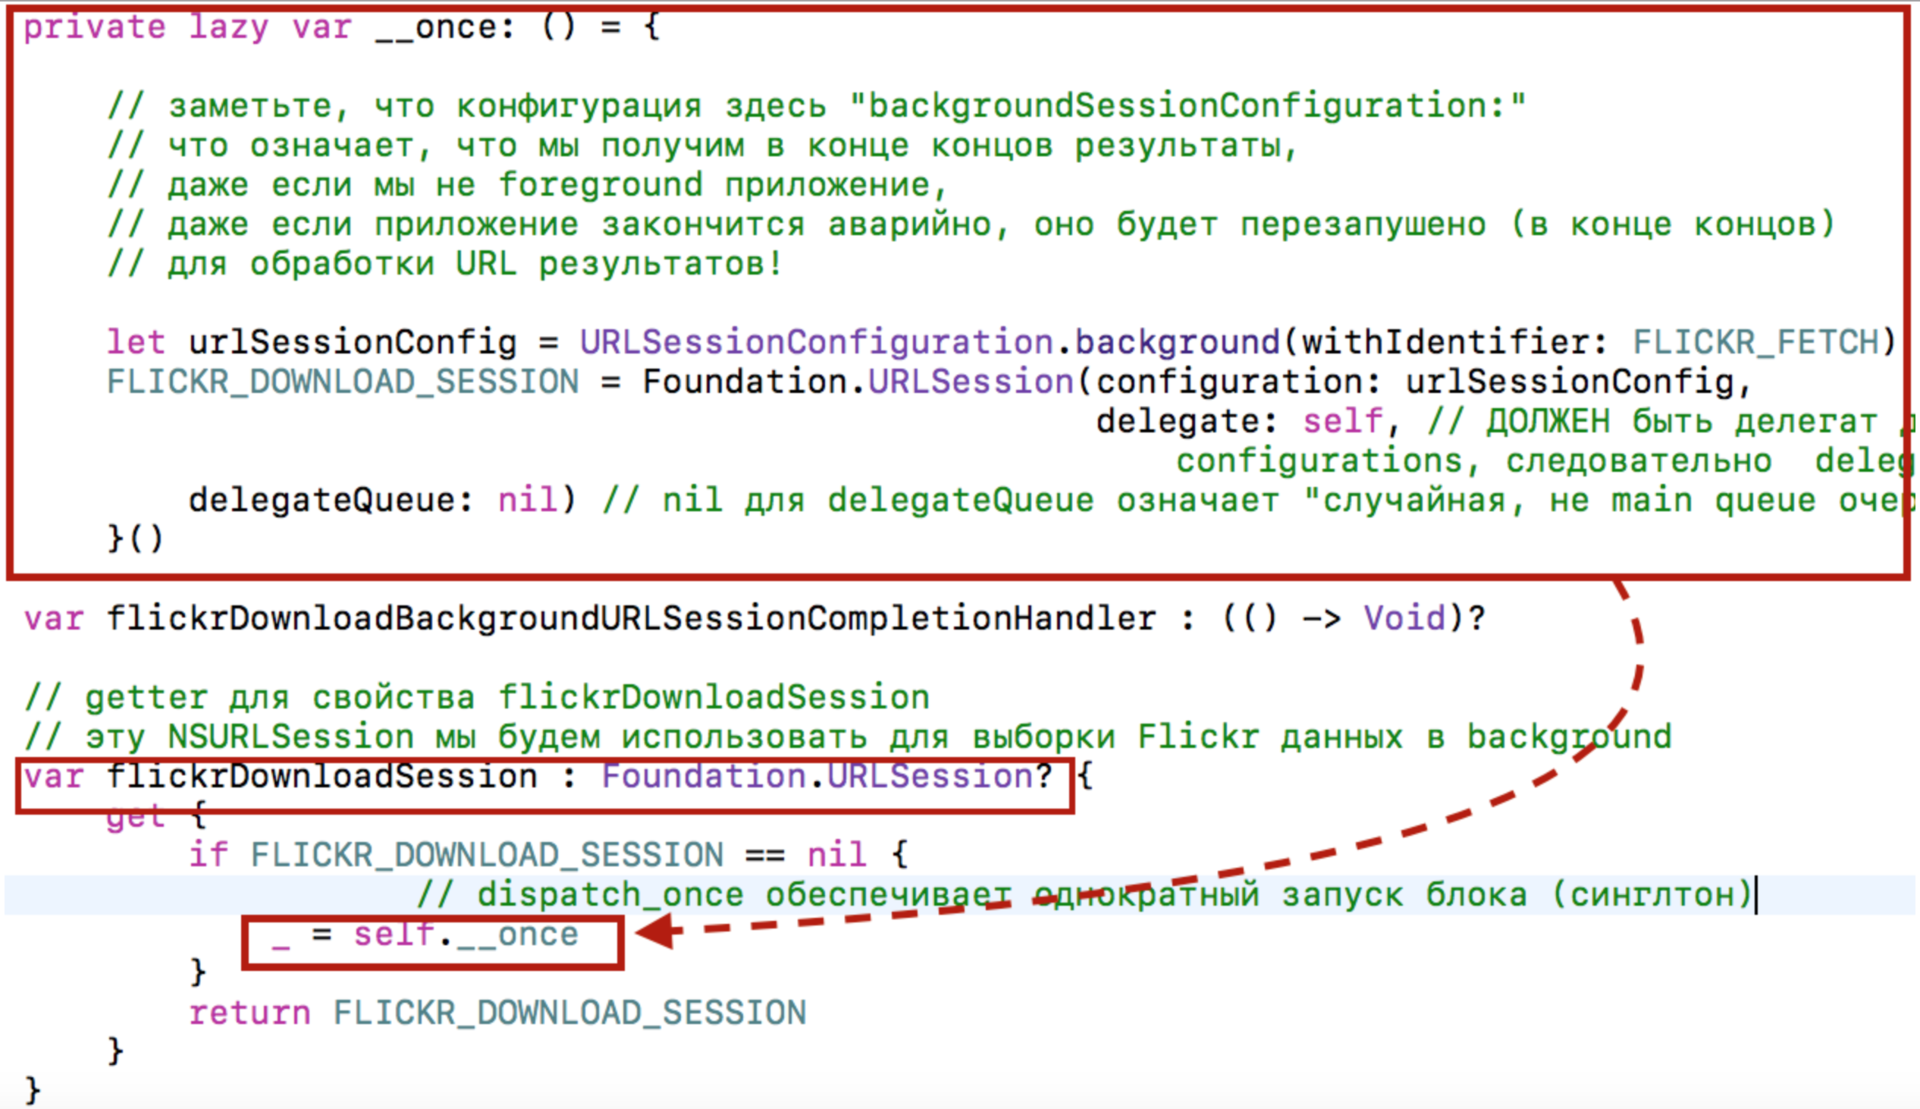
5. Be very careful with the replacement of methods of type …inPlace , when switching to Swift 3 .
Swift 3 returns to the convention on naming methods and functions that was in Swift 1 , that is, functions and methods are named depending on whether they create a “side effect”. And that's great. Let's give a couple of examples.First, we consider methods that do not have a “side effect”; they, as a rule, are called Nouns . For example,
x.distance (to: y)
x = y.union(z)
If functions and methods have a “side effect”, then they are usually referred to as the imperative Verb in the imperative mood. If I want the array
X be sorted, then I will say: “ X sort ( sort ) yourself or add X ( append ) to yourself Y ”:x.sort ()
x.append(y)
y.formUnion(z)Thus,
Swift 3 groups methods into two categories: methods that take action in place — think of them as Verbs — and methods that return the result of performing a specific action without affecting the original object — think of them as Nouns .If there is no end of “
ed ”, then everything happens “by place”: sort () , reverse () , enumerate () . These are Verbs . Every time Swift 3 modifies a method by adding the end “ ed ” or “ ing ”: sorted () , reversed () , enumerated () , then we have a return value. This is a noun .These rather innocent rules cause confusion when it comes to changing the sorting methods when moving from
Swift 2 to Swift 3 . The fact is that in Swift 2 all functions and methods that work “in place” contain the word “ InPlace ” in their name, so the sortInPlace () function is used for sorting by place, and the function Swift 2 in Swift 2 returns sorted array In Swift 3, as seen from the examples above, sort () renamed to sorted () , and sortInPlace () to sort () .As a result, the
sort () method has different semantics in Swift 2 and in Swift 3 . But this is not a bad thing, because if both Swift 2 and Swift 3 have a couple of functions (both with and without side effects), then the migration “robot” will brilliantly replace one name with another: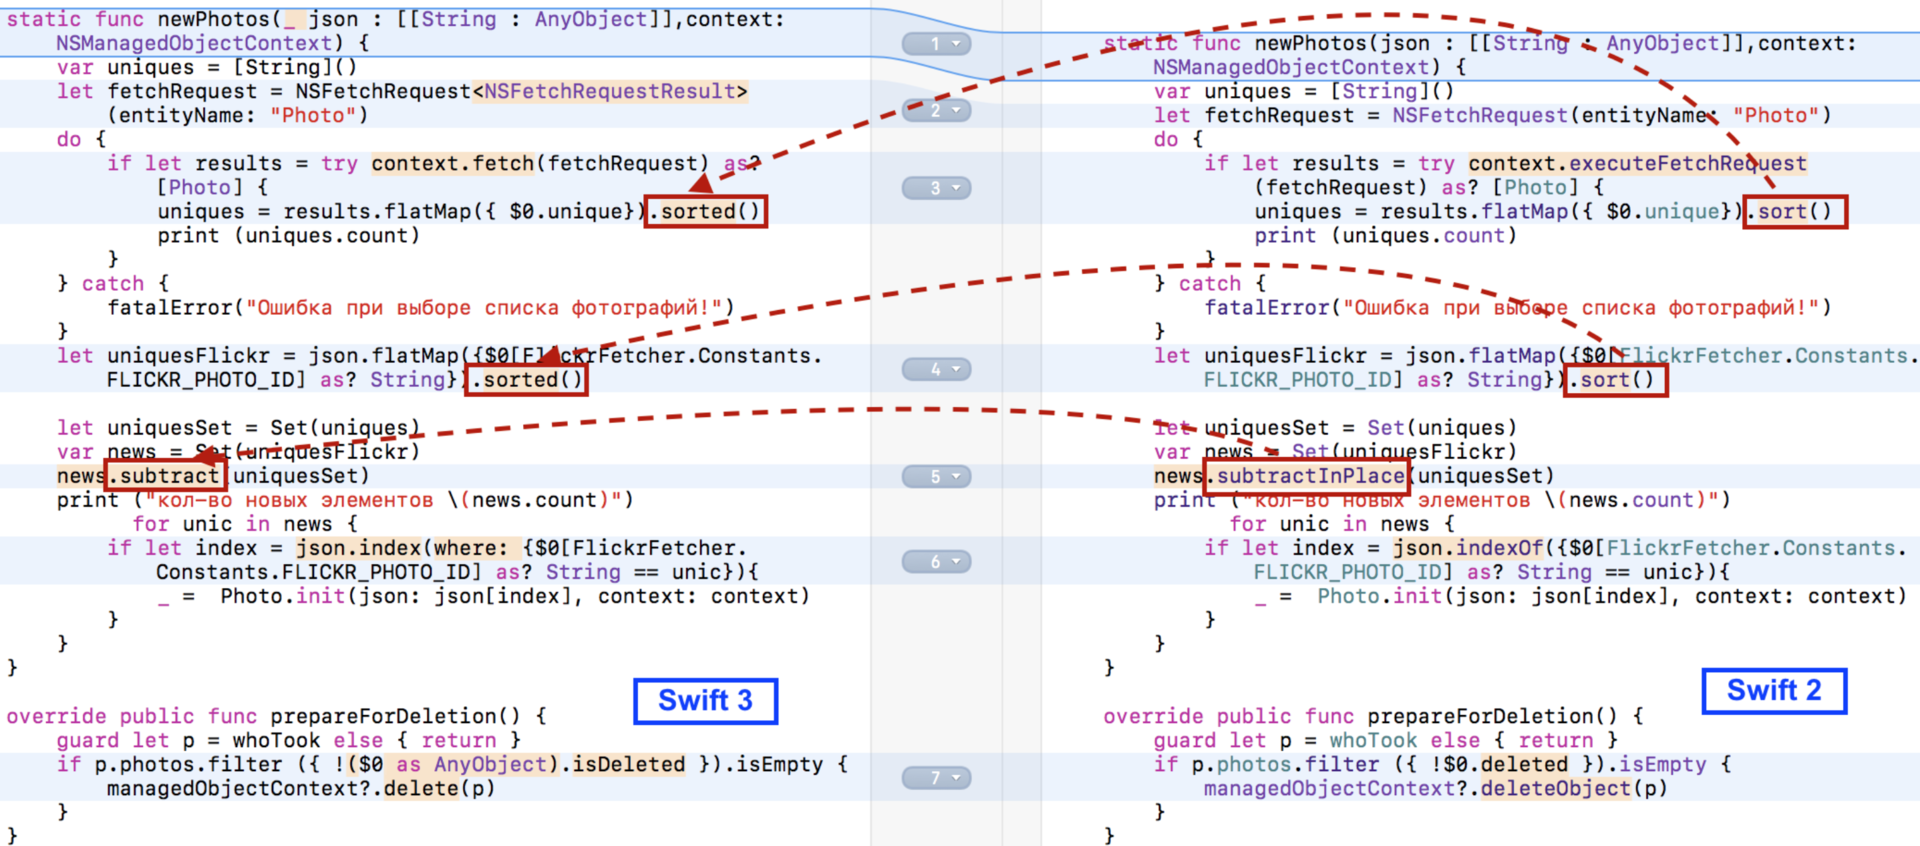
But what if there were two functions in
Swift 2 , and one remained in Swift 3 ? For example, in Swift 2 were insetInPlace and insetBy , and in Swift 3 was, for some reason, one - insetBy ? The migration “robot” will not help us in this case - it will leave the old name of the function - insetInPlace - which, of course, will give an error, and we will have to fix it manually.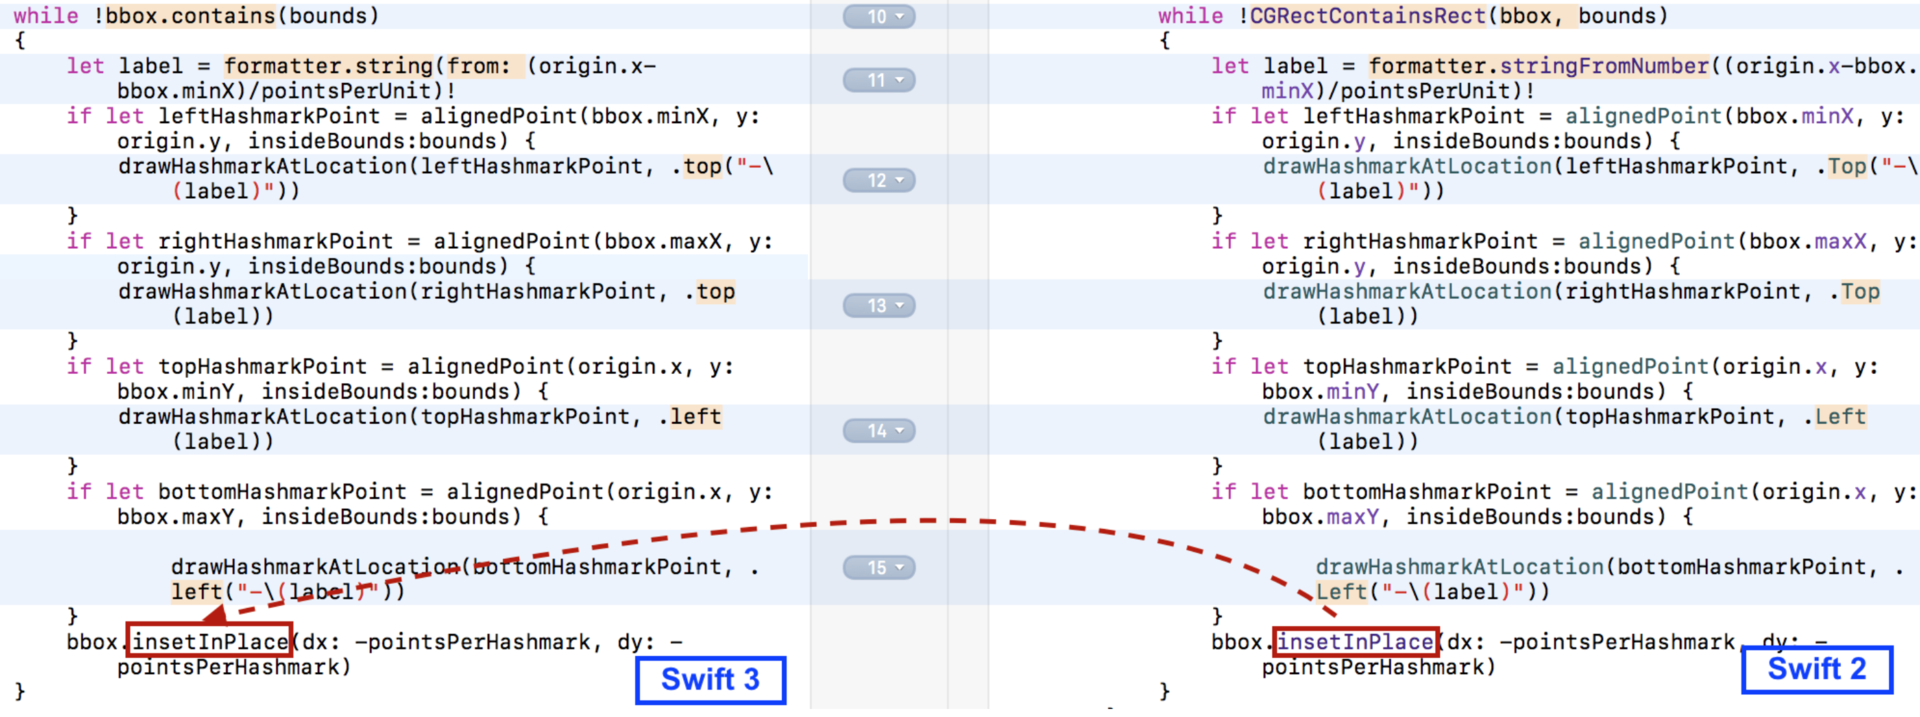
All methods in
Swift 2 with the presence of “ inPlace ” in the name require special attention when switching to Swift 3 .I myself fell for this seemingly innocent change. Consider the simplest
one() method, which increases the size of the bbox rectangle until it is “swallowed” by some other rectangle. This strongly simplified example has a real prototype, namely the AxesDrawer class, which was provided in the Stanford course for drawing the axes of the graph in Task 3. It is there that the case presented below meets and had to deal with when translating the AxesDrawer class from Swift 2.3 to Swift 3 .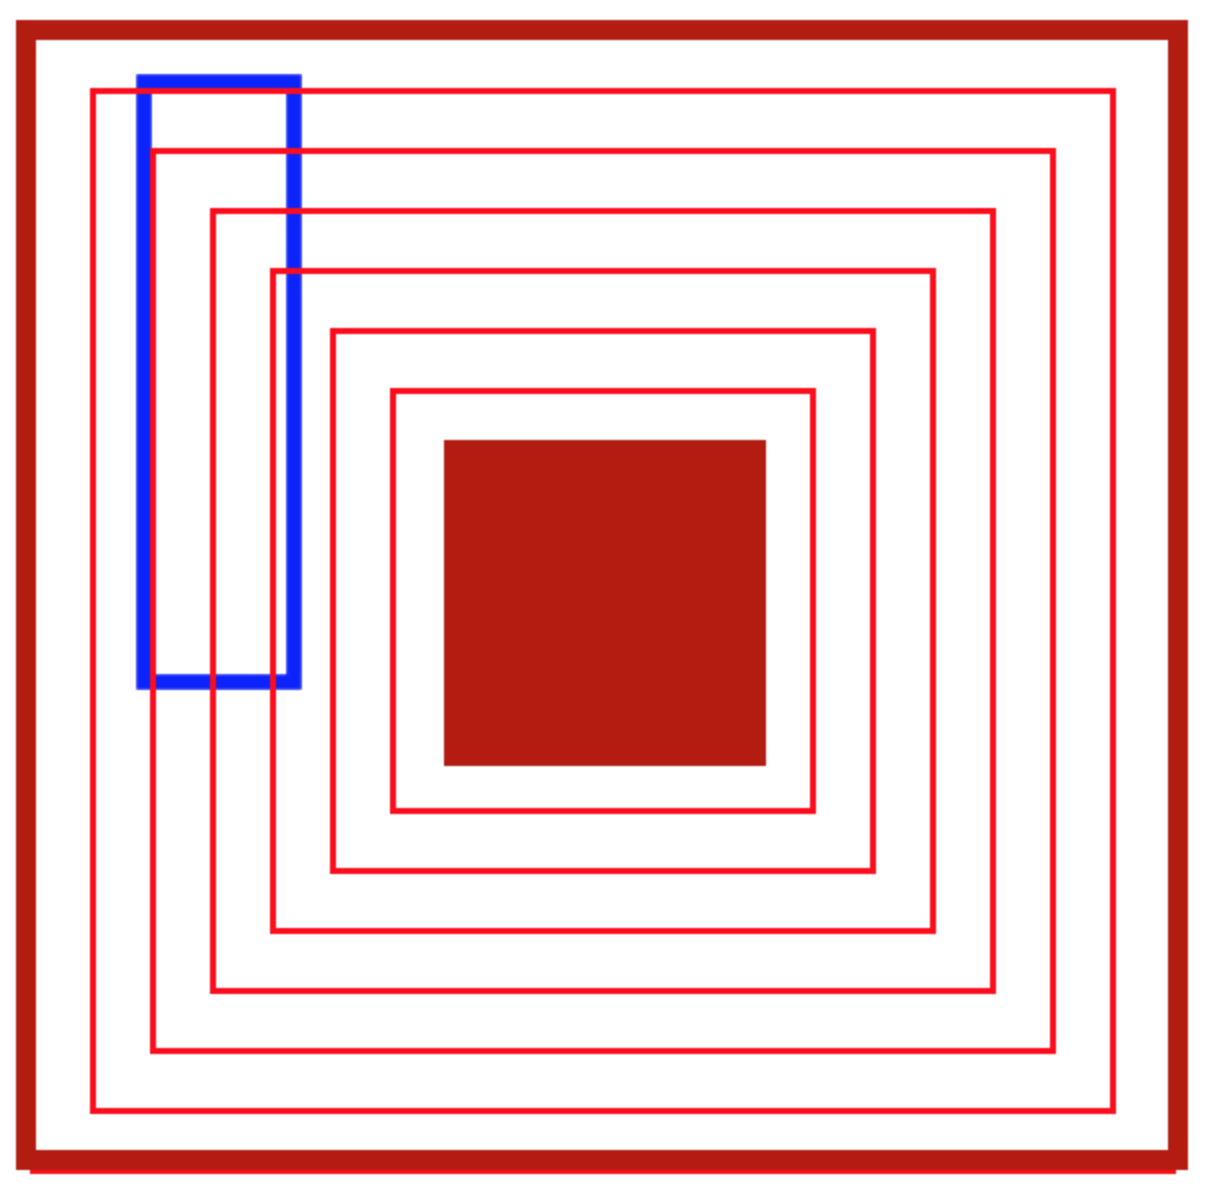
In
Swift 2 I can use the insetInPlace method for the insetInPlace rectangles, which will increase the size of the rectangle by dx along the X axis and by dy along the Y axis: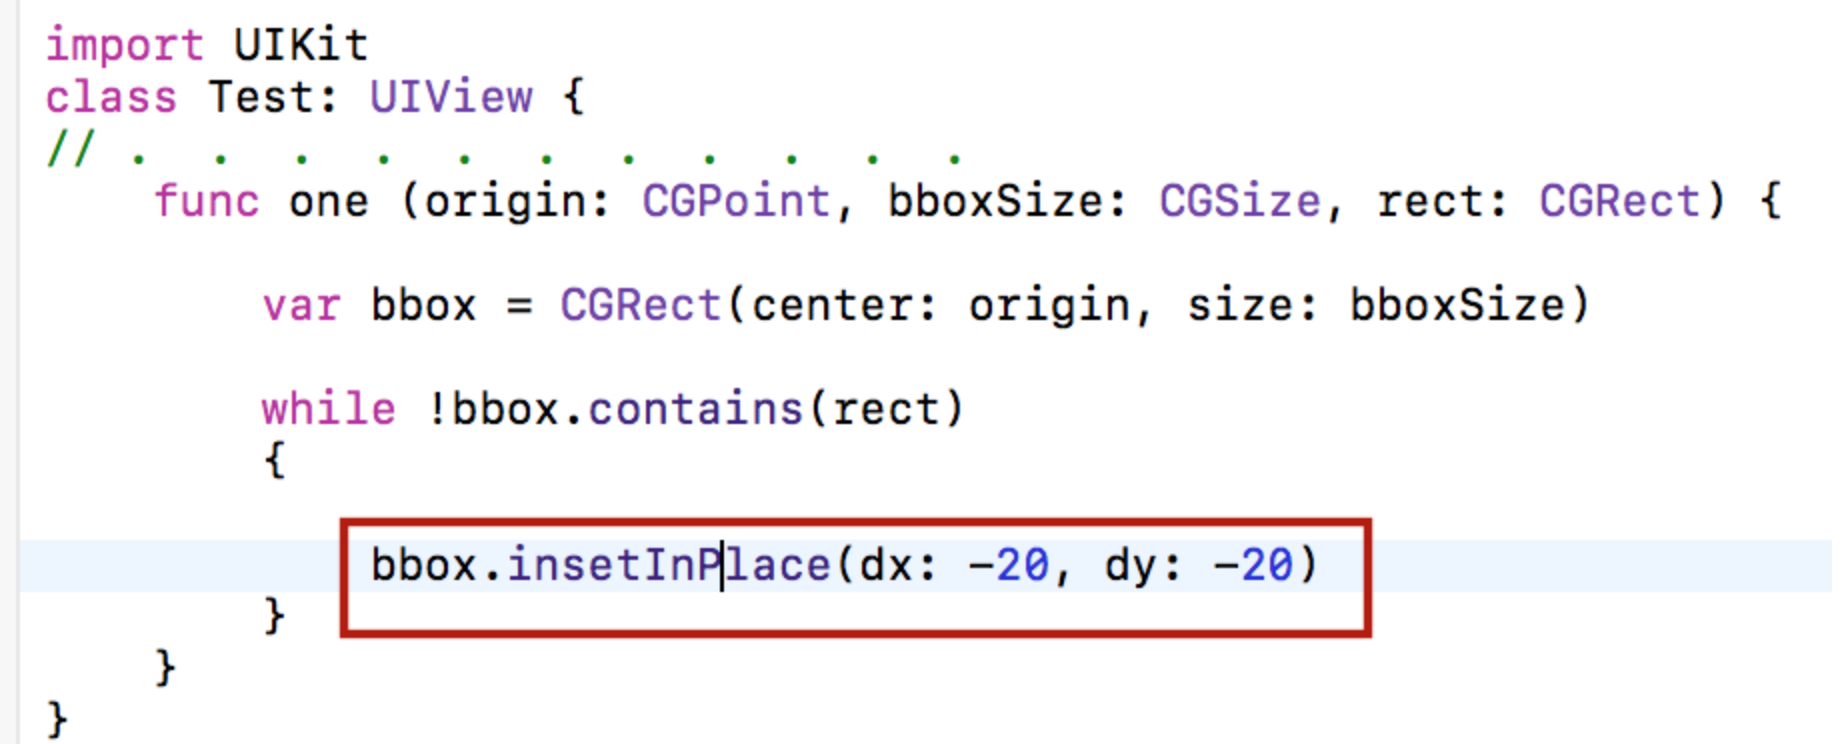
There is no need to use the return value of the
insetInPlace method, because the rectangle changes "in place".If we use the migration “robot” to switch to
Swift 3 , then it will leave the insetInPlace method unchanged, since there is no analog to it in Swift 3 , and we will get an error: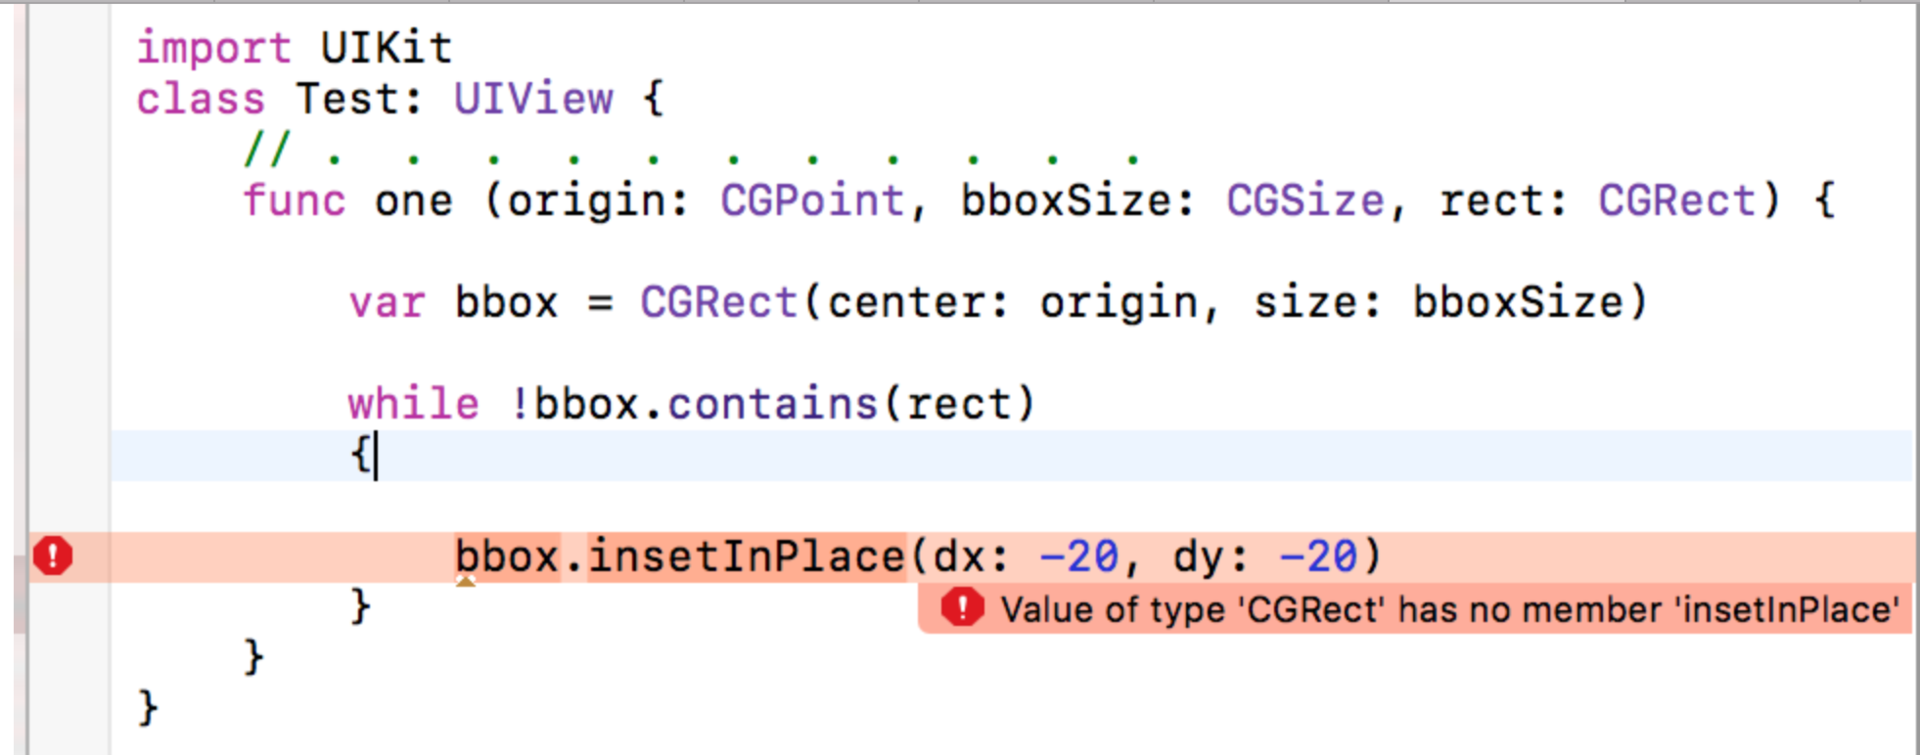
In
Swift 3 there is only the insetBy method, we apply it, the error disappears, and we are offered to change the var bbox variable to let bbox constant: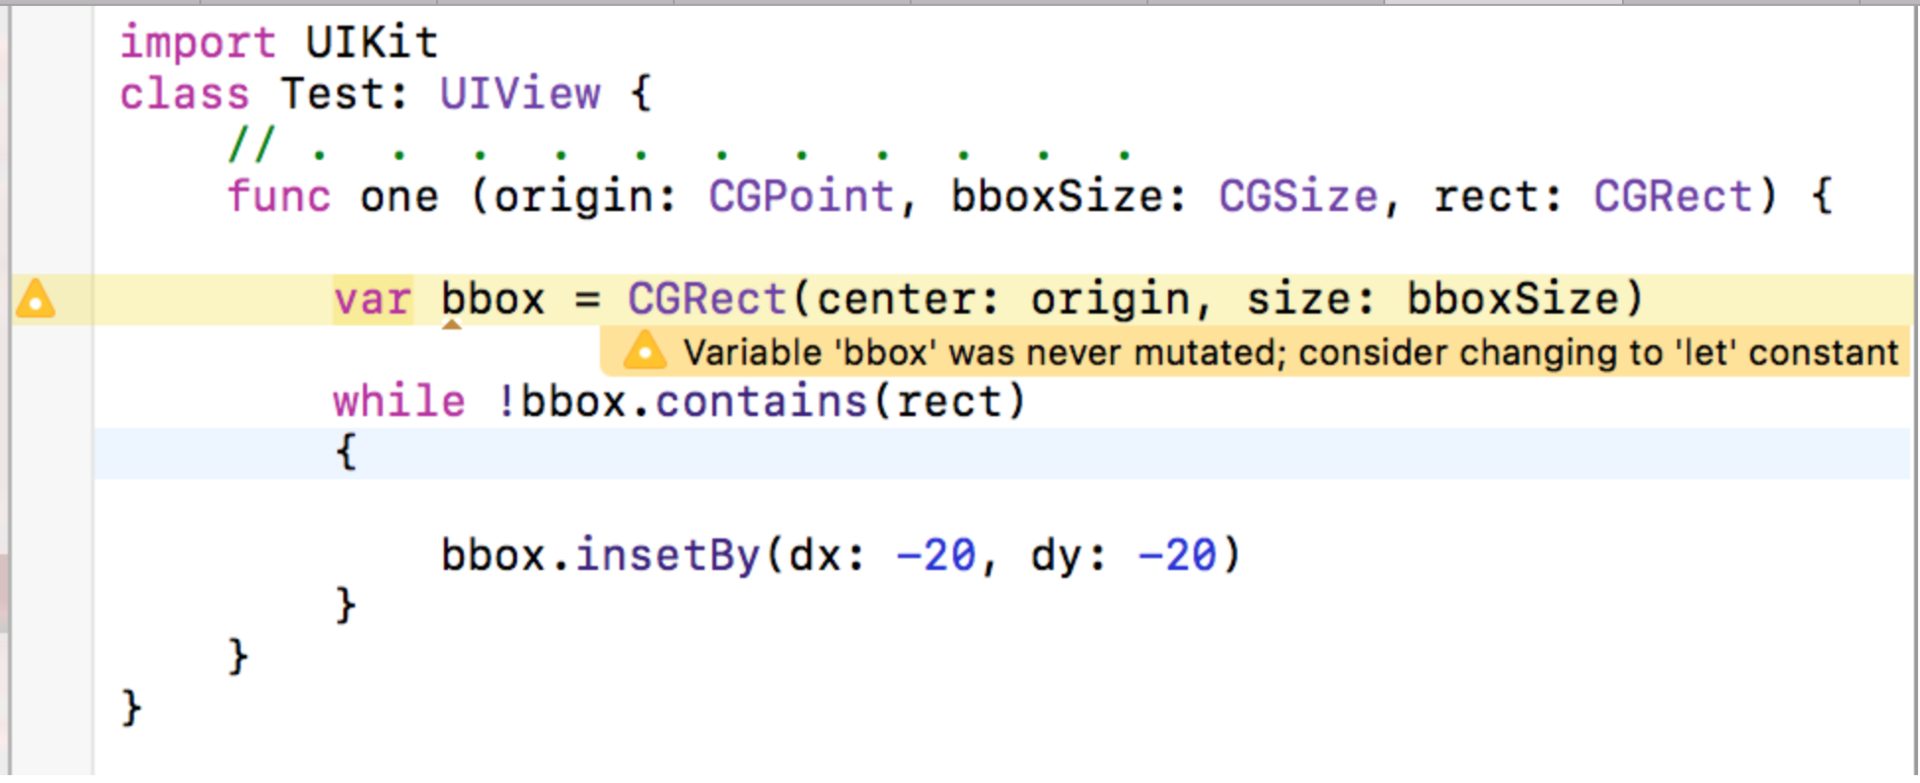
what we are doing:
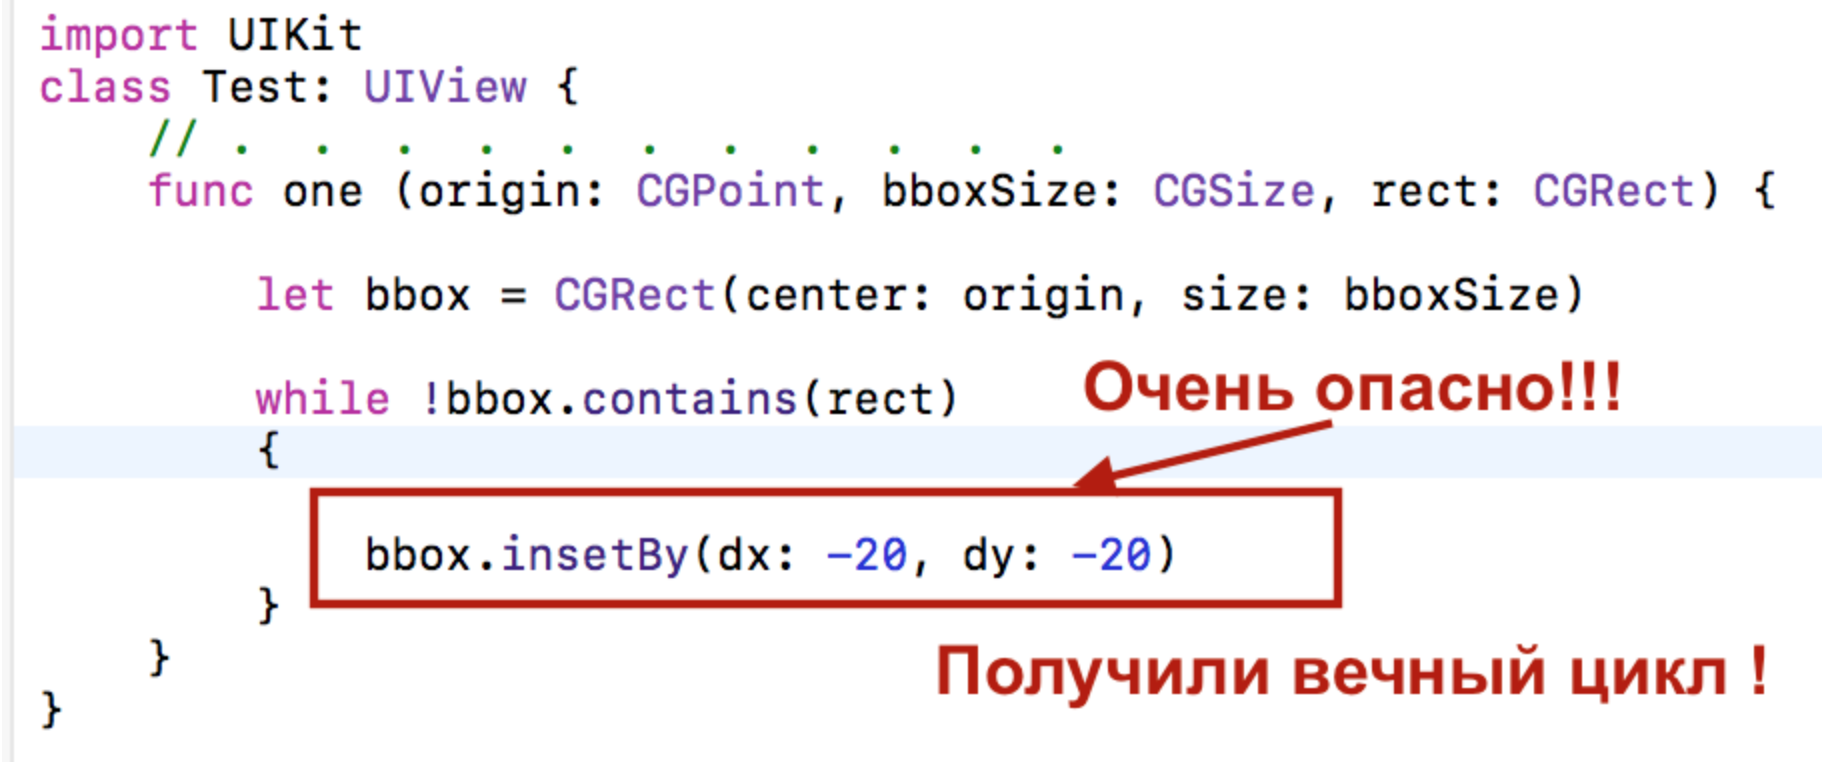
You see that there are no warnings, no errors, but we created the “perpetual” cycle, because the new
insetBy method insetBy not change the rectangle “in place”, but returns a modified value, which we do not use in the while , but this too for some reason there is no message, so a VERY DANGEROUS situation was created, when we "looped" our code forever.We must again assign the
insetBy value returned by the insetBy method:
Naturally, we are offered to return back from the
let bbox constant to the var bbox variable, and we do this: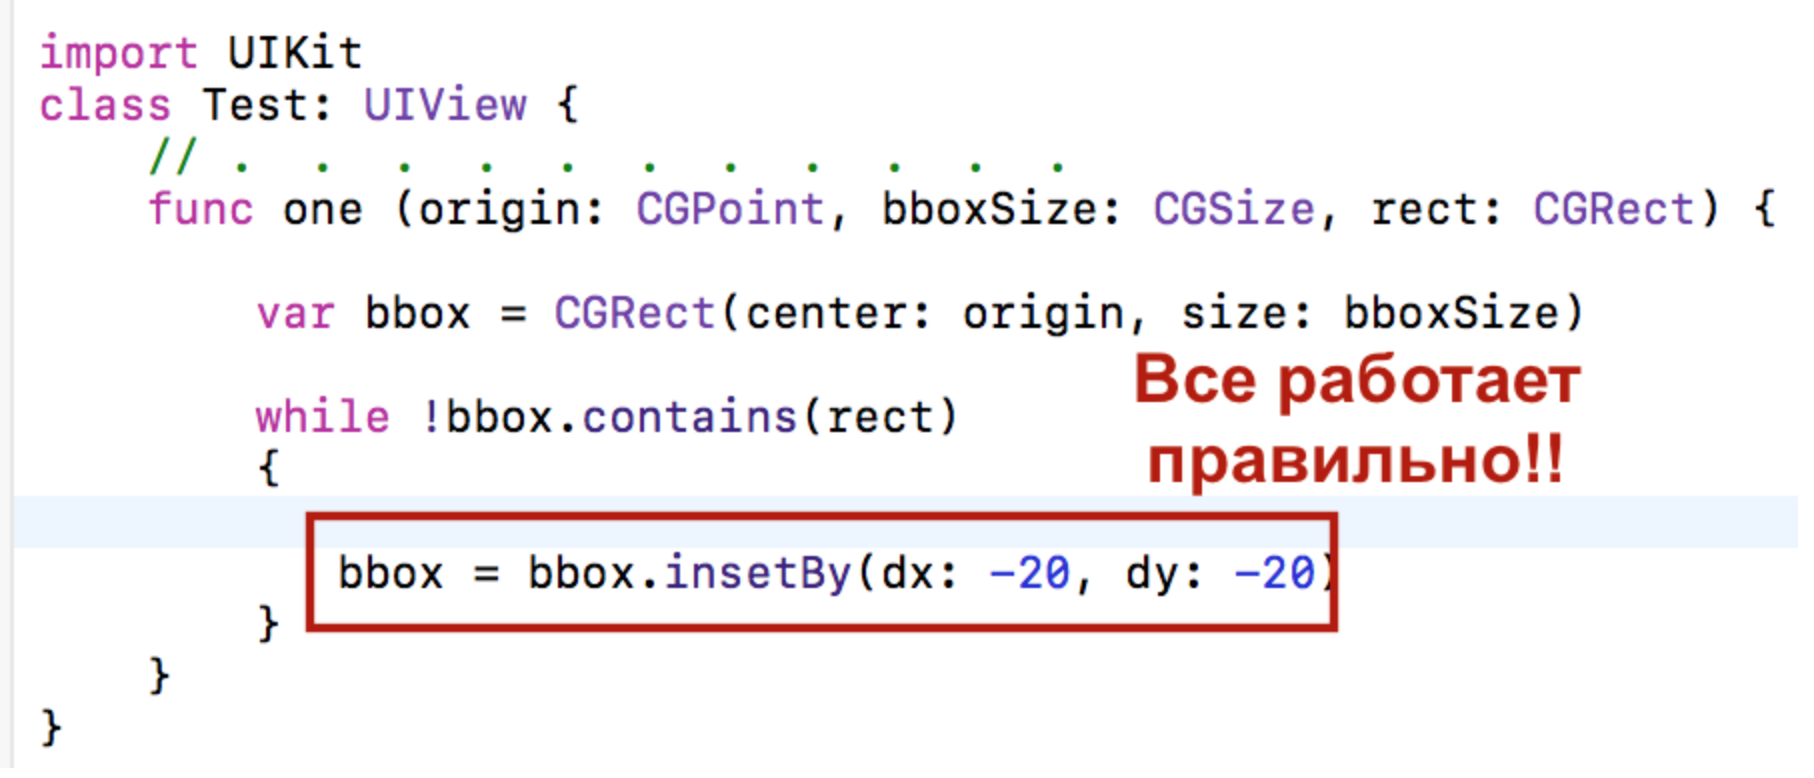
Now the code is working correctly. So be very careful with the replacement of methods
…inPlace when switching to Swift 3 .6. In Swift 3 the NSFetchRequest <NSFetchRequestResult> request to the Core Data database has become Generic
But the performance of the
CoreDataTableViewController class provided by Stanford University for working with Core Data in the table is automatically provided when using the migration tool. Let's look at how this happens.If you are working with the
Core Data framework, then you should note that the database query, which in Swift 2 was NSFetchRequest , in Swift 3 became Generic NSFetchRequest <NSFetchRequestResult> , and therefore, became Generic and the class NSFetchResultsController<NSFetchRequestResult> In Swift 3 they became dependent on the selectable result, which the NSFetchRequestResult protocol should implement: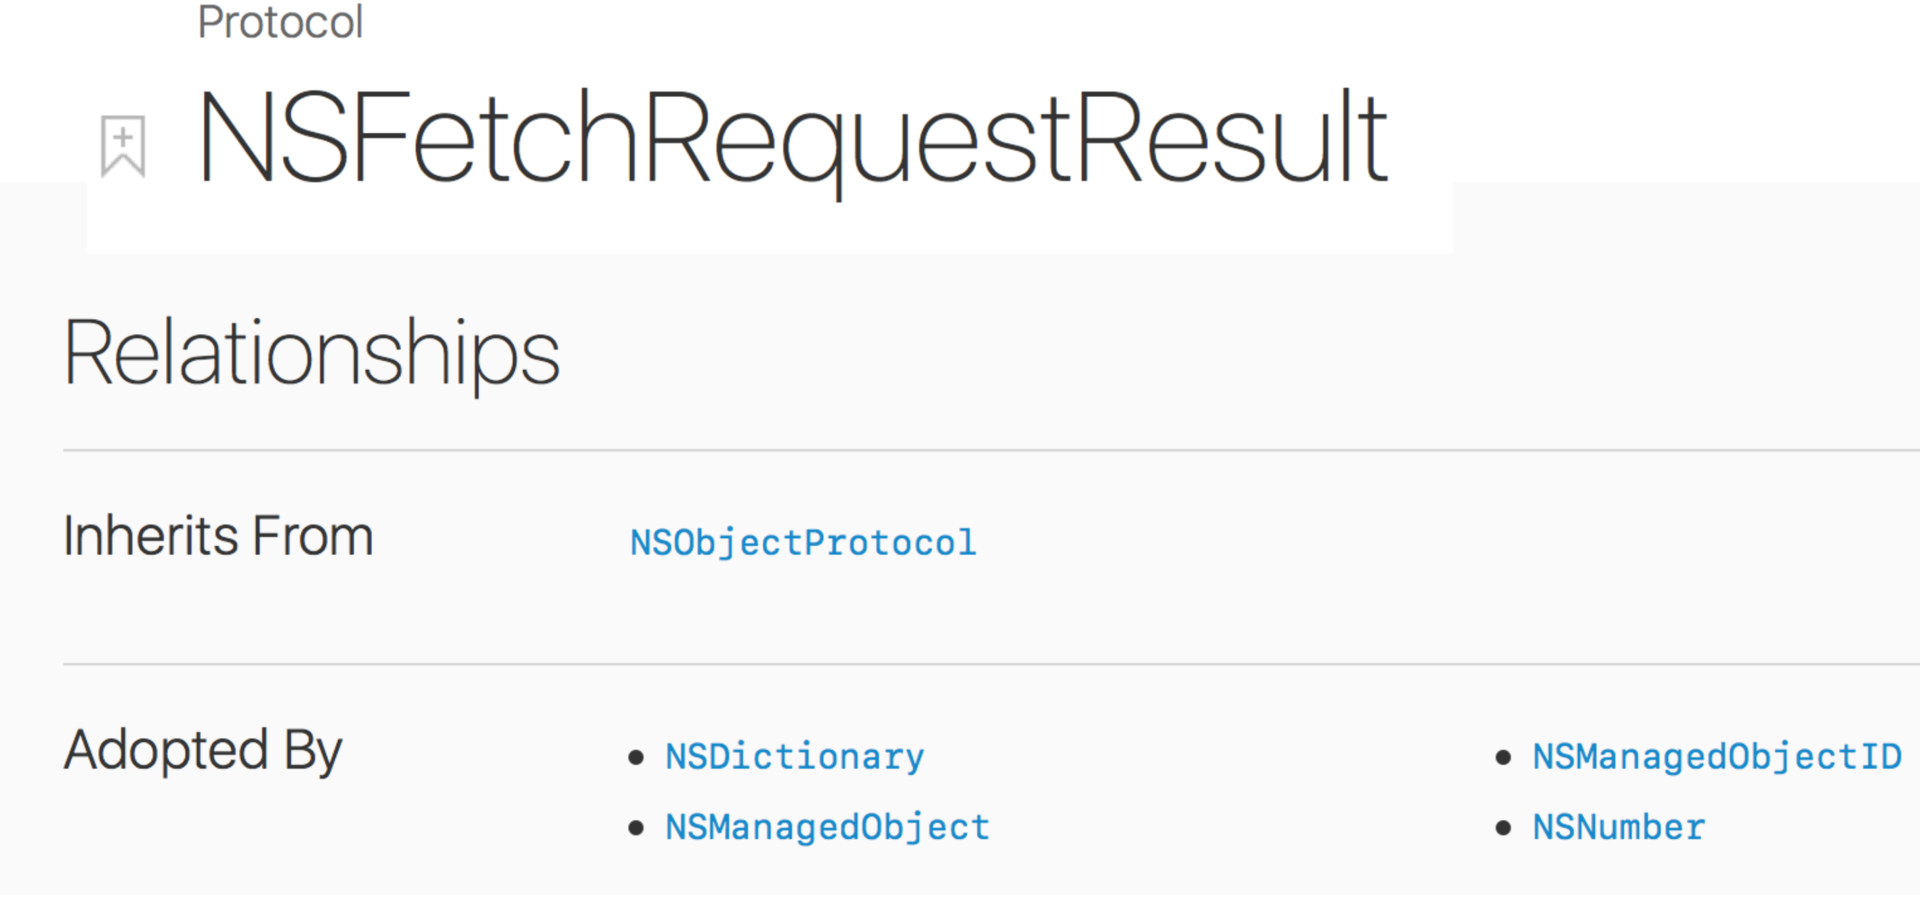
Fortunately, the
NSManagedObject objects in the Core Data database automatically execute the NSFetchRequestResult protocol and we can "legally" consider them as the result of a query.In
Swift 2 query and its execution look like this: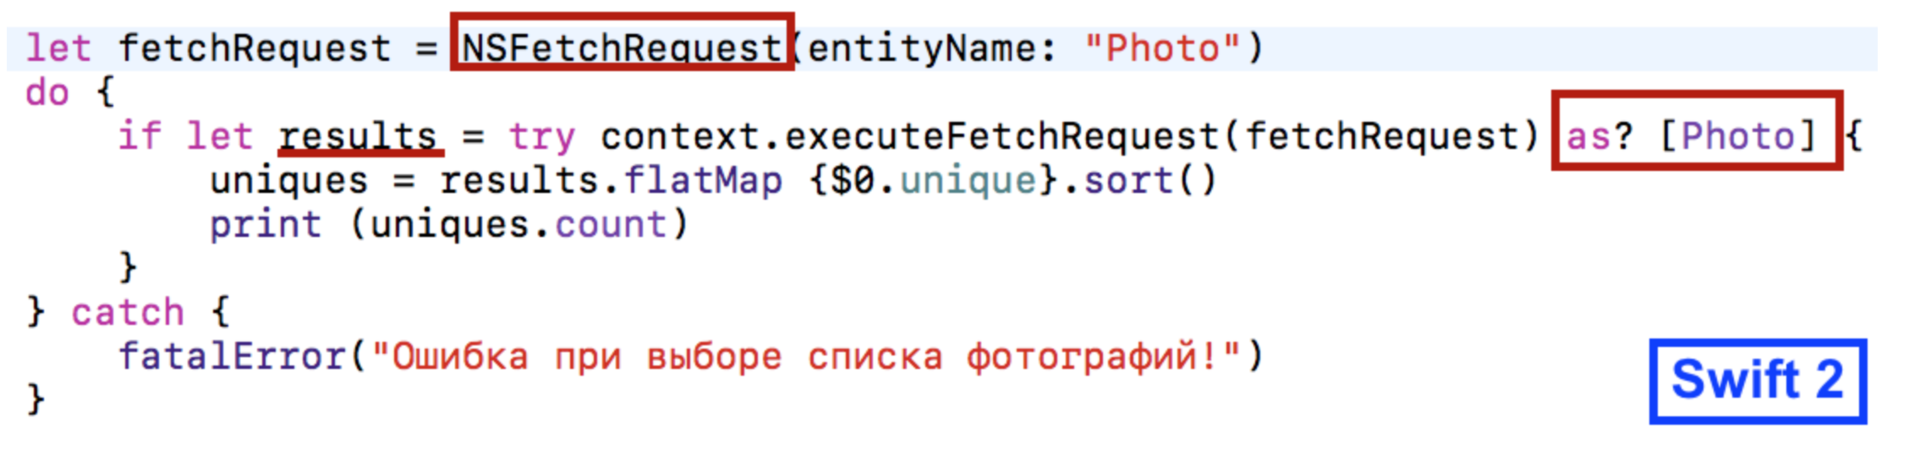
In
Swift 3 we can indicate in the request the type of the result we get (in our case, Photo ), and thus avoid additional “type casting”: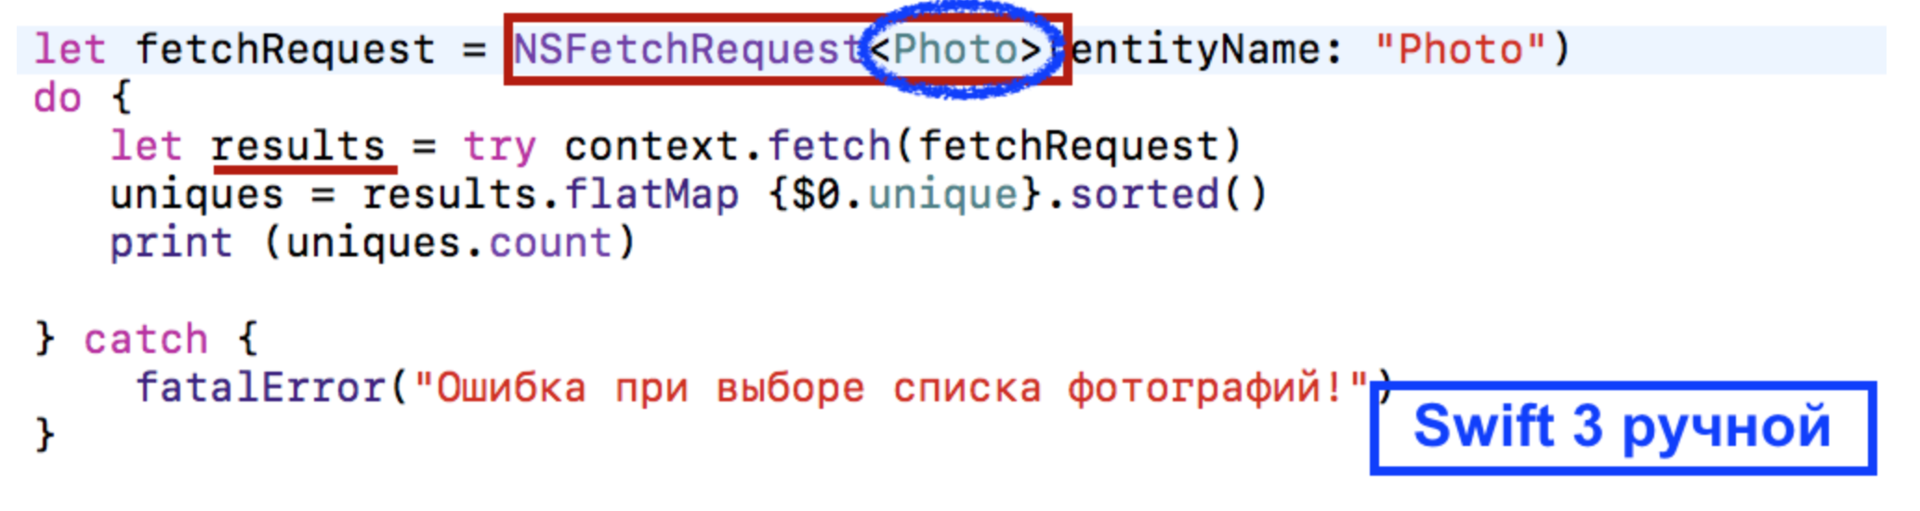
Indeed, if we look at the result type of the
results in Swift 3 , it will be [Photo] , which will allow us to extract the Photo attribute of the Photo database object: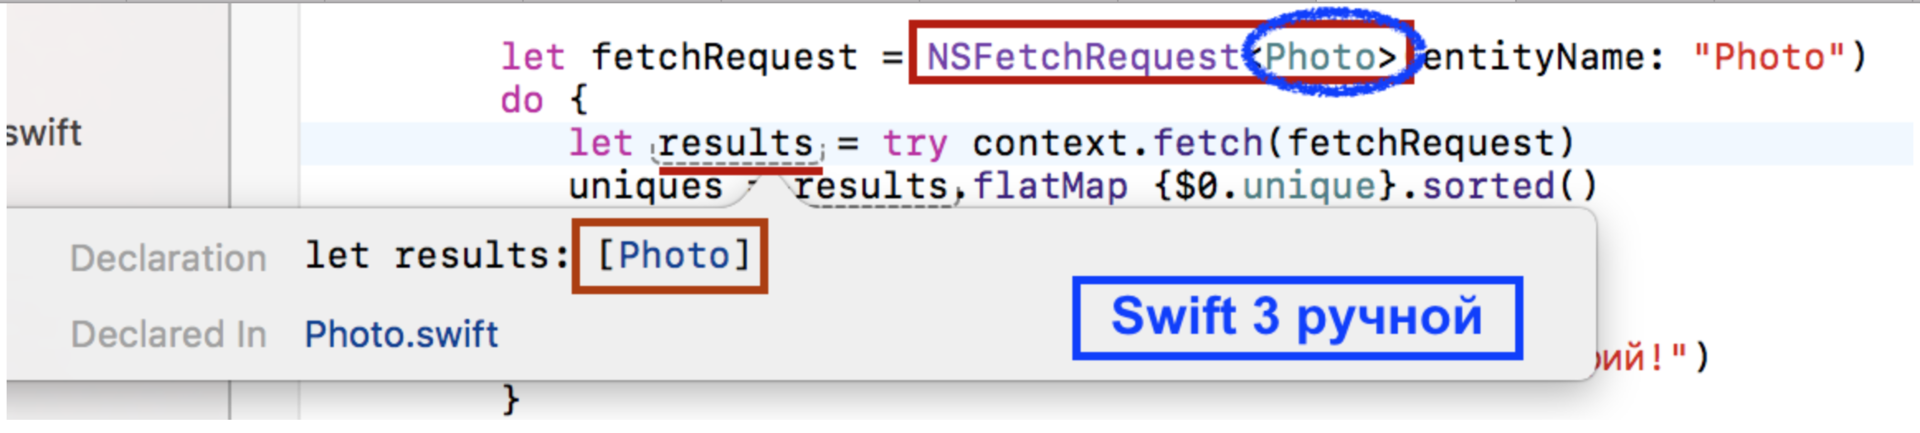
However, if we used the migration “robot” to switch to
Swift 3 , then we would get a code in which the result of the selection of results is determined only by the fact that it must perform the NSFetchRequestResult protocol: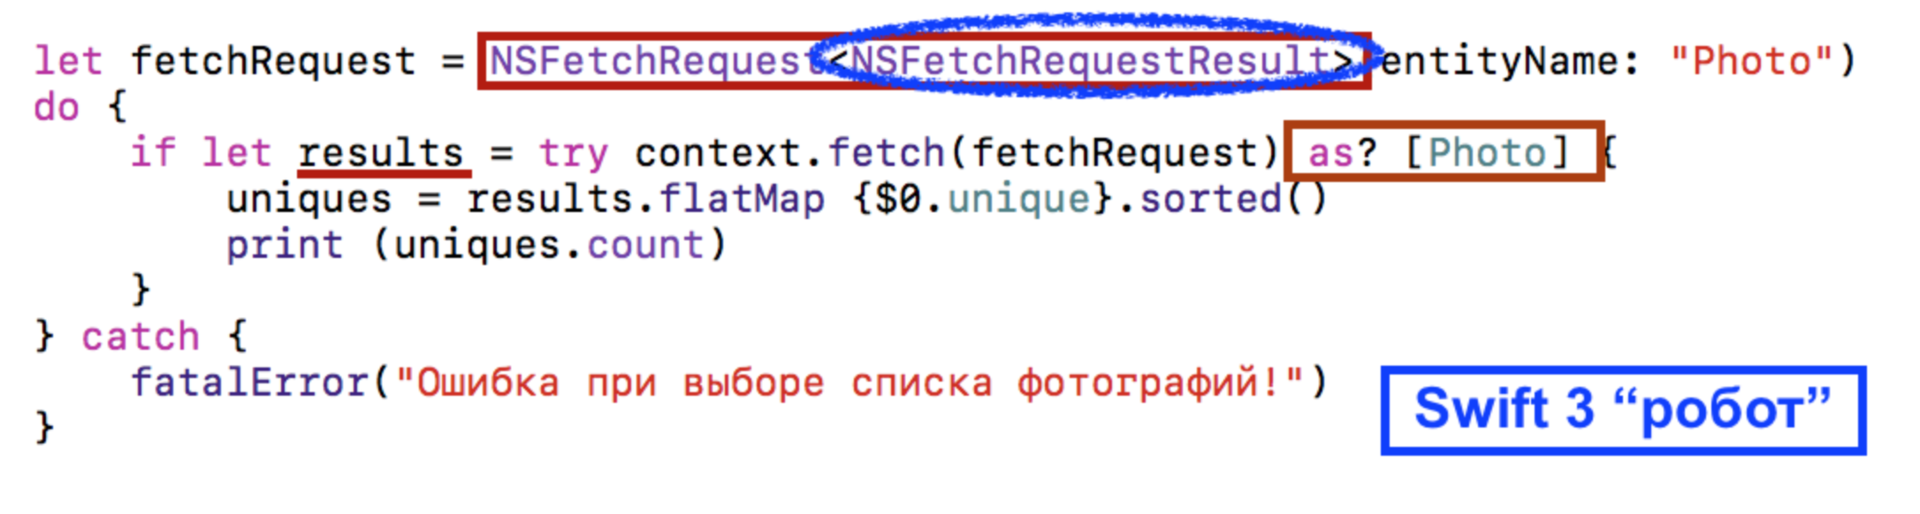
Therefore, the "robot" had to apply "casting type"
as ? [Photo] as ? [Photo] to retrieve the unique attribute of a Photo database object. We see that the migration “robot” is again trying to “slip” a more generalized solution, quite workable, but less effective and less “readable” than the above “manual” version. Therefore, after the work of the migration "robot" we will have to edit the code manually.But there is one place in applications related to
Core Data , where the migration “robot”, working as shown above, offers a brilliant code in Swift 3 . This is the NSFetchResultsController class, which in Swift 3 as well as the NSFetchRequest request became Generic , that is, NSFetchResultsController<NSFetchRequestResult> . As a result, some difficulties arose when using the fantastically convenient class CoreDataTableViewController , which was developed at Stanford, in Swift 3 .At first I’ll remind you very briefly where the
CoreDataTableViewController class CoreDataTableViewController . When you have a huge amount of information in the database, the Table View is an excellent means of displaying this information. In 99% of cases, either the Table View or the Collection View used to display the contents of large databases. And it is so common that Apple provided us in iOS with an excellent NSFetchedResultsController class that “ NSFetchRequest ” an NSFetchRequest request to a UITableView table.And not only “ties up” only once, but this “garter” is constantly in effect and, if changes are somehow made to the database,
NSFetchRequest returns new results and the table is updated. So the database can change “behind the scenes”, but the UITableView table always remains in sync with it.NSFetchResultsController provides us with methods of the UITableViewDataSource and UITableViewDelegate protocols, such as numberOfSectionsInTableView , numberOfRowsInSections , etc. The only method that it does not implement is cellForRowAt . You yourself will have to implement it, because to implement the cellForRowAt method, cellForRowAt need to know the custom UI for the table cell, and you are the only one who knows what data and how it is placed on the screen. But as for the other methods of the UITableViewDataSource protocol, even such as sectionHeaders and everything else, the NSFetchedResultsController takes over.How to work with
NSFetchResultsController ?All you need to do is create a
request , configure its predicate and sort, and the NSFetchResultsController will NSFetchResultsController output to the table.NSFetchResultsController also monitors all changes in the database and synchronizes them with the Table View .The way in which it does this is associated with the delegate of the
NSFetchResultsControllerDelegate , whose methods you are requested to copy without change from the documentation to your class.“Well, I thought that configuring
NSFetchResultsController is easy, but it turns out that I have to implement the delegate methods of NSFetchResultsControllerDelegate ?” - you think.But you were lucky, all this work was done for you and provided at your disposal a wonderful class called
CoreDataTableViewController .It was not only copied all the necessary code from the
NSFetchResultsController documentation, but also rewritten from Objective-C to Swift .Now, in order for yours to
UITableViewControllerinherit all the functionality NSFetchResultsController, you just have to make CoreDataTableViewControlleryour superclass and define it public varwith a name fetchedResultsController. You set this variable, and CoreDataTableViewControllerwill use it to answer all questions UITableViewDataSource, as well as the delegate NSFetchedResultsControllerwho will track the database changes.In the end, you just need:
- set a variable
var fetchedResultsControllerand - implement the method
cellForRowAt.
In the class that inherits from
CoreDataTableViewController, we create NSFetchResultsControllerusing an initializer, which includes a query as an argument request, and then assign it to a variable varwith a name fetchedResultsController. As soon as you do this, the table with the list of photos will automatically update ( Swift 2):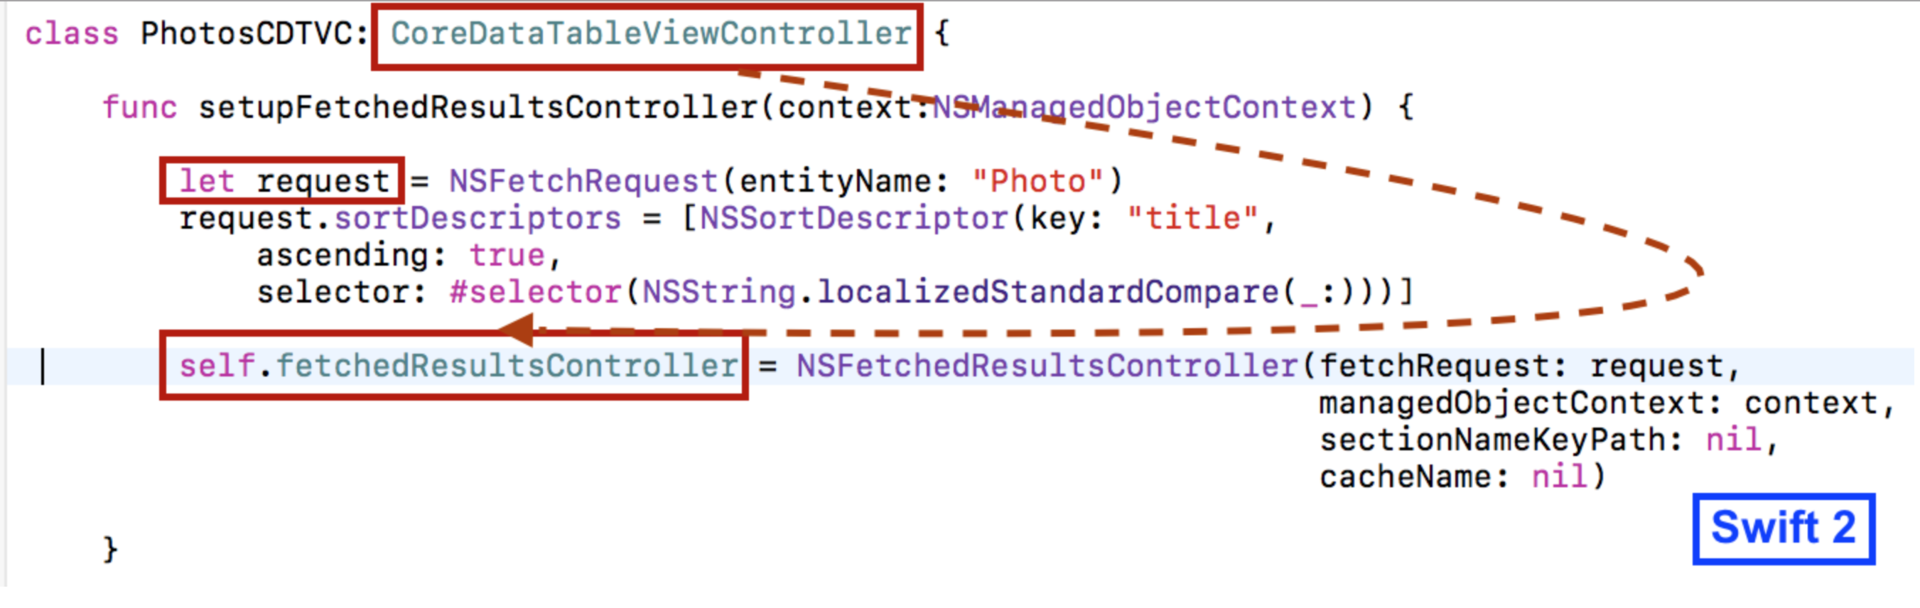
Of course, we implement the method
cellForRowAtIndexPath( Swift 2):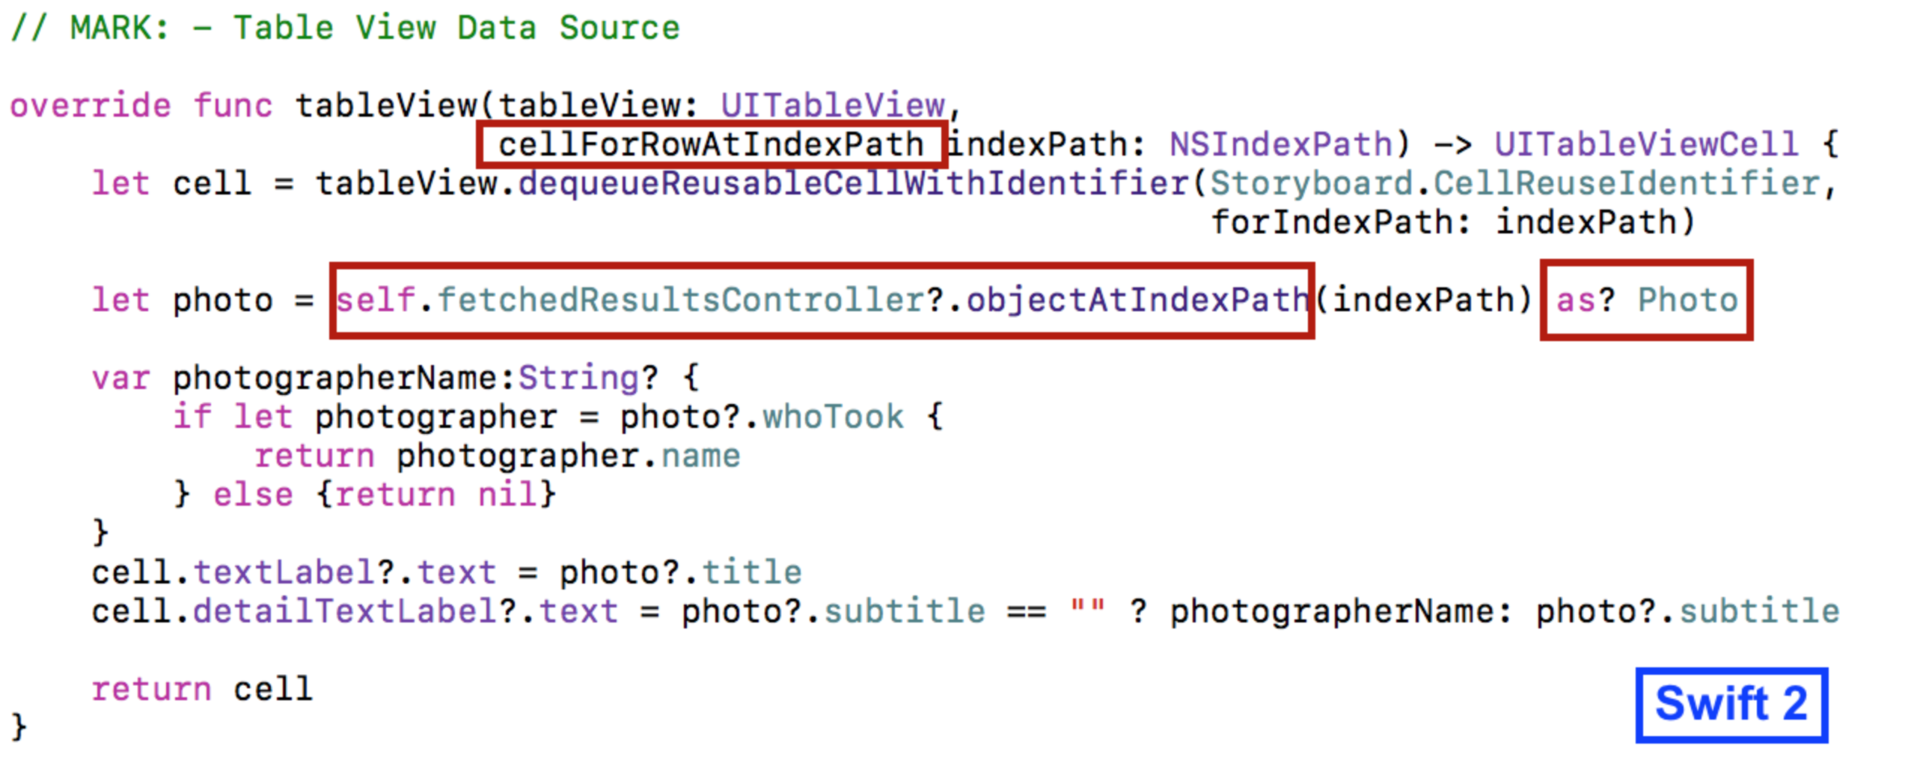
We receive the list of photos from the Flickr.com server :
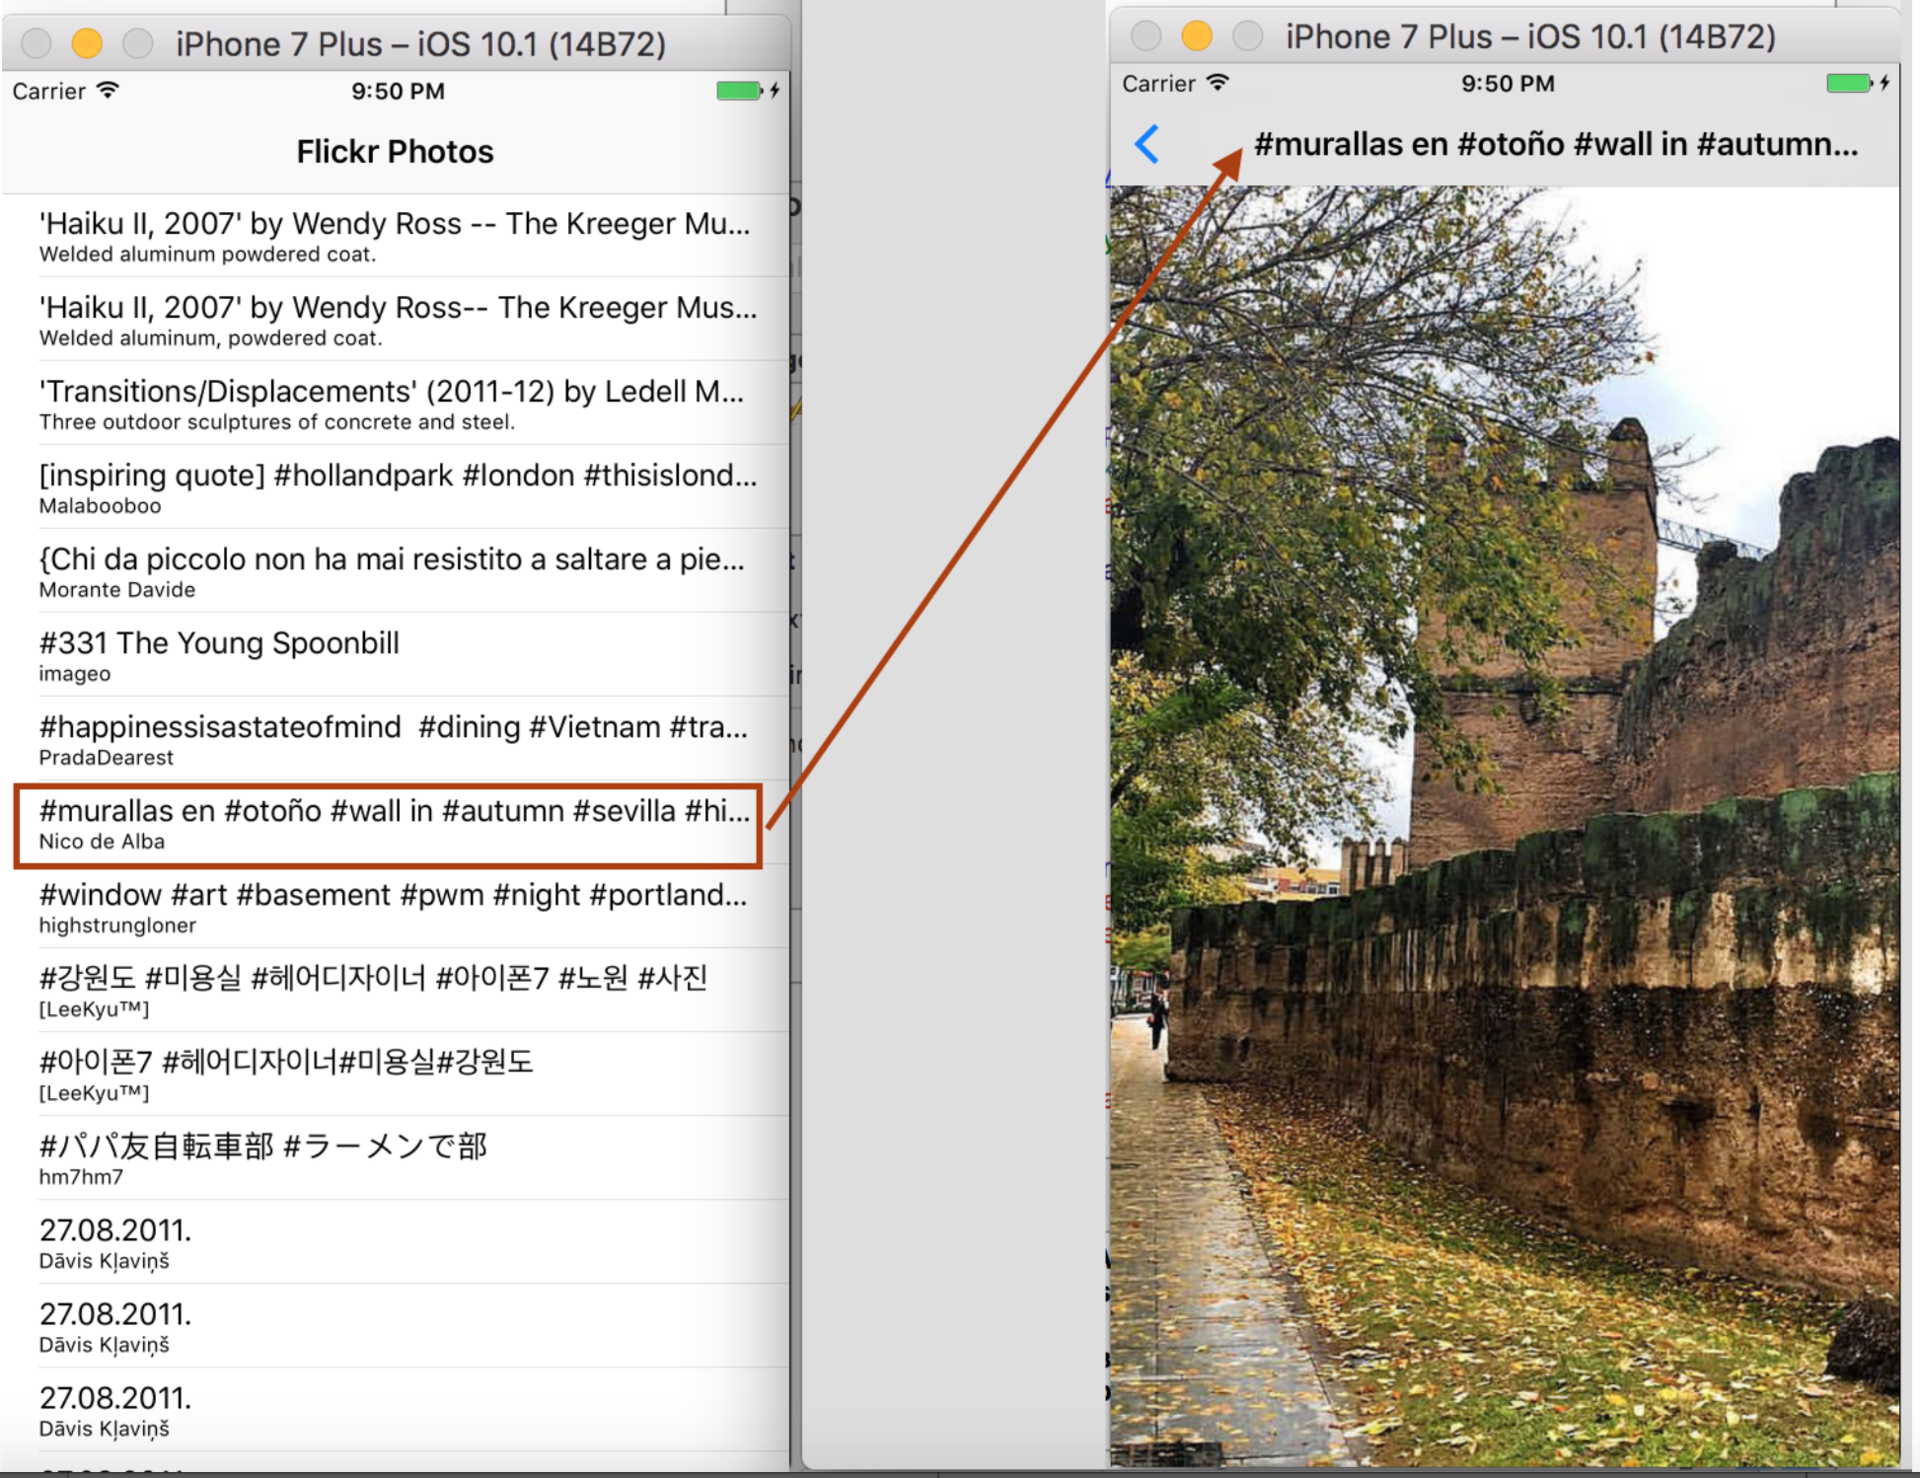
Everything is very cool and simple in
Swift 2, but the Swift 3query has NSFetchRequest<NSFetchRequestResult>become Generic, and therefore has become a Genericclass NSFetchResultsController<NSFetchRequestResult>.The variable
public varwith the name fetchedResultsControllerwith which we work in CoreDataTableViewController, also became Genericin Swift 3after the application of the migration "robot":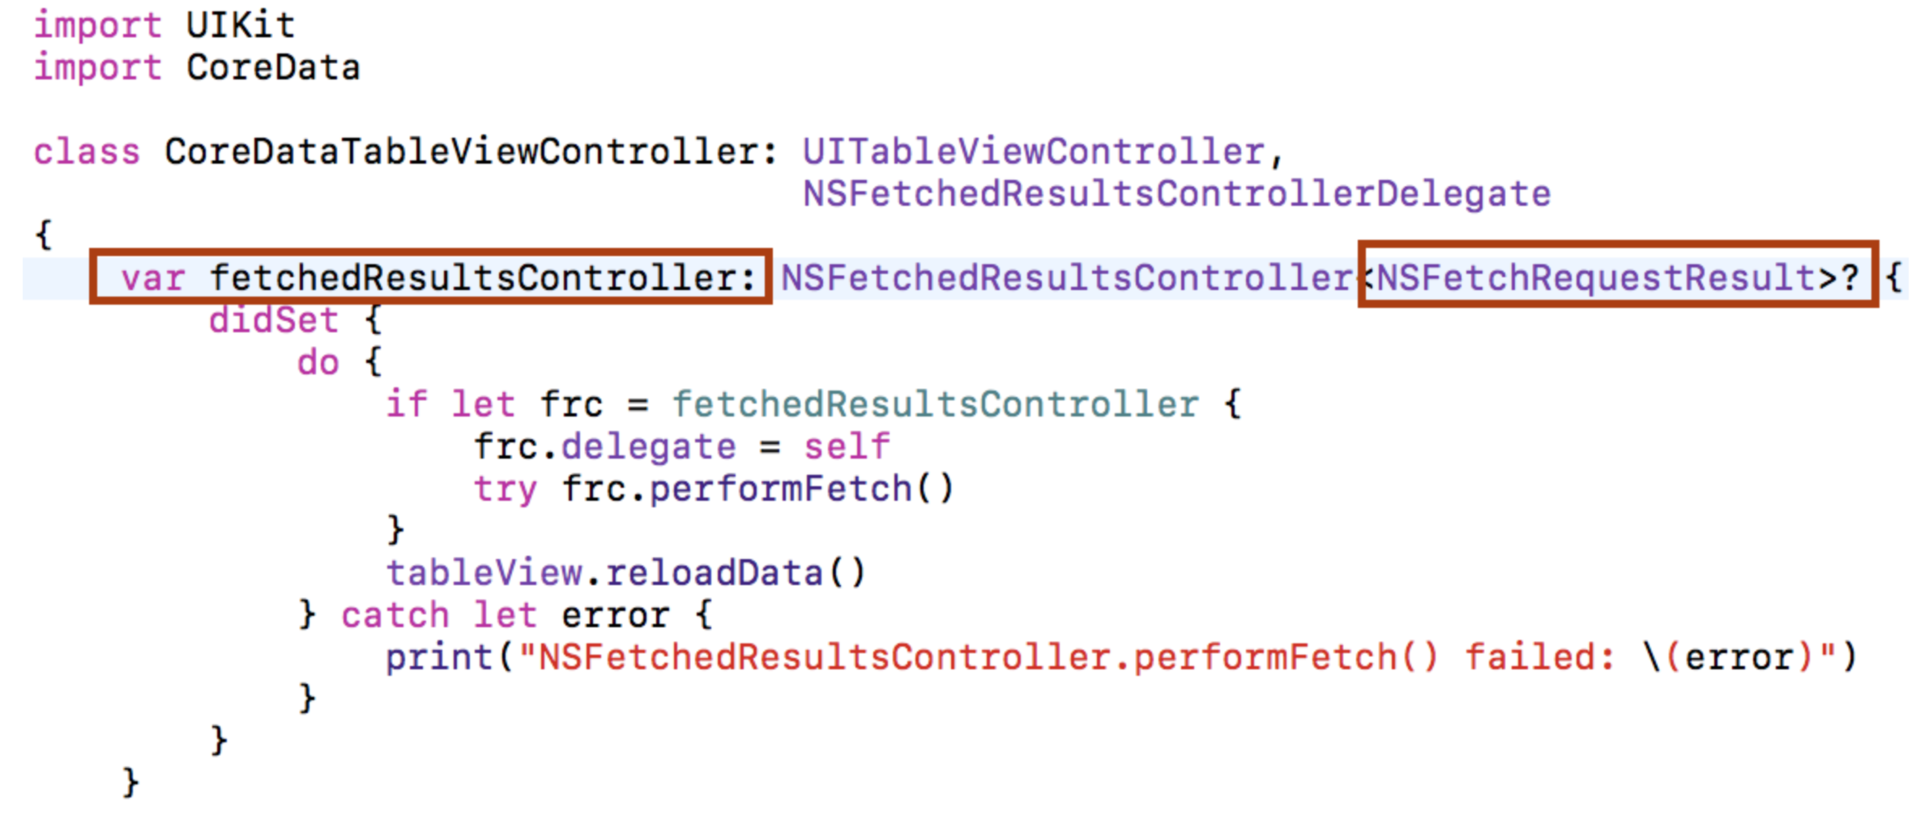
In theory, the class
CoreDataTableViewControllermust be done Generic, but we will not do this, because its subclasses, for example, such as the one above PhotosCDTVC, are used on storyboard, and the classes storyboarddo not work Generic.How can we be? The class is
CoreDataTableViewControllerextremely convenient and allows you to avoid duplication of code in all Table Viewworking c Core Data?Here we come to the aid of the migration "robot". Look at how he converted the class
PhotosCDTVCin the part of the definition of a variable with a name fetchedResultsControllerin which the result of the selection in the query is determined only by the fact that it must perform the protocol NSFetchRequestResult( Swift 3):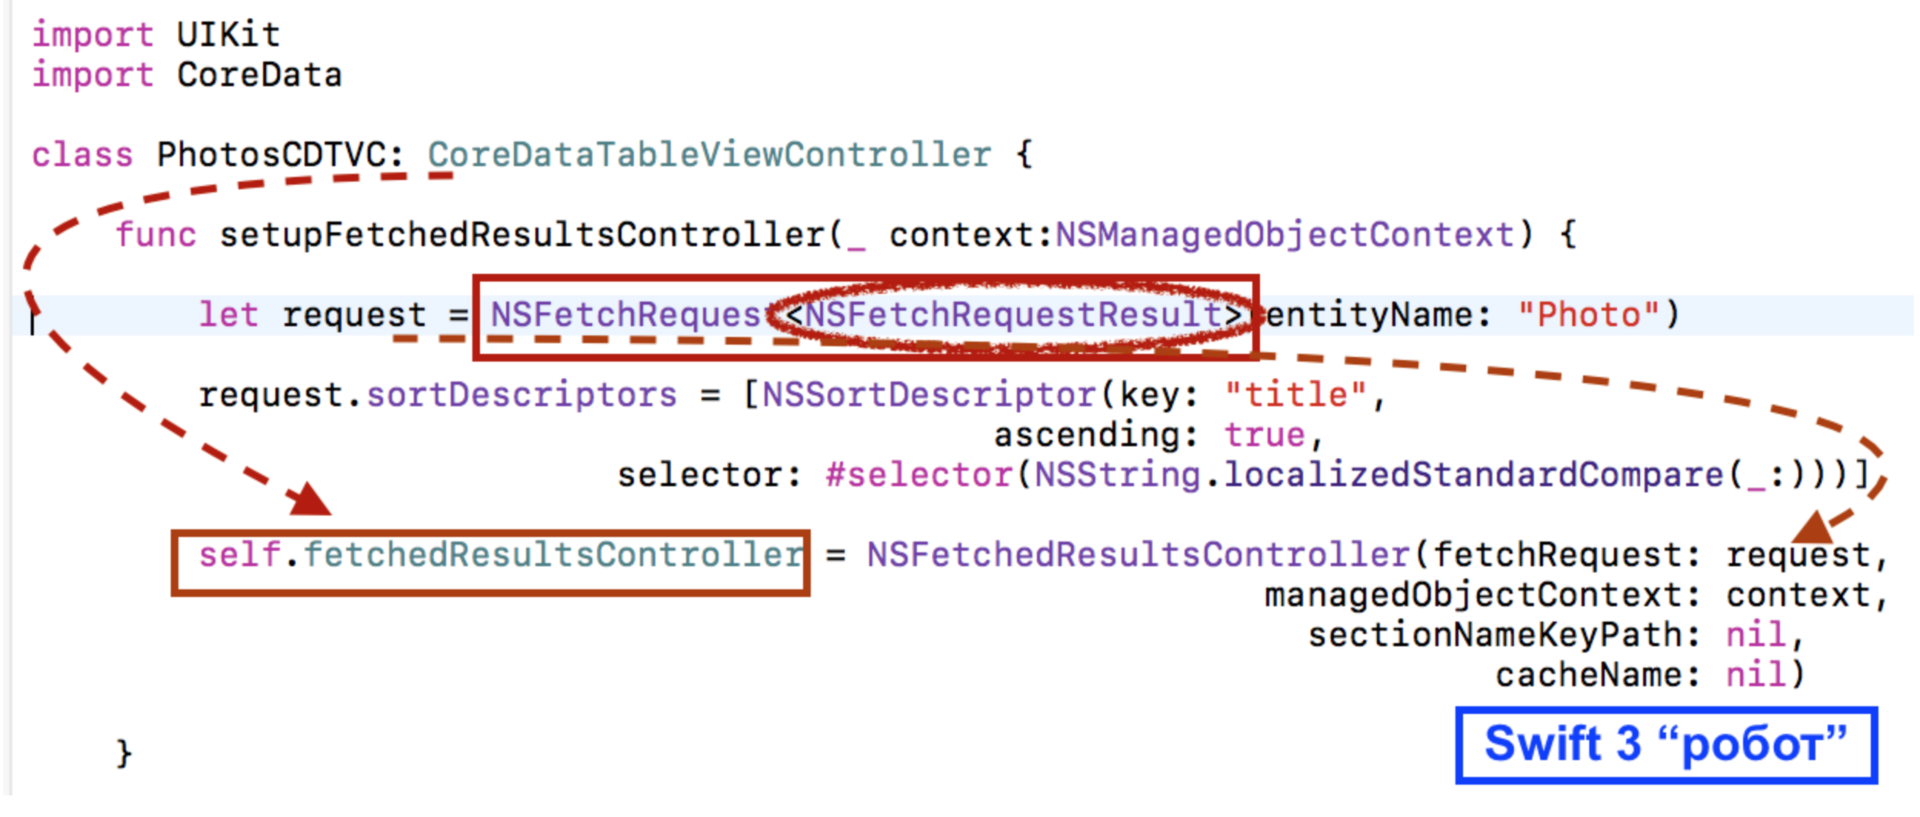
And this is exactly what the variable with the name
fetchedResultsControllerin our superclass requires CoreDataTableViewController, that is, in fact, “robot” performed “type casting” UP (upcast) of our result of selecting a database object Photobefore NSFetchRequestResult. It is clear that we will get the result of the type sampling NSFetchRequestResult, so when it comes time to work with a real object Photoin the cellForRowAtmigration method , the robot performs the opposite operation - “casting of the type” DOWN (downcast) - with the help of the operator as?( Swift 3):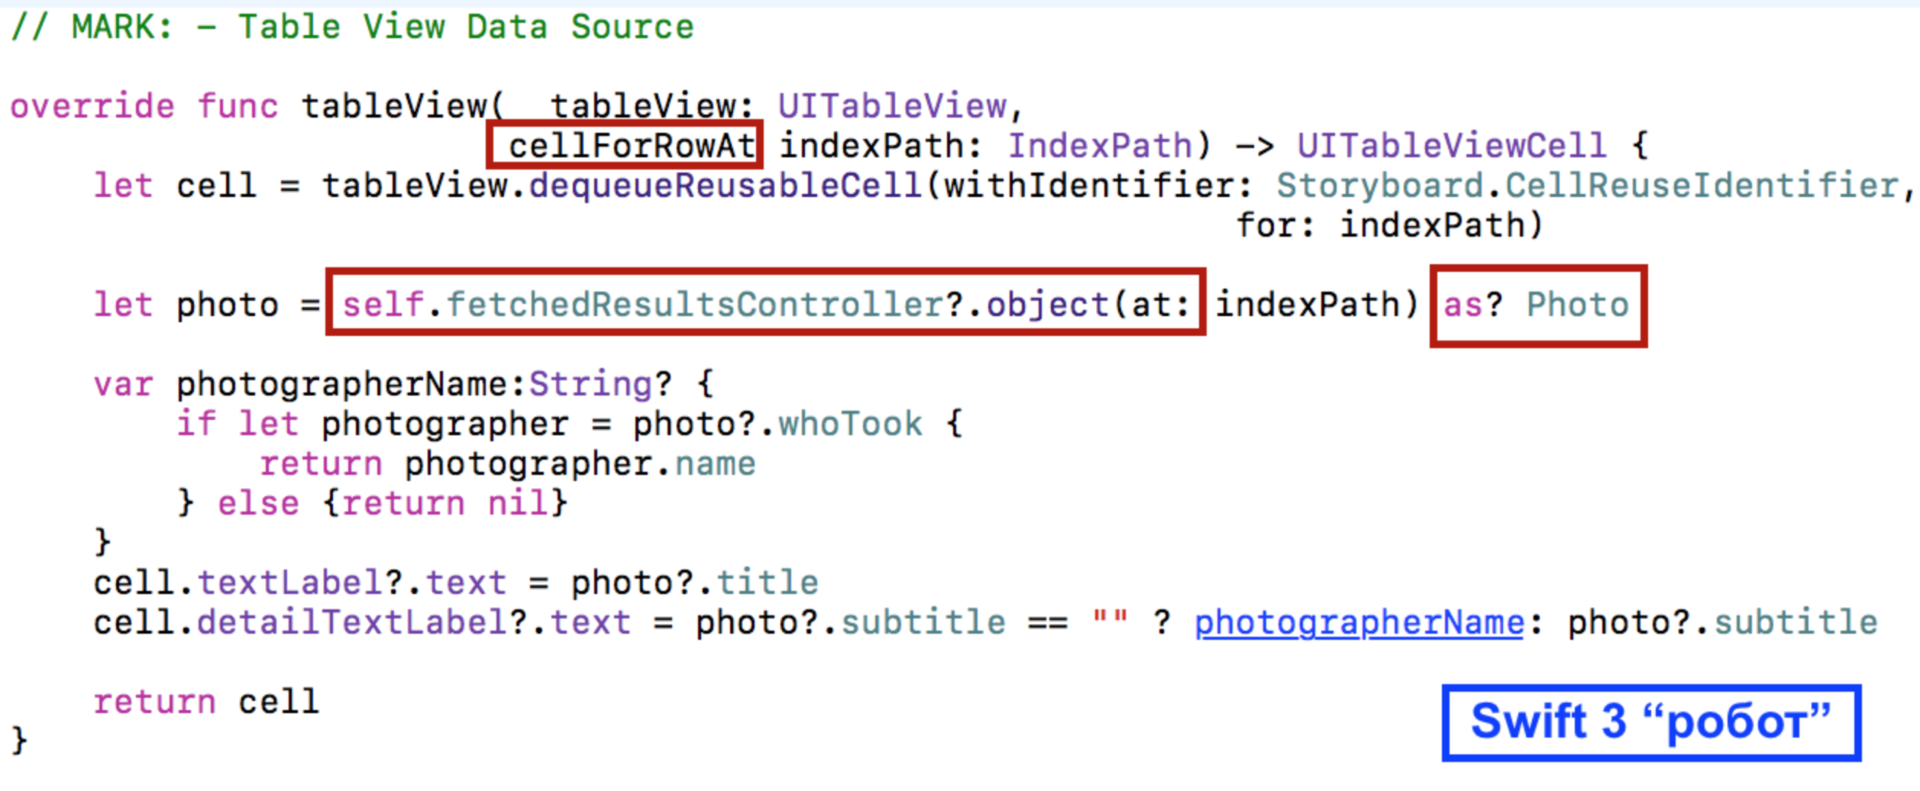
So, in the case of the class, the
CoreDataTableViewControllermigration “robot” worked perfectly. You do not need to change or supplement anything.7. Swift 3 #selector , getter: setter: Objective-C .
Swift 3 #selector , Objective-C , , setter getter .,
Swift , Core Data , public API var coreDataStack :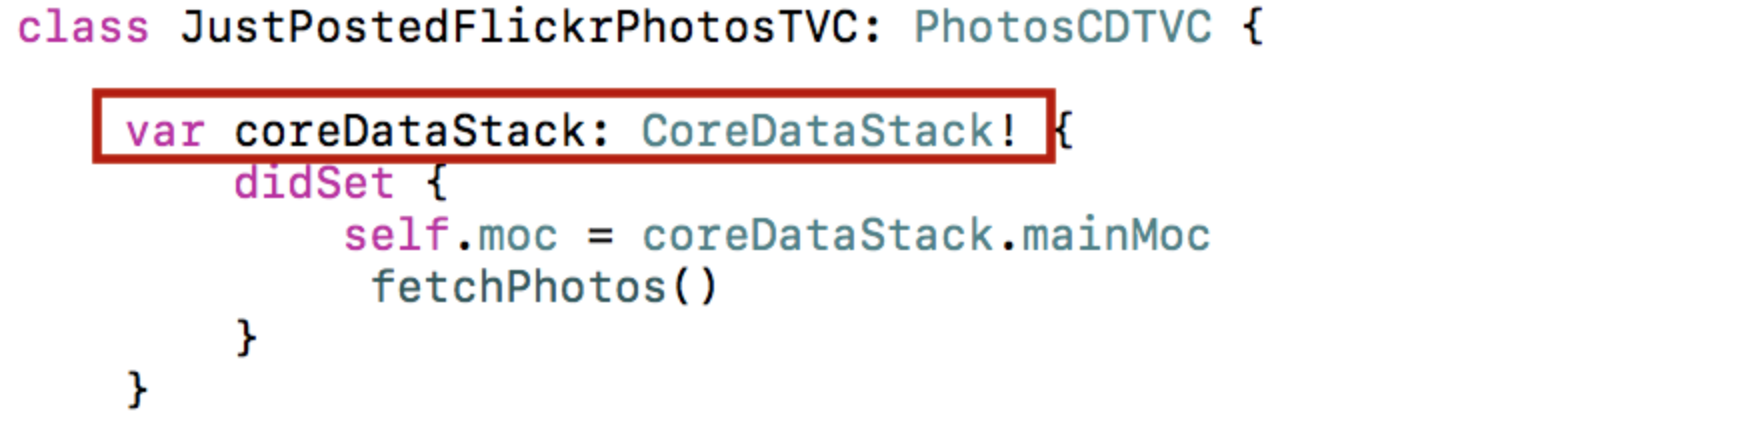
AppDelegate — Objective-C setter setCoreDataStack Swift coreDataStack . raywenderlich.com :
I was curious how you can set the selector to a method
setCoreDataStackthat is clearly not in the application. This code remained until I decided to switch to Swift 3. What was my surprise when I discovered how delicate the migration “robot” managed with this code — he used the syntax #selectorwith an argument unfamiliar to me setter:
I wanted to know more about it
#selectorand I found a wonderful article “Hannibal #selector” .8. Swift 3You will receive a warning if you do not use the return value of the function Void.
Swift 2 , Void . . , , @warn_unused_result . , , , . , sortInPlace .Swift 3 . , , . , Swift 3 @discardableResult .,
Swift 2 :
«» :

,
[UIViewController]? . , , , _ ():
FINDINGS
Swift 2 Swift 3 — . , , , . , Swift 2.0 . «» Xcode 8.1 8.2 Swift 3 . , Swift 3 , - , Swift 2 , «». , .: Yammer iOS App ported to Swift 3
Source: https://habr.com/ru/post/316320/
All Articles