PMEM emulation on Intel servers
Permanent memory (Persistent Memory, PMEM) is a fast memory that has the ability to store data after turning off the computer. Often it is called "Non-Volatile Random Access Memory" (NVRAM) - "non-volatile RAM," or simply "non-volatile memory." Another name for such a memory is NVDIMM. It indicates that the traditional memory contains traditional RAM modules.

Sometimes we just do not know which picture to insert before kata. And today is such a case. The path will be a cat :)
Historically, applications organize data using two levels of memory. The first is fast RAM, the second is relatively slow data storage devices. The appearance of PMEM means the appearance of a third memory level, which takes up space between the first and second.
You can work with the new type of memory in the same way as with RAM, using the processor instructions for loading and saving data.
')
The path of hardware solutions implementing PMEM is just beginning. However, everything points to the fact that they may well be widespread. A new kind of memory requires new approaches to software development. The programs themselves cannot benefit from PMEM, they need to be prepared for this.
If you are a programmer who wants, as early as possible, even before the widespread adoption of PMEM hardware solutions, to start creating applications that can work with new memory, you can use emulation. This approach will also help in updating existing projects.
From this material, you will learn how to set up PMEM emulation using normal RAM. The RAM area selected for emulation will be visible to the operating system as a permanent memory area. It should be noted that in our case, since the emulation is based on the usual DRAM, the data from the virtual PMEM is lost after turning off the power. However, the speed of work with emulated memory will be very high.
Here we will use a server with an Intel processor and a Linux OS with a 4.3 kernel. or higher. We will talk about configuring the hardware, and how to configure the software part of the solution. After the emulation is configured, you can try out examples of PMEM applications that can be found in the NVM library on the pmem.io website.
Here are the characteristics of the hardware and software used for the experiments.
The work used the Linux kernel version 4.5.3. Support for persistent memory and emulation devices has been available in the kernel since version 4.0, however, in order to simplify system configuration, it is recommended to use kernels of version above 4.2.
Emulation should work with any Linux distribution that can support the official kernel. To install the necessary drivers, run make nconfig.
Figures 1 through 5 show how to configure NVDIMM support in the Kernel Configuration menu.
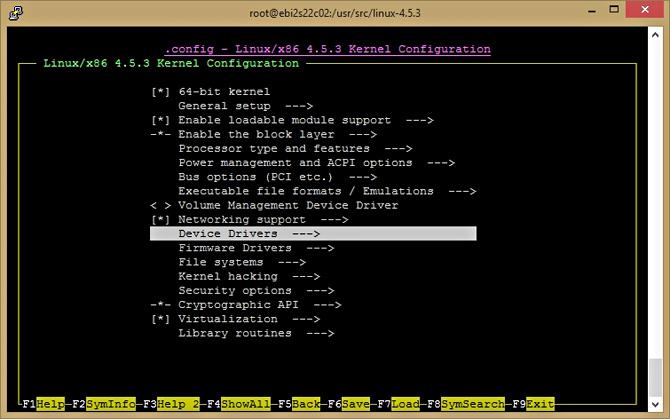
Fig. 1. Go to setting up device drivers
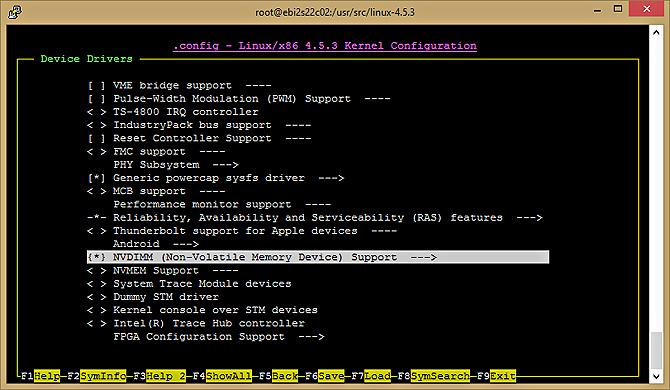
Fig. 2. Configure NVDIMM support
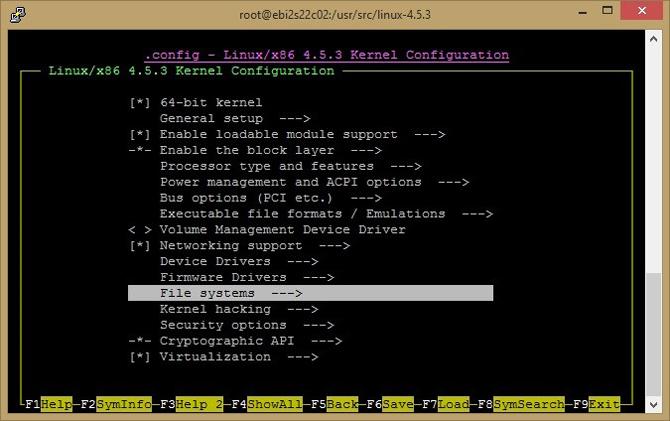
Fig. 3. Configure the file system to support Direct Access technology.
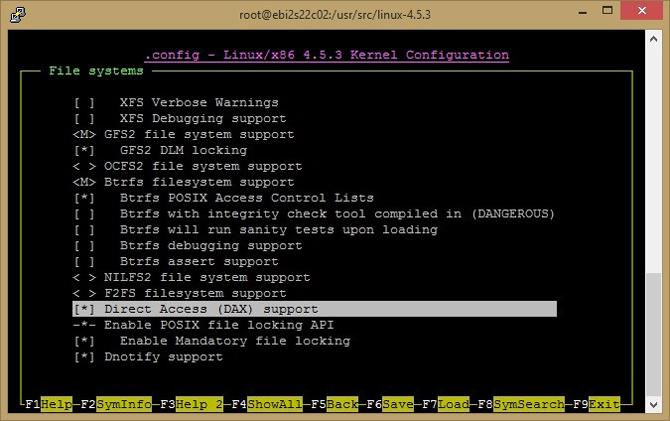
Fig. 4. Configure Direct Access Support (DAX)
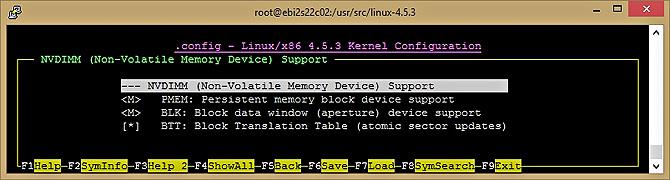
Fig. 5. NVDIMM support options
The kernel will offer memory areas for the PMEM driver, which can be used to emulate persistent storage. Figures 6 - 7 show the settings for the processor and system.
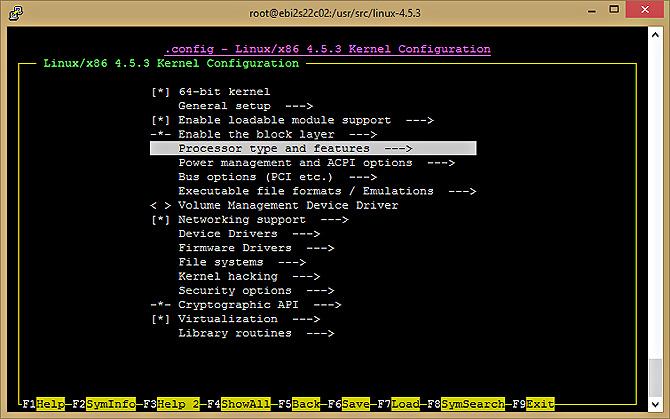
Fig. 6. Configure the processor to support NVDIMM
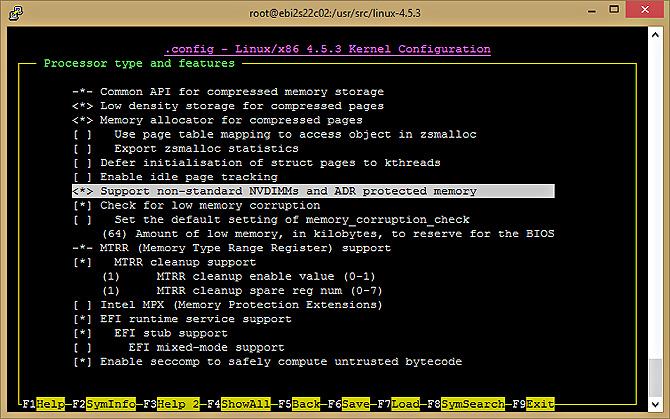
Fig. 7. Enabling support for non-standard NVDIMM memory and ADR-protected memory.
Now everything is ready to assemble the kernel using the command shown below.
A new kernel can be built much faster using multiple threads. Experiments with different number of threads showed that compilation can be accelerated by about 95% in multi-threaded mode. As a result, setting up a new kernel is pretty fast. The two figures below show CPU utilization and a graph illustrating the performance impact of using multiple threads when building a kernel.
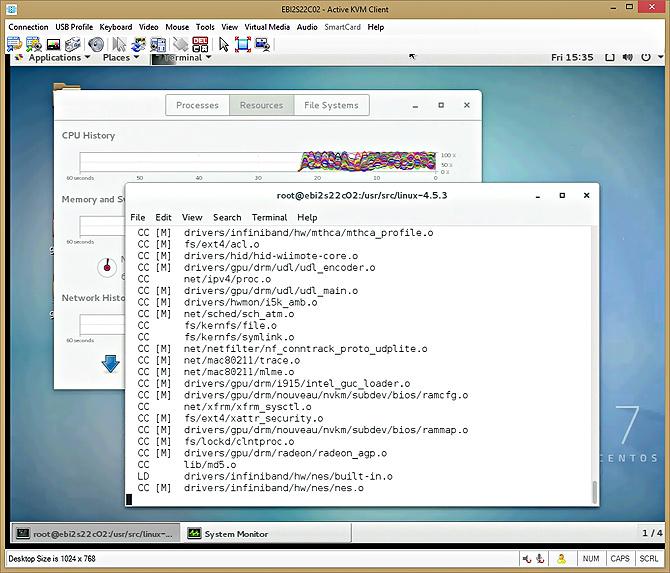
Fig. 8. Compiling kernel source code.
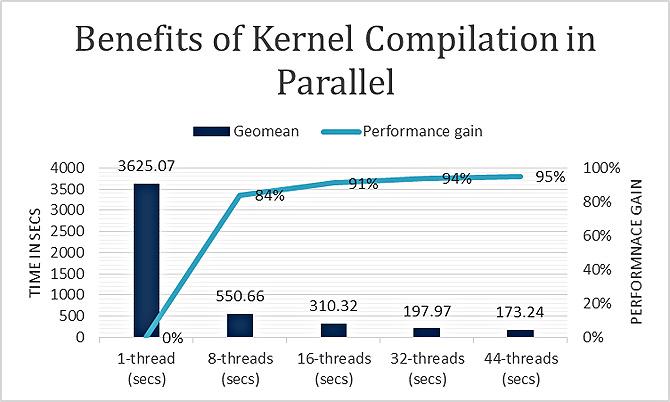
Fig. 9. The effect of multithreading on compilation performance
To install the kernel, use the following command:
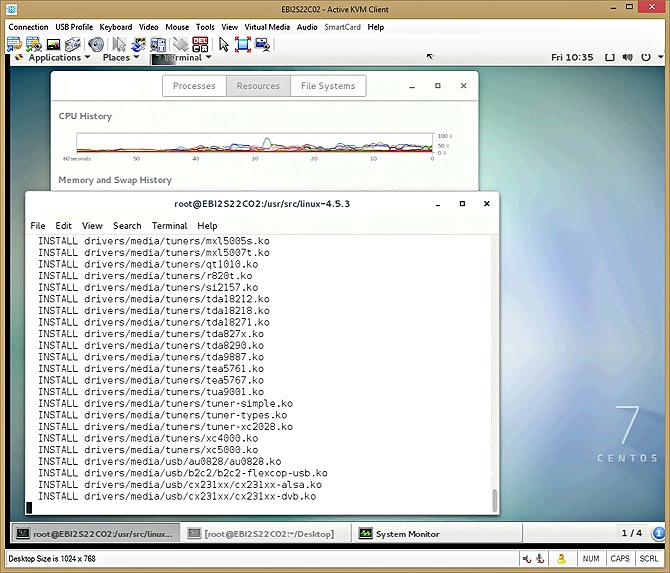
Fig. 10. Installing the kernel
Now we will reserve the memory area by modifying the kernel boot parameters. As a result, the selected area will look like a permanent memory for the operating system. Here is a command like this:
As a result of its execution, a memory area in the range from ss to ss + nn will be allocated. “KMG” is an abbreviation for units of measure: Kilo, Mega, Giga.
For example, a command like memmap = 4G! 12G reserves 4 GB of memory between 12th and 16th gigabytes. The configuration is done in GRUB and is different for different Linux distributions. Here is an example GRUB configuration for CentOS 7.0.
The figure below shows the instruction regarding PMEM added to the GRUB file.
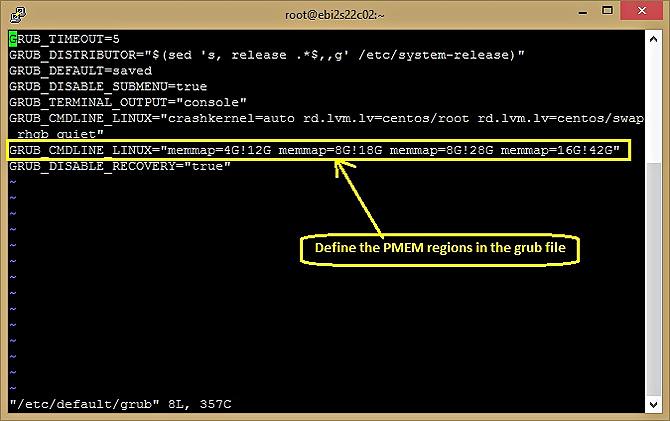
Fig. 11. Specifying areas for PMEM in the / etc / default / grub file
This is the build process for the GRUB configuration.
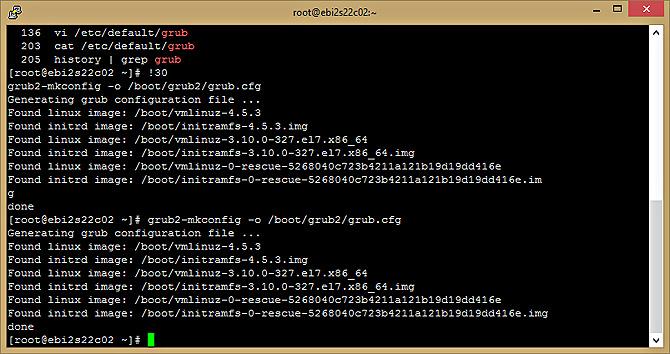
Fig. 12. Creating a boot configuration file based on the grub template
After configuring GRUB and restarting the computer, if everything is done correctly, you can see the device being emulated as / dev / pmem0 ... pmem3.
Attempting to capture reserved memory areas under emulation of persistent memory will result in broken regions related to persistent memory (type 12).
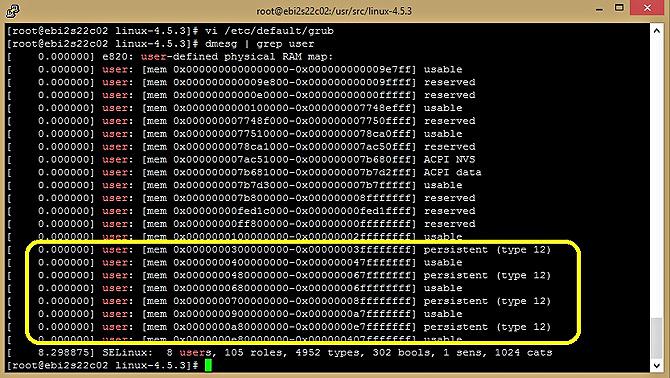
Fig. 13. Areas allocated for permanent memory emulation are marked as (type 12)
When setting up, it is recommended either to use memory in the range exceeding 4 GB (memmap = nnG! 4G), or to pre-check the memory card (via BIOS-e820) and select the appropriate range.
If the desired virtual device is not visible in the system, check the memmap settings in the grub file, as shown in Figure. 11, then analyze the memory state using dmesg, as shown in Figure 13. If everything is configured correctly, you will see reserved memory areas. There may be non-overlapping areas, reserved as permanent memory. If you use multiple memmap commands during setup, several virtual devices will be created, provided by the kernel and visible as / dev / pmem0, / dev / pmem1, / dev / pmem2, and so on.
File system Direct Access (DAX) extensions create an environment in which you can work with PMEM. Some distributions, such as Fedora 24 and later versions, already have built-in DAX / PMEM mechanisms, and the NVM library (NVML) is also available there.
Here's a quick way to check if DAX and PMEM are built into the kernel. To do this, you can use the egrep utility to process the kernel configuration file, which is usually located in the / boot folder of the distribution:
As a result of such a command, the following will be displayed:
Using the following commands you can install a file system with DAX (today it is possible for ext4 and xfs):
Now in the newly mounted partition, you can create files and transfer as input to NVML pools.

Fig. 14. Permanent memory blocks
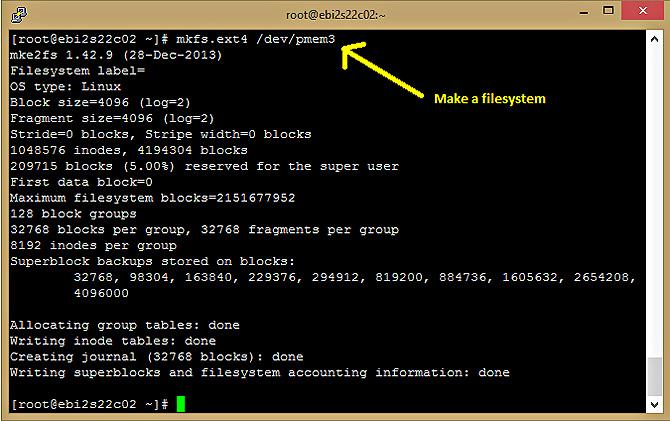
Fig. 15. Building the file system
It is worth noting that you can emulate persistent memory using ramdisk (that is, / dev / shm), or by setting the environment variable PMEM_IS_PMEM_FORCE = 1. This will avoid the performance impact caused by msync.
Now you know how to set up an environment in which you can create applications that work with PMEM, without having the appropriate hardware, but using additional threads on Intel architecture servers, you can quickly build a new Linux kernel, ready for experiments with persistent memory.
Sometimes we just do not know which picture to insert before kata. And today is such a case. The path will be a cat :)
Historically, applications organize data using two levels of memory. The first is fast RAM, the second is relatively slow data storage devices. The appearance of PMEM means the appearance of a third memory level, which takes up space between the first and second.
You can work with the new type of memory in the same way as with RAM, using the processor instructions for loading and saving data.
')
The path of hardware solutions implementing PMEM is just beginning. However, everything points to the fact that they may well be widespread. A new kind of memory requires new approaches to software development. The programs themselves cannot benefit from PMEM, they need to be prepared for this.
If you are a programmer who wants, as early as possible, even before the widespread adoption of PMEM hardware solutions, to start creating applications that can work with new memory, you can use emulation. This approach will also help in updating existing projects.
From this material, you will learn how to set up PMEM emulation using normal RAM. The RAM area selected for emulation will be visible to the operating system as a permanent memory area. It should be noted that in our case, since the emulation is based on the usual DRAM, the data from the virtual PMEM is lost after turning off the power. However, the speed of work with emulated memory will be very high.
Here we will use a server with an Intel processor and a Linux OS with a 4.3 kernel. or higher. We will talk about configuring the hardware, and how to configure the software part of the solution. After the emulation is configured, you can try out examples of PMEM applications that can be found in the NVM library on the pmem.io website.
Hardware and software components
Here are the characteristics of the hardware and software used for the experiments.
| Component | Specifications |
| CPU | Intel Xeon E5-2699 v4 (2.2 GHz, 22 cores, one core is used). |
| Chipset | Intel C610 QS (stepping B1), Intel QPI system bus, 9.6 GT / s. |
| Platform | Intel Server System R2000WT (Wildcat Pass), 24 DIMM slots, 2 processor sockets, 1100 watt power supply. BIOS - GRRFSDP1.86B.0271.R00.1510301446 ME: V03.01.03.0018.0 BMC: 1.33.8932 |
| RAM | Micron MTA36ASF2G72PZ2GATESIG, 256 GB (16x16 GB) DDR4 2133P. |
| Storage device | Western Digital WD1002FAEX, 1 TB. |
| operating system | CentOS with kernel 4.5.3 |
Linux kernel preparation
The work used the Linux kernel version 4.5.3. Support for persistent memory and emulation devices has been available in the kernel since version 4.0, however, in order to simplify system configuration, it is recommended to use kernels of version above 4.2.
Emulation should work with any Linux distribution that can support the official kernel. To install the necessary drivers, run make nconfig.
Figures 1 through 5 show how to configure NVDIMM support in the Kernel Configuration menu.
$ make nconfig -> Device Drivers -> NVDIMM Support -> <M>PMEM; <M>BLK; <*>BTT Fig. 1. Go to setting up device drivers
Fig. 2. Configure NVDIMM support
Fig. 3. Configure the file system to support Direct Access technology.
Fig. 4. Configure Direct Access Support (DAX)
Fig. 5. NVDIMM support options
The kernel will offer memory areas for the PMEM driver, which can be used to emulate persistent storage. Figures 6 - 7 show the settings for the processor and system.
$ make nconfig -> Processor type and features <*>Support non-standard NVDIMMs and ADR protected memory Fig. 6. Configure the processor to support NVDIMM
Fig. 7. Enabling support for non-standard NVDIMM memory and ADR-protected memory.
Now everything is ready to assemble the kernel using the command shown below.
$ make -jX X – Kernel build acceleration
A new kernel can be built much faster using multiple threads. Experiments with different number of threads showed that compilation can be accelerated by about 95% in multi-threaded mode. As a result, setting up a new kernel is pretty fast. The two figures below show CPU utilization and a graph illustrating the performance impact of using multiple threads when building a kernel.
Fig. 8. Compiling kernel source code.
Fig. 9. The effect of multithreading on compilation performance
Install and configure the new kernel
To install the kernel, use the following command:
# make modules_install install Fig. 10. Installing the kernel
Now we will reserve the memory area by modifying the kernel boot parameters. As a result, the selected area will look like a permanent memory for the operating system. Here is a command like this:
memmap=nn[KMG]!ss[KMG] As a result of its execution, a memory area in the range from ss to ss + nn will be allocated. “KMG” is an abbreviation for units of measure: Kilo, Mega, Giga.
For example, a command like memmap = 4G! 12G reserves 4 GB of memory between 12th and 16th gigabytes. The configuration is done in GRUB and is different for different Linux distributions. Here is an example GRUB configuration for CentOS 7.0.
# vi /etc/default/grub GRUB_CMDLINE_LINUX="memmap=nn[KMG]!ss[KMG]" On BIOS-based machines: # grub2-mkconfig -o /boot/grub2/grub.cfg The figure below shows the instruction regarding PMEM added to the GRUB file.
Fig. 11. Specifying areas for PMEM in the / etc / default / grub file
This is the build process for the GRUB configuration.
Fig. 12. Creating a boot configuration file based on the grub template
After configuring GRUB and restarting the computer, if everything is done correctly, you can see the device being emulated as / dev / pmem0 ... pmem3.
Attempting to capture reserved memory areas under emulation of persistent memory will result in broken regions related to persistent memory (type 12).
Fig. 13. Areas allocated for permanent memory emulation are marked as (type 12)
When setting up, it is recommended either to use memory in the range exceeding 4 GB (memmap = nnG! 4G), or to pre-check the memory card (via BIOS-e820) and select the appropriate range.
If the desired virtual device is not visible in the system, check the memmap settings in the grub file, as shown in Figure. 11, then analyze the memory state using dmesg, as shown in Figure 13. If everything is configured correctly, you will see reserved memory areas. There may be non-overlapping areas, reserved as permanent memory. If you use multiple memmap commands during setup, several virtual devices will be created, provided by the kernel and visible as / dev / pmem0, / dev / pmem1, / dev / pmem2, and so on.
Direct File System Access Extensions
File system Direct Access (DAX) extensions create an environment in which you can work with PMEM. Some distributions, such as Fedora 24 and later versions, already have built-in DAX / PMEM mechanisms, and the NVM library (NVML) is also available there.
Here's a quick way to check if DAX and PMEM are built into the kernel. To do this, you can use the egrep utility to process the kernel configuration file, which is usually located in the / boot folder of the distribution:
# egrep '(DAX|PMEM)' /boot/config-`uname –r` As a result of such a command, the following will be displayed:
CONFIG_X86_PMEM_LEGACY_DEVICE=y CONFIG_X86_PMEM_LEGACY=y CONFIG_BLK_DEV_RAM_DAX=y CONFIG_BLK_DEV_PMEM=m CONFIG_FS_DAX=y CONFIG_FS_DAX_PMD=y CONFIG_ARCH_HAS_PMEM_API=y Using the following commands you can install a file system with DAX (today it is possible for ext4 and xfs):
# mkdir /mnt/pmemdir # mkfs.ext4 /dev/pmem3 # mount -o dax /dev/pmem3 /mnt/pmemdir Now in the newly mounted partition, you can create files and transfer as input to NVML pools.
Fig. 14. Permanent memory blocks
Fig. 15. Building the file system
It is worth noting that you can emulate persistent memory using ramdisk (that is, / dev / shm), or by setting the environment variable PMEM_IS_PMEM_FORCE = 1. This will avoid the performance impact caused by msync.
Results
Now you know how to set up an environment in which you can create applications that work with PMEM, without having the appropriate hardware, but using additional threads on Intel architecture servers, you can quickly build a new Linux kernel, ready for experiments with persistent memory.
Source: https://habr.com/ru/post/316006/
All Articles