Protection of virtual machines located in the data center

In the age of cloud technologies, when each user has his own cloud for storing photos, and companies rent servers for cloud computing, the question arises about the confidentiality of stored information. And if users can trust the cloud or the use of crypto containers to protect stored data, companies are worse off. Since not only the data warehouse is transferred to the clouds, but also the calculations themselves.
Protection of virtual machines is particularly affected, since in the event of a host compromise, it will not be difficult to gain access to the VM. Until recently, none of the hypervisors, whether VMware, Xen, Hyper-V, provided any significant technologies to protect the VM.
And if the attacker gets physical access to the server, only disk encryption can save, and not only in all cases. Of course, when renting a server, a part of the security measures takes over the data center. But in this case, you need to trust the administrators of the data center.
With the release of Windows Server 2016, Microsoft decided to pay more attention to the security of the host and the virtual infrastructure. You can now isolate VMs from a Hyper-V host administrator. And using virtual TPM, it became possible to encrypt VM data using bitlocker.
Thus, using new technologies, you can place virtual machines on uncontrolled servers or in corporate data centers, but with an increased level of security, differentiating the roles of physical and virtual access.
')
Used technologies
Shielded VM - technology isolating the virtual machine from the host. Protects VMs from accidental or intentional actions of the host administrator and from malicious software.
Shielded VM requires Host Guardian Service (HGS) server, which issues VM access keys and checks the health of the Hyper-V host.
HGS supports two types of certification:
- TPM-trusted certification - the verification is based on the TPM identifier, the OS boot sequence and the code integrity policy. This way you can be sure that only approved code is working on the host.
- Admin-trusted certification - validation is based on membership in an Active Directory security group.
HGS work pattern

When you start a virtual machine, the secure host is certified by the HGS server, which decides on the transfer of access keys to the virtual machine.
Admin-trusted certification is advisable to use within the enterprise when it is necessary to isolate access to the VM from administrators.
TPM-trusted attestation is better to use when hosting a VM on a leased server, in order to ensure data and VM isolation from Data Center employees.
Communication between the HGS server and the secure host is carried out via the http (https) protocol. HTTPS is not required to ensure secure communication, but if you want to enable HTTPS, you will need an additional certificate. In the case of AD attestation, you must additionally configure a one-way domain trust.
Virtual Secure Mode (VSM) is a virtualization-based technology that allows you to isolate security-critical operations in a mini-OS.
Two other technologies work on VSM:
- Device Guard - check of UEFI firmware data and kernel mode drivers (code integrity monitoring).
- Credential Guard - user authentication process isolation (LSA).
How VSM works
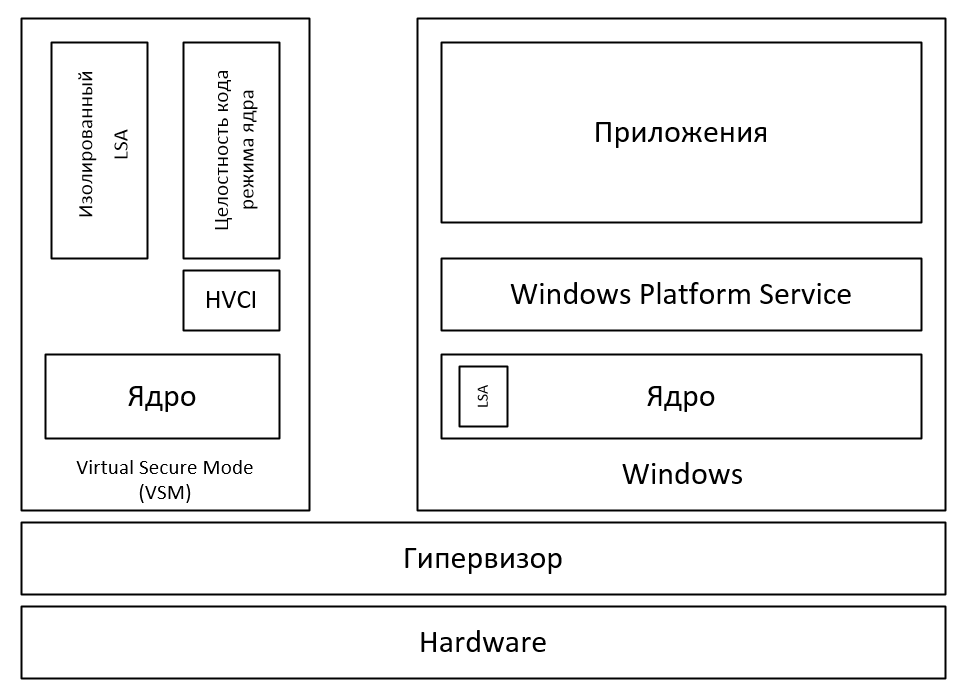
The main OS runs in a virtual environment. And the hypervisor acts as a host OS, thereby limiting access to RAM. As a result, the malware running on the host, even with administrative rights, will not be able to access the VSM memory. Also, such a structure should protect against attacks on DMA ports.
About the organization Shielded VM
Ordering a Shielded VM means that the Hyper-V host and the HGS server are on the data center side (as organized in Microsoft Azure). In this case, you can create a shielded virtual machine yourself or using the template provided.
By creating a Shielded VM, the customer independently on his PC unwraps and configures the VM, and then encrypts the key with the key issued by the Data Center. After transferring the VM to the Data Center.
In the second case, the customer creates only a PDK file that protects the VM created from the template. The PDK file links the template file with the HGS server. But you need to make sure that there is no malware in the template.
The first method looks more secure, since the VM data file gets to the host in an already encrypted form. In any case, the access keys to the VM do not reach the data center administrators in the open form.
The only place to be attacked was the HGS server. Because:
- The HGS administrator can lower the security policy requirements.
- An attacker with administrative rights can try to get access keys.
- HGS requires AD to work, and there is no requirement for the mandatory presence of TPM, therefore, the keys are most likely to be stored in clear text.
Based on this, the idea was to verify the ability of the Shielded VM to work under conditions where the HGS server is located in its infrastructure. This will further protect the virtual machines. Also, this method can be used if the Data Center does not provide the Shielded VM service. The disadvantage of this approach is that you have to independently administer this structure.
There may be a question about the replacement of the HGS server by the administrator of the hypervisor - for this you just need to specify a new address. Protection against this is implemented quite simply, the VM created is encrypted using the public key of the HGS server, so another HGS server will not be able to issue keys to launch it.
You should also understand that the Shielded VM technology encrypts only the configuration files of the virtual machine. The vhdx file remains unencrypted. To encrypt it, you need to enable vTPM, and encrypt the disk with a bitlocker.
The combination of new technologies provides reliable protection:
- human factor eliminated;
- keys are transmitted in encrypted form;
- servers are protected by new technologies that provide code integrity checks;
- white list of allowed applications;
- VM isolation from host.
This all protects very well against malware targeted at the Hyper-V host and provides access to the VM only to the owner, protecting it from the actions of administrators or anyone who has received administrative rights.
Hyper-V and HGS server requirements
Requirements are indicated for the use of TPM certification. AD certification is less demanding, but it provides much less protection.
Hgs:
- Windows Server 2016
Hyper-V:
- Windows Server 2016 Datacenter Edition
- UEFI Secure Boot
- TPM v2
- IOMMU (VT-d)
How to setup
For example, an option will be considered: you have rented a dedicated server and want to secure it. TPM certification will be used. The connection between the host and the HGS will be via the http protocol. If the HGS server does not have a white IP, you will need to forward port 80 or use reverse proxy.
Adding and configuring HGS server roles
Install HGS server and create domain
Install-WindowsFeature -Name HostGuardianServiceRole -IncludeManagementTools -Restart
HGS requires a domain to work. It can be connected to an existing domain, but it is recommended to create a separate domain for increased security. Before executing the following command, you must make sure that the computer is not connected to the domain.
$adminPassword = ConvertTo-SecureString -AsPlainText '<password>' -Force Install-HgsServer -HgsDomainName 'relecloud.com' -SafeModeAdministratorPassword $adminPassword -Restart 
Creating self-signed certificates
Self-signed certificates were created for the test, but for a real environment it is better to use PKI.
$certificatePassword = ConvertTo-SecureString -AsPlainText '<password>' -Force $signingCert = New-SelfSignedCertificate -DnsName "signing.relecloud.com" Export-PfxCertificate -Cert $signingCert -Password $certificatePassword -FilePath 'C:\signingCert.pfx' $encryptionCert = New-SelfSignedCertificate -DnsName "encryption.relecloud.com" Export-PfxCertificate -Cert $encryptionCert -Password $certificatePassword -FilePath 'C:\encryptionCert.pfx' 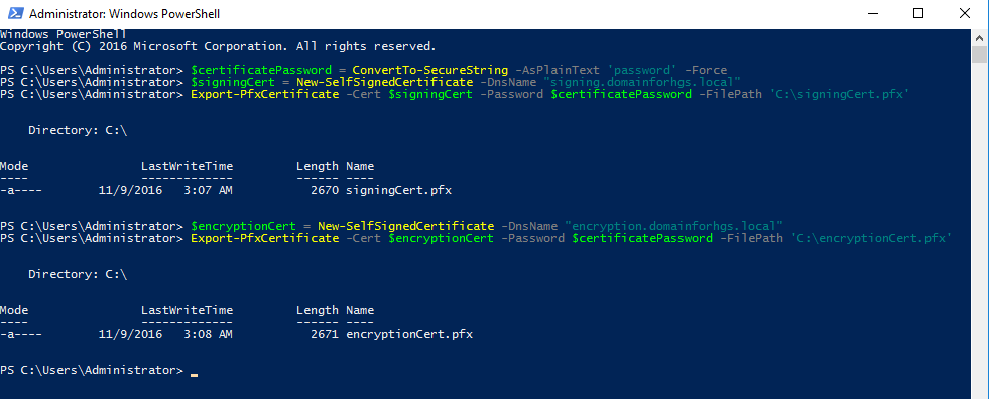
HGS server initialization
Specify encryption and signature certificates. Choose the method of certification.
$certificatePassword = ConvertTo-SecureString -AsPlainText '<password>' -Force Initialize-HgsServer -HgsServiceName '<HgsServiceName>' -SigningCertificatePath 'C:\signingCert.pfx' -SigningCertificatePassword $certificatePassword -EncryptionCertificatePath 'C:\encryptionCert.pfx' -EncryptionCertificatePassword $certificatePassword [-TrustActiveDirectory | -TrustTPM] 

Adding a secure Hyper-V host
Get TPM ID
This procedure must be performed for each protected host.
(Get-PlatformIdentifier -Name '<HostName>').InnerXml | Out-file <Path><HostName>.xml -Encoding UTF8 
Add the resulting file to the HGS server
Add-HgsAttestationTpmHost -Path <Path><Filename>.xml -Name <HostName> -Force 
Create and apply the Code Integrity Policy
When creating a policy, all installed programs are scanned and added to the white list. Before creating a policy, you must make sure that in the system:
- There are no viruses and malware.
- The necessary software is installed and it is trustworthy.
It is recommended that you first test the policy in audit mode. In this case, the executable file prohibited by the policy will be displayed in the log.
Scanning will take some time.
New-CIPolicy -Level FilePublisher -Fallback Hash -FilePath 'C:\temp\HW1CodeIntegrity.xml' -UserPEs ConvertFrom-CIPolicy -XmlFilePath 'C:\temp\HW1CodeIntegrity.xml' -BinaryFilePath 'C:\temp\HW1CodeIntegrity.p7b' 

The .p7b file must be renamed to SIPolicy.p7b and copied to the C: \ Windows \ System32 \ CodeIntegrity \ SIPolicy.p7b folder
Reboot the computer and check the operation of the system under the planned typical load. After successful verification of the system, disable the audit mode
Set-RuleOption -FilePath 'C:\temp\HW1CodeIntegrity.xml' -Option 3 -Delete ConvertFrom-CIPolicy -XmlFilePath 'C:\temp\HW1CodeIntegrity.xml' -BinaryFilePath 'C:\temp\HW1CodeIntegrity_enforced.p7b' Copy-Item -Path '<Path to HW1CodeIntegrity\_enforced.p7b>' -Destination 'C:\Windows\System32\CodeIntegrity\SIPolicy.p7b' Restart-Computer If several identical hosts are to be protected, the policy can be created only once.
It is recommended to leave the source XML file in order to change the policy in case of need not to re-scan.
When policy is enabled, you need to be careful about updating or adding kernel-mode drivers, as this may prevent the system from booting.
We register policy on HGS server
Add-HgsAttestationCIPolicy -Path <Path> -Name '<PolicyName>' 
Creating a TPM baseline policy
This policy is based on the PCR registers (Platform Configuration Registers) located in the TPM module. They store the integrity of system metrics, starting with loading the BIOS and ending the system. If the boot order is changed, for example, by a rootkit, it will appear in the PCR registers.
A policy is created for a class of identical hardware hosts. Before creating it, you must have Hyper-V installed.
Install-WindowsFeature Hyper-V, HostGuardian -IncludeManagementTools -Restart Get-HgsAttestationBaselinePolicy -Path 'HWConfig1.tcglog' For this command, you must enable Secure Boot, IOMMU (VT-d), Virtualization Based Security.
You can use the -SkipValidation flag to allow the command to execute, but it will not fix the error.

Add TCGlog file to HGS server
Add-HgsAttestationTpmPolicy -Path <Filename>.tcglog -Name '<PolicyName>' 
Checking the status of the HGS server
At this point, setting up the HGS server ends. To check the work performed we will carry out diagnostics.
Get-HgsTrace -RunDiagnostics 

We connect the Hyper-V host to the HGS server
To connect the protected host to the HGS server, simply enter the URL address of the server.
Set-HgsClientConfiguration -AttestationServerUrl 'http://<FQDN>/Attestation' -KeyProtectionServerUrl 'http://<FQDN>/KeyProtection' 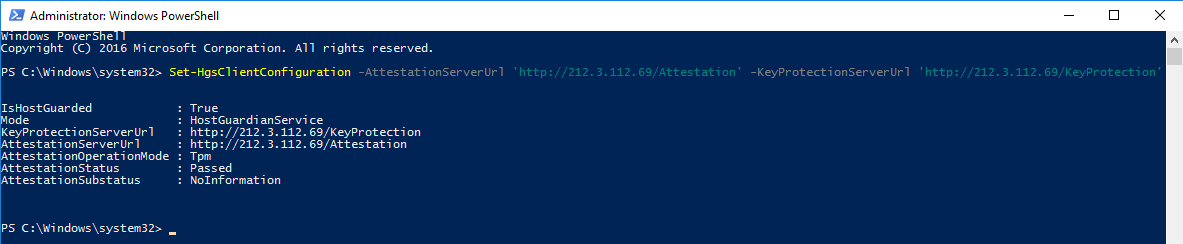
When properly configured, it should be:
- IsHostGuarded: true
- AttestationStatus: passed
If something is configured incorrectly, the reason will be indicated in AttestationStatus.
Creating a shielded virtual machine
We get the HGS server description file, which is needed to bind the VM to the server.
Invoke-WebRequest http://<"HGSServer">FQDN>/KeyProtection/service/metadata/2014-07/metadata.xml -OutFile C:\HGSGuardian.xml 
You need to create VMs on a separate machine running Windows Server 2016, which is not configured to use HGS.
We create a new VM of the second generation, install the OS on it, configure RDP and check its performance, encrypt it with a Bitlocker.
VM screening
Set the name of VM
$VMName = 'SVM' Turn off the VM
Stop-VM –VMName $VMName Create an owner certificate
$Owner = New-HgsGuardian –Name 'Owner' –GenerateCertificates Import server certificate
$Guardian = Import-HgsGuardian -Path 'C:\HGSGuardian.xml' -Name 'TestFabric' –AllowUntrustedRoot Create Key Protector
$KP = New-HgsKeyProtector -Owner $Owner -Guardian $Guardian -AllowUntrustedRoot Turn on screening
Set-VMKeyProtector –VMName $VMName –KeyProtector $KP.RawData Set-VMSecurityPolicy -VMName $VMName -Shielded $true Turn on vTPM in the virtual machine
Enable-VMTPM -VMName $VMName 
After setting up and enabling protection in the VM, it must be moved to a guarded host. To do this, export the machine, transfer the received files to the host, and import it into the Hyper-V console.
At this stage, the configuration is completed, the VM is shielded.
We check the work of Shielded VM
When you try to connect to the VM via the Hyper-V console, we will see the message:

Also, in the VM settings, we will see a warning about the impossibility of changing the protection settings:

The virtual machine partition is protected by BitLocker:

Thus, Shielded VM was configured, which provides a higher level of protection for virtual machines. If you have any questions, welcome to the comments.
More articles on Servilon
Source: https://habr.com/ru/post/315972/
All Articles