Spine animation, tips and tricks, pseudo 3D effect
I want to share my experience with Spine - a program for creating skeletal animation, specially sharpened for the game.
After viewing the official guide, many questions arise, let's talk about what pitfalls await us when working with this program at every stage of the workflow (using Spine - Unity as an example), how you can optimize your work, as well as consider some popular 3D chips. effect. The article will have a lot of heavy gifs.
UPD: After the recent release of Spine version 3.6, the chips with Json described in the end of the article are relevant except for general development, because the developers have added this functionality that is called "out of the box."
Immediately make a reservation, to create software animation in games, there are other solutions, Dragon Bones, Spriter, Creature, Marionette studio, Puppet 2D plugin, and surely there are others, I just work as an animator in Spine.
When we have information and understanding on our hands which characters / animations should be created for the game, the necessary material is drawn - you can proceed.
')
The general scheme of work is as follows:
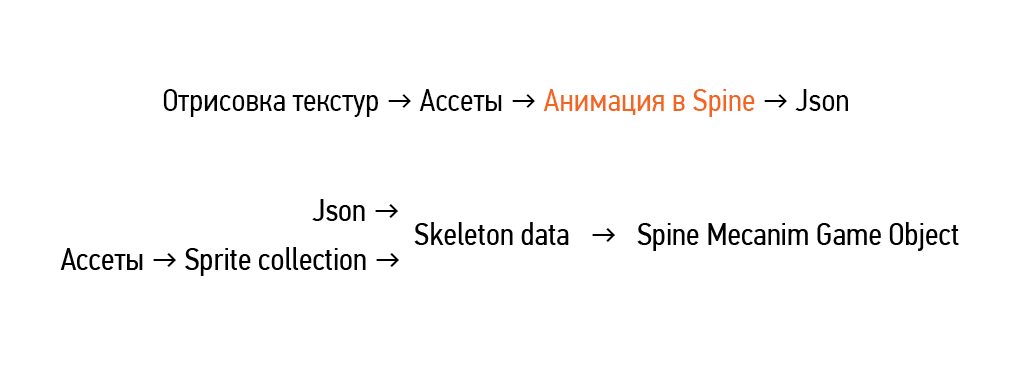
The first step is to prepare a working material from graphic editors. Then assets (textures) are imported into Spine and animated. At the output we get Json - a file in which all the key frames of the transformation of bones, slots, etc. are recorded. This file is imported into the engine, a special skeleton data is created, which is added to the stage in the Spine game object, where our animation is visualized using mesh renderer, the launch can be controlled using code or the standard unity animator.
Directly workflow in spine looks like this:
As an example, let's try to make an animation of such a character:

At the stage of preparing textures, it is important for us to understand how many character projections are needed, what part of the work will be done frame by frame, which programmatically, how to correctly cut the character and prepare assets.
Common mistakes:
And also an insufficient number of projections if the character changes the angle.
Often characters have paired elements with identical images - hands, legs, eyes, and so on. In this case, it is advisable to save only one texture, and use it two or more times.
In this case, one projection will be enough for us, and the artist draws the assets well. You can start importing into spine.
The process of importing textures can be significantly accelerated using the layers to PNG script , which saves each layer from Photoshop into a separate png image, while recording a Json file that contains information about the location of textures, importing it into spine, we get the finished character.
However, this method has several drawbacks - the script saves images without compression, which is impractical. By simply re-saving the layers through file-generate-image assets, we will reduce the weight of the image by about 10 times.
Next, you must not forget to turn your sprites into a horizontal or vertical position, and erase all unnecessary, because The script will save the images right in the position in which they are located in Photoshop.

If the project requires frame-by-frame animation (for example, fire, special effects, etc.) - the materials must be drawn in advance. Then, using adobe after effects and the ae_to_spine script, we can transfer the sequence of frames to Spine in a couple of clicks.
I recommend to think over the concept of the name in advance, the materials often come in the format "layer 1 (copy) 5", this is not very practical, for each texture in the project you need to make a unique name that would not cause problems when packing atlases. The version of CharacterVyasya_Skin_a_Hand_R_1 format is quite suitable.
Here in many ways we can be helped by the find and replace tool which allows you to quickly rename, specify the path for a large number of objects.
Adjusting the skeleton for the character you need to think about that, most likely, in the process of working on the game, the animation will need to be adjusted, corrected, so it is advisable to make it as flexible as possible so that the editing process is as simple and fast as possible.
Here, the introduction of additional bone-controls for splitting movement along the X and Y axes can help (since there is no separate dimentions function in the spine).
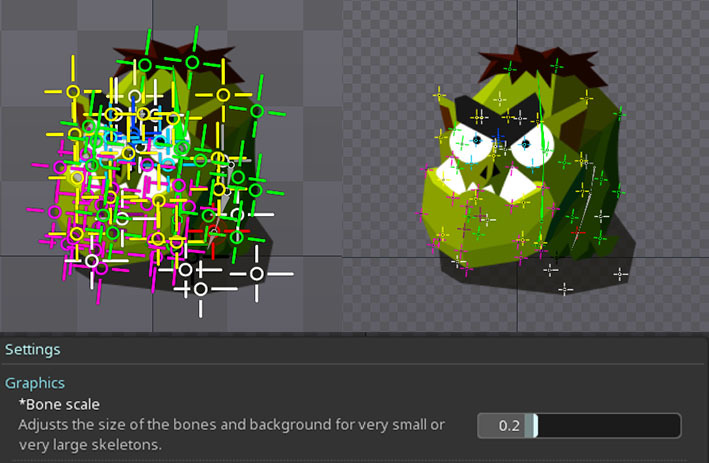
Immediately a small tips, if you suddenly feel a heap of due to excessive bones - try to twist the bone scale setting:
See examples of ready rigs from samples delivered with spine, or online.
You can also search for useful materials on behane , a forum , relevant communities on social networks.
Mesh - One of the key tools in the spine, imposing on its texture, we get the opportunity to deform it, distort, create the illusion of 3D.
When creating a mesh, remember: the smaller the vertices - the easier it is to control the animation.
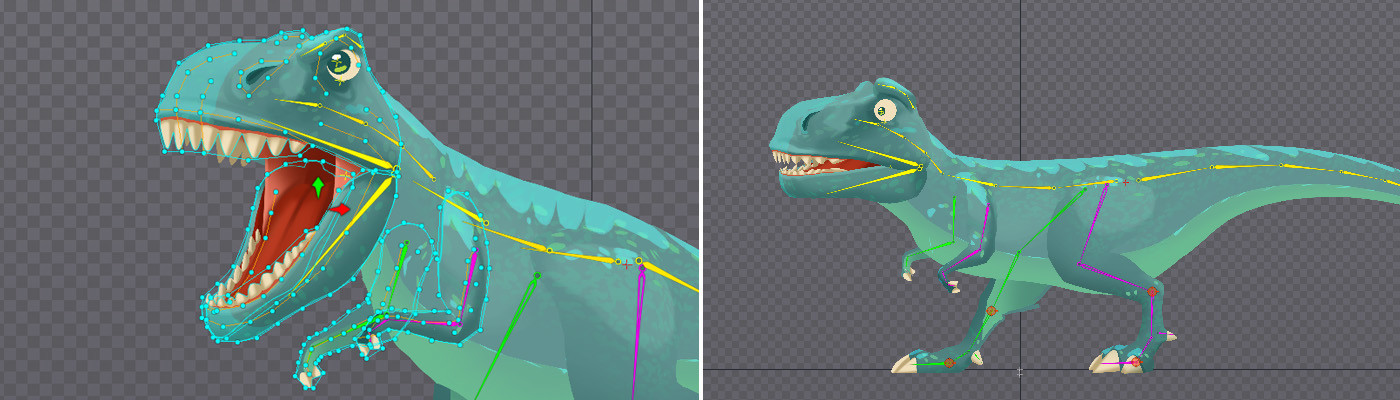
Since deformation of the mesh consumes CPU resources, when creating a grid, it is necessary to follow the principle of the necessary minimum, clearly this can be seen on the example of the tail tip of a dinosaur:
Do not forget about the possibility of duplicating the whole hierarchy of the mesh with bones and weights. This will greatly save time when reeving objects are riga.
In the end, we have a question - how many vertices can you use?
Spine developers do not specifically answer this question, and refer to the Spine Metrics tab, where we can track the total number of elements in the scene, but they also indicate the need for custom performance tests.
It is important to remember that the transformation of the mesh, the timelines, the standards load the CPU, and the static geometry - the GPU. In general, I would advise in the case of working on key characters not to bother too much about the points, plus minus a dozen will not play any role, however, in the case of an object from the environment, which will be repeated a hundred times, each saved vertex will benefit.
And so, when our character is set up, you can proceed to the animation:
By itself, animation is a very big topic and is clearly not for discussion in a single article.
Here I will limit myself to banal advice in the key:
This is what Spine is so fond of — the ability to deform an image using a mesh, thereby creating a three-dimensional effect.
For myself, I noted several ways to create a pseudo 3D:
The principle of constructing a three-dimensional effect can be visually seen on geometric primitives:
From the examples it is clear that the animation of the points directly in the mesh is one of the most inflexible options, which, if necessary, will be laboriously redone. It should be added to this that in some other runtimes, besides the unit, this feature is not supported. Therefore, I recommend whenever possible not to touch the mesh and control it with the help of bones.
By analogy, you can make the deformation of any geometric shape, thereby adding expressiveness to your animation.
And so, we spent a few hours on the keyframes, meshes, and made the character animation:
Then you can send our animation to the engine. However, situations often arise when the appearance of the animation in the spine and in the runtime is significantly different, as each interaction animator-programmer takes a certain time, it is better to pre-test the animation in runtime, during which the main jambs will be revealed, and only then give up the work being sure that everything is fine.
If your animator is not friendly with the engine, you can use Skeleton Viewer
What problems arise most often:
Incorrect texture mapping
Most often this happens because of the wrong composition of the texture - the mesh must clearly correspond to the size of the sprite.

This happens because in runtime the animation is calculated not from the default position, but from the current one. Those. If we turn on the texture once and do not turn it off, it will remain in this position in all animations. The same with other keys. This is probably not a bug, but a feature, but unfortunately the animator does not see the real picture until he imports his material into runtime. This issue can be resolved in several ways:
1) Put down the keys on all properties of all objects at the beginning and at the end of each animation. At first glance, a little dreary, but this way you will completely protect yourself from unexpected surprises. Using filters and hotkeys will speed up the process.
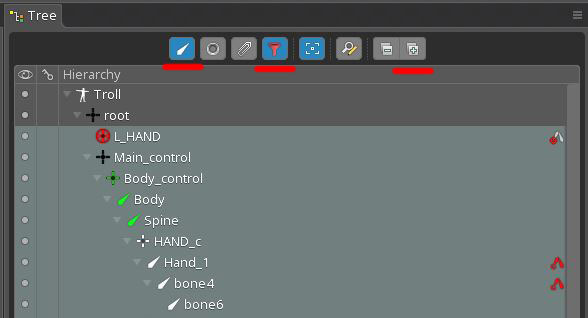
The red icon for filtering objects by bones and the button for quickly expanding the hierarchy are highlighted:
Default hotkeys:
2) Use the setToSetupPose script , which, as it were, causes the animation to play from the default state. But this method has a significant drawback - Setup Pose is set instantly, and the render changes the image to the corresponding one only from the next frame. Thus, we have a slip of an extra frame between animations, it looks unpleasant. The corresponding issue is already on the board of the developers.
We can export from Json spine, carry out any manipulations with it, and import back, having received a certain result. This is a very powerful tool. we get access to all components of the project, in turn, this can help us a lot in certain situations:
Often there is a need to keep the animation in one scene, for example, like this:
There are at least two ways to do this: with hands and a script.
We copy pieces of code from one json to another, into the appropriate categories: slots for slots, bones for bones, animations for animations, etc. In order to avoid conflicts, it is important to observe the correctness of the names of objects, so that the names from one json do not coincide with the names from another. The easiest way to achieve this in advance is to assign all your objects in the names their unique index of the type _skel1_ and _skel2_. This method is slightly time consuming, but has not let me down yet.
Kind people wrote a special tool for merging. You can read and download the link . It is quite convenient to use it, automatic object renaming is turned on, however, I have repeatedly encountered errors.
In the spine there is no nesting of compositions (analogue of precomposes in After Effects or a symbol in Flash), however, as shown above, it is possible to duplicate objects, preserving all dependencies, but the animation keys are not copied in this case. It is not difficult to guess that, in order not to re-do the animation, you can reassign it to the duplicate bones, for this you just need to kill names in Json. Again, this is easier to do if each bone has its own unique index.
Projects saved in a newer version will not be compatible with older ones. Sometimes this can be a problem, and there are several ways to solve it:
It will help if there is a small gap between versions, and there are no fundamental differences in the animation algorithms.
You can familiarize yourself with the principle of work and download it here .
Thank you for your attention, for sure if you have read the article up to this point you have any questions or comments, I will be happy to read everything in the comments.
PS The article was written by the animator for the most part for animators, if you are a programmer and you have a “handy”, you can comment in the comments.
After viewing the official guide, many questions arise, let's talk about what pitfalls await us when working with this program at every stage of the workflow (using Spine - Unity as an example), how you can optimize your work, as well as consider some popular 3D chips. effect. The article will have a lot of heavy gifs.
UPD: After the recent release of Spine version 3.6, the chips with Json described in the end of the article are relevant except for general development, because the developers have added this functionality that is called "out of the box."
Immediately make a reservation, to create software animation in games, there are other solutions, Dragon Bones, Spriter, Creature, Marionette studio, Puppet 2D plugin, and surely there are others, I just work as an animator in Spine.
Visual demonstration of the principle of skeletal animation
Scheme of work
When we have information and understanding on our hands which characters / animations should be created for the game, the necessary material is drawn - you can proceed.
')
The general scheme of work is as follows:
The first step is to prepare a working material from graphic editors. Then assets (textures) are imported into Spine and animated. At the output we get Json - a file in which all the key frames of the transformation of bones, slots, etc. are recorded. This file is imported into the engine, a special skeleton data is created, which is added to the stage in the Spine game object, where our animation is visualized using mesh renderer, the launch can be controlled using code or the standard unity animator.
Directly workflow in spine looks like this:
- Texture import
- Rigging (skeleton setting)
- Skinning (setting up the mesh and linking it to the bones)
- Animation
- Json export and validation
As an example, let's try to make an animation of such a character:
Texture import
At the stage of preparing textures, it is important for us to understand how many character projections are needed, what part of the work will be done frame by frame, which programmatically, how to correctly cut the character and prepare assets.
Common mistakes:
do not draw the textures of moving parts where they are not visible:
wrong shadows
And also an insufficient number of projections if the character changes the angle.
Often characters have paired elements with identical images - hands, legs, eyes, and so on. In this case, it is advisable to save only one texture, and use it two or more times.
In this case, one projection will be enough for us, and the artist draws the assets well. You can start importing into spine.
The process of importing textures can be significantly accelerated using the layers to PNG script , which saves each layer from Photoshop into a separate png image, while recording a Json file that contains information about the location of textures, importing it into spine, we get the finished character.
How to use the layers to PNG script
1) Export from Photoshop using Json script and PNG images (you can specify the skele factor)
2) Import json into spine file-import data
3) Specify the path to the textures
more
2) Import json into spine file-import data
3) Specify the path to the textures
more
However, this method has several drawbacks - the script saves images without compression, which is impractical. By simply re-saving the layers through file-generate-image assets, we will reduce the weight of the image by about 10 times.
Next, you must not forget to turn your sprites into a horizontal or vertical position, and erase all unnecessary, because The script will save the images right in the position in which they are located in Photoshop.
If the project requires frame-by-frame animation (for example, fire, special effects, etc.) - the materials must be drawn in advance. Then, using adobe after effects and the ae_to_spine script, we can transfer the sequence of frames to Spine in a couple of clicks.
How to use the script AE to Spine
I recommend to think over the concept of the name in advance, the materials often come in the format "layer 1 (copy) 5", this is not very practical, for each texture in the project you need to make a unique name that would not cause problems when packing atlases. The version of CharacterVyasya_Skin_a_Hand_R_1 format is quite suitable.
Here in many ways we can be helped by the find and replace tool which allows you to quickly rename, specify the path for a large number of objects.
find and replace tool
Rigging
Adjusting the skeleton for the character you need to think about that, most likely, in the process of working on the game, the animation will need to be adjusted, corrected, so it is advisable to make it as flexible as possible so that the editing process is as simple and fast as possible.
Here, the introduction of additional bone-controls for splitting movement along the X and Y axes can help (since there is no separate dimentions function in the spine).
Example rig with additional controls
The complicated movement of the lizard is summed up from several components: vertical, horizontal, and global control is added to enable quick adjustments.
Immediately a small tips, if you suddenly feel a heap of due to excessive bones - try to twist the bone scale setting:
See examples of ready rigs from samples delivered with spine, or online.
A small selection of fairly well-known authors who have something to peep:
You can also search for useful materials on behane , a forum , relevant communities on social networks.
Skinning
Mesh - One of the key tools in the spine, imposing on its texture, we get the opportunity to deform it, distort, create the illusion of 3D.
When creating a mesh, remember: the smaller the vertices - the easier it is to control the animation.
Demonstration
Since deformation of the mesh consumes CPU resources, when creating a grid, it is necessary to follow the principle of the necessary minimum, clearly this can be seen on the example of the tail tip of a dinosaur:
Option 1 - not enough points, visible kinks in the picture:
2, 3 option - good:
Option 4 - an excessive number of points that do not perform any function is no good:
Do not forget about the possibility of duplicating the whole hierarchy of the mesh with bones and weights. This will greatly save time when reeving objects are riga.
Life hacking how to duplicate the whole hierarchy
Performance
In the end, we have a question - how many vertices can you use?
Spine developers do not specifically answer this question, and refer to the Spine Metrics tab, where we can track the total number of elements in the scene, but they also indicate the need for custom performance tests.
It is important to remember that the transformation of the mesh, the timelines, the standards load the CPU, and the static geometry - the GPU. In general, I would advise in the case of working on key characters not to bother too much about the points, plus minus a dozen will not play any role, however, in the case of an object from the environment, which will be repeated a hundred times, each saved vertex will benefit.
And so, when our character is set up, you can proceed to the animation:
Animation
By itself, animation is a very big topic and is clearly not for discussion in a single article.
Here I will limit myself to banal advice in the key:
- Do not forget about the artistic part, try to make the animation as expressive as possible.
- Follow the Disney Animation Principles.
- Import the material into the location, often only after that the jambs are visible.
3D effect
This is what Spine is so fond of — the ability to deform an image using a mesh, thereby creating a three-dimensional effect.
Demonstration
For myself, I noted several ways to create a pseudo 3D:
- Animate the vertices directly in the mesh.
- Many bones at key points in the mesh, bones animated
- The bones are set selectively, and then the weights in the mesh are carefully adjusted.
- The combined method, everything is brought together under global controls.
The principle of constructing a three-dimensional effect can be visually seen on geometric primitives:
Cube
Bones are placed at key points in the mesh:
Animating the bones we create a three-dimensional effect:
Animating the bones we create a three-dimensional effect:
A bit more complicated is the example with the sphere:
You can make animation of vertices in a mesh, but as we can see, compared with the cube, there are much more points:
Similar to a cube, the bones are at key points in the mesh. For the time spent, this method is not better than the previous one:
It would be much more flexible to reduce the rig to one global control with the help of constrains, moving one to manage all the bones:
The same can be done without too much bone mass.
To do this, each vertex carefully selected value in the scales. This method can be considered optimal for rounded surfaces.
From the examples it is clear that the animation of the points directly in the mesh is one of the most inflexible options, which, if necessary, will be laboriously redone. It should be added to this that in some other runtimes, besides the unit, this feature is not supported. Therefore, I recommend whenever possible not to touch the mesh and control it with the help of bones.
By analogy, you can make the deformation of any geometric shape, thereby adding expressiveness to your animation.
And so, we spent a few hours on the keyframes, meshes, and made the character animation:
What happened
Testing
Then you can send our animation to the engine. However, situations often arise when the appearance of the animation in the spine and in the runtime is significantly different, as each interaction animator-programmer takes a certain time, it is better to pre-test the animation in runtime, during which the main jambs will be revealed, and only then give up the work being sure that everything is fine.
If your animator is not friendly with the engine, you can use Skeleton Viewer
What problems arise most often:
- You forgot to put some assets, or vice versa got into the export of unnecessary (working files, references, etc.) - everything is obvious here - before you give away the material, carefully check what should be in the project and what is not
- mismatch at the interfaces of the animation - you can try to set the duration of the transition as a unit, thereby smoothing the joint. Or fix the keys if possible
- textures are displayed incorrectly
- after working out the animation does not look like before
Incorrect texture mapping
Most often this happens because of the wrong composition of the texture - the mesh must clearly correspond to the size of the sprite.
Otherwise it will be like this.
After working out the animation does not look like before
Example
Initially, the oviraptor sits on a nest with eggs, then rises and moves aside. It would seem that when the animation starts from the beginning, it should sit on the nest in the same way, however, since we moved it in the previous animation, it will be shifted until it is keyed to the appropriate position.
This happens because in runtime the animation is calculated not from the default position, but from the current one. Those. If we turn on the texture once and do not turn it off, it will remain in this position in all animations. The same with other keys. This is probably not a bug, but a feature, but unfortunately the animator does not see the real picture until he imports his material into runtime. This issue can be resolved in several ways:
1) Put down the keys on all properties of all objects at the beginning and at the end of each animation. At first glance, a little dreary, but this way you will completely protect yourself from unexpected surprises. Using filters and hotkeys will speed up the process.
The red icon for filtering objects by bones and the button for quickly expanding the hierarchy are highlighted:
Default hotkeys:
Key Active: L
Key Selected: ctrl + L
Key Dopesheet: ctrl + shift + L
Key Translation, Key Rotation, Key Scale, Key Shear, Key Color - you need to customize yourself
2) Use the setToSetupPose script , which, as it were, causes the animation to play from the default state. But this method has a significant drawback - Setup Pose is set instantly, and the render changes the image to the corresponding one only from the next frame. Thus, we have a slip of an extra frame between animations, it looks unpleasant. The corresponding issue is already on the board of the developers.
Setup pose bug
Json
We can export from Json spine, carry out any manipulations with it, and import back, having received a certain result. This is a very powerful tool. we get access to all components of the project, in turn, this can help us a lot in certain situations:
- If necessary, merge several projects
- If necessary, copy the bone hierarchy along with the animation.
- If necessary, roll back to an older version.
- Any other use that comes to your mind.
Merging projects
Often there is a need to keep the animation in one scene, for example, like this:
Frog eating beetle
The bug itself appears in a variety of other scenes and was copied from one of them. However, now there are two skeletons in the project, and, accordingly, the output will be 2 json and 2 objects on the stage, which will add the need to make certain logic of synchronous launch of these animations to combine them in time, as well as it will be necessary to precisely align objects by location in location. You can simplify your life by giving material in one scene. To do this, two json need to smite.
There are at least two ways to do this: with hands and a script.
Hands
We copy pieces of code from one json to another, into the appropriate categories: slots for slots, bones for bones, animations for animations, etc. In order to avoid conflicts, it is important to observe the correctness of the names of objects, so that the names from one json do not coincide with the names from another. The easiest way to achieve this in advance is to assign all your objects in the names their unique index of the type _skel1_ and _skel2_. This method is slightly time consuming, but has not let me down yet.
Examples
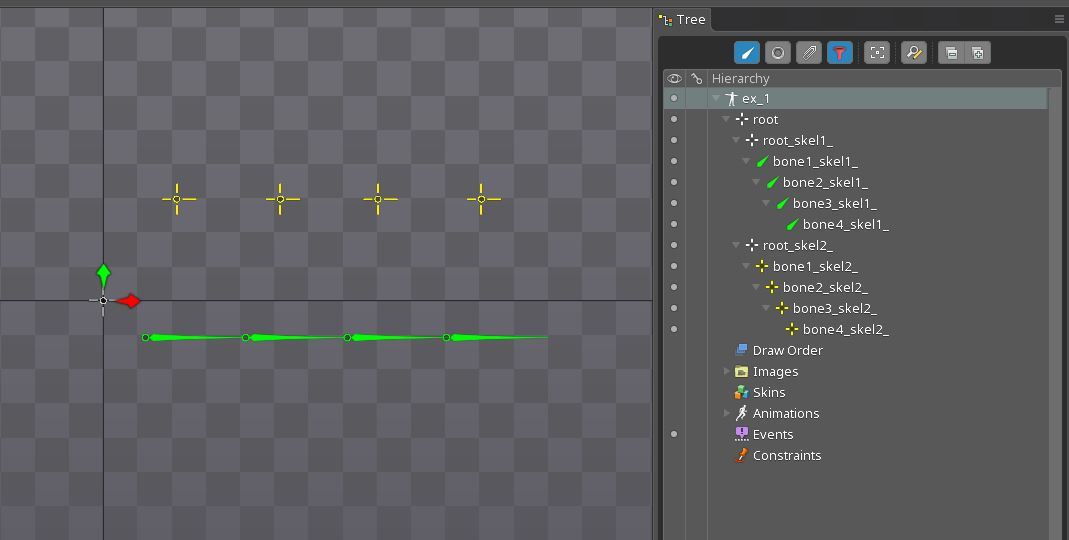
A very simple example to demonstrate the principle, two skeletons with bones in one project:

As a result, we have everything in one project:
Problems may arise in projects with skins, if possible try not to change the hierarchy of bones.
A more complex example with a frog:
(Caution, long files)
beetle
Frog
Beetle + Frog
Skeleton 1
{ "skeleton": { "hash": "ZMTMZiuTD2M2gnBhJR0JLPQWOws", "spine": "3.4.02", "width": 0, "height": 0, "images": "" }, "bones": [ { "name": "root_skel1_" }, { "name": "bone1_skel1_", "parent": "root_skel1_", "length": 26.95, "rotation": 360, "x": 11.09, "y": -9.65, "color": "00ff00ff" }, { "name": "bone2_skel1_", "parent": "bone1_skel1_", "length": 26.95, "x": 26.27, "color": "00ff00ff" }, { "name": "bone3_skel1_", "parent": "bone2_skel1_", "length": 26.95, "x": 26.57, "color": "00ff00ff" }, { "name": "bone4_skel1_", "parent": "bone3_skel1_", "length": 26.95, "x": 25.97, "color": "00ff00ff" } ], "animations": { "animation": {} } } Skeleton 2
{ "skeleton": { "hash": "osF6oBu7PH6sMNfjN7pm2EwQ8fY", "spine": "3.4.02", "width": 0, "height": 0, "images": "" }, "bones": [ { "name": "root_skel2_" }, { "name": "bone1_skel2_", "parent": "root_skel2_", "x": 19.25, "y": 26.63, "color": "fff100ff" }, { "name": "bone2_skel2_", "parent": "bone1_skel2_", "x": 27.14, "color": "fff100ff" }, { "name": "bone3_skel2_", "parent": "bone2_skel2_", "x": 25.57, "color": "fff100ff" }, { "name": "bone4_skel2_", "parent": "bone3_skel2_", "x": 27.14, "color": "fff100ff" } ], "animations": { "animation": {} } } United Skeletons
{ "skeleton": { "hash": "ZMTMZiuTD2M2gnBhJR0JLPQWOws", "spine": "3.4.02", "width": 0, "height": 0, "images": "" }, "bones": [ { "name": "root" }, { "name": "root_skel1_", "parent": "root" }, { "name": "bone1_skel1_", "parent": "root_skel1_", "length": 26.95, "rotation": 360, "x": 11.09, "y": -9.65, "color": "00ff00ff" }, { "name": "bone2_skel1_", "parent": "bone1_skel1_", "length": 26.95, "x": 26.27, "color": "00ff00ff" }, { "name": "bone3_skel1_", "parent": "bone2_skel1_", "length": 26.95, "x": 26.57, "color": "00ff00ff" }, { "name": "bone4_skel1_", "parent": "bone3_skel1_", "length": 26.95, "x": 25.97, "color": "00ff00ff" }, { "name": "root_skel2_", "parent": "root" }, { "name": "bone1_skel2_", "parent": "root_skel2_", "x": 19.25, "y": 26.63, "color": "fff100ff" }, { "name": "bone2_skel2_", "parent": "bone1_skel2_", "x": 27.14, "color": "fff100ff" }, { "name": "bone3_skel2_", "parent": "bone2_skel2_", "x": 25.57, "color": "fff100ff" }, { "name": "bone4_skel2_", "parent": "bone3_skel2_", "x": 27.14, "color": "fff100ff" } ], "animations": { "animation": {} } } As a result, we have everything in one project:
Problems may arise in projects with skins, if possible try not to change the hierarchy of bones.
A more complex example with a frog:
(Caution, long files)
beetle
Frog
Beetle + Frog
Skeleton merger tool
Kind people wrote a special tool for merging. You can read and download the link . It is quite convenient to use it, automatic object renaming is turned on, however, I have repeatedly encountered errors.
Duplication of objects with animation
In the spine there is no nesting of compositions (analogue of precomposes in After Effects or a symbol in Flash), however, as shown above, it is possible to duplicate objects, preserving all dependencies, but the animation keys are not copied in this case. It is not difficult to guess that, in order not to re-do the animation, you can reassign it to the duplicate bones, for this you just need to kill names in Json. Again, this is easier to do if each bone has its own unique index.
Example
There is an ant with animation. The task is to make in the spine a whole chain of ants running after each other. When duplicating an ant, the animation is not copied. Note that the first ant in the name is an index _skel_1_, the second _skel_2_.
Export Json and open it with a text editor. The animation code walk_1 is copied, we find all the _skel_1_ sections there:
replace them with _skel_2_
Paste back. So we reassigned the animation to the other bones. Save json, and import it into spine by file - import data. Now we have two running ant.

Export Json and open it with a text editor. The animation code walk_1 is copied, we find all the _skel_1_ sections there:
"animations": { "walk_1": { "bones": { "US_2_skel_1_": { "rotate": [ { "time": 0, "angle": -42.21, "curve": [ 0.25, 0, 0.75, 1 ] }, { "time": 0.4, "angle": -0.92, "curve": [ 0.25, 0, 0.75, 1 ] }, { "time": 0.8, "angle": -42.21 } ] }, .... replace them with _skel_2_
.... "US_2_skel_2_": { "rotate": [ { "time": 0, "angle": -42.21, "curve": [ 0.25, 0, 0.75, 1 ] }, { "time": 0.4, "angle": -0.92, "curve": [ 0.25, 0, 0.75, 1 ] }, { "time": 0.8, "angle": -42.21 } }, ... Paste back. So we reassigned the animation to the other bones. Save json, and import it into spine by file - import data. Now we have two running ant.
Roll back to the old version
Projects saved in a newer version will not be compatible with older ones. Sometimes this can be a problem, and there are several ways to solve it:
Hands to interrupt the version in json
"skeleton": { "hash": "", "spine": "3.4.02", "width": 0, "height": 0, "images": "" }, It will help if there is a small gap between versions, and there are no fundamental differences in the animation algorithms.
JsonRollback tool
You can familiarize yourself with the principle of work and download it here .
Summary
- Clearly identify what tasks you are doing
- Use scripts to speed up the work.
- Make a flexible rig and do not overdo it with the mesh
- Before sending test material in runtime
- Feel free to get into json if it saves you time
Thank you for your attention, for sure if you have read the article up to this point you have any questions or comments, I will be happy to read everything in the comments.
PS The article was written by the animator for the most part for animators, if you are a programmer and you have a “handy”, you can comment in the comments.
Source: https://habr.com/ru/post/315950/
All Articles