Virtual Private Cloud: Work with CoreOS and RancherOS

We recently added a new image with the RancherOS operating system to the Virtual Private Cloud service and updated the CoreOS image.
These operating systems will be of interest to users who need a tool for simple management of a large number of applications in containers and the use of various container clustering systems - Kubernetes , Docker Swarm , Apache Mesos, and others.
CoreOS and RancherOS differ from most popular Linux distributions: they contain only a minimal set of software for running applications inside containers. These systems lack package managers and interpreters of various programming languages (Python, Ruby, and others.).
Below we look at the specifics of CoreOS and RancherOS, analyze the configuration features of the etcd and fleet services, and also give an example of setting up a Docker Swarm cluster based on RancherOS.
CoreOS
The CoreOS distribution is designed specifically for the rapid and mass deployment of a large number of user applications in isolated containers.
CoreOS contains pre-installed tools for conveniently managing multiple nodes and containers in a cluster:
- etcd - distributed data storage, which is used by nodes to get information about available services in a cluster, configuration and temporary files;
- Docker - the main platform for delivering and running applications inside containers;
- rkt - alternative Docker, developed by the creators of CoreOS;
- fleet is a distributed initialization system that allows you to manage multiple systemd instances on individual nodes of the cluster and launch the necessary services on less loaded nodes.
Configuration
The main method of changing system parameters is a description of the required settings using the declarative YAML language in the cloud-config.yml configuration file. This file is used by the Cloud-init utility to configure the system.
Please note that CoreOS uses its own implementation of Cloud-init, whose configuration files are only partially compatible with the settings for the more common version of Launchpad-cloud-init used in most common distributions for system configuration in various cloud services, including the service. "Virtual Private Cloud".
Here is an example of the cloud-config.yml file:
#cloud-config # Set hostname hostname: "node01" # Set ntp servers write_files: - path: /etc/systemd/timesyncd.conf content: | [Time] NTP=0.ru.pool.ntp.org 1.ru.pool.ntp.org coreos: units: # Configure static network on eth0 interface - name: iface-eth0.network runtime: true content: | [Match] Name=eth0 [Network] DNS=188.93.16.19 DNS=188.93.17.19 DNS=109.234.159.91 Address=10.11.12.13/24 Gateway=10.11.12.1 # Change standard SSH port - name: sshd.socket command: restart runtime: true content: | [Socket] ListenStream=2345 FreeBind=true Accept=yes Using the specified parameters, the Cloud-init utility will change the hostname and standard port 22 for the SSH service, configure the static network on the eth0 interface, and add ntp servers for time synchronization.
More information about the structure of the configuration file cloud-config.yml can be found in the official documentation .
When creating a server from a ready CoreOS image in the Virtual Private Cloud service, you will not need to perform basic system configuration using cloud-config.yml. We have already made the necessary changes to the image, with the help of which the standard server configuration is automatically performed, including the configuration of network interfaces.
Access via SSH to the server running CoreOS will initially be possible only by the key specified when creating the server. The specified key will be added for the core user.
In addition to the native version of cloud-init, the creators of CoreOS have developed the Ignition utility. This tool duplicates the capabilities of cloud-init and also allows for low-level system settings, for example, changing disk partition tables and formatting file systems. This is possible due to the fact that Ignition starts working during the early stages of system boot, during the initram process.
Ignition uses JSON format for configuration files.
Below is an example of a file with which Ignition will format the root partition in Btrfs , and configure the system with parameters similar to the example above for Cloud-init:
{ "ignition": { "version": "2.0.0" }, "storage": { "filesystems": [{ "mount": { "device": "/dev/disk/by-label/ROOT", "format": "btrfs", "create": { "force": true, "options": [ "--label=ROOT" ] } } }], "files": [{ "filesystem": "root", "path": "/etc/systemd/timesyncd.conf", "mode": 420, "contents": { "source": "data:,%5BTime%5D%0ANTP=0.ru.pool.ntp.org%201.ru.pool.ntp.org%0A" } }, { "filesystem": "root", "path": "/etc/hostname", "mode": 420, "contents": { "source": "data:,node01" } } ] }, "networkd": { "units": [{ "name": "iface-eth0.network", "contents": "[Match]\nName=eth0\n\n[Network]\nDNS=188.93.16.19\nDNS=188.93.17.19\nDNS=109.234.159.91\nAddress=10.11.12.13/24\nGateway=10.11.12.1" }] }, "systemd": { "units": [{ "name": "sshd.socket", "command": "restart", "runtime": true, "contents": "[Socket]\nListenStream=2345\nFreeBind=true\nAccept=yes" }] } } More information about all the features of Ignition can be found in the official documentation .
CoreOS Cluster Configuration Example
For this example, we will need to pre-create three servers running CoreOS in the VPC control panel with the following parameters:
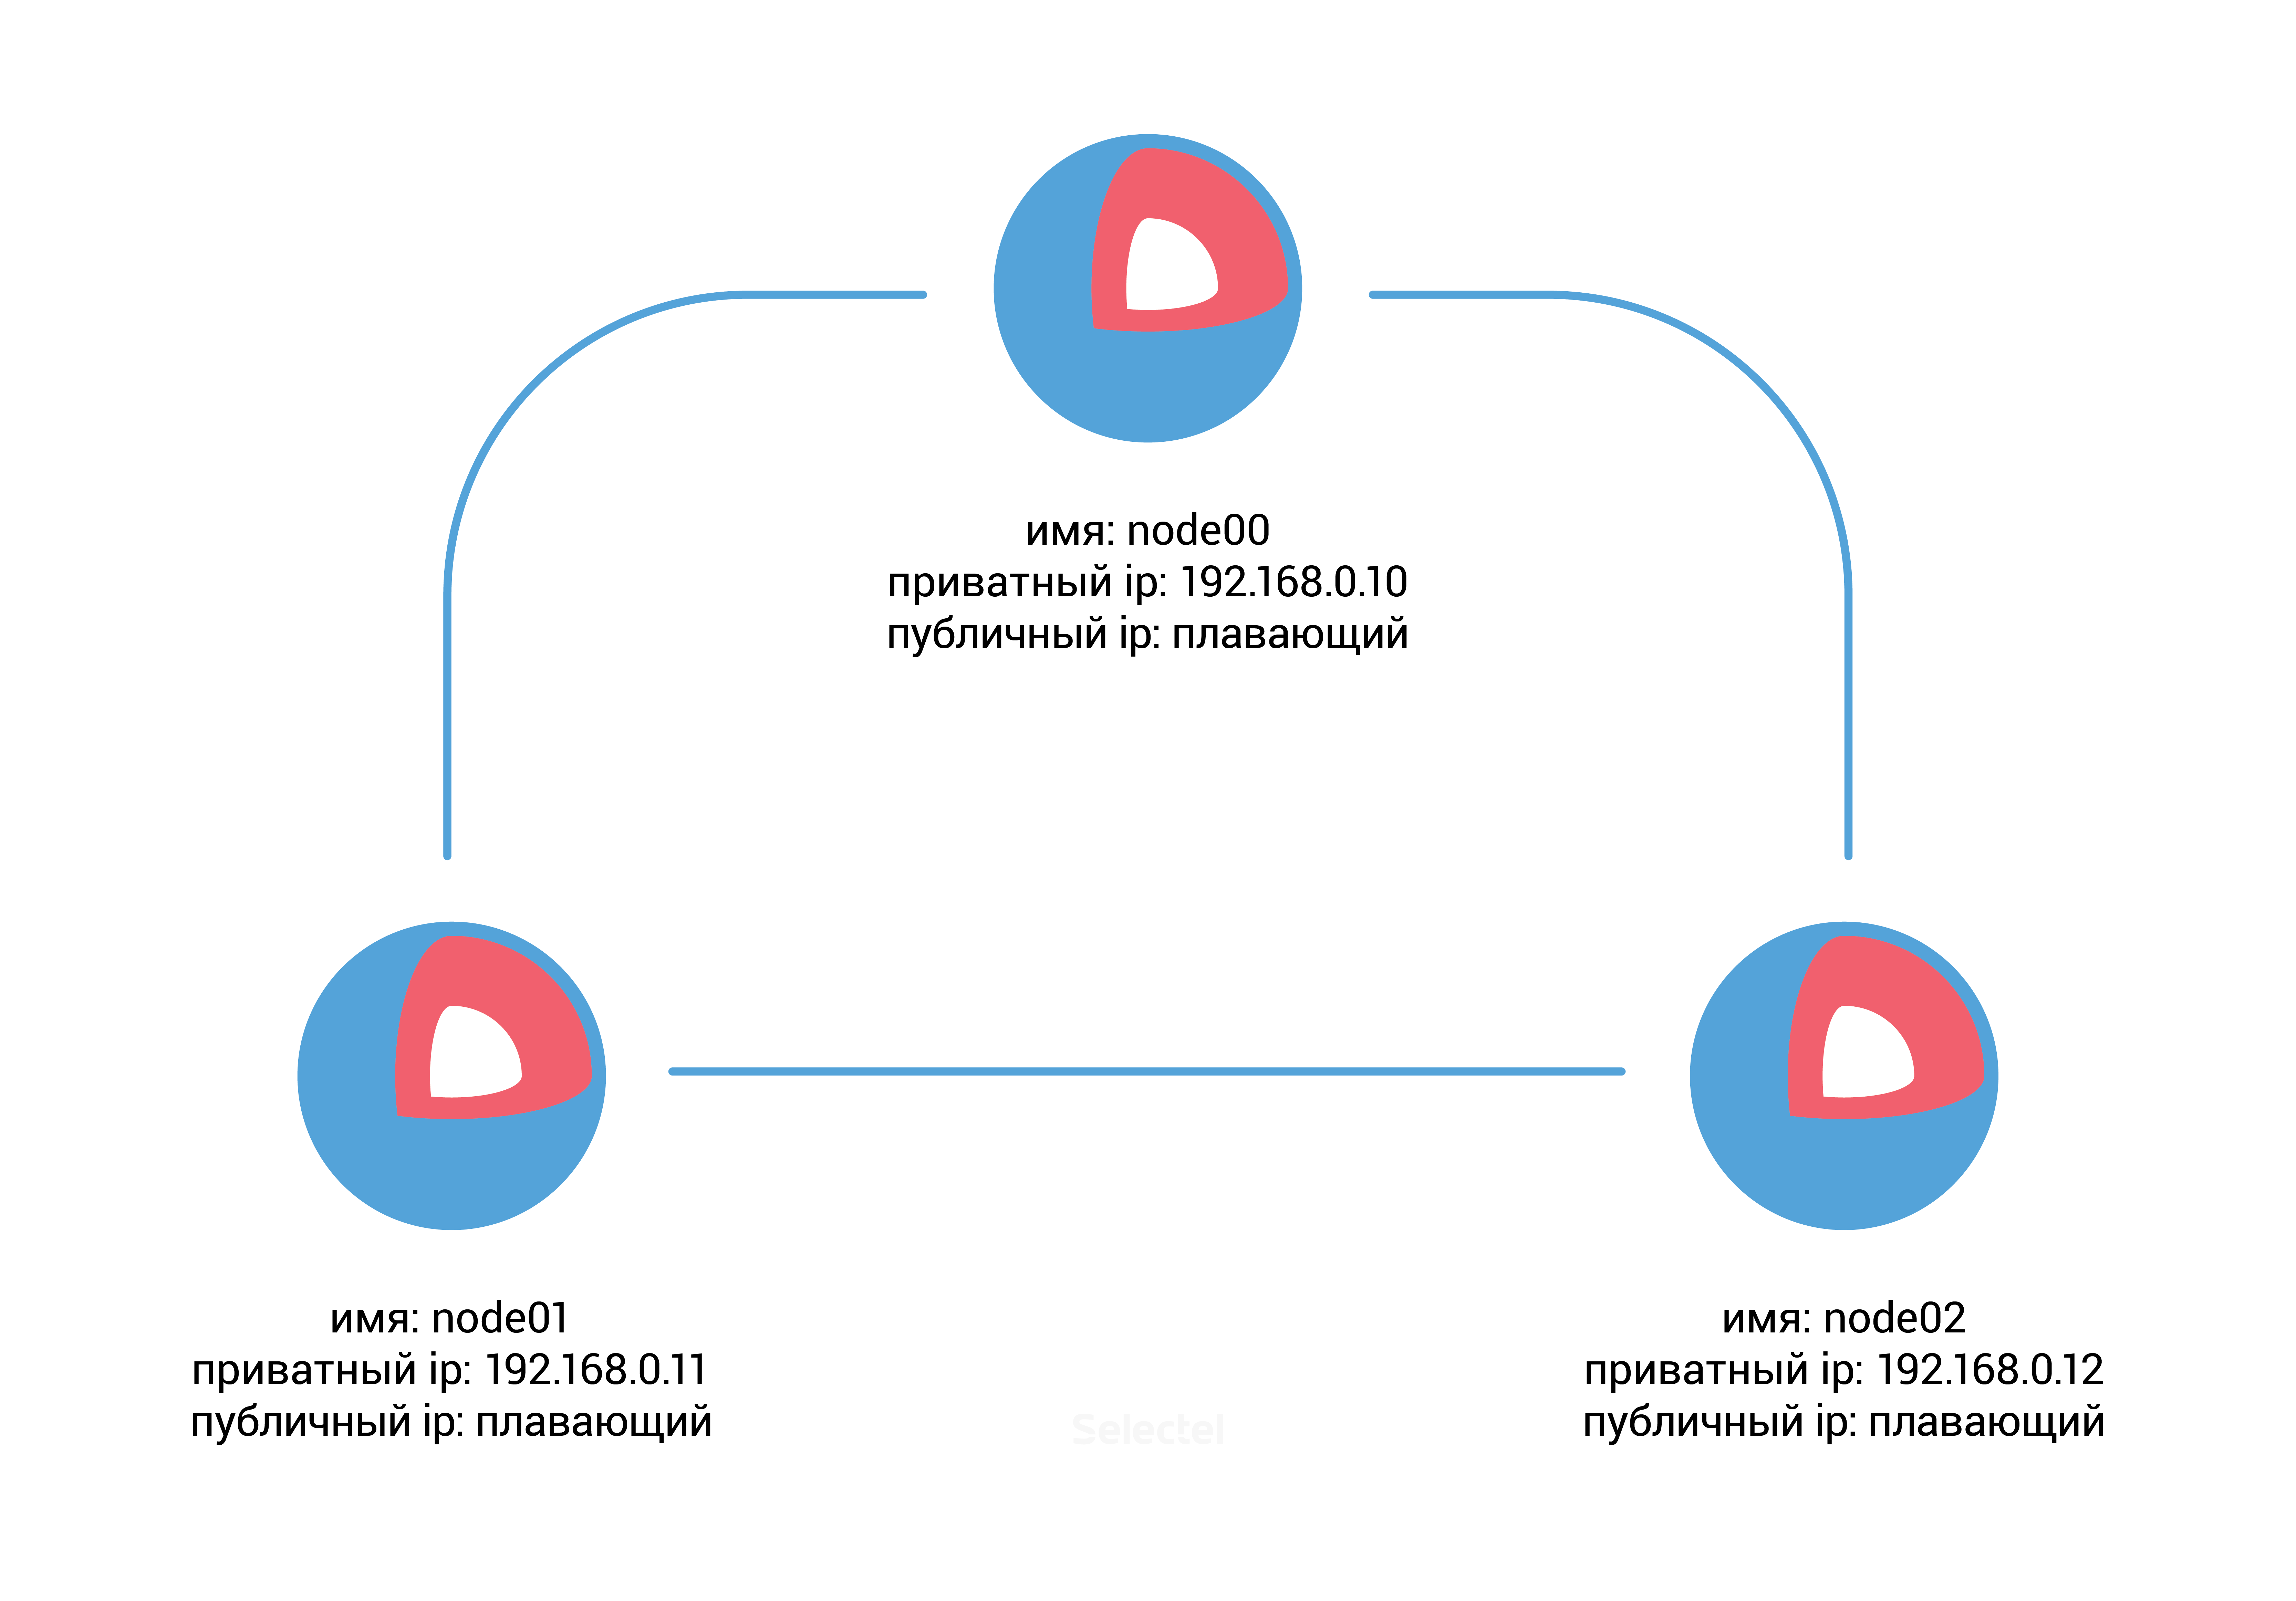
')
After creating the servers, you need a discovery url for the etcd service. To do this, we can use the public free service discovery.etcd.io . Run the following command on the node00 host:
core@node00 ~ $ curl -w "\n" 'https://discovery.etcd.io/new?size=3' https://discovery.etcd.io/ec42cfef0450bd8a99090ee3d3294493 Add the resulting URL and additional parameters etcd to the file /usr/share/oem/cloud-config.yml on each server:
coreos: etcd2: discovery: https://discovery.etcd.io/ec42cfef0450bd8a99090ee3d3294493 advertise-client-urls: http://192.168.0.10:2379,http://192.168.0.10:4001 initial-advertise-peer-urls: http://192.168.0.10:2380 listen-client-urls: http://0.0.0.0:2379,http://0.0.0.0:4001 listen-peer-urls: http://192.168.0.10:2380 units: - name: etcd2.service command: start - name: fleet.service command: start The parameters in the etcd2 section indicate the URLs in the protocol: // address: port format, which are required to announce the node and exchange data with other cluster members.
The units section allows you to manage systemd units in the system; in our case, it will launch the etc2d.service and fleet.service units .
For node01 and node02 servers, you will need to add similar changes to cloud-config.yml , changing the ip address from 192.168.0.10 to 192.168.0.11 for the node01 server, and to the address 192.168.0.12 for the node02 server.
After adding new settings, run the Cloud-init utility on all three servers (or you can simply restart these servers):
core@node00 ~ $ sudo coreos-cloudinit --from-file /usr/share/oem/cloud-config.yml Also check the status of the etcd service:
core@node00 ~ $ etcdctl cluster-health member 3aaf91fd1172594e is healthy: got healthy result from http://192.168.0.11:2379 member 8cf40790248e1dcd is healthy: got healthy result from http://192.168.0.12:2379 member 96b61f40c082cd0b is healthy: got healthy result from http://192.168.0.10:2379 cluster is healthy Check the availability of the distributed storage, add a new directory (in the etcd terminology, the key) with the value on the node00 server:
core@node00 ~ $ etcdctl set /common/cluster-name selectel-test-cluster selectel-test-cluster Then make sure that our new key with value is available from any other node in the cluster:
core@node01 ~ $ etcdctl get common/cluster-name selectel-test-cluster Great, etcd is functioning and we can start using the fleet service.
In our example, we will use fleet to run Nginx in an isolated Docker container. First, create a systemd-unit /etc/systemd/system/nginx.service :
[Unit] Description=Nginx Test Service [Service] EnvironmentFile=/etc/environment ExecStartPre=/usr/bin/docker pull nginx ExecStart=/usr/bin/docker run --rm --name nginx -p 80:80 nginx ExecStop=/usr/bin/docker kill nginx [X-Fleet] Conflicts=nginx.service The Conflicts parameter in the X-Fleet section prohibits running two or more Nginx services on the same node, which will “spread out” the load on the cluster and increase the availability of the service. Additional X-Fleet parameters that can be used inside systemd units are described in the fleet documentation .
The remaining sections in the file are standard for systemd, you can read them for example in a small introductory instructions from CoreOS.
Run the new nginx.service unit in our cluster using fleetctl :
core@node00 ~ $ fleetctl start /etc/systemd/system/nginx.service Unit nginx.service inactive Unit nginx.service launched on 1ad018e0.../192.168.0.11 After that we can see the presence of Nginx in the list of units on any node of the cluster:
core@node02 ~ $ fleetctl list-units UNIT MACHINE ACTIVE SUB nginx.service 1ad018e0.../192.168.0.11 active running core@node02 ~ $ fleetctl list-unit-files UNIT HASH DSTATE STATE TARGET nginx.service 0c112c1 launched launched 1ad018e0.../192.168.0.11 As we see, the container with Nginx was launched on the server with the IP address 192.168.0.11 , which corresponds to the node01 server.
We can disable or completely remove the node01 server, after which fleet will automatically transfer Nginx to another available node.
Etcd will report member unavailability when checking cluster status:
core@node00 ~ $ etcdctl cluster-health failed to check the health of member 3aaf91fd1172594e on http://192.168.0.11:2379: Get http://192.168.0.11:2379/health: dial tcp 192.168.0.11:2379: i/o timeout failed to check the health of member 3aaf91fd1172594e on http://192.168.0.11:4001: Get http://192.168.0.11:4001/health: dial tcp 192.168.0.11:4001: i/o timeout member 3aaf91fd1172594e is unreachable: [http://192.168.0.11:2379 http://192.168.0.11:4001] are all unreachable member 8cf40790248e1dcd is healthy: got healthy result from http://192.168.0.12:2379 member 96b61f40c082cd0b is healthy: got healthy result from http://192.168.0.10:2379 cluster is healthy But as we can see, the status of the Nginx service is normal, it started on a different working node:
core@node00 ~ $ fleetctl list-units UNIT MACHINE ACTIVE SUB nginx.service 4a1ff11c.../192.168.0.10 active running We have analyzed an elementary example of a cluster configuration of etcd + Docker + fleet based on CoreOS. In the next section, we will look at another distro, RancherOS, which is based on CoreOS and is also intended for active use of containers.
RancherOS
The RancherOS distribution is a CoreOS fork. A distinctive feature of this system is that not only user applications, but also all system services are launched in containers. Moreover, in RancherOS Docker has a PID = 1 , so it starts immediately after the system kernel.
The operating system contains two Docker instances; one of them is a system one, it runs udev, acpid, syslog, ntp and other basic services necessary for the system to work. The system Docker-instance replaces the traditional system initialization (systemd, Upstart, SysV), present in the usual distributions of Linux.
The second Docker instance is used to launch user applications and is a special container running inside the system Docker.
This separation protects the system containers from incorrect user actions.

Since the Docker-instance in RancherOS is a regular Docker environment, we can use the standard Docker command set to manage both user and system containers.
# Docker [rancher@rancher-os ~]$ docker --version Docker version 1.12.1, build 23cf638 # Docker Hub [rancher@rancher-os ~]$ docker run -d nginx Unable to find image 'nginx:latest' locally latest: Pulling from library/nginx … Status: Downloaded newer image for nginx:latest # [rancher@rancher-os ~]$ docker ps CONTAINER ID IMAGE COMMAND CREATED STATUS PORTS NAMES 2ec5126e8dd5 nginx "nginx -g 'daemon off" About a minute ago Up About a minute 80/tcp, 443/tcp sad_fermat To access system containers, you must use the system-docker command along with the sudo utility.
You can view the list of running basic services of the operating system using the command:
[rancher@rancher-os ~]$ sudo system-docker ps CONTAINER ID IMAGE COMMAND CREATED STATUS PORTS NAMES a566d0c7cc4c rancher/os-docker:1.12.1 "/usr/bin/user-docker" 8 minutes ago Up 8 minutes docker 8697a04e90a4 rancher/os-console:v0.6.1 "/usr/bin/ros entrypo" 8 minutes ago Up 8 minutes console c8c337282aaa rancher/os-base:v0.6.1 "/usr/bin/ros entrypo" 8 minutes ago Up 8 minutes network 1e55244fc99c rancher/os-base:v0.6.1 "/usr/bin/ros entrypo" 8 minutes ago Up 8 minutes ntp fd6a03fdb28f rancher/os-udev:v0.6.1 "/usr/bin/ros entrypo" 8 minutes ago Up 8 minutes udev 7e9e50c28651 rancher/os-acpid:v0.6.1 "/usr/bin/ros entrypo" 8 minutes ago Up 8 minutes acpid 5fec48b060f2 rancher/os-syslog:v0.6.1 "/usr/bin/ros entrypo" 8 minutes ago Up 8 minutes syslog Restarting the system container is as follows:
[rancher@rancher-os ~]$ sudo system-docker restart ntp Configuration
The main tool for automatic configuration of the system is its own implementation of cloud-init, which was divided into two separate utilities: cloud-init-execute and cloud-init-save . By analogy with other implementations of cloud-init, the version of RancherOS uses declarative YAML, but cloud-config.yml for another distribution will not be compatible with RancherOS.
All possible configuration file directives are described in the official documentation docs.rancher.com/os .
System services use the parameters obtained from the files in the sequence described below (each subsequent file from the specified list overwrites the previous parameters if they match):
- /usr/share/ros/os-config.yml — default system settings;
- /usr/share/ros/oem/oem-config.yml - in our case, this file allows automatic configuration of static network settings, in accordance with the parameters from the VPC control panel;
- YAML files in the /var/lib/rancher/conf/cloud-config.d/ directory;
- /var/lib/rancher/conf/cloud-config.yml is a file that stores the values set by the ros utility, which we will discuss next;
- kernel parameters starting with the keyword "rancher";
- / var / lib / rancher / conf / metadata - metadata from the cloud service used, added by the cloud-init-save utility.
You can change the system configuration using the ros utility, after which the new parameters will be displayed in the /var/lib/rancher/conf/cloud-config.yml file:
[rancher@rancher-os ~]$ sudo ros config set rancher.network.dns.nameservers "['188.93.16.19','188.93.17.19', '109.234.159.91']" [rancher@rancher-os ~]$ sudo cat /var/lib/rancher/conf/cloud-config.yml rancher: network: dns: nameservers: - 188.93.16.19 - 188.93.17.19 - 109.234.159.91 In addition to changing the configuration of system services, the ros utility is also used to manage operating system versions, Docker versions, TLS and SELinux settings.
When using a ready-made image of RancherOS in the Virtual Private Cloud service, you do not need to configure the basic system parameters (network interface configuration, etc.)
After installation, the server will be available at your chosen IP address in the VPC control panel. You can connect to the server using the SSH protocol, however, authentication will initially only be possible using the key specified when creating the server. This key will be added to the rancher user.
Version control
To find out the current version of the operating system, use the command:
[rancher@rancher-os ~]$ sudo ros os version v0.6.1 And to check all available releases:
[rancher@rancher-os ~]$ sudo ros os list rancher/os:v0.4.0 remote rancher/os:v0.4.1 remote rancher/os:v0.4.2 remote rancher/os:v0.4.3 remote rancher/os:v0.4.4 remote rancher/os:v0.4.5 remote rancher/os:v0.5.0 remote rancher/os:v0.6.0 remote rancher/os:v0.6.1 remote You can install the latest stable version of the system using the sudo ros os upgrade command, or select the required version by specifying the -i parameter:
[rancher@rancher-os ~]$ sudo ros os upgrade -i rancher/os:v0.5.0 Since the version 0.5.0 indicated by us is older than the installed 0.6.1, instead of updating the system, a downgrade will occur
Managing the Docker version is just as easy. Here are some examples:
# [rancher@rancher-os ~]$ sudo ros engine list disabled docker-1.10.3 disabled docker-1.11.2 current docker-1.12.1 # 1.11.2 [rancher@rancher-os ~]$ sudo ros engine switch docker-1.11.2 INFO[0000] Project [os]: Starting project INFO[0000] [0/19] [docker]: Starting … INFO[0010] Recreating docker INFO[0010] [1/19] [docker]: Started Cluster Docker Swarm on RancherOS
In Docker 1.12, integrated tools for managing a cluster of Docker Swarm containers appeared, making it much easier to set up a ready-made cluster.
In our example, we will use a ready-made image of RancherOS in the Virtual Private Cloud service. It uses Docker version 1.12.1.
We will need to create three servers with the following parameters:
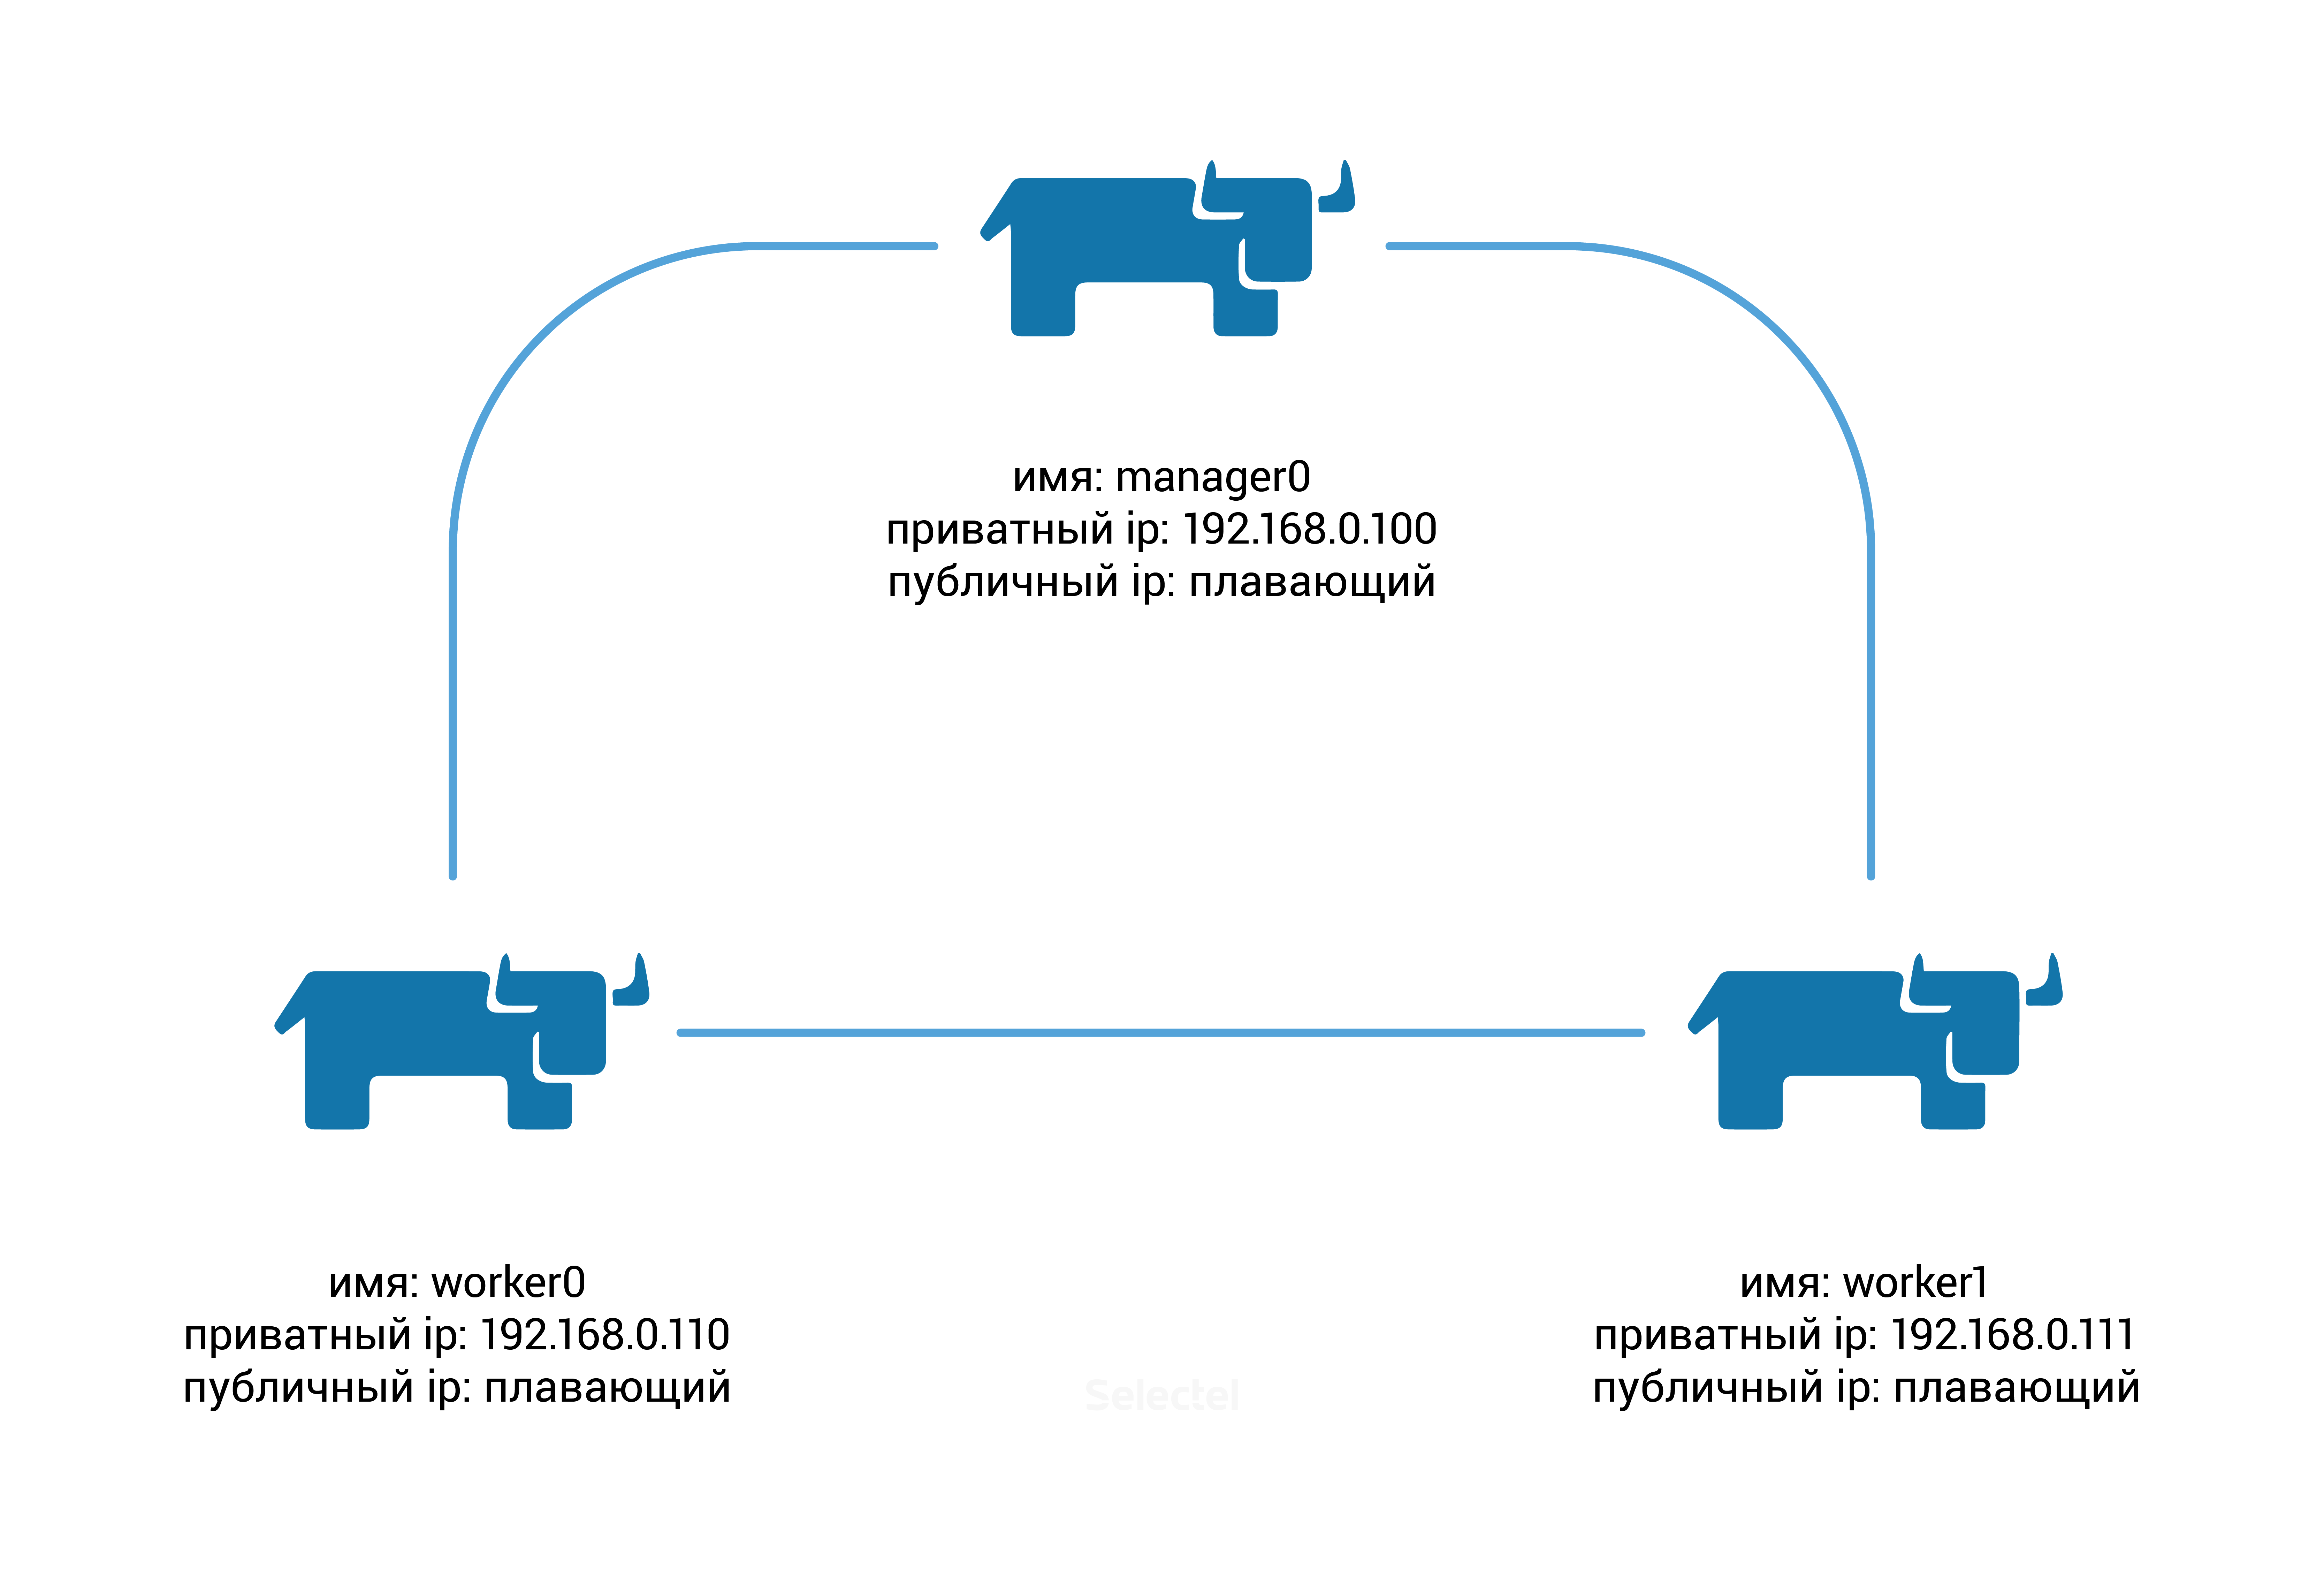
First we need to initialize the creation of the Docker Swarm cluster, for this we will execute the following command on the manager0 node :
[rancher@manager0 ~]$ docker swarm init --advertise-addr 192.168.0.100 Swarm initialized: current node (8gf95qb6l61v5s6561qx5vfy6) is now a manager. To add a worker to this swarm, run the following command: docker swarm join \ --token SWMTKN-1-0hlhela57gsvxzoaqol70n2b9wos6qlu3ukriry3pcxyb9j2k6-0n1if4hkvdvmrpbb7f3clx1yg \ 192.168.0.100:2377 To add a manager to this swarm, run 'docker swarm join-token manager' and follow the instructions. As you can see from the hint that appears, on the worker0 and worker1 nodes you need to execute the command:
docker swarm join \ --token SWMTKN-1-0hlhela57gsvxzoaqol70n2b9wos6qlu3ukriry3pcxyb9j2k6-0n1if4hkvdvmrpbb7f3clx1yg \ 192.168.0.100:2377 Check the status of the cluster nodes. To do this, run the command on manager0 :
[rancher@manager0 ~]$ docker node ls ID HOSTNAME STATUS AVAILABILITY MANAGER STATUS 366euocei01dw3ay66uwzb3pv worker0 Ready Active 67pt4fo5gi13cxkphtfzfbfbo worker1 Ready Active 8gf95qb6l61v5s6561qx5vfy6 * manager0 Ready Active Leader Docker Swarm is ready to use!
By default, new services will be launched on all nodes of the cluster. We will adjust these settings so that all services are started on the worker0 and worker1 nodes , and the manager0 node fulfills only the management role.
To make these settings, change the “availability” of manager0 node:
[rancher@manager0 ~]$ docker node update --availability drain manager0 Let's start the service with the Nginx container:
[rancher@manager0 ~]$ docker service create --name webserver --replicas 1 --publish 80:80 nginx In response, we get the service ID:
av1qvj32mz8vwkwihf0lauiz8 Initially, the number of replicas will be 0, and the only task related to this service will be in “Preparing” status:
[rancher@manager0 ~]$ docker service ls ID NAME REPLICAS IMAGE COMMAND av1qvj32mz8v webserver 0/1 nginx [rancher@manager0 ~]$ docker service ps webserver ID NAME IMAGE NODE DESIRED STATE CURRENT STATE ERROR cjxkza3qzx5m73bgbls0r26m6 webserver.1 nginx worker1 Running Preparing about a minute ago After a few seconds, the required Nginx image will be automatically downloaded from the Docker Hub, after which the service status will change to “Running”:
[rancher@manager0 ~]$ docker service ls ID NAME REPLICAS IMAGE COMMAND av1qvj32mz8v webserver 1/1 nginx [rancher@manager0 ~]$ docker service ps webserver ID NAME IMAGE NODE DESIRED STATE CURRENT STATE ERROR cjxkza3qzx5m73bgbls0r26m6 webserver.1 nginx worker1 Running Running 8 minutes ago As we can see, the service started on the worker1 node (the value in the “NODE” column). Disable this node through the VPC control panel and check the status of the webserver service again:
[rancher@manager0 ~]$ docker service ps webserver ID NAME IMAGE NODE DESIRED STATE CURRENT STATE ERROR 5lwf4z54p74qtoopuilshw204 webserver.1 nginx worker0 Running Preparing 32 seconds ago cjxkza3qzx5m73bgbls0r26m6 \_ webserver.1 nginx worker1 Shutdown Running 16 minutes ago The status of the service has changed to “Preparing”, Docker Swarm is trying to transfer the service to another worker0 worker node, the delay is due to the fact that before running on the worker0 node an Nginx image from the Docker Hub must be added.
After the image is automatically added, the webserver service will start successfully on worker0 :
[rancher@manager0 ~]$ docker service ps webserver ID NAME IMAGE NODE DESIRED STATE CURRENT STATE ERROR 5lwf4z54p74qtoopuilshw204 webserver.1 nginx worker0 Running Running about a minute ago cjxkza3qzx5m73bgbls0r26m6 \_ webserver.1 nginx worker1 Shutdown Running 19 minutes ago To avoid downtime when transferring a service from a fallen node, we can increase the number of replicas of this service.
Run the command (don't forget to turn worker1 back):
[rancher@manager0 ~]$ docker service update --replicas 2 webserver The service will start replicating to the second node worker1 :
[rancher@manager0 ~]$ docker service ps webserver ID NAME IMAGE NODE DESIRED STATE CURRENT STATE ERROR 5lwf4z54p74qtoopuilshw204 webserver.1 nginx worker0 Running Running 11 minutes ago cjxkza3qzx5m73bgbls0r26m6 \_ webserver.1 nginx worker1 Shutdown Complete 6 minutes ago f3o7icke69zw83ag92ywol0dr webserver.2 nginx worker1 Running Preparing 2 seconds ago Conclusion
In this article we have done a review of Linux distributions designed for quick deployment and convenient management of a cluster of isolated containers.
We will be glad if you share your own experience of using CoreOS, RancherOS and similar operating systems.
Source: https://habr.com/ru/post/315930/
All Articles