Module import goods in Bitrix
In this post, we would like to share our experience in developing a module for importing Bitrix to the developer community.
Our import module has the following features:
- It works directly with MySQL DB Bitrix (that is, the entire CMS Bitrix object model for products is recreated inside).
- You can connect to the database in the following ways:
- Direct connection;
- SSH;
- HTTP Bridge connection.
- The source for importing data is the CLP file (sqlite database with the CatalogLoader object data model).
- C # / .NET 4.0 programming language.
Requirements
There were several requirements for the module:
Filling rate
The module should work as fast as possible. First, the client always wants to see the result "here and now", and even better, "already yesterday." And it is right. We often do the filling of several test items directly upon contacting the client, so that he can assess how it works and, if necessary, immediately determine which revisions are needed.
Secondly, if there are a lot of goods and their combinations, then data loading can take a very long time. Photo loading takes especially long. each product can have dozens of photos, several combinations (sales offers) in a different color, each also has several photos, plus each photo should have several sizes for correct display on the site. However, permanent changes on the site and a decrease in the speed of the site due to import are undesirable.
Resilience
The module should be as resistant as possible to changes in the site itself. Bitrix also does not stand still. Regularly there are new versions, new extensions. Also, the site may be in the process of refinement by the designer and the web programmer (to the extent that some pages are not available at the moment). But we cannot wait, we need to do our work here and now and move into a bright future.
Given these requirements, the best solution was to develop your own independent module that allows you to download data directly to the database, minimizing the use of additional components.
Filling process
So we got to the most delicious =)
A simplified Bitrix dataset in store mode looks like this.
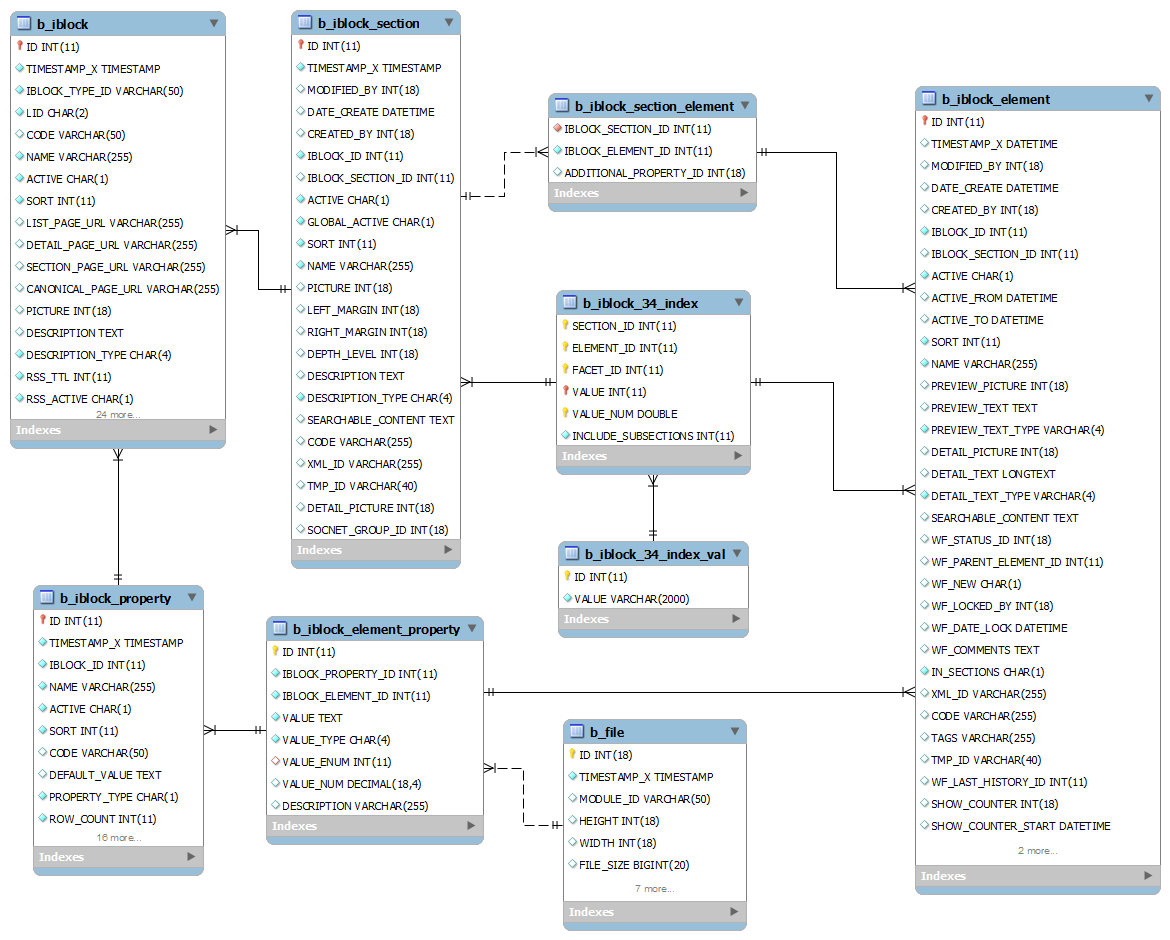
A brief description of these tables:
- b_iblock - information block directory
- b_iblock_section - category directory
- b_iblock_element - directory of products and their combinations
- b_iblock_section_element - directory of matching categories and products. One product can be in several categories.
- b_iblock_property - reference of characteristics
- b_iblock_element_property - product features
- b_file - a table that stores data about photos and additional files (for example, datasheets) for products. In the context of Bitrix, all files are just one more characteristic, only of a special type (VALUE_TYPE = 'F'). The files themselves are physically stored separately from the database, on disk.
- b_iblock_34_index - facet index for information block №34.
- b_iblock_34_index_val - the table of values for the facet index of the information block №34.
The process of filling the store is performed in the following order:
- Creating the necessary information blocks
- Filling categories
- Filling the goods
For each product you also need to fill in the characteristics, combinations, photos and search indexes.
Creating information blocks
Usually, only one information block is allocated for a trade catalog, which must be appropriately configured (the name, where and how it is displayed, does it need a child information block for trade offers). This is the default behavior. But some customers make a more complex structure: their information block is essentially a top-level category, and you have to combine data from information blocks with data from a category table in order to correctly build a full tree of a store.
Filling categories
Nested Sets
The category tree is based on nested sets. Similar used in PrestaShop and ShopScript. They allow you to make a very beautiful, from an algorithmic point of view, branching, allow you to make quick convenient samples from the database.
A nested set is a tree structure in which, in addition to the element itself, its nesting area is expressed, expressed in terms of two numerical fields commonly referred to in the literature as LEFT and RIGHT. In Bitrix, they are named LEFT_MARGIN and RIGHT_MARGIN. They allow one request to get all children, regardless of the number of subcategories, in the already sorted order or of all parents. We do not need to recursively bypass each category to get its connections, which significantly reduces the time and server resources spent on these operations.
Here is an example of the simplest sample of two categories on a live project. You can clearly see the sorting order and nesting level; you can visually evaluate how the LEFT_MARGIN and RIGHT_MARGIN fields are related to the standard DEPTH_LEVEL (depth), SORT (sorting order) and IBLOCK_SECTION_ID (link to the parent category).
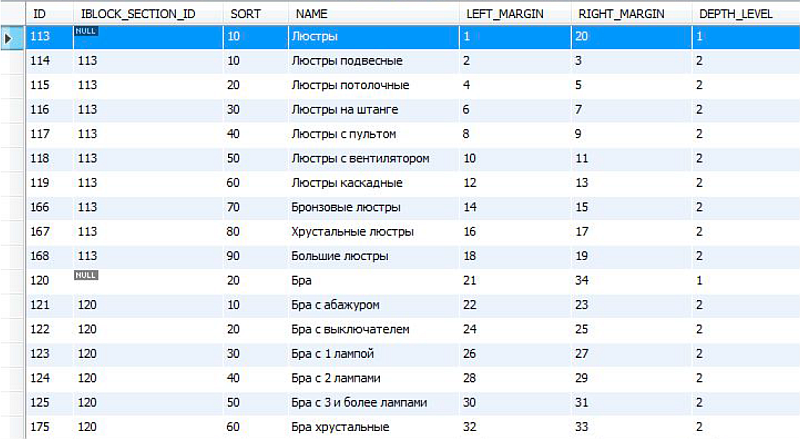
In the sample, there are two top-level categories and their subcategories. In the form of a tree, this structure looks like this:

“Chandeliers” and “Bras” are categories of the first level and represent two adjacent branches. The left digit in the category block is LEFT_MARGIN, and the right digit is RIGHT_MARGIN. In the parent category, LEFT_MARGIN is the minimum key for the current branch, RIGHT_MARGIN is the maximum. Anything that falls outside the range between LEFT_MARGIN and RIGHT_MARGIN does not apply to the branch we need. You can see that in two neighboring (and displayed in a row) categories of the same level, the numbering of the indices goes in a row: the left key of the next element is always one more than the right key of the current element. If categories have to go in a row, but you see that key values are not consecutive - this is the first sign of problems with key building.
All this looks beautiful and works fine exactly as long as the indices are perfectly filled. As soon as something happened to the index, at best your categories will start to “dance”, at worst - the layout breaks down or the categories disappear. They need to work very carefully, because if the category disappears, the user will not see the products in it and the work goes down the drain.
And to spoil this structure is very easy. You no longer need to simply insert or simply delete the record in the database. If you insert, delete, or drag a record (by changing the sorting order), you will have to rebuild the category tree so that the indices remain consistent. Very often, newcomers, seeing the clear fields DEPTH_LEVEL, SORT and IBLOCK_SECTION_ID, consider that they are enough to fill in, but they don’t know anything about Nested Sets, respectively, indices are not rearranged and the category tree is slowly but surely turning into stuffing. When there are only a few categories that do not change much - it gives minimal problems, it is often easier for people to delete everything and recreate than to figure it out. But when the store after upgrades is loaded with working data from thousands of categories - the problem becomes across the throat.
Even worse, if the project got a new developer already broken - a lot of time is spent on figuring out the causes of problems.
Here are some useful SQL queries for checking your database, they will help you verify the correctness of the Nested Sets and not waste time guessing the coffee grounds in search of problems.
-- , , ; SELECT * FROM `b_iblock_section` WHERE LEFT_MARGIN >= RIGHT_MARGIN; -- (), , = 1; = * 2 SELECT COUNT(ID), MIN(LEFT_MARGIN), MAX(RIGHT_MARGIN) FROM `b_iblock_section`; -- , , ; SELECT * FROM (SELECT ID, MOD((RIGHT_MARGIN - LEFT_MARGIN), 2) AS ostatok FROM `b_iblock_section`) t WHERE ostatok = 0; -- , , ; SELECT * FROM (SELECT ID, MOD(LEFT_MARGIN - DEPTH_LEVEL + 2, 2) AS ostatok FROM `b_iblock_section`) t WHERE ostatok = 1; -- , , . , SELECT ID, CONCAT(REPEAT('--', DEPTH_LEVEL - 1), `NAME`) as `NAME`, LEFT_MARGIN, RIGHT_MARGIN, DEPTH_LEVEL, IBLOCK_SECTION_ID as PARENT FROM `b_iblock_section` ORDER BY IF(ISNULL(IBLOCK_SECTION_ID), ID, IBLOCK_SECTION_ID), LEFT_MARGIN; -- SELECT ID, CONCAT(REPEAT('--', DEPTH_LEVEL - 1), `NAME`) as `NAME`, LEFT_MARGIN, RIGHT_MARGIN, DEPTH_LEVEL, IBLOCK_SECTION_ID as PARENT FROM `b_iblock_section` WHERE LEFT_MARGIN IN (SELECT LEFT_MARGIN FROM `b_iblock_section` GROUP BY LEFT_MARGIN HAVING count(*)>1) ORDER BY LEFT_MARGIN; -- , , SELECT CHILD.ID, CHILD.DEPTH_LEVEL, CHILD.`NAME`, CHILD.LEFT_MARGIN, CHILD.RIGHT_MARGIN, PARENT.LEFT_MARGIN as PARENT_LEFT_MARGIN, PARENT.RIGHT_MARGIN as PARENT_RIGHT_MARGIN FROM `b_iblock_section` AS CHILD JOIN `b_iblock_section` AS PARENT ON PARENT.ID = CHILD.IBLOCK_SECTION_ID WHERE (CHILD.LEFT_MARGIN <= PARENT.LEFT_MARGIN) OR (CHILD.RIGHT_MARGIN >= PARENT.RIGHT_MARGIN) OR ((CHILD.DEPTH_LEVEL - 1) <> PARENT.DEPTH_LEVEL) OR (CHILD.LEFT_MARGIN >= CHILD.RIGHT_MARGIN); Filling the goods
Full display of goods "out of the box" does not work
Such is the "feature". Regardless of what and how you imported and see in the admin panel, you will not see the properties in the frontend yet additionally, manually, allow them to be displayed through the edit mode.
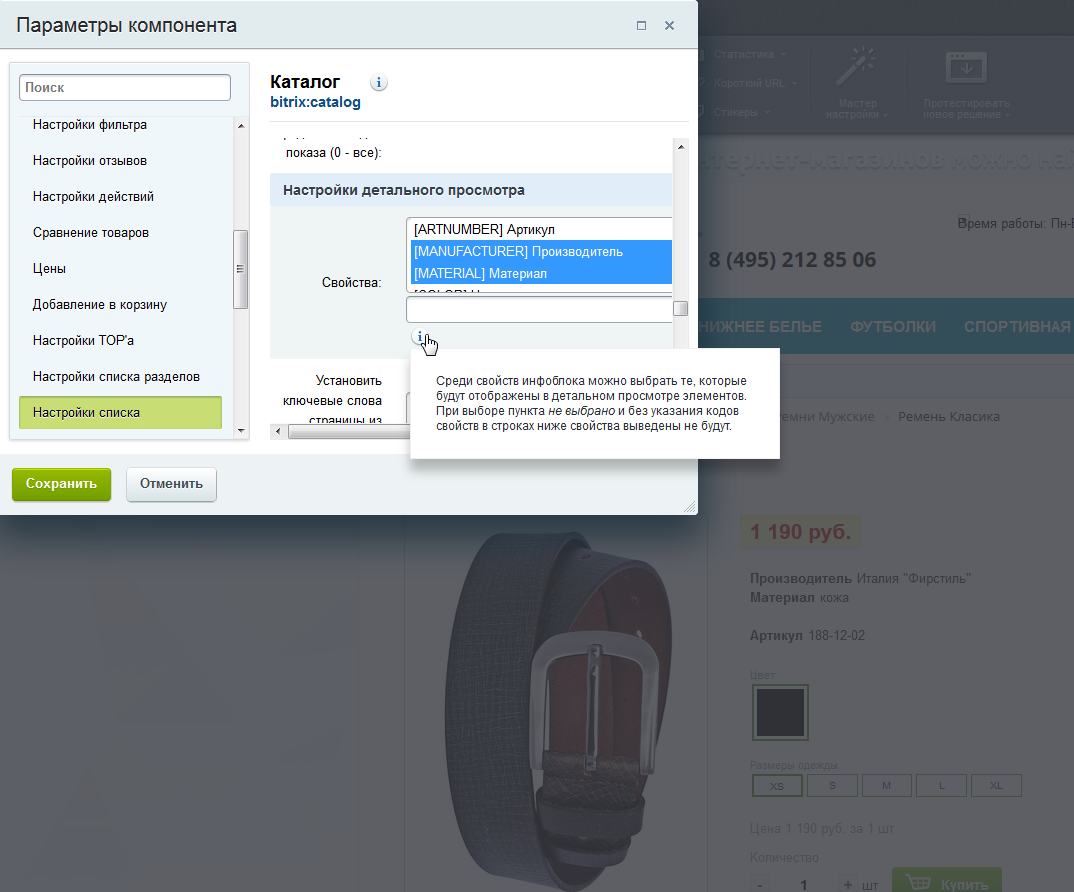
At the first acquaintance with this CMS, this behavior is somewhat confusing, and I don’t remember any other CMS with the same default behavior. Although the designer of the information block blocks is powerful, by default no one knows about him, and you need to either spend a lot of time reading the documentation, or spend a lot of money on a Bitrix specialist who will spend time for you, or look for a CMS easier (which takes time).
Faceted indices
Faceted index involves the creation of an index for each characteristic of the goods, which you can do a very fast search. Two tables of the form b_iblock_{IBLOCK_ID}_index and b_iblock_{IBLOCK_ID}_index_val are added to the database for each information b_iblock_{IBLOCK_ID}_index_val in which each product describes the characteristics by which it can be searched. In the diagram above, these two tables came with index 34, since The 34th information block was used to describe the trade offers in the database taken. There can be many such blocks and, accordingly, a pair of tables with faceted indices will be created for each information block. An entry is added for each category in the branch. Those. so that the product is searched for the specified fields in all the necessary categories, you need to duplicate the entries for each category in which you want to find this product. As a rule, this is a lower level category - with a product, and all categories are higher along this branch (all parents), so that, for example, products from subcategories can be found in the top level category.
The appearance of the facet indices was an unpleasant surprise for us. After one of the winter updates, the goods in the frontend are gone. No mistakes. Everything can be seen in the administration panel. But in the front end there were no new products. Through the resulting silence, programmers could be heard turning gray. It turned out that, henceforth and forever, products for which facet indexes are not filled are not displayed. Even if no one wanted these faceted indices, nobody intentionally turned on, and moreover, no one chose anything in the front end. Those. the filter for some reason works even if the fields for filtering by the user are not filled. The behavior is strange. The consequences of such introductions - shops died in people. People suffered losses. Regardless of the method of filling.
We should also mention the calculation of the identifier characteristics. Do you believe in magic? That is magic. First, according to the documentation, this field should not correspond to the identifier from the general list of characteristics (which would be logical for a filter by characteristics), but be an identifier from the general list of characteristics multiplied by two. A clear answer to the question “What is the meaning of this magic,” we have not found. It seems that multiplying by 42 would work much better, it has at least some meaning. Secondly, it was repeatedly noted that filling the site through the admin could not comply with this seemingly trivial magic.
The implementation of magic is described here , there is also a link to the documentation, according to which what was to be described and what was multiplied, but alas, at the time of writing the article there is again the magic of numbers with fours.
You can read more about facet indices and how to deal with them at the Bitrix developer forum in the subject Smart filter is all so faceted and nyashny .
Other nuances
Excessive caching is bad
Bitrix has its own enabled cache by default. Changes to the site may not be displayed until this cache is forcibly reset. With this, everything is clear, you can use the API of the CMS itself for reset. But sometimes people include additional caching tools, a hosting provider can also include them, and in the end, for example, chrome cache can aggravate the situation.
System requirements are growing with the store
We optimized our module as much as possible, but this does not always save clients from having to increase server capacity. With a large increase in the number and characteristics of goods, Bitrix also requires the growth of server capacity, especially RAM for normal operation. In the configuration with the cheapest hosting on which CMS was launched and worked with a dozen demo products, everything will work out well if you fill in 10,000 products. It should be understood that this is still a powerful multi-functional CMS for business, respectively, and it needs hosting more seriously than for a business card site.
What we came to
Bitrix has given us a lot of interesting experience, both in the framework of working with CMS, and in the framework of interaction with customers. Undoubtedly, this is a good CMS with great features. But it is too heavy, too overloaded for beginners. Why are there for beginners, even programmers can spend a lot of time and nerves to launch a fully out-of-the-box site if they work specifically with this CMS for the first time. Too many nuances. If you are just starting your own business and you don’t have an experienced Bitrix programmer in your staff, you may want to choose some more understandable CMS or at least try the demo version right in their Virtual Lab service before purchasing.
If you already bought Bitrix, the first thing you need to do is fill it with content and make a full backup. Later you can order a layout for the designer, customize the display of products and other edits. The advantage of this approach is that the person who completes the store will immediately be able to visually assess the effects of edits on a live product, with a description, all the necessary attributes, combinations and photos. Repeatedly there were cases when at first the site was given to the mercy of the designers, and only then to us, and the client at the last moment faced the problems in the layout before launching the store.
We also made a small benchmark of the speed of import into Bitrix through our module. In the test set involved 1495 products with 23298 photos, as well as with combinations.
Local database connection (direct MySQL connection)
| Test type | Load time |
|---|---|
| Import to empty database | 21.48 seconds |
| Update prices and balances | 15.91 seconds |
Import to the site via http bridge
Test import from the working machine was done on the bitrixlabs.ru test store. Photos for import were located on the supplier’s server, were accessible via the http protocol. In this test, you can see how the photo upload and network speed affects the filling speed.
| Test type | Load time |
|---|---|
| Import to empty database (no photo) | 6 minutes 8.11 seconds |
| Import to empty database (from 23298 photos) | 38 minutes 11.49 seconds |
| Update prices and balances | 4 minutes 11.87 seconds |
The module is now used in the following programs and services:
- PriceMatrix for price lists;
- Site parsers CatalogLoader.
')
Source: https://habr.com/ru/post/315848/
All Articles