WebRTC: Making a peer to peer javascript game
Recently, I happened to work on a prototype video chat. It was an excellent opportunity to get acquainted with the concepts of WebRTC and try them out in practice. As a rule, when talking about WebRTC, they imply the organization of audio and video communications, but this technology can also be used for other interesting things. I decided to try to make a peer-to-peer game and share the experience of its creation. Video of what happened and implementation details under the cat.
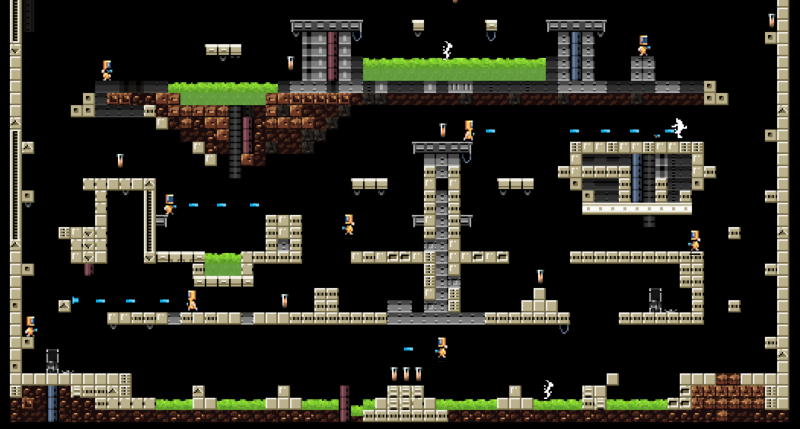
Once upon a time a demo of the game with pretty pixelart graphics caught my eye. The game was made on the JavaScript engine Impact . About him even once mentioned on Habré .

')
The engine is paid, I bought it a couple of years ago, but I didn’t do anything practical on it, and finally it came in handy to me. I must say that the process of creating a game on it is in itself a very exciting experience, and for people like me who want to quickly and inexpensively feel like cool igrodels, this is what you need. Having decided on the technology of communication and the game engine, you can proceed to the implementation. Personally, I started with game rooms.
How can a player get into the game and how to invite his friends to it? Many online games use so-called rooms or channels so that players can play with each other. To do this, you need a server that allows you to create these same rooms and add / delete users. The scheme of his work is quite simple: when the user starts the game, and in our case opens the browser window with the address of the game, the following happens:

All this is quite simple to implement, for example, on node.js + socket.io. What happened, you can see here . After the player has entered the game room, he must establish a peer-to-peer connection with each of the players in this room. But, before turning to the implementation of peer-to-peer data, I suggest thinking about what kind of data it will be in principle.
The format and meaning of the messages transmitted between players, strongly depends on what will happen in the game. In our case, this is a simple 2D shooter where players run and shoot each other. Therefore, the first thing you need to know about the location of other players on the map:
Receiving such a message you can understand where the player is, but you can not understand how he looks at the moment. Therefore, to complete the picture, here you can add information about what kind of animation the player has at the moment, what frame it is in and in which direction it looks:
Fine! What other messages will be needed? Depending on what you plan to do in the game, you will have your own set, and I got something like this:
As you can see, each of the fields in the messages has its own data type, for example, int16 - for the fields that represent the coordinates. Let's understand this right away, at the same time I will tell you a little about the WebRTC API. The fact is that for data transfer between peers, an object of the type RTCDataChannel is used , which, in turn, can work with data of the type USVString , BLOB , ArrayBuffer or ArrayBufferView . Just in order to use ArrayBufferView , and you need to clearly understand what format the data will be.
So, having described all the messages, we are ready to continue and go directly to the organization of interaction between the feasts. Here I will try to describe the hardware as briefly as I can. In general, trying to tell about WebRTC in all its details is a long and difficult task, all the more so since in public access there is a book by Ilya Grigorik , which is simply a wealth of information on this and other topics related to networking. My goal, as I said, is to give a brief description of the basic mechanisms of WebRTC, with the study of which everyone will have to start.
What is needed for A and B users to establish a peer-to-peer connection between themselves? Well, at least each of the users must know the address and port where his opponent listens and can receive incoming data. But how will A and B communicate this information to each other if the connection has not yet been established? To transfer this information you need a server. In WebRTC terminology, it is called a signalling server. And since its own server for game rooms has already been implemented, it can also be used as a signalling server.
Also, in addition to addresses and ports, A and B must agree on the parameters of the session to be established. For example, the use of certain codecs and their parameters in the case of audio and video communications. The format of the data describing various properties of the connection is called SDP - Session Description Protocol. More information on him can be found at webrtchacks.com . So, based on the above, the order of data exchange through signaling is as follows:
Upon completion of these actions, both users know each other’s addresses and parameters and can begin to exchange data. But before moving on to implementation, there is one more thing to learn about the definition of a pair of IP address + port.
When each user is available at a public IP address or both are on the same subnet, everything is simple. Then each of them can request his IP from the operating system and send it through signaling to his opponent. But what to do if the user is not directly accessible, but is behind NAT, and he has two addresses: one is local, inside the subnet ( 192.168.1.1 ), the second is the address of the NAT itself ( 50.76.44.114 )? In this case, he somehow needs to determine his public address and port.
The idea of the solution is quite simple: we need a publicly available server, which, upon receiving a request from us, will send back our public address and port.

Such servers are called STUN ( Session Traversal Utilities for NAT ). There are ready-made solutions, for example, coturn, which can be deployed as your STUN server. But you can do even easier and use the already deployed and accessible servers, for example from Google.
Thus, everyone can get their address and send it to their opponent. But this is not enough, because after receiving the address from your opponent you need to check whether we can reach him at this address?
Fortunately, the ICE ( Interactive Connectivity Establishment ) framework embedded in the browser takes on the task of interacting with STUN and the availability test. All we need is to handle the events of this framework. So let's get down to implementing ...
At first it may seem that the process of setting up a connection is rather complicated. But, fortunately, all the complexity is hidden with just one interface RTCPeerConnection, and in practice everything is simpler than it might seem at first glance. The full code for the class that implements the peer-to-peer connection can be found here , then I will explain it.
As I have already said, setting up, monitoring and closing a connection, as well as working with SDP and ICE candidates - all this is done via RTCPeerConnection. More detailed information about the configuration can be found, for example, here . As a configuration, we will only need the address of the STUN server from Google, which I mentioned above.
RTCPeerConnection provides a set of callbacks for various connection lifecycle events, from which we will need:
In the list of actions for a connection, the first two points were the request to establish a connection and the confirmation of this request. We will simplify the process a bit and assume that if the user knows the address of the game room, then someone gave him a link, so the request to establish a connection is not required, you can immediately proceed to the exchange of session data and addresses.
To get session parameters in RTCPeerConnection, there are createOffer methods — for calling on the originating side, and createAnswer — on the answering side. The result of the work of these methods are the data in SDP format, which must be sent through signaling to the opponent. RTCPeerConnection stores both a local session description and a remote session, obtained through signaling from an opponent. To set these fields there are setLocalDescription and setRemoteDescription methods . So, let's say client A initiates a connection, then the procedure is as follows:
1. Client A creates an SDP-offer, sets a local session description in his RTCPeerConnection , and then sends it to client B:
2. Client B receives an offer from client A and establishes a remote session description. Then it creates an SDP-answer, sets it as a local session description and sends it to client A:
4. After client A receives the SDP-answer from client B, it also sets it as a remote session description. As a result, each client has established a local session description and a remote one received from his opponent:

Each time the client's ICE agent A finds a new IP + port pair that can be used for communication, the icecandidate event is fired for RTCPeerConnection . Candidate data is as follows:
Here's what you can understand by looking at this data:
You can read more about the protocol for describing ICE candidates here .
This data needs to be transmitted through signaling to client B so that he adds them to his RTCPeerConnection. Client B does the same when it detects its IP + port pairs:
Well, and perhaps the last thing worth staying at is RTCDataChannel . This interface provides us with an API with which you can transfer arbitrary data, as well as customize the properties of data delivery:
More details about the configuration of RTCDataChannel can be found, for example, here . At the moment, the ordered = false property will be enough to preserve the UDP semantics when transferring our data. Like RTCPeerConnection , RTCDataChannel provides a set of events describing the life cycle of a data channel. From it, you will need open , close and message to open, close a channel and receive a message, respectively:
Finally, after successfully opening a data channel between players, you can begin to transfer game messages between them.
We considered how to establish a connection between two players, and this, in principle, is enough to play one on one. And if we want to have several players in the same room? What will change then? In fact - nothing, just for each pair of players must have its own connection. Those. if you are playing in a room with 3 more players, you must have 3 peer-to-peer connections with each of them. The full code of the class responsible for interacting with all opponents in the room can be found here .

So, the signaling server with rooms is ready, the format of messages and the method of their delivery have been discussed, so how can we make players see each other based on this?
The idea of synchronization is quite simple: you need to send your coordinates to your opponents once at some time, then they can reliably reflect your location based on this data.
How often do I need to send sync messages? Ideally, the opponent should see updates as often as the player, i.e. if the game works with a frame rate of 30-60 frames per second, then the messages should also be sent with the same frequency. But this is a rather naive decision, and much ultimately depends on the dynamism of the game itself. For example, is it worth sending coordinates so often if they change every ten to twenty seconds? Perhaps in this case it is unnecessary. In my case, the animation and position of the players changes quite often, so I decided to go the simple way and send messages with coordinates to each frame.
Sending synchronization message:
Receive sync message:
Unfortunately, what turned out works without any delays only until you start playing with someone real, who is sitting at another computer and not on the same network with you. Because then it starts working like this:
The fact is that for a smooth image it is necessary to deliver messages with a constant frequency - the same with which they were sent. To achieve this in real conditions is almost impossible, because of this, the intervals between incoming messages are constantly changing, creating an effect that is unpleasant to the eye. You can defeat him using extrapolation of coordinates.
First you need to understand in more detail how message delays affect the quality of a picture that a player sees. For a smooth movement, it is necessary that messages arrive at an equal interval close to the frame refresh rate in the game:

In practice, it turns out something else. The intervals between messages are unevenly distributed, which leads to hopping animation and changing coordinates:

When looking at the second scheme, it becomes clear what happens at the moment of an increased message delay: the player first sees a fade, and then a sharp jump. This produces an unpleasant effect.
The movement would be much smoother if, at the moments of delay, the coordinates of the player changed proportionally, though not always reliably:

And indeed, if we analyze the movement of players, it can be understood that there is usually no abrupt change in the direction of movement, which means that without receiving the next message with coordinates at some point, we can assume them based on, for example, its speed in the previous frame. To do this, you must either calculate this speed on the receiving side, or simply send it along with the coordinates. I, as usual, chose the easiest way and send it along with the coordinates. And now, if there was no message with coordinates updating in a certain frame, they are calculated from the player’s speed in the previous frame:
And this is how it looks after applying extrapolation:

Of course, this method has a lot of flaws, and on very slow connections it can happen, for example, like this:
But the implementation of extrapolation goes far beyond the scope of this article, so I propose to dwell on what is.
In addition to moving around the map, it would be nice to collect cartridges and shoot someone. What I mean is that there are a number of actions that the player performs in the game, and they too are subject to synchronization. Fortunately, there are much fewer problems there than in the synchronization of movement: it is enough to simply reproduce the event received through the message. Therefore, I probably will not dwell on this in detail, but simply refer to the project code.
The code (with the exception of the source code of ImpactJS itself) and the instructions for launching can be viewed on the github .
I would venture to leave this link here, where you can try to play . I don’t know what will happen to my single-core droplet, but come what may =)
If you have read to the end - thanks! So, my work was not in vain and you found something interesting for yourself. Questions, comments and suggestions, please leave in the comments.
Alexander Gutnikov, frontend developer, Badoo.
Game engine
Once upon a time a demo of the game with pretty pixelart graphics caught my eye. The game was made on the JavaScript engine Impact . About him even once mentioned on Habré .
')
The engine is paid, I bought it a couple of years ago, but I didn’t do anything practical on it, and finally it came in handy to me. I must say that the process of creating a game on it is in itself a very exciting experience, and for people like me who want to quickly and inexpensively feel like cool igrodels, this is what you need. Having decided on the technology of communication and the game engine, you can proceed to the implementation. Personally, I started with game rooms.
Game rooms
How can a player get into the game and how to invite his friends to it? Many online games use so-called rooms or channels so that players can play with each other. To do this, you need a server that allows you to create these same rooms and add / delete users. The scheme of his work is quite simple: when the user starts the game, and in our case opens the browser window with the address of the game, the following happens:
- a new player tells the server the name of the room in which he would like to play;
- the server sends back a list of players in this room;
- the rest of the players receive a notification about the appearance of a new member.
All this is quite simple to implement, for example, on node.js + socket.io. What happened, you can see here . After the player has entered the game room, he must establish a peer-to-peer connection with each of the players in this room. But, before turning to the implementation of peer-to-peer data, I suggest thinking about what kind of data it will be in principle.
Interaction protocol
The format and meaning of the messages transmitted between players, strongly depends on what will happen in the game. In our case, this is a simple 2D shooter where players run and shoot each other. Therefore, the first thing you need to know about the location of other players on the map:
message PlayerPosition { int16 x; int16 y; } Receiving such a message you can understand where the player is, but you can not understand how he looks at the moment. Therefore, to complete the picture, here you can add information about what kind of animation the player has at the moment, what frame it is in and in which direction it looks:
message PlayerPositionAndAnimation { int16 x; int16 y; int8 anim; int8 animFrame; bool flipped; } Fine! What other messages will be needed? Depending on what you plan to do in the game, you will have your own set, and I got something like this:
- player dies ();
- the player is born (int16 x, int16 y);
- player shoots (int16 x, int16 y, boolean flipped);
- the player picks up the weapon (int8 weapon_id).
Typed fields in messages
As you can see, each of the fields in the messages has its own data type, for example, int16 - for the fields that represent the coordinates. Let's understand this right away, at the same time I will tell you a little about the WebRTC API. The fact is that for data transfer between peers, an object of the type RTCDataChannel is used , which, in turn, can work with data of the type USVString , BLOB , ArrayBuffer or ArrayBufferView . Just in order to use ArrayBufferView , and you need to clearly understand what format the data will be.
So, having described all the messages, we are ready to continue and go directly to the organization of interaction between the feasts. Here I will try to describe the hardware as briefly as I can. In general, trying to tell about WebRTC in all its details is a long and difficult task, all the more so since in public access there is a book by Ilya Grigorik , which is simply a wealth of information on this and other topics related to networking. My goal, as I said, is to give a brief description of the basic mechanisms of WebRTC, with the study of which everyone will have to start.
Connection setup
What is needed for A and B users to establish a peer-to-peer connection between themselves? Well, at least each of the users must know the address and port where his opponent listens and can receive incoming data. But how will A and B communicate this information to each other if the connection has not yet been established? To transfer this information you need a server. In WebRTC terminology, it is called a signalling server. And since its own server for game rooms has already been implemented, it can also be used as a signalling server.
Also, in addition to addresses and ports, A and B must agree on the parameters of the session to be established. For example, the use of certain codecs and their parameters in the case of audio and video communications. The format of the data describing various properties of the connection is called SDP - Session Description Protocol. More information on him can be found at webrtchacks.com . So, based on the above, the order of data exchange through signaling is as follows:
- User A sends a connection request to User B;
- User B confirms the request from A;
- having received confirmation, user A determines his IP, port, possible session parameters and sends them to user B;
- User B responds by sending his address, port and session parameters to User A.
Upon completion of these actions, both users know each other’s addresses and parameters and can begin to exchange data. But before moving on to implementation, there is one more thing to learn about the definition of a pair of IP address + port.
Address determination and availability check
When each user is available at a public IP address or both are on the same subnet, everything is simple. Then each of them can request his IP from the operating system and send it through signaling to his opponent. But what to do if the user is not directly accessible, but is behind NAT, and he has two addresses: one is local, inside the subnet ( 192.168.1.1 ), the second is the address of the NAT itself ( 50.76.44.114 )? In this case, he somehow needs to determine his public address and port.
The idea of the solution is quite simple: we need a publicly available server, which, upon receiving a request from us, will send back our public address and port.
Such servers are called STUN ( Session Traversal Utilities for NAT ). There are ready-made solutions, for example, coturn, which can be deployed as your STUN server. But you can do even easier and use the already deployed and accessible servers, for example from Google.
Thus, everyone can get their address and send it to their opponent. But this is not enough, because after receiving the address from your opponent you need to check whether we can reach him at this address?
Fortunately, the ICE ( Interactive Connectivity Establishment ) framework embedded in the browser takes on the task of interacting with STUN and the availability test. All we need is to handle the events of this framework. So let's get down to implementing ...
Making a connection
At first it may seem that the process of setting up a connection is rather complicated. But, fortunately, all the complexity is hidden with just one interface RTCPeerConnection, and in practice everything is simpler than it might seem at first glance. The full code for the class that implements the peer-to-peer connection can be found here , then I will explain it.
As I have already said, setting up, monitoring and closing a connection, as well as working with SDP and ICE candidates - all this is done via RTCPeerConnection. More detailed information about the configuration can be found, for example, here . As a configuration, we will only need the address of the STUN server from Google, which I mentioned above.
iceServers: [{ url: 'stun:stun.l.google.com:19302' }], connect: function() { this.peerConnection = new RTCPeerConnection({ iceServers: this.iceServers }); // ... } RTCPeerConnection provides a set of callbacks for various connection lifecycle events, from which we will need:
- icecandidate - to process the found candidate;
- iceconnectionstatechange - to track the status of the connection;
- datachannel - for processing an open data channel.
init: function(socket, peerUser, isInitiator) { // ... this.peerHandlers = { 'icecandidate': this.onLocalIceCandidate, 'iceconnectionstatechange': this.onIceConnectionStateChanged, 'datachannel': this.onDataChannel }; this.connect(); }, connect: function() { // ... Events.listen(this.peerConnection, this.peerHandlers, this); // .... } Send connection request
In the list of actions for a connection, the first two points were the request to establish a connection and the confirmation of this request. We will simplify the process a bit and assume that if the user knows the address of the game room, then someone gave him a link, so the request to establish a connection is not required, you can immediately proceed to the exchange of session data and addresses.
Defining session parameters
To get session parameters in RTCPeerConnection, there are createOffer methods — for calling on the originating side, and createAnswer — on the answering side. The result of the work of these methods are the data in SDP format, which must be sent through signaling to the opponent. RTCPeerConnection stores both a local session description and a remote session, obtained through signaling from an opponent. To set these fields there are setLocalDescription and setRemoteDescription methods . So, let's say client A initiates a connection, then the procedure is as follows:
1. Client A creates an SDP-offer, sets a local session description in his RTCPeerConnection , and then sends it to client B:
connect: function() { // ... if (this.isInitiator) { this.setLocalDescriptionAndSend(); } }, setLocalDescriptionAndSend: function() { var self = this; self.getDescription() .then(function(localDescription) { self.peerConnection.setLocalDescription(localDescription) .then(function() { self.log('Sending SDP', 'green'); self.sendSdp(self.peerUser.userId, localDescription); }); }) .catch(function(error) { self.log('onSdpError: ' + error.message, 'red'); }); }, getDescription: function() { return this.isInitiator ? this.peerConnection.createOffer() : this.peerConnection.createAnswer(); } 2. Client B receives an offer from client A and establishes a remote session description. Then it creates an SDP-answer, sets it as a local session description and sends it to client A:
setSdp: function(sdp) { var self = this; // Create session description from sdp data var rsd = new RTCSessionDescription(sdp); // And set it as remote description for peer connection self.peerConnection.setRemoteDescription(rsd) .then(function() { self.remoteDescriptionReady = true; self.log('Got SDP from remote peer', 'green'); // Add all received remote candidates while (self.pendingCandidates.length) { self.addRemoteCandidate(self.pendingCandidates.pop()); } // Got offer? send answer if (!self.isInitiator) { self.setLocalDescriptionAndSend(); } }); } 4. After client A receives the SDP-answer from client B, it also sets it as a remote session description. As a result, each client has established a local session description and a remote one received from his opponent:
ICE candidate gathering
Each time the client's ICE agent A finds a new IP + port pair that can be used for communication, the icecandidate event is fired for RTCPeerConnection . Candidate data is as follows:
candidate:842163049 1 <b>udp</b> 1677729535 <b>94.221.38.159 60478 typ srflx raddr 192.168.1.157 rport 60478</b> generation 0 ufrag KadE network-cost 50 Here's what you can understand by looking at this data:
- udp : If the ICE agent decides to use this candidate for communication, then udp transport will be used for it;
- typ srflx is a candidate obtained by accessing a STUN server to determine the NAT address;
- 94.221.38.159 60478 — NAT address and port to be used for communication;
- raddr 192.168.1.157 rport 60478 - the address and port inside NAT.
You can read more about the protocol for describing ICE candidates here .
This data needs to be transmitted through signaling to client B so that he adds them to his RTCPeerConnection. Client B does the same when it detects its IP + port pairs:
// When ice framework discoveres new ice candidate, we should send it // to opponent, so he knows how to reach us onLocalIceCandidate: function(event) { if (event.candidate) { this.log('Send my ICE-candidate: ' + event.candidate.candidate, 'gray'); this.sendIceCandidate(this.peerUser.userId, event.candidate); } else { this.log('No more candidates', 'gray'); } } addRemoteCandidate: function(candidate) { try { this.peerConnection.addIceCandidate(new RTCIceCandidate(candidate)); this.log('Added his ICE-candidate:' + candidate.candidate, 'gray'); } catch (err) { this.log('Error adding remote ice candidate' + err.message, 'red'); } } Creating a data feed
Well, and perhaps the last thing worth staying at is RTCDataChannel . This interface provides us with an API with which you can transfer arbitrary data, as well as customize the properties of data delivery:
- full or partial guarantee of message delivery;
- ordered or unordered message delivery.
More details about the configuration of RTCDataChannel can be found, for example, here . At the moment, the ordered = false property will be enough to preserve the UDP semantics when transferring our data. Like RTCPeerConnection , RTCDataChannel provides a set of events describing the life cycle of a data channel. From it, you will need open , close and message to open, close a channel and receive a message, respectively:
init: function(socket, peerUser, isInitiator) { // ... this.dataChannelHandlers = { 'open': this.onDataChannelOpen, 'close': this.onDataChannelClose, 'message': this.onDataChannelMessage }; this.connect(); }, connect: function() { // ... if (this.isInitiator) { this.openDataChannel( this.peerConnection.createDataChannel(this.CHANNEL_NAME, { ordered: false })); } }, openDataChannel: function(channel) { this.dataChannel = channel; Events.listen(this.dataChannel, this.dataChannelHandlers, this); } Finally, after successfully opening a data channel between players, you can begin to transfer game messages between them.
More players
We considered how to establish a connection between two players, and this, in principle, is enough to play one on one. And if we want to have several players in the same room? What will change then? In fact - nothing, just for each pair of players must have its own connection. Those. if you are playing in a room with 3 more players, you must have 3 peer-to-peer connections with each of them. The full code of the class responsible for interacting with all opponents in the room can be found here .
So, the signaling server with rooms is ready, the format of messages and the method of their delivery have been discussed, so how can we make players see each other based on this?
Location sync
The idea of synchronization is quite simple: you need to send your coordinates to your opponents once at some time, then they can reliably reflect your location based on this data.
How often do I need to send sync messages? Ideally, the opponent should see updates as often as the player, i.e. if the game works with a frame rate of 30-60 frames per second, then the messages should also be sent with the same frequency. But this is a rather naive decision, and much ultimately depends on the dynamism of the game itself. For example, is it worth sending coordinates so often if they change every ten to twenty seconds? Perhaps in this case it is unnecessary. In my case, the animation and position of the players changes quite often, so I decided to go the simple way and send messages with coordinates to each frame.
Sending synchronization message:
update: function() { // ... // Broadcast state this.connection.broadcastMessage(MessageBuilder.createMessage(MESSAGE_STATE) .setX(this.player.pos.x * 10) .setY(this.player.pos.y * 10) .setVelX((this.player.pos.x - this.player.last.x) * 10) .setVelY((this.player.pos.y - this.player.last.y) * 10) .setFrame(this.player.getAnimFrame()) .setAnim(this.player.getAnimId()) .setFlip(this.player.currentAnim.flip.x ? 1 : 0)); // ... } Receive sync message:
onPeerMessage: function(message, user, peer) { // ... switch (message.getType()) { case MESSAGE_STATE: this.onPlayerState(remotePlayer, message); break; // ... } }, onPlayerState: function(remotePlayer, message) { remotePlayer.setState(message); }, // in RemotePlayer class: setState: function(state) { var x = state.getX() / 10; var y = state.getY() / 10; this.dx = state.getVelX() / 10; this.dy = state.getVelY() / 10; this.pos = { x: x, y: y }; this.currentAnim = this.getAnimById(state.getAnim()); this.currentAnim.frame = state.getFrame(); this.currentAnim.flip.x = !!state.getFlip(); this.stateUpdated = true; } Unfortunately, what turned out works without any delays only until you start playing with someone real, who is sitting at another computer and not on the same network with you. Because then it starts working like this:
The fact is that for a smooth image it is necessary to deliver messages with a constant frequency - the same with which they were sent. To achieve this in real conditions is almost impossible, because of this, the intervals between incoming messages are constantly changing, creating an effect that is unpleasant to the eye. You can defeat him using extrapolation of coordinates.
Extrapolation of coordinates
First you need to understand in more detail how message delays affect the quality of a picture that a player sees. For a smooth movement, it is necessary that messages arrive at an equal interval close to the frame refresh rate in the game:
In practice, it turns out something else. The intervals between messages are unevenly distributed, which leads to hopping animation and changing coordinates:
When looking at the second scheme, it becomes clear what happens at the moment of an increased message delay: the player first sees a fade, and then a sharp jump. This produces an unpleasant effect.
The movement would be much smoother if, at the moments of delay, the coordinates of the player changed proportionally, though not always reliably:
And indeed, if we analyze the movement of players, it can be understood that there is usually no abrupt change in the direction of movement, which means that without receiving the next message with coordinates at some point, we can assume them based on, for example, its speed in the previous frame. To do this, you must either calculate this speed on the receiving side, or simply send it along with the coordinates. I, as usual, chose the easiest way and send it along with the coordinates. And now, if there was no message with coordinates updating in a certain frame, they are calculated from the player’s speed in the previous frame:
setState: function(state) { var x = state.getX() / 10; var y = state.getY() / 10; this.dx = state.getVelX() / 10; this.dy = state.getVelY() / 10; this.pos = { x: x, y: y }; this.currentAnim = this.getAnimById(state.getAnim()); this.currentAnim.frame = state.getFrame(); this.currentAnim.flip.x = !!state.getFlip(); this.stateUpdated = true; }, update: function() { if (this.stateUpdated) { this.stateUpdated = false; } else { this.pos.x += this.dx; this.pos.y += this.dy; } if( this.currentAnim ) { this.currentAnim.update(); } } And this is how it looks after applying extrapolation:
Of course, this method has a lot of flaws, and on very slow connections it can happen, for example, like this:
But the implementation of extrapolation goes far beyond the scope of this article, so I propose to dwell on what is.
Other game actions
In addition to moving around the map, it would be nice to collect cartridges and shoot someone. What I mean is that there are a number of actions that the player performs in the game, and they too are subject to synchronization. Fortunately, there are much fewer problems there than in the synchronization of movement: it is enough to simply reproduce the event received through the message. Therefore, I probably will not dwell on this in detail, but simply refer to the project code.
What happened in the end
The code (with the exception of the source code of ImpactJS itself) and the instructions for launching can be viewed on the github .
I would venture to leave this link here, where you can try to play . I don’t know what will happen to my single-core droplet, but come what may =)
At last
If you have read to the end - thanks! So, my work was not in vain and you found something interesting for yourself. Questions, comments and suggestions, please leave in the comments.
Alexander Gutnikov, frontend developer, Badoo.
Source: https://habr.com/ru/post/315812/
All Articles