Jenkins for Android on a clean system and without UI
On Habré already have similar articles on the theme of assembling an Android application using Jenkins. The key features / additions of the current will be the following:
So, you got access to the server. The UI is missing there, but this is not a problem at all.
First, let's install the jenkins server itself.
More details about what makes the installation of this package can be found in the official documentation .
')
After installation, Jenkins itself will be in the
However, before this you need to install everything you need to build an Android application.
On the official website below you can find links to the distribution kit that we need. Usually it is installed together with Android Studio, but in our case, we do not need it, so we select the desired link and load the command line tools (Command Line Tools).
At the time of this writing, the current version for Linux was: android-sdk_r24.4.1. To install, execute the following commands:
Next, you need to download the Platform Tools, Build tools used in your project and the current API for which you are building the application. To do this, look into the build.gradle file of your project (at the level of the application module). For example, in my project, the part of interest to us is as follows:
This clearly shows which versions we need to download. In order for us to download the components we need, we add the following parameters to the system variables:
Further, most guides suggest simply downloading all components using the command:
But since we feel sorry for wasting space on the hard drive, we will download only what we need. Run the command to find out exactly what we need to download:
The results are as follows:
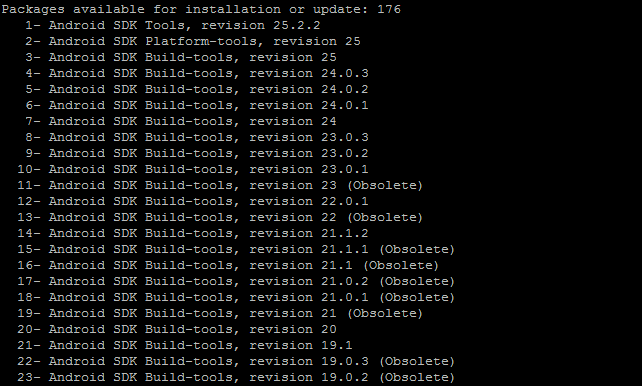
Now we can install only what we need with the help of the command:
Now put JAVA with the command:
Fine! We put everything you need to build Jenkins and build the application. Now go to setting up Jenkins.
If your git repository is public or you decide to access it using your login and password, you can skip this block and go directly to the next one.
So, we decided that we will do everything correctly and get access to the repository via SSH. To do this, we need to generate an ssh key and put it in the /var/lib/jenkins/.ssh directory.
When you installed jenkins, a user was automatically generated with the name jenkins on a unix machine. In order for jenkins to use the key, the easiest way is to generate it from under the user's jenkins.
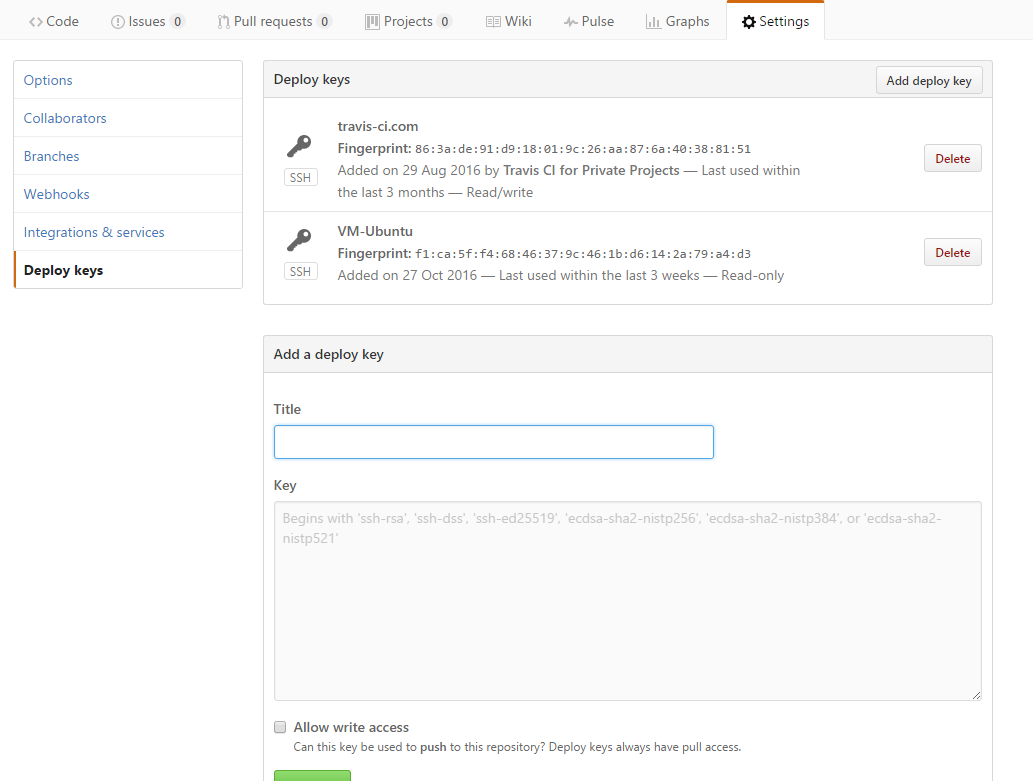
After that 2 files will be generated (with standard names id_rsa, id_rsa.pub). The id_rsa file must be put in the /var/lib/jenkins/.ssh directory, then the Deploy Key must be added in the github settings of the repository (the contents of the id_rsa.pub file).
It looks like this:
Next, add the repository URL to the list of known ones. To do this, try to access the repository and get a list of repository branches.
And we agree to add github to the list of known hosts. If you do not have access to the id_rsa file, it means that you created it not from under the user's jenkins, in which case you should give jenkins access to the user to work with this file:
After completing these steps, we will be able to access our private repository for building an Android application.
Now let's go to jenkins. By default, it will be available on port 8080. We will switch to this port in any browser. After the first start, you will be able to log in using a password that is located in the / var / lib / jenkins / secrets / initialAdminPassword file. After that you get to Jenkins panel. First we need to configure the path to the ANDROID_HOME directory.
Manage Jenkins (System Jenkins) → System Configuration (System Configuration):

Also configure the paths to the JDK, the Gradle version and Git. To do this, specify the directory where JAVA is stored, and add the gradle version required for the build.
Manage Jenkins (Configure Jenkins) → Global Tool Configuration:


Now we can create the first task to build the application. Let's choose to create a task with a free configuration. On the tab with the "Source Code Management" choose git. Next, specify the url of the git repository for ssh access. For the first task we will collect from the wizard branch. That is the default and specified.
Next, add the build step by running the gradle script. Select the gradle version added earlier. On all important fields are hints, why they are needed. For example, if you have a non-standard project structure, then you need to specify the place where the root build.gradle project file and the file name are found, if it is different from build.gradle.

Next, archive the .apk files so that testers or someone else can download them later. To do this, add a post-assembly task and specify the format, which files we want to save. The first time I created a task, I assumed that the search for the desired file was performed using a regular expression format, but it turned out that Jenkins uses the Ant path style to find files. As a standard, it is proposed to save all files with the .apk extension, but most of them are not needed, so we will save only those that end in debug.apk and release.apk.

To publish an application on Google Play, the .apk file must be signed with a special key . If you signed using Android Studio, indicating the path to the file, then you need to learn how to do it from the build.gradle script. Next, we look at the simplest example and ways to improve it. It is enough to put the key under version control, and then refer to it from the build script. Here is an example of how this can be implemented.
The disadvantage of the solution is that your private key is stored under version control, as is the password for building the release version of the application. Pay attention to the fact that even if you remove the key in the future and correct the build.gradle script, then there is a possibility that someone, after digging into the commit history, will restore this information, so be careful. A better solution would be to keep the property file, which is not under version control and lies, for example, in the ~ / home directory in which all the necessary parameters are written.
For example, our project uses the following approach. The file with the settings and the file for the signature are missing in the version control. For developers, they are covered with hands. Thus, we solve the problem that someone who does not follow this may sign your application. Now you need to solve the problem so that Jenkins himself could sign the application. To do this, we will check the presence of the file in two places when signing the application. The first is the root directory of the project. The second is a specific place on the server where it is expected that this file should be stored. Then you enclose this file on the jenkins server and get the opportunity to collect signed versions of the application. Here is an example gradle script, as it is implemented:
Fabric is a great system for building crash reports for your application. If you are using standard Google analytics to build kreshy, then I highly recommend to look at the fabric or firebase. To use Fabric, we need to install the jenkins plugin.
Customize jenkins (Manage Jenkins) → Manage Plugins (Manage Plugins) tab Available, enter the Fabric. We are interested in Fabric Beta Publisher . After installing it, let's return to the task description and add another one.


You need to specify Fabric_api_key, as well as secret_key, and specify the relative path to the .apk file of the application, which we will upload to testers. You can view these values in the personal account of the fabric. Settings → Organizations → {Your_app_name} → API_KEY, Build Secret.
Further you can send notifications for your testers. You can specify both email and testers group. How to manage groups, you will know best yourself. For example, we prefer to use 2 groups: dev, production. All test application builds will notify the dev group of testers, and the assemblies that will be uploaded to Google Play will notify production of the testers group.
Further, if our assemblies are somehow different from each other, then we need to specify this information in Build Notes for testers. We do this through the Environment Variable and the script that will fill in this information.
Our project adheres to the following approach. When the time comes for release, a delivery_xx branch is created from the master branch, where xx is the sprint number. Unfortunately, Jenkins by default does not know how to build assemblies from branches, where the name of the branch may change. We have to teach him that ourselves.
To do this we need to install another plugin - EnvInject . After this, we return to the task view and set a new option - Prepare an environment for the run. Thanks to this plugin, we can execute any groovy script, and then save all the necessary results in the environment variables.
In our case, we need to get a list of branches from the repository and find a branch whose name begins with delivery. Also, we need to set up build notes for testers, so that they know from which branch the application was built. The script for this will look like this:
Sure, here you can add any logic you need in your particular case.
Next, correct the name of the branch from which to build.

And we will update the application publishing block in the fabric, as shown in the screenshot above.
Now we can do almost all the points described at the beginning of the article, and all we have to do is learn how to publish the final build of the application in google play.
For us, we have already prepared a plugin for publishing applications on Google Play using Jenkins. Put it: Google Play Android Publisher Plugin . Next, we need to create a special service account that will be engaged in the publication of applications on Google Play. To do this, follow these steps:
The same in pictures:


Next, you must issue the appropriate access in the developer console for the created service account and publish applications. To do this, perform the following steps:
The same in pictures:

Now we can exit the developer console and proceed to setting up Jenkins to publish the application.
The same in pictures:


Next, go to the task view and add the Step after assembly - Upload Android APK to Google Play.
You must specify the credentials for this step that we added earlier. As well as the path to the apk file and information, what percentage of users need to be transferred to this version. Probably initially it will be 100%. You also need to specify which version of the .apk file you are uploading. You can publish alpha, beta, production versions via jenkins. After that, you can safely run the task, and go for tea yourself, while jenkins does all the routine work of assembling, signing the application and publishing for you.
Now we are able to create tasks, we can give testers access, and they themselves will build application assemblies for themselves when they need it. Naturally, we do not want our QA to randomly publish an application. I propose to do the following.
We will need to take out the publication of the application in a separate task and take access from QA to start this task.

Now our QA will not be able to accidentally publish the application on Google Play.
Perhaps that's all. We could continue to improve the automatic assembly and publication of applications, but this is beyond the scope of this tutorial.
PS It would also be interesting to compare Jenkins with other CI servers and see how to implement similar items for building applications. It is also interesting to try to arrange the task not in the form of a free configuration, but with the help of PipeLine, so that we can describe the entire configuration in a document that we put under version control and will be dynamically changed in the project.
- We will install Jenkins on a remote Linux machine where there is no UI.
- We will build the application from the private repository.
- We will solve the problem of building an application from a branch whose name we do not know.
- After assembling the .apk files, we will send them to the Fabric and notify the testers.
- After sending to Fabric, we will publish the application on Google Play.
- Protect application publishing tasks from running by testers.
Install jenkins
So, you got access to the server. The UI is missing there, but this is not a problem at all.
First, let's install the jenkins server itself.
$ wget -q -O - https://pkg.jenkins.io/debian/jenkins-ci.org.key | sudo apt-key add - $ sudo sh -c 'echo deb http://pkg.jenkins.io/debian-stable binary/ > /etc/apt/sources.list.d/jenkins.list' $ sudo apt-get update $ sudo apt-get install jenkins More details about what makes the installation of this package can be found in the official documentation .
')
After installation, Jenkins itself will be in the
/var/lib/jenkins directory, project repositories and other files necessary for Jenkins to work. Now you can log in to Jenkins via a browser and start configuring your CI server.However, before this you need to install everything you need to build an Android application.
Install Android SDK + JAVA
On the official website below you can find links to the distribution kit that we need. Usually it is installed together with Android Studio, but in our case, we do not need it, so we select the desired link and load the command line tools (Command Line Tools).
At the time of this writing, the current version for Linux was: android-sdk_r24.4.1. To install, execute the following commands:
$ wget http://dl.google.com/android/android-sdk_r24.4.1-linux.tgz $ tar -xvf android-sdk_r24.4.1-linux.tgz Next, you need to download the Platform Tools, Build tools used in your project and the current API for which you are building the application. To do this, look into the build.gradle file of your project (at the level of the application module). For example, in my project, the part of interest to us is as follows:
android { .... compileSdkVersion 25 buildToolsVersion '25.0.0' .... } This clearly shows which versions we need to download. In order for us to download the components we need, we add the following parameters to the system variables:
$ export ANDROID_HOME=~/android-sdk-linux # SDK-Tools $ export PATH=$ANDROID_HOME/tools:$PATH $ export PATH=$ANDROID_HOME/platform-tools:$PATH Further, most guides suggest simply downloading all components using the command:
$ android update sdk --no-ui --all But since we feel sorry for wasting space on the hard drive, we will download only what we need. Run the command to find out exactly what we need to download:
$ android list sdk --all The results are as follows:
Now we can install only what we need with the help of the command:
$ android update sdk --no-ui --all --filter 1,2,163,164,168,169,170,171 Now put JAVA with the command:
$ sudo apt-get install openjdk-8-jdk Fine! We put everything you need to build Jenkins and build the application. Now go to setting up Jenkins.
Setting up access to a private repository
If your git repository is public or you decide to access it using your login and password, you can skip this block and go directly to the next one.
So, we decided that we will do everything correctly and get access to the repository via SSH. To do this, we need to generate an ssh key and put it in the /var/lib/jenkins/.ssh directory.
When you installed jenkins, a user was automatically generated with the name jenkins on a unix machine. In order for jenkins to use the key, the easiest way is to generate it from under the user's jenkins.
$ sudo su jenkins -s /bin/bash $ ssh-keygen -t rsa -b 4096 -C "your_email@example.com" After that 2 files will be generated (with standard names id_rsa, id_rsa.pub). The id_rsa file must be put in the /var/lib/jenkins/.ssh directory, then the Deploy Key must be added in the github settings of the repository (the contents of the id_rsa.pub file).
It looks like this:
Next, add the repository URL to the list of known ones. To do this, try to access the repository and get a list of repository branches.
$ sudo apt-get install git # git $ sudo su jenkins -s /bin/bash $ git ls-remote -h git@github.com:[your_repo_url] And we agree to add github to the list of known hosts. If you do not have access to the id_rsa file, it means that you created it not from under the user's jenkins, in which case you should give jenkins access to the user to work with this file:
$ sudo chmod 700 /var/lib/jenkins/.ssh/id_rsa After completing these steps, we will be able to access our private repository for building an Android application.
Creating a task for building an application
Now let's go to jenkins. By default, it will be available on port 8080. We will switch to this port in any browser. After the first start, you will be able to log in using a password that is located in the / var / lib / jenkins / secrets / initialAdminPassword file. After that you get to Jenkins panel. First we need to configure the path to the ANDROID_HOME directory.
Manage Jenkins (System Jenkins) → System Configuration (System Configuration):
Also configure the paths to the JDK, the Gradle version and Git. To do this, specify the directory where JAVA is stored, and add the gradle version required for the build.
Manage Jenkins (Configure Jenkins) → Global Tool Configuration:
Now we can create the first task to build the application. Let's choose to create a task with a free configuration. On the tab with the "Source Code Management" choose git. Next, specify the url of the git repository for ssh access. For the first task we will collect from the wizard branch. That is the default and specified.
Next, add the build step by running the gradle script. Select the gradle version added earlier. On all important fields are hints, why they are needed. For example, if you have a non-standard project structure, then you need to specify the place where the root build.gradle project file and the file name are found, if it is different from build.gradle.
Next, archive the .apk files so that testers or someone else can download them later. To do this, add a post-assembly task and specify the format, which files we want to save. The first time I created a task, I assumed that the search for the desired file was performed using a regular expression format, but it turned out that Jenkins uses the Ant path style to find files. As a standard, it is proposed to save all files with the .apk extension, but most of them are not needed, so we will save only those that end in debug.apk and release.apk.
Build signed apk using build.gradle script
To publish an application on Google Play, the .apk file must be signed with a special key . If you signed using Android Studio, indicating the path to the file, then you need to learn how to do it from the build.gradle script. Next, we look at the simplest example and ways to improve it. It is enough to put the key under version control, and then refer to it from the build script. Here is an example of how this can be implemented.
android { signingConfigs { release { keyAlias 'KEY_ALIAS' keyPassword 'KEY_PASSWORD' storeFile file('RELATIVE_PATH_TO_KEYSTORE') storePassword 'STORE_PASSWORD' } } ... buildTypes { release { signingConfig signingConfigs.release } } } The disadvantage of the solution is that your private key is stored under version control, as is the password for building the release version of the application. Pay attention to the fact that even if you remove the key in the future and correct the build.gradle script, then there is a possibility that someone, after digging into the commit history, will restore this information, so be careful. A better solution would be to keep the property file, which is not under version control and lies, for example, in the ~ / home directory in which all the necessary parameters are written.
For example, our project uses the following approach. The file with the settings and the file for the signature are missing in the version control. For developers, they are covered with hands. Thus, we solve the problem that someone who does not follow this may sign your application. Now you need to solve the problem so that Jenkins himself could sign the application. To do this, we will check the presence of the file in two places when signing the application. The first is the root directory of the project. The second is a specific place on the server where it is expected that this file should be stored. Then you enclose this file on the jenkins server and get the opportunity to collect signed versions of the application. Here is an example gradle script, as it is implemented:
android { ... signingConfigs { if (rootProject.file("release.properties").exists() || new File("/home/ubuntu/release.properties").exists()) { def properties = new Properties() def fileToLoad = rootProject.file("release.properties").exists() ? new FileInputStream(rootProject.file("release.properties")) : new FileInputStream("/home/username/release.properties") properties.load(fileToLoad) release { keyAlias properties.keyAlias keyPassword properties.keyAliasPassword storePassword properties.keyStorePassword storeFile rootProject.file('keystore.jks') } } } ... buildTypes { release { if (signingConfigs.hasProperty("release")) signingConfig signingConfigs.release } } } Publishing test builds in Fabric and alerting testers
Fabric is a great system for building crash reports for your application. If you are using standard Google analytics to build kreshy, then I highly recommend to look at the fabric or firebase. To use Fabric, we need to install the jenkins plugin.
Customize jenkins (Manage Jenkins) → Manage Plugins (Manage Plugins) tab Available, enter the Fabric. We are interested in Fabric Beta Publisher . After installing it, let's return to the task description and add another one.
You need to specify Fabric_api_key, as well as secret_key, and specify the relative path to the .apk file of the application, which we will upload to testers. You can view these values in the personal account of the fabric. Settings → Organizations → {Your_app_name} → API_KEY, Build Secret.
Further you can send notifications for your testers. You can specify both email and testers group. How to manage groups, you will know best yourself. For example, we prefer to use 2 groups: dev, production. All test application builds will notify the dev group of testers, and the assemblies that will be uploaded to Google Play will notify production of the testers group.
Further, if our assemblies are somehow different from each other, then we need to specify this information in Build Notes for testers. We do this through the Environment Variable and the script that will fill in this information.
Our project adheres to the following approach. When the time comes for release, a delivery_xx branch is created from the master branch, where xx is the sprint number. Unfortunately, Jenkins by default does not know how to build assemblies from branches, where the name of the branch may change. We have to teach him that ourselves.
To do this we need to install another plugin - EnvInject . After this, we return to the task view and set a new option - Prepare an environment for the run. Thanks to this plugin, we can execute any groovy script, and then save all the necessary results in the environment variables.
In our case, we need to get a list of branches from the repository and find a branch whose name begins with delivery. Also, we need to set up build notes for testers, so that they know from which branch the application was built. The script for this will look like this:
def gitURL = "git@github.com:[your_repo_url]" def command = "git ls-remote -h $gitURL" def proc = command.execute() proc.waitFor() if (proc.exitValue() != 0) { println "Error ${proc.err.text}" } def branch = proc.in.text.readLines() .collect { it.replaceAll(/[a-z0-9]*\trefs\/heads\//, '')} .find { it.startsWith("delivery")} if (branch == null) { def build = Thread.currentThread().executable build.doStop() return 0 } def map = [BRANCH: branch, FABRIC_RELEASE_NOTES: "$branch"] Sure, here you can add any logic you need in your particular case.
Next, correct the name of the branch from which to build.
And we will update the application publishing block in the fabric, as shown in the screenshot above.
Now we can do almost all the points described at the beginning of the article, and all we have to do is learn how to publish the final build of the application in google play.
Publish to Google Play
For us, we have already prepared a plugin for publishing applications on Google Play using Jenkins. Put it: Google Play Android Publisher Plugin . Next, we need to create a special service account that will be engaged in the publication of applications on Google Play. To do this, follow these steps:
- Go to the developer console under the account owner.
- Settings → API access.
- Click "Create a project."
- Click "Create an application account."
- Follow the link.
- In the drop-down list, click "Edit" and change the name of the account to the required, for example "Jenkins".
- In the drop-down list, select “Create key” and select the key type “JSON”.
- Click to create a key.
- A file will be automatically downloaded, which will later be used for authentication in the plugin developer console to publish the application.
The same in pictures:
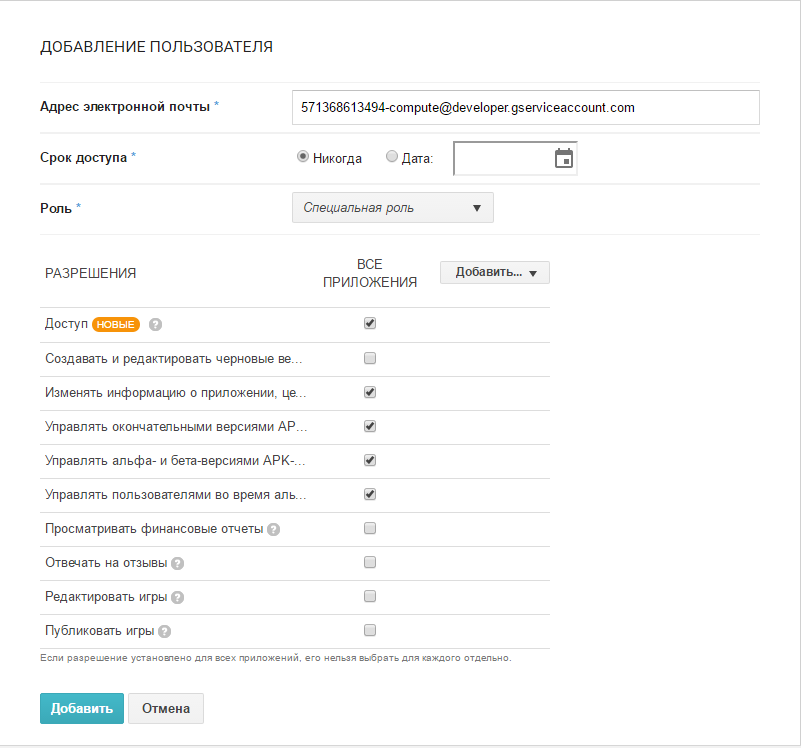
Next, you must issue the appropriate access in the developer console for the created service account and publish applications. To do this, perform the following steps:
- Return to the developer console
- For the created application account, click "Open Access"
- For the created application account, click "Open Access"
- You need to make sure that you have permissions to change the application and control information for the Production, Alpha and Beta versions of the application
- Click add
The same in pictures:
Now we can exit the developer console and proceed to setting up Jenkins to publish the application.
- Go to Jenkins
- Select the menu item "Credentials"
- Select public access and click "Add Credentials"
- Select the type of access: "Google Service Account from private key"
- Enter the access name (it will be used later in the task setup), for example android-publish
- Choose the type "JSON key"
- Download the file that we previously downloaded the “JSON key”
- Click OK to create access.
The same in pictures:
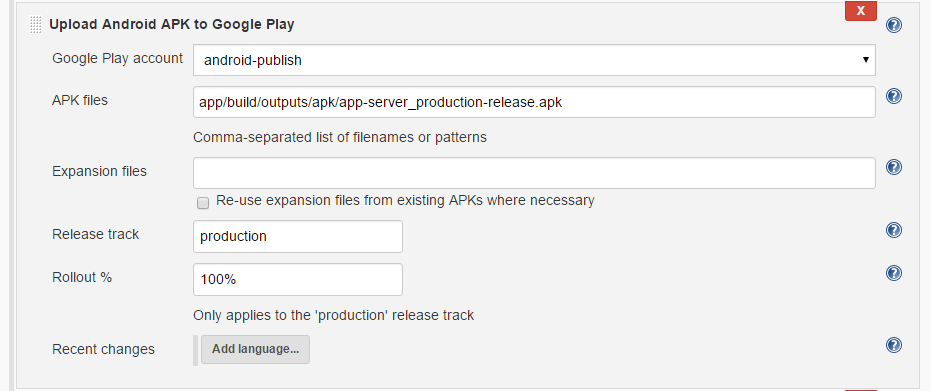
Next, go to the task view and add the Step after assembly - Upload Android APK to Google Play.
You must specify the credentials for this step that we added earlier. As well as the path to the apk file and information, what percentage of users need to be transferred to this version. Probably initially it will be 100%. You also need to specify which version of the .apk file you are uploading. You can publish alpha, beta, production versions via jenkins. After that, you can safely run the task, and go for tea yourself, while jenkins does all the routine work of assembling, signing the application and publishing for you.
Protection of critical tasks
Now we are able to create tasks, we can give testers access, and they themselves will build application assemblies for themselves when they need it. Naturally, we do not want our QA to randomly publish an application. I propose to do the following.
We will need to take out the publication of the application in a separate task and take access from QA to start this task.
- Go to Settings Jenkins → Configure Global Security
- “Authorization” block → choose the item “Project-based Matrix Authorization Strategy”
- Immediately add your username and set all items for yourself as available. If you do not make this item, you will deny access to yourself from jenkins (if it still happened, see the solution here ).
- Next, add the username QA, and set it permissions that you consider necessary. For us it is important not to let him run tasks. “Task” block, “Build” item
- After that, go to the task, access for which we want to give QA, and give him the appropriate access.
Now our QA will not be able to accidentally publish the application on Google Play.
Perhaps that's all. We could continue to improve the automatic assembly and publication of applications, but this is beyond the scope of this tutorial.
PS It would also be interesting to compare Jenkins with other CI servers and see how to implement similar items for building applications. It is also interesting to try to arrange the task not in the form of a free configuration, but with the help of PipeLine, so that we can describe the entire configuration in a document that we put under version control and will be dynamically changed in the project.
Source: https://habr.com/ru/post/315804/
All Articles