React Testing

Each JS developer sooner or later begins to write tests and regret that he did not do this before. Since over the past couple of years everyone has gradually moved to component development based on React, Angular or, for example, Vue, this gave another impetus to popularize testing, since the components are usually small and testing them is much easier. In this article, we will look at component testing in React.
I apologize in advance for having to use English terms in this article. Translation of some phrases that have become the standard in the field of testing would lead to a loss of understanding and complication in the search for additional information.
')
Let's start by looking at the utilities that are needed to organize testing in a JS project:
- Test Runner is a utility that takes files with our tests, runs them and displays test results. The most popular tools in this area are Mocha and Karma.
- Assertion library - a library with a set of functions to check the conditions of your tests. Chai and Expect are the most used libraries from this field.
- The mock library is the library used to create mocks during testing. The utility allows you to replace the connected parts of the component under test with “plugs” that mimic the desired behavior. Here the most popular choice is Sinon.
Consider existing testing tools for React, and give examples of simple tests using these tools. I’ll say right away that I’m not going to describe how to set up the project’s build, ES6 transpaling, and so on: if you want, you can study all this yourself or find the articles you need in Habré. As a last resort - write, and I will try to help you.
Also within the framework of this article, we will not follow the path of “blind” use of the most popular libraries that is common in the field of testing, but we will look at those that have appeared recently and try to understand whether they deserve attention.
Act 1
The first thing we need is a TestRunner for our future tests. As promised, this review will not consider popular utilities, such as Karma or Mocha. Consider a new tool: Jest from Facebook. Unlike Mocha, Jest is quite simple to configure, integrate into a project and is quite functional. This is a young project that a year ago was quite “sad” to use: it lacked much of the functionality required for tests, for example, there was no testing of asynchronous functions or a watch-mode that would monitor changed files. Now this product is already pretty "devoured" and can be with such monsters as Mocha or Karma. In addition, the maintainers began to promptly correct defects, which was completely lacking several years ago. So let's take a look at what Jest can do:
- Amazingly easy to integrate into a project.
No need to put a dozen small libraries and customize their interaction with each other, since Jest already contains everything you need. I understand those who at least once used the popular Karma + Mocha + Sinon bundle for tests, the rest will have to take my word for it. - Running tests and displaying test results
The jest contains enough parameters to customize the search and run tests, so you can always customize it for your project and tasks. - Contains an assert library, which, however, can be replaced by any other
The jest is based on the second version of the Jasmine library, so if you have once worked with it, the syntax will seem familiar. If you don't like Jasmine, you can use your favorite library. - Able to run each test in a separate process, thereby accelerating the execution of tests
- Able to work with asynchronous code and test code using timers
- Able to automatically create "plugs" for imported components
In fact, this is one of the killer features of Jest, but rather difficult to configure. It is because of it that many people at the time refused to use Jest, and in new versions it is now disabled by default. - Able to work in interactive watch-mode
Jest has a pretty cool interactive mode that allows you to run not only tests for changed components, but also, for example, from the last commit in git, the latest tests that failed, or using the pattern to search by name. - Able to collect the coverage of the project tests (coverage)
- Contains jsdom and, as a result, can run tests without a browser
- Can test components using snapshots
This is not all that can Jest. For more information on this utility, you can read on their official website - facebook.imtqy.com/jest . However, Jest also contains some drawbacks that I noted for myself:
- The Jest documentation is rather "scant", often you have to look for the answer yourself, rummaging through github or stack overflow.
- Cannot run tests in browsers
Yes, its plus is also its minus. True, for me this is not a critical minus, because I try to avoid situations where the display may differ in different browsers. - Slow start of tests.
About the slow start. The Jest development team is constantly making improvements that speed test execution. After Dmitrii Abramov joined them, the situation has greatly improved, this is confirmed . Nevertheless, according to my personal feelings, the tests that I wrote using Karma + Mocha, nevertheless, started and worked out faster than those written using Jest. Hopefully, over time, the guys will eliminate this disadvantage.
So let's write some tests and see how they look in practice. First, take a simple function that calculates the sum of two numbers:
function sum(a, b) { return a + b; } The test for this function will be as follows:
describe('function tests', () => { it('should return 3 for arguments 1 and 2', () => { expect(sum(1, 2)).toBe(3); }); }); 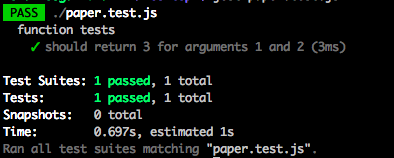
Everything is simple and familiar. Let's now complicate our function by adding a call to another function:
function initial() { return 1; } function sum(a, b) { return initial() + a + b; } A properly constructed test for an atomic element should exclude all dependencies on the rest of the code. Therefore, we need to exclude the possible incorrect operation of the initial function from our test of the sum function. To do this, we will make a “stub” for the initial function, which will return the value we need. The test will be as follows:
describe('function tests', () => { it('should return 4 for arguments 1 and 2', () => { initial = jest.fn((cb) => 1); expect(sum(1, 2)).toBe(4); }); }); Now let's complicate our function and suppose that, first, our sum function must be asynchronous, and second, it must think before returning the desired result to us:
function initial(salt) { return 1; } function sum(a, b) { return new Promise((resolve, reject) => { setTimeout(function(){ resolve({ value: initial(1) + a + b, param1: a, param2: b, }); }, 100); }); } Let's refine the test so that it takes into account our changes:
describe('function tests', () => { beforeAll(() => { jest.useFakeTimers(); }); afterAll(() => { jest.useRealTimers(); }); it('should return 4 for arguments 1 and 2', () => { initial = jest.fn((cb) => 1); const result = sum(1, 2); result.then((result) => { expect(result).not.toEqual({ value: 3, param1: 1, param2: 2, }); expect(initial).toHaveBeCalledWith(1); }); jest.runTimersToTime(100); return result; }) }); In this test, we applied several new Jest features:
- First, we asked him to use fake-timers so that we could manage the time ourselves.
- Secondly, we saw how to test asynchronous functions
- Third, we saw how to use negatives and comparison of objects in verifying tests.
- Fourth, we saw how to test that our mock function was called with the right parameters.
Let's see how to test React components. Suppose we have a simple component that displays a greeting to the user and catches a click on the displayed text:
export default class Wellcome extends React.Component { onClick() { this.props.someFunction(this.props.username); } render() { return ( <div> <span onClick={this.onClick.bind(this)}>Wellcome {this.props.username}</span> </div> ); } } Let's test it:
import React from 'react'; import TestUtils from 'react-addons-test-utils'; import Wellcome from './welcome.jsx'; describe('<Welcome />', () => { it('Renders wellcome message to user', () => { const onClickSpy = jest.fn(); const username = 'Alice'; const component = ReactTestUtils.renderIntoDocument( <Wellcome username= {username} someFunction={onClickSpy} /> ); const span = TestUtils.findRenderedDOMComponentWithTag( component, 'span' ); TestUtils.Simulate.click(span); expect(span.textContent).toBe('Wellcome Alice'); expect(onClickSpy).toBeCalledWith(username); }); }); As we can see, there is nothing complicated here. We use React Test Utils to render our component and search for Dom nodes. Otherwise, the test is no different from the usual test for Jest.
So, we looked at how you can use Jest to create and run tests, but before going further, let's take a little more of one of its features, namely, testing on the basis of snapshots. Snapshot testing is the ability to save a React tree nugget as a JSON object and compare it on subsequent test runs with the resulting structure.
Roughly speaking, the first time you run a test to form such an impression, check its validity with your hands and commit it to the code repository. And - voila - all subsequent runs of the test will compare your snapshot from the repository with what happened.
This feature appeared in Jest quite recently, personally, my innovation caused mixed feelings. On the one hand, I found a useful application for it - some tests really became simpler (where there is no interactivity and you need, in fact, just to check the structure), now I don’t need to duplicate the code in the tests. On the other hand, I also saw a minus: tests for me are the documentation of my code, and testing on the basis of the impressions, in fact, gives me the opportunity to "skimp" and, without thinking about assert, simply compare the two component trees. In addition, this approach deprives me of the possibility of classic TDD, when I first write component tests, and then write the code itself. But I think that this feature will definitely find its fans.
Let's see how it works for our component:
import React from 'react'; import renderer from 'react-test-renderer'; import Wellcome from './welcome.jsx'; describe('<Welcome />', () => { it('Renders wellcome message to user', () => { const onClickSpy = jest.fn(); const username = 'Alice'; const component = renderer.create( <Wellcome username={username} someFunction={onClickSpy} /> ); const json = component.toJSON(); expect(json).toMatchSnapshot(); expect(onClickSpy).toHaveBeCalledWith(username); }); }); We note that our test specifically did not simplify much (we already had it easy). For a component that is more voluminous in structure, the test can be reduced by half and simplified many times. Let's run our test and see what happens:
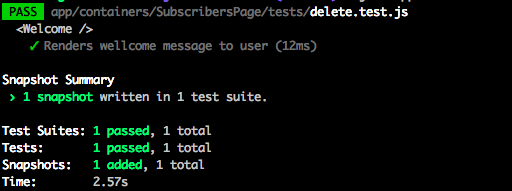
So jest has created a cast for us. Here's what's inside the cast:
exports[<Welcome /> Renders wellcome message to user 1] = ` <div> <span onClick={[Function]}> Wellcome Alice </span> </div> `; The cast is an html structure of the component and is convenient for “eye” validation.
In addition to the above disadvantages, I came across another drawback of testing on the basis of casts. If you are using HOC components (for example, a redux-form), the impression will not contain the component you are testing, but a wrapper from the redux-form. Therefore, to test just the component, I have to export it as well, and also to imitate a contract that requires a redux-form.
Basically, it's okay if you have one HOC component. But, for example, I can have three in some cases: one from react-redux, the second from redux-from and the third from react-intl. With the latter, by the way, it is quite difficult to test the code, since it is not possible to simply lay a component over the “plugs”; you need to put an honest localization API to the component. How this is done - you can see here .
Summarize. Now we have everything we need to run tests of our components. But let's look again at how to simplify and improve our tests.
Act 2
When you first think about testing React components and start looking for information on how to do this, you will most likely come across the React Test Utilites package of test utilities. This package was developed by the Facebook team and allows you to write component tests. This package provides the following features:
- Component Rendering in DOM
- Simulating events for DOM elements
- "Mock-ing" components
- Find items in the DOM
- Shallow rendering component
As we can see, the set of possibilities is quite wide, sufficient for writing tests for any components. An example of what our test would look like using React Test Utilites was covered in the previous section:
import React from 'react'; import TestUtils from 'react-addons-test-utils' import Wellcome from './welcome.jsx'; describe('<Welcome />', () => { it('Renders wellcome message to user', () => { const onClickSpy = jest.fn(); const username = 'Alice'; const component = ReactTestUtils.renderIntoDocument( <Wellcome username= {username} someFunction={onClickSpy} /> ); const span = TestUtils.findRenderedDOMComponentWithTag( component, 'span' ); TestUtils.Simulate.click(span); expect(span.textContent).toBe('Wellcome Alice'); expect(onClickSpy).toBeCalledWith(username); }); }); But we will not go "standard way" and will not use React Test Utilites for our tests for several reasons. First of all, this library has very poor documentation, and in order to deal with it, the newcomer will have to actively use the search for answers on the Internet. Secondly, the most “tasty” feature for us is the shallow rendering of components that has long been in the experimental stage and does not come out of it. Instead, we will use the wonderful Enzyme library, which was developed by the Arbnb team and has already become quite popular when testing React applications. In fact, Enzyme is a library that is an add-on to three other libraries: React TestUtils, JSDOM and CheerIO:
- TestUtils is a library created by Facebook for testing React components.
- JSDOM is a JS implementation of the DOM. Allows us to emulate a browser.
- CheerIO - Jquery equivalent for working with DOM elements
Combining everything together and adding a little more, Enzyme allows you to easily and clearly build tests for React components and, besides the functionality of Test Utilites, also gives us:
- Three options for rendering the component: shallow, mount and render
- JQuery-like component search syntax
- Search for a component using the component name (only if you specified this name using the DisplayName parameter)
- Search for a component using its parameter values (props)
Yes, Enzyme does not contain a TestRunner, and also does not know how to make "plugs" for the components, but for this we already have a Jest.
Let's take a closer look at three options for rendering the component and what it gives us. So, Enzyme has three methods that render a component and return similar wrappers with a set of methods in the jquery style:
- Shallow rendering - Enzyme will only render the component itself, ignoring the rendering of the components nested in it.
- Full Dom Rendering - full rendering of the component and all its nested components
- Static rendering - renders static HTML for the passed component
I will not give the whole list of methods Enzyme gives us, I will only say that with its help you will be able to:
- Find components or DOM elements
- Compare component content with JSX markup
- Check component properties
- Update component status
- Emulate events
This is not all Enzyme features. A complete list can be found in the library documentation, and we will focus on the differences between the three types of rendering.
What gives us shallow-rendering and what are its charms? And it gives us the opportunity to concentrate when testing only on the component itself and not to think about nested components. We absolutely do not care how the structure produced by the nested components will change: this should not break our tests for us. Thus, we can test our component in isolation from other components. But this does not mean that we are not testing nested components at all. No, we can check in tests that we correctly transfer properties to nested components. In addition, another plus of such testing is that the speed of such tests is much higher than when using Full Dom rendering, since it does not require the presence of a DOM. But unfortunately, not always we can only use surface rendering. For example, let, besides the Wellcome component we use, we also have the Home component with the following contents:
import React, { PropTypes, Component } from 'react' import Wellcome from './Wellcome' class Home extends Component { onChangeUsername(e) { this.props.changeUsername(e.target.value); } render() { return ( <section className='home'> <h1>Home</h1> <Wellcome username={this.props.username} /> <input type="text" name="username" value={this.props.username} onChange={this.onChangeUsername.bind(this)} /> </section> ) } } Home.propTypes = { changeUsername: PropTypes.func.isRequired } export default Home Let's write now the test for this component:
import React from 'react' import { shallow } from 'enzyme' import Home from './Home' import Wellcome from './Wellcome'; describe('<Home />', () => { it('should render self and Wellcome', () => { const renderedComponent = shallow( <Home username={'Alice'} changeUsername={jest.fn()} /> ); // console.log(renderedComponent.debug()); expect(renderedComponent.find('section').hasClass('home')).toBe(true); expect(renderedComponent.find('h1').text()).toBe('Home'); expect(renderedComponent.find('input').length).toBe(1); expect(renderedComponent.find(Wellcome).props().username).toBeDefined(); expect(renderedComponent.contains(<Wellcome username={'Alice'} />)).toBe(true); }); it('should call changeUsername on input changes', () => { const changeUsernameSpy = jest.fn(); const renderedComponent = shallow( <Home username={'Alice'} changeUsername={changeUsernameSpy} ); renderedComponent.find('input').simulate('change', { target: { value: 'Test' } }); expect(changeUsernameSpy).toBeCalledWith('Test'); }); }); In order to see how shallow-rendering works in Enzyme, we will use the debug function and see what the following code will output to us.
<section className="home"> <h1> Home </h1> <Wellcome username="Alice" /> <input type="text" name="username" value="Alice" onChange={[Function]} /> </section> As we see, Enzyme has rendered our component, but did not render the nested components. However, he formed the right parameters for them and we can check them if necessary.
Now let's analyze the option when surface rendering does not suit us and you may need to use full rendering via a call to the mount method. And surface rendering does not suit us if:
- our component contains logic in lifecycle methods, such as componentWillMount and componentDidMount. We, of course, can call them manually, but not sure that this is always a good way;
- our component must interact with the DOM. The fact is that surface rendering does not use JSDOM and all interaction with the DOM simply will not work;
- we need to check the integration of several components among themselves - for example, we use the ToDo creation component and the ToDo list component on one page
In these cases, we will have to use mount instead of shallow, which, unfortunately, will make our tests slower, since it already needs DOM and the loading of the Jsdom library. So, I give an example when we need full rendering:
import React, { PropTypes, Component } from 'react' import Wellcome from './Wellcome' class Home extends Component { componentWillMount() { this.props.fetchUsername(); } onChangeUsername(e) { this.props.changeUsername(e.target.value); } render() { return ( <section className='home'> <h1>Home</h1> <Wellcome username={this.props.username} /> <input type="text" name="username" value={this.props.username} onChange={this.onChangeUsername.bind(this)} /> </section> ); } } Home.propTypes = { changeUsername: PropTypes.func.isRequired, fetchUsername: PropTypes.func, }; export default Home; And our test:
import React from 'react' import { mount } from 'enzyme' import Home from './Home' import Wellcome from './Wellcome'; describe('<Home />', () => { it('should fetch username on mount', () => { const fetchUsernameSpy = jest.fn(cb => 'Alie'); const renderedComponent = mount( <Home username={'Alie'} changeUsername={jest.fn()} /> ); // console.log(renderedComponent.debug()); expect(fetchUsernameSpy).toBeCalled(); }) }) Let's see what the debug call returned to us:
<Home username="Alise" changeUsername={[Function]} fetchUsername={[Function]}> <section className="home"> <h1> Home </h1> <Wellcome username="Alie"> <div> <span onClick={[Function]}> Wellcome Alise </span> </div> </Wellcome> <input type="text" name="username" value="Alie" onChange={[Function]} /> </section> </Home> As we can see, with full rendering, Enzyme also rendered nested components, and all methods of the LifeCycle component were launched.
It remains for us to consider the last type of rendering that Enzyme has: static rendering. It renders the component into an HTML string using the Cherio library, and returns us back an object that is similar to the one given to us by the shallow and mount methods. The test will differ from the previous one only by replacing the mount call with a render, so you can write it yourself, if anything.
I see only one application to this method, when it is necessary to analyze only the HTML structure of the component and the speed of the test is important. When using static rendering, the test will work faster than when using full rendering. I did not find other uses for this type of rendering.
Intermission
So, in this article we looked at testing React components, “felt” new utilities used for testing, and put together a ready-made “combine” to create tests. If this topic is interesting, then in the following articles we will try to seriously test a more complex application that uses redux, redux-saga, react-intl, modal windows and other elements that complicate testing.
Green to you tests and passing 100% coverage!
Source: https://habr.com/ru/post/315760/
All Articles