PixelPixie - a font generator for LCD and OSD

Hello% username%. In this article I would like to tell you about my small project, designed with the help of a single bike and a small bunch of crutches to slightly simplify the life of an embedded developer dealing with graphic displays or OSD boards.
Intro
One day I happened to see how a colleague created fonts for the OSD board, which was then to be installed in the monitor. What I saw introduced me into a light stupor and made the hair on my head begin to stir (the picture is clickable).
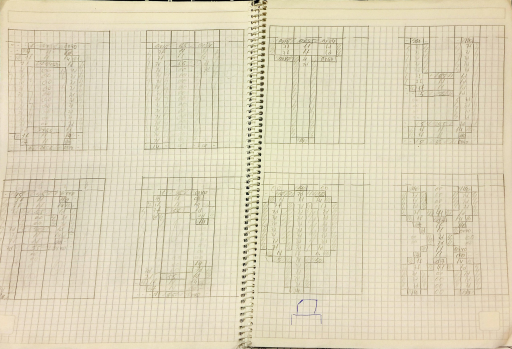
At first each character was drawn on a sheet in a cage. Then the image of each character in the notebook was manually transferred to an array of bytes and placed in the sources of the firmware. It took about an hour of hard work to create each character. The realization that the year 2016 is already over, and a notebook in a cage is not the best way to achieve the goal, pushed me ... no, not to write my own decision, but to search for something ready. However, a cursory search showed that most of the available solutions contain at least one of the listed drawbacks:
- not free (sometimes the price was close to 100 euros);
- sharpened by a specific format (the number of bits per pixel, the size of the character and the color coding)
- support only characters from the standard set of fonts (often on the OSD you have to display characters completely different from letters, numbers, and arrows).
On the way to the bike factory
The desire to make the world a little bit better and a couple of free evenings turned into a small command line utility, PixelPixie. At the entrance the program receives a file with an image, in which at regular intervals (for this it is easiest to use a grid) symbols of a future font are shown. Font generator settings are stored in a JSON file. All colors used in drawing characters must be mapped to a sequence of bits. The sequence is specified in decimal form.
"ColorMapping": { "#FFFFFF": 0, "#000000": 1, "#C8C8C8": 2, "#808080": 3 } The generator, processing the image, will make the output array bit by bit. One of the important features of PixelPixie is that it can work with any number of bits per pixel. For example, it is often necessary to encode each pixel with 2 or 3 bits. The characters themselves can also be of arbitrary size and be in a grid with an arbitrary number of columns and rows. Thus, I tried to make the generator as independent as possible from the specific device for which the font is generated.
Additionally, PixelPixie can create an image with an empty grid. The developer is left with the favorite raster editor to "fit" the characters into the grid cells and double-click on the batch script that launches PixelPixie. Now the process of working on the font looks like this:

At the output, we get arrays ready for copy-paste to the source of the firmware of the control microcontroller.
//symbol 1 unsigned char c1[54] = {0x44, 0xC5, 0x7F, 0xFF, 0xDF, 0x7F, 0x73, 0xFD, 0x73, 0xD3, 0xF7, 0x73, 0x70, 0xF7, 0x73, 0xFC, 0xD7, 0x73, 0xFC, 0xD7, 0x73, 0xFC, 0xD7, 0x73, 0xDC, 0xD4, 0x33, 0xDC, 0xD4, 0x3F, 0xD4, 0x30, 0x3F, 0xF7, 0x03, 0x37, 0xF4, 0x00, 0x07, 0xF7, 0x00, 0x37, 0xF7, 0xF7, 0xD7, 0xF5, 0x55, 0x5F, 0xFF, 0xFF, 0xFF, 0xFF, 0xFF, 0xFF}; //symbol 2 unsigned char c2[54] = {0xFD, 0x57, 0xFF, 0xFF, 0xFF, 0xFF, 0xFF, 0xFF, 0xFF, 0xFF, 0x0F, 0xFF, 0xFD, 0xCF, 0xFF, 0xFD, 0x0F, 0xFF, 0xF5, 0x3F, 0xFF, 0xF7, 0x04, 0xFF, 0xF7, 0xD4, 0xFF, 0xF5, 0x54, 0xFF, 0xFF, 0xD3, 0xFF, 0xFF, 0x53, 0xFF, 0xFF, 0x70, 0x0F, 0xFF, 0xFF, 0x0F, 0xFF, 0xC0, 0x3F, 0xFF, 0xFF, 0xFF, 0xFF, 0xFF, 0xFF, 0xFF, 0xFF, 0xFF}; And we observe our font on the LCD screen connected to the OSD board.

Instead of conclusion
Using PixelPixie to develop OSD board fonts has reduced the time to work on each character from an hour to 10 minutes in the most complex characters. Of course, the developer still has to draw each letter per pixel by pixel by pixel and check several times how it is displayed on the end device, but the number of the routine was reduced several times.
PixelPixie source code is available on GitHub .
')
Source: https://habr.com/ru/post/315712/
All Articles