Configuring Virtual Private Network on AWS EC2 from OpenVPN on Linux
Amazon Web Service provides an opportunity to launch Amazon EC2 servers for a test period (12 months) for free. Such a server can be used for VPN (Virtual Private Network - virtual private network). With this technology, the remote server serves as an intermediary between your computer and other servers on the Internet.
This can be useful in cases when it is necessary to enter the site bypassing blocking (for your provider, you contact your VPN server, and not the site from which you actually receive data), or, say, have a permanent IP from which you access certain services, or have the IP associated not with the region in which you are physically located (the site determines the entry from the IP of your server, and not from the IP of your working machine).
Creating a server on AWS EC2
So, first we register at https://aws.amazon.com , for registration you will need a working credit card.
After registration, go to the console https://console.aws.amazon.com/console/home
In the upper right corner, click on the "Services" menu and in the "Compute" section, select "EC2".

To access the future server, we need to create a key. Click "Key Pairs", then the button "Create Key Paire", set the name for the key, for example "myVPNkey" and save this file (with the extension .pem) to your computer, usually in the ~ / .ssh folder
Now go to the folder in which we saved the key and set the rights to access the file:
cd ~/.ssh chmod 400 myVPNkey.pem You will also need to make a copy of this file and save it in a safe place.
Next on the AWS website we return to the EC2 Dashboard (see the menu in the upper left corner), and there we click on the big blue "Launch Instance" button
Choosing an operating system for the server: Ubuntu Server 14.04 LTS (HVM) 64-bit (namely 14.04, not 16.04)
Select the server configuration. For our purposes, the free configuration for the trial period is quite enough:
t2.micro (Variable ECUs, 1 vCPUs, 2.5 GHz, Intel Xeon Family, 1 GiB memory, EBS only) will be marked with a green label "Free tier eligible". Push the blue button "Review and launch"(Step 7: Review Instance Launch) in the Security Groups section click "Edit security groups"
- (Configure Security Group) Select: Assign a security group: * Create a new security group
Choose a name in the Security group name, for example "myVPN". Next, we see the rules governing access to the server. By default there is one rule:
Type: SSH
Protocol: TCP
Port Range: 22
Source: Custom 0.0.0.0/0
In this case, it means that you can connect to the server from any IP to port 22 using the SSH protocol. These are the default settings used for ssh connection.
Click the "Add Rule" button, and add a new rule:
Type: All traffic
Protocol: All
Port Range: 0-65535
Source: My IP
in Source, specify the IP of your working machine, if you select "My IP", it will be determined automatically.
Specifying an IP means that, within the framework of this rule, access is allowed only from this IP (later it can be changed, of course, if you access the Internet under a different IP).
You can find out your IP / check by setting "my ip" in Google search. Or using specialized sites. In the console:
wget -qO- http://ipecho.net/plain ; echo or
curl ipecho.net/plain ; echo The first rule can be deleted (recommended). Or register in it also your IP. Or leave the ability to connect from any IP and ignore the warning "for all IP addresses only."
Again, click "Review and Launch", review the information, and click "Launch" - we will have a window in which you need to select a key to access the server.
Select the key that we previously created (the existing key par), tick the item "I acknowledge that I have access to my private key file" (myVPNkey.pem) "and click" Launch Instances ".
If everything is good, we get a message that the server is running. Click the "View Instances" button and go to the console where we will see the list of our servers. When we mark a server in the list, we can view its information, in particular its IP, as well as perform actions with the server (stop, start, delete, etc.) Pressing the "Connect" button will display the information necessary to connect to the server.
Server Tuning
Now from the console we can connect to the server using ssh. The default username is ubuntu, to connect, we can use either the server’s IP or its domain name: ec2-35-163-203-49.us-west-2.compute.amazonaws.com
Enter the command in the console:
ssh -i "~/.ssh/myVPNkey.pem" ubuntu@ec2-35-163-203-49.us-west-2.compute.amazonaws.com at the first connection we will need the question: Are you sure you want to continue connecting (yes / no)? - type the answer "yes" (by default the answer is "no", and if you just press Enter, we get the message "Host key verification failed."
When connecting, you may also receive an error:
"Permissions 0644 for '~ / .ssh / myVPNkey.pem' are too open.
It is required that your private key files are NOT accessible by others.
This private key will be ignored. "
In this case, as indicated above, you need to change the file permissions.chmod 400 ~/.ssh/myVPNkey.pem
If the connection is successful, we go to the server console, as evidenced by switching the command line to something like ubuntu @ ip-172-31-21-156: ~ $
Installing OpenVPN on the server
Now in the server console, first (necessarily) we update the software:
sudo apt-get update && sudo apt-get upgrade -y && sudo apt-get -y autoremove && sudo apt-get install -f Then install OpenVPN
sudo apt-get install -y openvpn Setting up forwarding (IP forwarding) ( when shutting down / restarting the server, this is repeated ):
sudo modprobe iptable_nat echo 1 | sudo tee /proc/sys/net/ipv4/ip_forward sudo iptables -t nat -A POSTROUTING -s 10.4.0.1/2 -o eth0 -j MASQUERADE Go to the openvpn folder and create a secret key:
cd /etc/openvpn sudo openvpn --genkey --secret ovpn.key Create an OpenVPN configuration file, let's call it openvpn.conf, for this we use the nano editor working in the console:
sudo nano openvpn.conf Insert into the file:
port 1194 proto tcp-server dev tun1 ifconfig 10.4.0.1 10.4.0.2 status server-tcp.log verb 3 secret ovpn.key Press CTRL + O and confirm the entry in the file, exit the editor - CTRL-X.
Run OpenVPN on the server with the command
sudo service openvpn start Stop accordingly with the command:
sudo service openvpn stop Check if openvpn is running
sudo service openvpn status 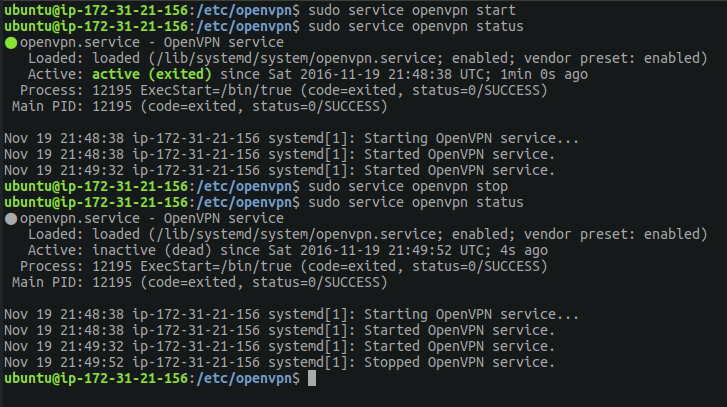
Installing and configuring OpenVPN on the local machine
Open another console window (terminal) on the local machine. Install OpenVPN on the local computer:
sudo apt-get install -y openvpn In the server console , we temporarily change permissions on the key file:
sudo chmod 777 /etc/openvpn/ovpn.key In the console of the local machine, create a folder for the OpenVPN settings:
mkdir ~/OpenVPNconf && cd ~/OpenVPNconf And download the OpenVPN key from the server there:
scp -i "~/.ssh/myVPNkey.pem" ubuntu@ec2-35-163-203-49.us-west-2.compute.amazonaws.com:/etc/openvpn/ovpn.key ~/OpenVPNconf/ On the server, we will return the access settings for the key file:
sudo chmod 600 /etc/openvpn/ovpn.key Also on the local:
chmod 600 ~/OpenVPNconf/ovpn.key On the local machine, create a file with the OpenVPN settings, let's call it openvpn.client.conf:
gedit openvpn.client.ovpn Insert into the file:
proto tcp-client remote .IP.... port 1194 dev tun secret "/home//OpenVPNconf/ovpn.key" redirect-gateway def1 ifconfig 10.4.0.2 10.4.0.1 Pay attention in the setting in the "secret" setting should be the full address of the key file ("UserName" should of course be like in your system), remote indicate the server address on Amazon of the form 35.163.203.49 or ec2-35-163-203-49. us-west-2.compute.amazonaws.com
Save the openvpn.client.ovpn file
Now we just run OpenVPN in the console with the command:
sudo openvpn --config ~/OpenVPNconf/openvpn.client.ovpn 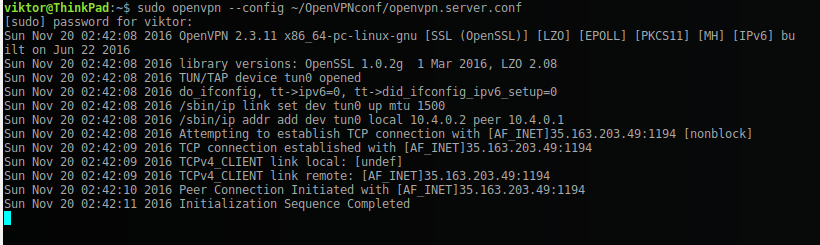
and go to http://ipecho.net/plain - now it should show the IP address of our server on Amazon. You can also try to go to a site that is not available in your area.
UPD: As correctly indicated in the comments, you should add AWS Elastic IP to this. Elastic IP is the IP address that is reserved by the user, and can be associated with servers running on AWS. On one server, you can add one Elastic IP for free, for reserved Elastic IP not tied to a specific service is charged. Elastic IP can be quickly and conveniently linked and disconnected from used services on AWS.
In the AWS EC2 user console in the left menu, select the Elastic IPs option in the NETWORK & SECURITY group; in the opened window, you can create new Elastic IP (the "Allocate New Address" button)
Next: in the list of available Elastic IPs, select the address and use the "Actions" menu (gray button) to tie it to the server running on AWS, or disconnect it from the running service.
Happy networking!
')
Source: https://habr.com/ru/post/315664/
All Articles