Ceph storage cluster on VMWare in 10 minutes

This manual is written for those who want to try the flexibility and convenience of Ceph distributed file storage in a virtual environment on a home PC. Immediately I will clarify that 10 minutes is the time to deploy the cluster itself (installing and configuring Ceph on virtual machines). But the creation and cloning of virtual machines and the installation of the OS will take some time.
By the end of the article we will have a virtual cluster of three machines, and the Windows PC itself as a storage client. Next we throw there photos of cats, drop one node, then pick up, drop another, download photos of cats back, be glad.
')
Who else is not in the Ceph topic, you can read the introductory article Introducing Ceph in pictures and see the fashion promo from the manufacturer.
My booth was:
PC settings
Processor: i5-6500
Memory: 16 GB (but in theory, 8 GB should be enough)
Disk: normal home HDD with 100 GB of free space
OS: Windows 7 x64
Virtual machine options (all three are the same)
Processor: 1 core
Memory: 1024 MB
Subnet: 192.168.1.0/24
Drives: 4 virtual disks of 10 GB each (1 for OS, 3 for storage)
OS: Ubuntu Server 16.04.2 x64
I want to remind you that the goal of the experiment is to try the possibilities and create a platform for further rituals. But since 9 virtual disks (system disks are not counted) are on the same physical disk, you should not expect any acceptable performance from this system. Performance will be extremely low, but quite sufficient for testing.
Plan
- Create a cn1 virtual machine (ceph-node-1)
- Install the OS, customize
- Making two clones (cn2 and cn3), changing IP addresses
- Raise Ceph Cluster
- Configure iSCSI-target on one of the machines
- We connect Windows as a client
- We try to upload / download / delete files, drop nodes
Create a virtual machine
Virtual machine parameters are listed above. For storage, I created preallocated disks without splits. VMWare subnet can take NAT with DHCP. In the future, we should have this:
192.168.1.11 - cn1 (there will be another iSCSI-target)
192.168.1.12 - cn2
192.168.1.13 - cn3
192.168.1.1 - Client (iSCSI-initiator)
Gateway / mask: 192.168.1.2 / 255.255.255.0
Install and configure the OS
This manual should work on Ubuntu Server 16.04.2, on other versions or distributions some settings will be different.
All settings I will produce from the root with a simple password. And here I must necessarily wag his finger and mention that for the sake of security on the battle cluster, it is better not to do that.
Install the OS:
Installation
Now that the OS is installed, we boot into it and check the issued address:
ip -4 addr | grep inet I turned out to be 192.168.1.128. Connect to it via SSH. Set the root password:
sudo su passwd root Let's configure the network interface (at this moment we will be thrown out with SSH, because the IP has changed):
cd /etc/network cp interfaces interfaces.BAK IFACE=ens32 ADDR=192.168.1.11 MASK=255.255.255.0 GW=192.168.1.2 sed -i "s/iface $IFACE inet dhcp/iface $IFACE inet static\naddress $ADDR\nnetmask $MASK\ngateway $GW\ndns-nameservers $GW/g" interfaces ip addr flush to 192.168.1.0/24 && ip addr add $ADDR/24 dev $IFACE How do I get it now?
As you read the listings, you may encounter not very readable one-liners, which are designed to reduce the number of manual edits in order to use more direct copy-paste from the article to the terminal. But I will lead the decryption.
In addition, I did not fully understand the problem, but in Ubunt 16 there is a certain embarrassment with the configuration of network interfaces (although it works fine on 14). I urge adult admins to highlight this topic in the comments. From here dances with ip addr flush / add.
The essence of the problem is that when the daemon is restarted, a new secondary address is added, and the old one is not deleted, while ip addr delete instead of deleting a specific one, deletes all addresses (removes one in 14 ubunt). Nobody bothers with this, because the old address does not bother anyone, but in our case, the old address must be deleted with the clones, otherwise the miracle will not happen. Reboot of the machine helps, but this is a bad way.
Connect to a new address (192.168.1.11) and allow you to connect to the machine with root:
su cd /etc/ssh/ cp sshd_config sshd_config.BAK sed -i "s/PermitRootLogin.*/PermitRootLogin yes/g" sshd_config Decryption
In the / etc / ssh / sshd_config file, look for the PermitRootLogin directive and set it to yes
We set the host name and host names of neighbors:
HOSTNAME=cn1 echo $HOSTNAME > /etc/hostname sed -i "s/127.0.1.1.*/127.0.1.1\t$HOSTNAME/g" /etc/hosts echo " # Ceph-nodes 192.168.1.11 cn1 192.168.1.12 cn2 192.168.1.13 cn3" >> /etc/hosts Decryption
In the / etc / hostname file, write the host name cn1.
In the / etc / hosts file, we change the name to the entry 127.0.1.1 to cn1, if it was stated otherwise during the installation of the OS. We also add names to all the nodes of the cluster at the end of the file.
In the / etc / hosts file, we change the name to the entry 127.0.1.1 to cn1, if it was stated otherwise during the installation of the OS. We also add names to all the nodes of the cluster at the end of the file.
After changing the address, a default route may be required, without which we will not be able to deliver the necessary packages. From the packages, it is necessary to put ntp to synchronize the time on all nodes. In htop it is convenient to look with your eyes at the Ceph demons and their threads.
ip route add default via 192.168.1.2 dev ens32 apt update apt install mc htop ntp -y Everything is ready, the first car received the axis, the necessary packages and settings, which the clones will inherit. Turn off the car:
shutdown -h now Making clones, setting up a network
At this place, we make a snapshot of the machine and create two complete clones indicating this snapshot. This is the birth of cn2 and cn3 machines. Since the clones completely inherited the settings of the cn1 node, we have three machines with the same IP addresses. Therefore, we turn them on one by one in the reverse order, simultaneously changing the IP addresses to the correct ones.
Turn on cn3
We start the machine, connect with the root via SSH at 192.168.1.11, change the interface settings to 192.168.1.13, after which the SSH session will fall off at the old address:
HOST_ID=3 echo cn$HOST_ID > /etc/hostname sed -i "s/127.0.1.1.*/127.0.1.1\tcn$HOST_ID/g" /etc/hosts sed -i "s/address.*/address 192.168.1.1$HOST_ID/g" /etc/network/interfaces ip addr flush to 192.168.1.0/24 && ip addr add 192.168.1.1$HOST_ID/24 dev ens32 Decryption
We change the host name in the / etc / hostname file, change the name to the entry 127.0.1.1 in the / etc / hosts file, remove all the 192.168.1.0/24 addresses from the interfaces and hang the correct one.
Turn cn2 on
On cn3, by this moment the correct address is already, and on cn2 it is still 192.168.1.11, we connect to it and make the same setup for the address 192.168.1.12:
HOST_ID=2 echo cn$HOST_ID > /etc/hostname sed -i "s/127.0.1.1.*/127.0.1.1\tcn$HOST_ID/g" /etc/hosts sed -i "s/address.*/address 192.168.1.1$HOST_ID/g" /etc/network/interfaces ip addr flush to 192.168.1.0/24 && ip addr add 192.168.1.1$HOST_ID/24 dev ens32 Decryption
Listing differs from the previous one only in the first line.
Now when there are no conflicting addresses left, and the session with cn2 has fallen off,
Turn on cn1 .
Connecting to 192.168.1.11, and henceforth we will do all the work on this node (including managing the other nodes). To do this, we will generate SSH keys and decompose them into all the nodes (this is not my whim, Ceph calls for it). In the process, you will need to enter passwords and nod your head at his questions:
# cn1 , ssh-keygen # cn1 for node_id in 1 2 3; do ssh-copy-id cn$node_id; done # cn1 cn2, , cn2 ssh cn2 ssh-keygen for node_id in 1 2 3; do ssh-copy-id cn$node_id; done exit # cn1 # cn3 ssh cn3 # cn1 cn3, , cn3 ssh-keygen for node_id in 1 2 3; do ssh-copy-id cn$node_id; done exit # cn1 Thus, we brought the cluster subnet to the state described at the beginning of the article. All nodes have root access on their neighbors without a password * runs a finger *
The cluster is still not a cluster, but is ready for clustering, so to speak. However, before shooting
Raise Ceph Cluster
10 minutes have gone ...
We start all the machines and connect to cn1 via SSH. To begin with, we will install ceph-deploy on all the nodes, which is designed to simplify the installation and configuration of some cluster components. Then we will create a cluster, install the Ceph distribution kit on all nodes, add three monitors to the cluster (one is possible, but then the monitor’s fall will be equivalent to the fall of the entire cluster) and fill the storage with disks.
# ceph-deploy : for node_id in 1 2 3; do ssh cn$node_id apt install ceph-deploy -y; done # Ceph: mkdir /etc/ceph cd /etc/ceph # : ceph-deploy new cn1 cn2 cn3 # Ceph : ceph-deploy install cn1 cn2 cn3 # , : ceph-deploy mon create-initial # Ubuntu systemd # - , # systemd : for node_id in 1 2 3; do ssh cn$node_id systemctl enable ceph-mon; done # : ceph-deploy disk zap {cn1,cn2,cn3}:{sdb,sdc,sdd} # : # ceph-deploy disk zap cn1:sdb cn1:sdc cn1:sdd cn2:sdb cn2:sdc cn2:sdd cn3:sdb cn3:sdc cn3:sdd # OSD : ceph-deploy osd create {cn1,cn2,cn3}:{sdb,sdc,sdd} The cluster is almost ready, we check its status with the command ceph -s or ceph status:
root@cn1:/etc/ceph# ceph -s cluster 0cb14335-e366-48df-b361-3c97550d6ef4 health HEALTH_WARN too few PGs per OSD (21 < min 30) monmap e1: 3 mons at {cn1=192.168.1.11:6789/0,cn2=192.168.1.12:6789/0,cn3=192.168.1.13:6789/0} election epoch 6, quorum 0,1,2 cn1,cn2,cn3 osdmap e43: 9 osds: 9 up, 9 in flags sortbitwise,require_jewel_osds pgmap v107: 64 pgs, 1 pools, 0 bytes data, 0 objects 308 MB used, 45672 MB / 45980 MB avail 64 active+clean The key line in this report is health, and it is in the HEALTH_WARN state. This is better than HEALTH_ERR, because at least the cluster works with us, although not so much. And immediately under HEALTH_WARN it is written why it is _WARN, namely: “too few PGs per OSD (21 <min 30)”, which tells us about the need to increase the number of placement groups so that at least 21 PG fall to one OSD. Then multiply 9 OSD by 21 and get 189, then round to the nearest power of two and get 256. While the current number of PG = 64, which is clearly seen in the pgmap line. All this is described in the Ceph documentation .
In this case, we satisfy the requirement of the cluster and do it:
PG_NUM=256 ceph osd pool set rbd pg_num $PG_NUM ceph osd pool set rbd pgp_num $PG_NUM We give the system a few seconds to rebuild the map and check the cluster status again:
root@cn1:/etc/ceph# ceph -s cluster 0cb14335-e366-48df-b361-3c97550d6ef4 health HEALTH_OK monmap e1: 3 mons at {cn1=192.168.1.11:6789/0,cn2=192.168.1.12:6789/0,cn3=192.168.1.13:6789/0} election epoch 6, quorum 0,1,2 cn1,cn2,cn3 osdmap e50: 9 osds: 9 up, 9 in flags sortbitwise,require_jewel_osds pgmap v151: 256 pgs, 1 pools, 0 bytes data, 0 objects 319 MB used, 45661 MB / 45980 MB avail 256 active+clean We see the cherished HEALTH_OK, which tells us that the cluster is healthy and ready to go.
By default, the pool replication factor is 3 (read about the size and min_size variables in the introductory article ). This means that each object is stored in triplicate on different disks. Let's look at it with our eyes:
root@cn1:/etc/ceph# ceph osd pool get rbd size size: 3 root@cn1:/etc/ceph# ceph osd pool get rbd min_size min_size: 2 Now we will reduce the size to 2, and min_size to 1 (in production, it is strongly advised not to do this! But as part of a virtual stand, this should improve performance)
ceph osd pool set rbd size 2 ceph osd pool set rbd min_size 1 What's next? Next you need to try the cluster in the work.
You can perform file sharing with a cluster in one of three well-known ways (block device, file system and object storage). Windows 7 out of the box prefers traditional iSCSI, and therefore our way is a block device. In this case, we need to install the iSCSI-target on some node (let it be cn1).
Install and configure iSCSI-target
We need not a simple target, but with RBD (Rados Block Device) support. The tgt-rbd package will do, so install it on cn1:
apt install tgt-rbd -y # rbd: tgtadm --lld iscsi --mode system --op show | grep rbd rbd (bsoflags sync:direct) # , Ceph by default creates an rbd pool for block devices, in which we will create an rbd image:
rbd create -p rbd rbd1 --size 4096 --name client.admin --image-feature layering # rbd - , rbd1 - , 4096 - Now we ask the target to give the image of rbd1 for any IP-address by writing it to the config:
echo '<target virtual-ceph:iscsi> driver iscsi bs-type rbd backing-store rbd/rbd1 # Format: <pool_name>/<rbd_image_name> initiator-address ALL </target>' > /etc/tgt/conf.d/ceph.conf # : systemctl restart tgt We look at the stopwatch: 8 minutes. Fulfilled.
Connecting a Windows PC via iSCSI
Winda is equipped with a built-in utility iscsicpl.exe, which will help us connect the image of rbd1 as a local disk. Launch and go to the "Targets" tab. Enter the cn1 node (192.168.1.11) IP-address in the "Object" field and click "Quick Connection". If we configured everything correctly, then our iSCSI target will be listed. Choose it and connect.
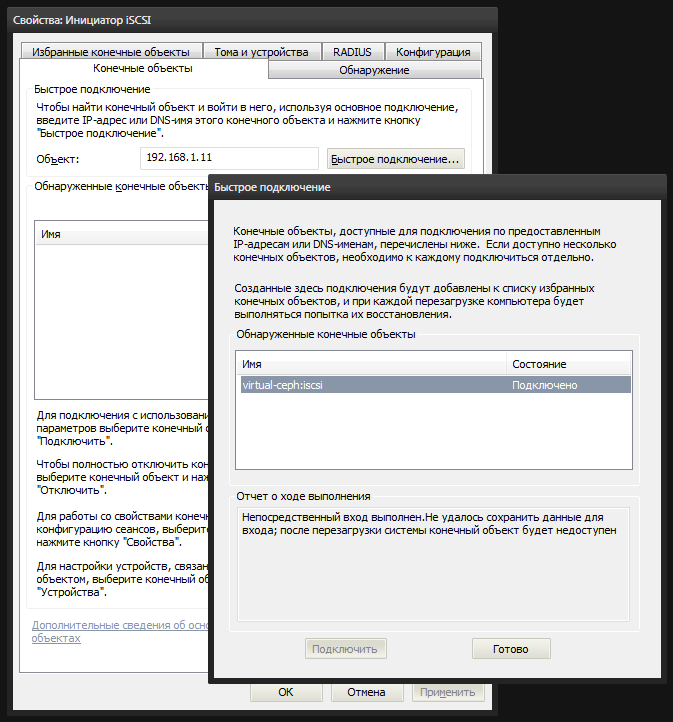
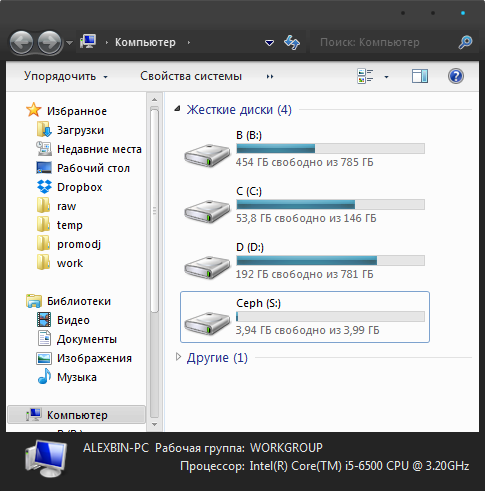
After that, the system will appear unallocated disk. In the disk management console diskmgmt.msc we see a new 4-gig device. You need to create a partition on it and format it, marking it as Ceph.

Now you can go to my computer and enjoy the result.
Tests
It's time to fill the cluster with photos of cats. As photos of cats I will use 4 images of distributions of ubunt of different versions, which have come to hand, with a total volume of 2.8 gigabytes.
We try to fill them with our new local disk. As you can first mistakenly notice that the files are filled quickly, but this is just filling the buffers, of which the data will be gradually written to the physical disks of the cluster. In my case, the first 3 files of 700-800 megabytes flew off quickly, and the last one was despondent, and the speed dropped to the expected one.
If you run the ceph -w command on the cluster node, you can monitor the cluster status in real time. Reading / writing data, blade disk, node or monitor, all this is displayed in this log in real time.
You can drop and raise nodes one by one, the main thing is not to drop cn1 (because there is only one iSCSI-target on it without multipassing) and not to drop two nodes at once. But if you increase the size back to 3, then you can afford it.
It’s time for vandalism: try dropping the cn3 node by clicking the stop button in VMWare, watching ceph -w on cn1. First, we will see how the cluster gets worried that some OSDs do not respond for a long time:
osd.6 192.168.1.13:6800/6812 failed (2 reporters from different host after 21.000229 >= grace 20.000000) osd.7 192.168.1.13:6804/7724 failed (2 reporters from different host after 21.000356 >= grace 20.000000) osd.8 192.168.1.13:6808/8766 failed (2 reporters from different host after 21.000715 >= grace 20.000000) osdmap e53: 9 osds: 6 up, 9 in Within 5 minutes, the cluster will remain in a state of hope that the disks will still come to their senses and come back. But after 5 minutes (this is the default value), the cluster will put up with the loss and begin rebalancing data from dead OSDs, smearing the missing objects on other disks, having previously marked the non-responding OSD as dropped (out) and having corrected the placement group card:
osd.6 out (down for 300.042041) osd.7 out (down for 300.042041) osd.8 out (down for 300.042041) Until rebalancing is completed, ceph -s will show HEALTH_WARN status, however the files will be available, but not without a loss in performance, yes. The reason HEALTH_WARN will write this:
health HEALTH_WARN 102 pgs degraded 102 pgs stuck unclean recovery 677/1420 objects degraded (47.676%) 1 mons down, quorum 0,1 cn1,cn2 Continue without me.
Source: https://habr.com/ru/post/315646/
All Articles