Connect Akuvox IP phones to Avaya PBX without a SIP license

I had to visit me at the office of a certain company, where only analog phones were used. And these people had a strong desire to switch at least in part to IP telephony with the ability to “stretch” phones from the external network. As a PBX, they used Avaya hardware. Everything was brought to her: robots, dialplans, modes of operation. Completely ready office. But analog.
“You can also connect IP phones to Avaya ,” you say. And you will be right. But since this is a fully proprietary product - a license is needed and this license is worth a lot of tangible money - more than the cost of the IP phones themselves. And licenses are needed for everything. The task was set: to create a hybrid connection with a reasonable number of IP phones within the network at minimal cost.
Let's start
Available in:
')
• Avaya for ~ 50 numbers with configured multiple trunks
• Ready network with NAT `and firwall`.
• Synology DS209 + II (3.5 2TB HDD x2 to RAID1)
• Dell latitude (Intel T5600 @ 1.8 GHz, 2 GB of RAM, 750 GB HDD, broken touchpad and trackball)
• Man hours
• Akuvox IP Phones
Server side with Avaya
After some thought, such a scheme was discussed:
Asterisk rises at latitude and retracts into the cabinet, the backup of which goes to Synology. Avaya trunk connects to Asterisk and is configured from the Avaya FXS gateway. As well as a complete reconfiguration of the scheme. Avaya becomes a stupid piece of hardware that only serves analog phones.
Further, any IP phone is configured directly to work only with Asterisk, which is not a problem and even a relief.
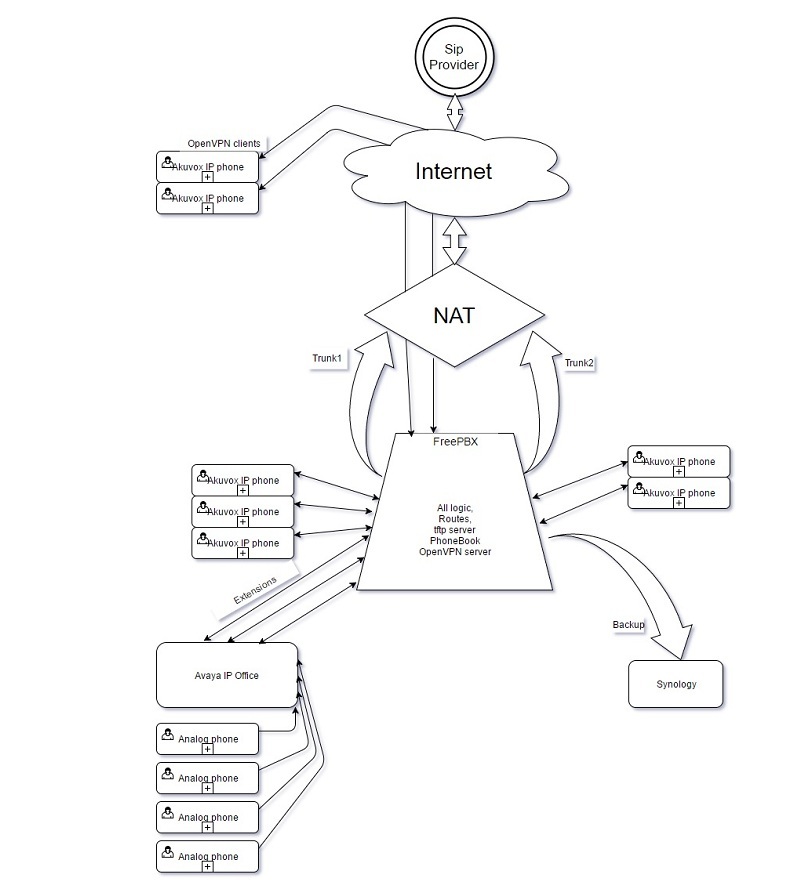
The scheme of our solution
Getting started
The first thing to start with is that in order to accomplish this task, Avaya must have a license for at least one trunk. Let even used. We need one to pick up Asterisk. Further communication and trunks (any their quantity) will be controlled by it.
We take our beautiful dell and install Debian stable on it (it’s good that Klava didn’t have time to die, but even that wouldn’t be a problem to install the system on ROM beforehand) via debootstrap (because we can and would like to), then we assemble Asterisk from sources and install FreePBX muzzle. (Well, well, yet not only from the console to control the iron)
I will not describe the complete installation process, just give a link to the manual I used to raise this good:
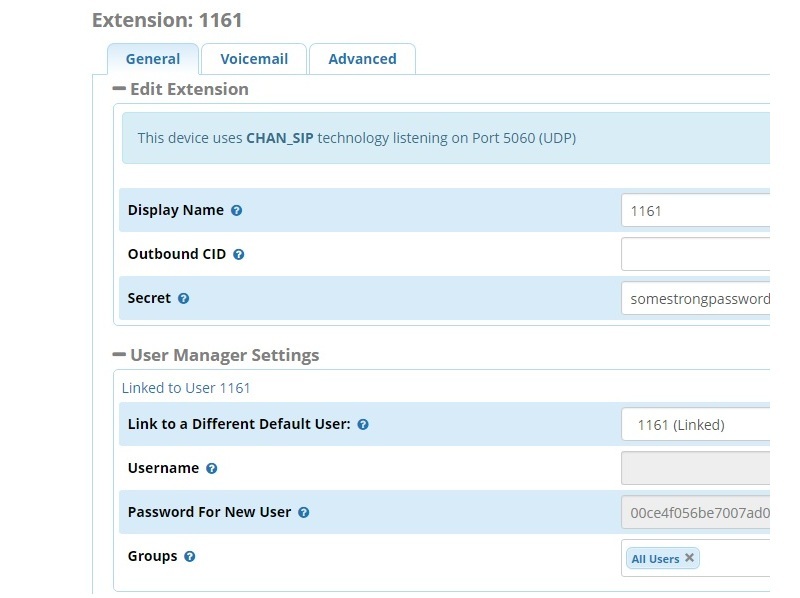
After the minimum Asterisk setup we create extensions for each analog channel. Yes. Not heard. For each, which in the future we want to call. In my configuration, the extensions of analog telephones have four-digit numbers. For ease of use, I recommend creating the same numbers as in Avaya and Asterisk. The author used for a better description in Asterisk four-digit numbers that corresponded to analog, they are three-digit.
An approximate diagram looks like this:
The corresponding extension rises on each analog line. (Yes, sekurnost at height). We also create a user (for convenience, each extension has a user with the same name, which is not necessary).
Next, go to Avaya itself. We do on this manual . Check for licenses for trunks.

Great, it is also eternal!
Go to the "Lines" section and create a new SIP line.
In the “SIP Line” tab, set the “Call Routing Method” field to “Request URI”. Optionally, we can fill in the “ITSP Domain Name” field, where you can enter our asterisk domain, if there is one. I don't have it, so I leave it empty.
Transport tab
The field "Address of the ITSP proxy server" - specify the address of our Asterisk server.
We also specify ports (standard 5060) and protocols (TCP \ UDP, if you are not sure - leave UDP). Here you can also specify the necessary DNS servers for this trunk.
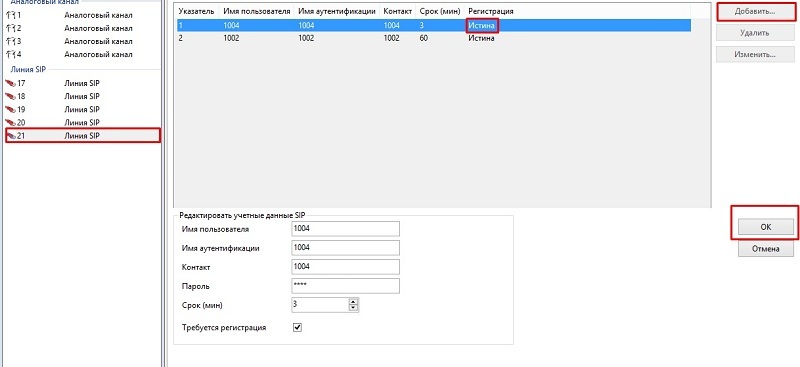
SIP credentials tab
Add an account using data from an Asterisk extension
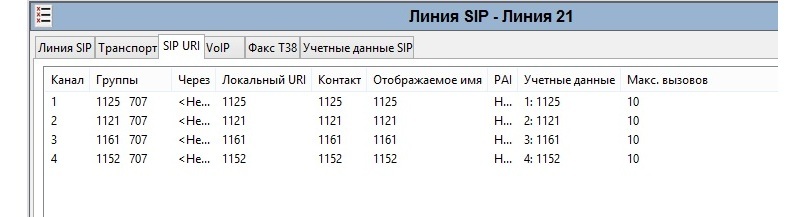
SIP URI Tab
Do not touch the fields where the value is set to “Use username from credentials”.
Specify the numbers of the incoming group corresponding to the extension number.
Outgoing group - we invent ourselves and make it uniform for all accounts here.
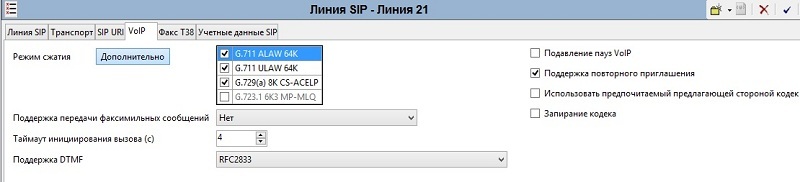
VoIP tab
Here we set up codecs and specify the DTMF standard. I recommend to put in the same gradation as set in Asterisk. Or just sync the list.
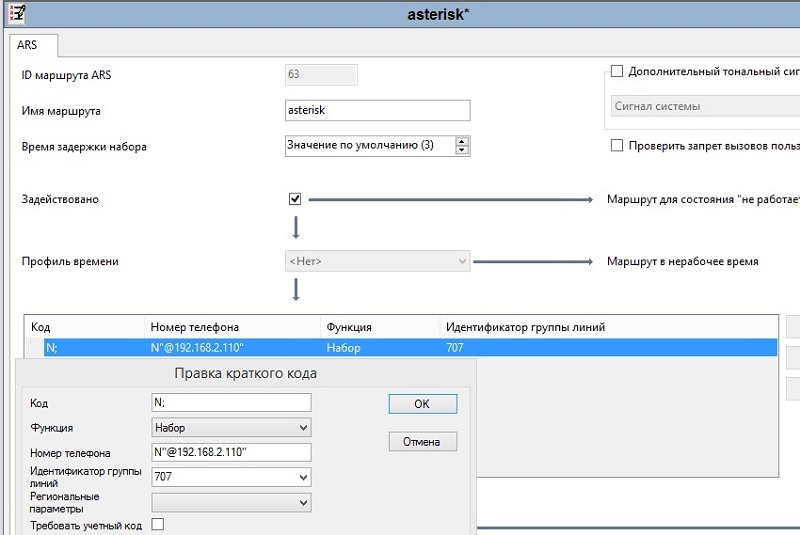
Create a dialplan for calls.
Go to the "ASR". Create a new global dial plan. The field "Code" - specify N; (I draw your attention to the fact that ";" is obligatory at the end if you do not want to call into emptiness. The author burned at this and got to the bottom of the matter only in udp dumps). Field "Function" - Set. Field "Phone number" - Specify the route itself. I have this N "@host". We also indicate the identifier of the outgoing line that was invented earlier.
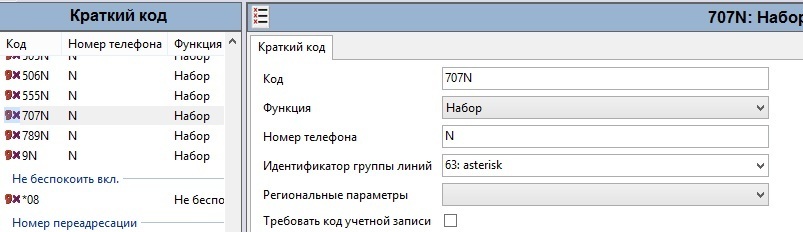
Now we will create a shortcut for calls to this particular line.
Go to the "Short Code" and create a new one. In the field "Code" - specify the desired shortcut. I have it 0. The field function is “Set”. The field "Phone number" - N (without ";"). The “ID group of the outgoing line” field is actually a group created in ASR.
These settings are used only for ease of use in Asterisk. The same three-digit numbers will be created for Asipisk-only SIP customers. For analogs, this will be the N route and all calls will go to Asterisk no matter who is called. On Asterisk we get routes and all logic.
The minimum config for calls to IP phones is created.
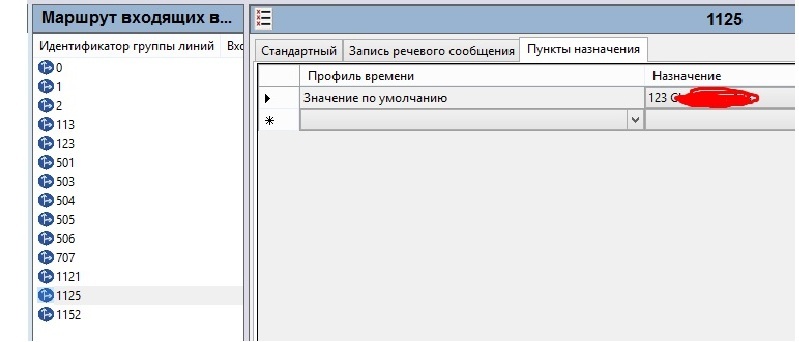
But we want and take calls from this line. Therefore, open the "Incoming Call Route" and create a new one. What is important to us here are the two fields, “Carrier Capacity” and “Line Group Identifier” on the “Standard” tab .
And the "Destinations" tab - specify the number corresponding to the analog line. At this contact, this is number 123. But in the routes it is listed as 1125. Because in the wilds of the avaya there is already a redirect from 125 to 123. I don’t want to touch the established routes of work of employees. Therefore, we do everything as transparently as possible for them.
So we crossed Avaya with Asterisk. But for now, it’s not a full FXS gateway. Because Asterisk and I cannot call other Avaya trunks. And here we are faced with a major problem. Asterisk cannot transfer a call to the trunk we need through IVR. At this stage, it was decided to make Avaya a “stupid” FXS gateway that deals only with analog lines. And all the magic to give to the fate of Asterisk. It is also more flexible. This requires a complete setting of transparent for users migration of their PBX to Asterisk. For me personally, this is a couple of days of work ... Eh.
There was also the need to connect some phones from the external network. I don’t want to open a shared access, so on the same Dell I raise OpenVPN. It does not take a lot of resources. Think of VoIP traffic over UDP.
Setting up our beautiful server backup
For backup, the built-in FreePBX package for backup was used. Backup rests on ssh on Synology. All scheduled at 00.00 weekly, given that the server configuration does not change often after setting. In the first days I did backups almost every hour. I would be happy to pick up everything in Synology Docker, if I had a model with x86 on hand. Or even in the DSM native package. But we have what we have.
Telephones
I did not have to choose, worked with those who gave. These are models R50, R-53P, R-59P, EM53, EM63 from Akuvox. Phones on a solid confident four plus, for which we can safely say thanks. All Akuvox models standardly have two Ethernet ports (Internet \ PC), and work in bridge or router mode. Models with the index "P" have PoE. Those who are few - full specifications in Russian can be found here .
I had all the models one by one from the set purchased to the warehouse, which is quite enough for simple tests with the basic configuration of my perverted FXS gateway.
R50 basic model for 1 SIP account, R53 has 3 SIP accounts, R59 has 6 SIP accounts.
The rest of the functional part of them is the same. Is that the expansion modules, in my case can only connect to R-59P, because only he has the necessary port RJ12. The difference between EM53 and EM63 is only in the type of screen: in the 53rd it is monochrome, and in the 63rd it is color. The sequence of connecting modules is not important.
Photo devices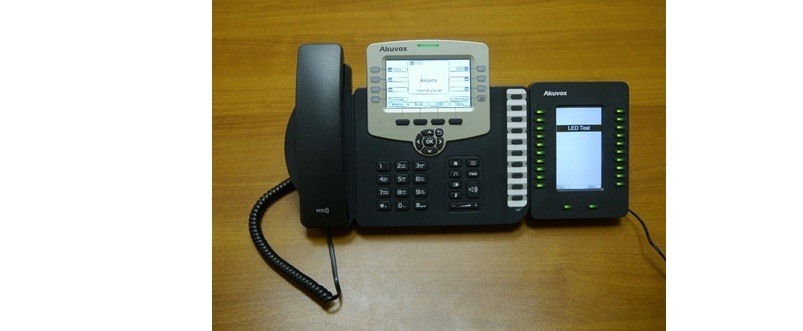
R59P with a connected expansion module on which the LED indicator test is running
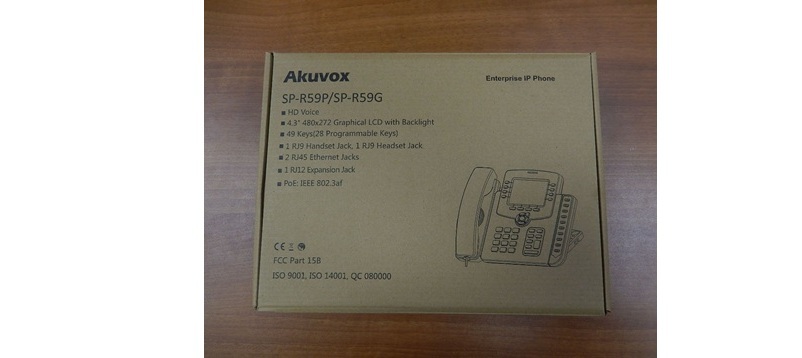
Box R59
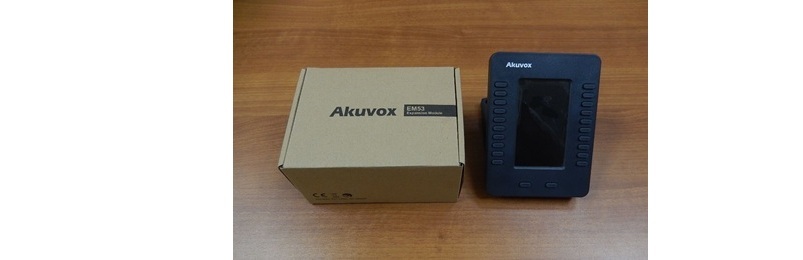
EM53 module box and EM53 itself

R53 with Russian menu
 Box R53

R50 in a box
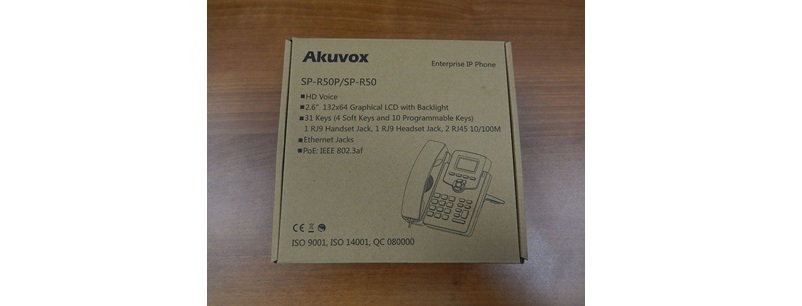
Box R50
R59P with a connected expansion module on which the LED indicator test is running
Box R59
EM53 module box and EM53 itself
R53 with Russian menu
Box R53 R50 in a box
Box R50
The set of features is standard: BLF \ BLFList, SRTP indicators, local conference, VPN (only OpenVPN via importing an ovpn file, which we use), several remote books (including Broadsoft), remote control, tightening the config and updating from the server, LDAP integration.
Amused the ability to change the action keys. For example, you can change the action keys "Ok" and "back." Or shooter.
Russian language is available, but not in the firmware "out of the box." The translation is solid, not Chinese.
Setting up all this stuff below.
The phones have a nice plastic case, the handset fits comfortably in the hand, the screen is informative and has nothing superfluous. The sound is good, nothing to complain about.
IMHO: R59P is the best available. The screen is b / w but not monochrome as in R50 / 53.

Comparison Screens
The device has assigned buttons for switching accounts with multi-colored indicators on each (can be changed) and a port for expansion modules.
About modules - just a screen with add. buttons. How many of them in the chain could not be found out, because I have only 2 in total. It works exactly with two. If the buttons become small, there is a three-page interface on each of the modules. Connection chain (color or b / w module is also not important).
Phone Setup
Climbing the official website was found documentation. And in the support section a document on AutoP was found.
Fine. Head over to the phones themselves. I had enough time to play with them, as they sent me into the hands of the main office. Sami work on setting up this symbiosis were later.
Next to the documentation are the settings recommendations for OpenVPN.
This is the main disadvantage of these phones. They have no choice of VPN type. Only OpenVPN without options. Well, at least pptp or l2tp would be given. A bit poorly in this regard.
As I said, the phones have Russian language. For an LCD screen, this is great. But for the web interface it is not subjectively familiar. In general, the Russian interface is clear, everything that a person needs to use and not only is available.

Change to English and go to Upgrade> Advanced
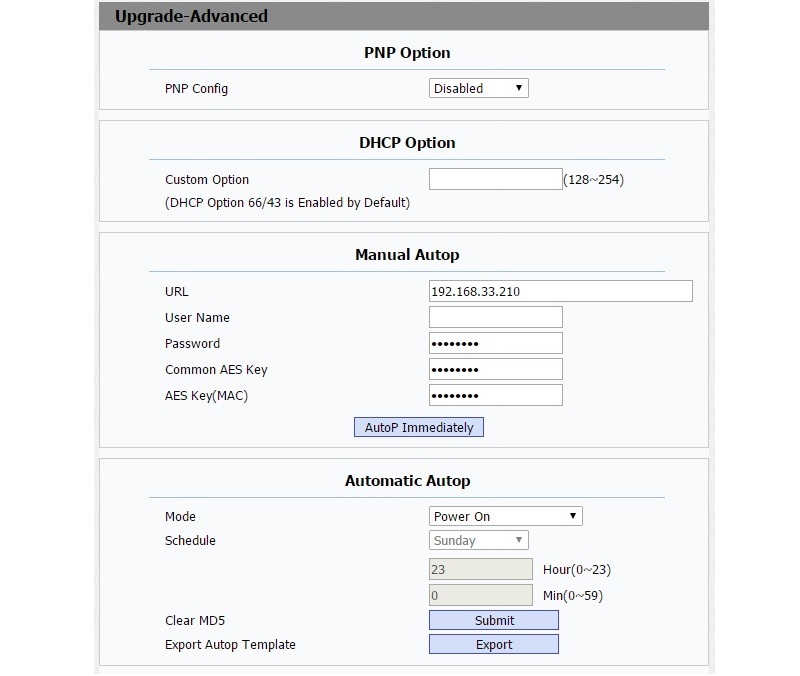
Well, everything is clear. By PnP or DHCP, the phone receives the address of the AutoP server and climbs there for config and updates.
The documentation does not describe every possible option, only a small piece. We set up the phone via the web, set the desired settings, and click the Export Autop Template button. As a result, we will have a text document with all options available to users / administrators.
Just below, in the same menu there is an Export option in the Others subsection. At first I downloaded it and could not understand why config.tgz is being downloaded. Which is not an archive, but a text file, but is encrypted. Fortunately, everything was decided.
The configuration file has syntax:
Config.Account \ Network. <Subsection>. <Item> = <value>
For example:
Config.Account1.OUTPROXY.BakServer =
Depending on the setting, the value may be numeric or text. Everything is simple and clear.
To automatically configure personalized phones, you must give them the names corresponding to their MAC address with the extension cfg.
For the server balls, it was decided to choose tftp as the easiest and the minimum necessary.
For phones via VPN, this is a problem. But we will first load all the necessary settings into them and transfer them to the person. For tftp I used tftpd-hpa on the same dell. The backup of the ssh directory on Synology is also organized.
The issue of security does not arise sharply, since the network is local, already behind a NAT with a forwarding VPN over the configuration file. But locally it is not needed by anyone, but everyone is available. Also there phonebook.xls put there created by the same principle, as well as a config. Also nothing complicated. If there is not enough one book - the phone drags up to 5 such. Also can have local. For the eyes of the place under the numbers.
Setting up one phone made it easier to set up the rest. The author of the idea AutoP eternal glory.
Instead of conclusion
Much work has been done. The basis for moving to Asterisk has been created, all analog lines already have their own extension and communicate freely with IP phones. Temporarily, until I transferred the trunks from Avaya to Asterisk, another account was used for the trunk from the SIP provider. He is already only for Asterisk. It rolls around the transfer and general testing on it too. Routes are a separate story, and as a temporary solution in the Avaya config, it is still ad. But it is temporary. The transfer is in full swing.
When entering the commissioning of the entire solution, the Akuvox phones were very pleased with the results. In my inner perception, they have come a full way from “oh what is it” to understanding that the customer really did not miss this time. Akuvox turned out to be objectively stable, imputed, and for my own money - this is quite a working option.
If there is an agiotage, I will write a complete manual on transferring and setting up all this stuff in Asterisk.
From features that you can enjoy - you can take out the entire IVR in google.voice. Greetings, speeches, etc. will be generated in realtime, that is, without recorded audio files.
Source: https://habr.com/ru/post/315618/
All Articles