Fonts for android
Good afternoon! In this article I want to discuss such an important issue as fonts in Android. We will create our TextView with the ability to add fonts to xml and visually display them in the preview. We will also solve one important problem - the use of fonts in the list, without glitches and straining for our smaller brothers, our Android devices.
Next I'll write out how to create the assets folder and add my own fonts, so you can skip this.
So, now let's turn to the implementation of the use of fonts for TextView, in its pure form it looks like this:
')
When it comes to more than five TextViews, this process becomes annoying. But irritation is not the only problem with which a developer using this design is encountered. The fact is that the processing of the font file itself and its transformation into a Typeface object is a rather laborious process, therefore, the use of such a construction in the sheet will cause incredible glitches.
I propose to solve this problem with an ordinary sington. And so we create something similar:
And install the fonts using singleton, like this:
Using this construction, we solved the second problem, regarding the lags in the sheet, but not the first, the most important, you still need to find all the text fields and mesh the fonts again and again, write separate methods and lose nerve cells. Another problem is that in the preview - the standard font, hence the width, height of its font. You can only see it on a live device or an emulator, this is not very convenient.
I will introduce the above problems, we will now write your TextView with blackjack and fonts.
First of all, create a class that inherits the usual TextView with constructors:
Next, create the attrs.xml file in the values folder.
In it we create the following block of code:
Then we return to our class CustomFontsTextView and write the following method:
That's all. Now you need to rebuild the project so that you have custom attributes. After that we go to our activation xml file and write:
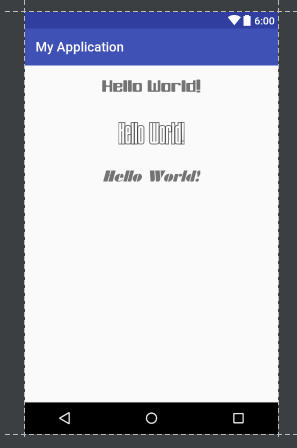
In the preview, we will see already completely finished text fields with our fonts.
It is better to refer to our custom text fields as to ordinary TextView, in a standard form:
Thanks for attention.
Next I'll write out how to create the assets folder and add my own fonts, so you can skip this.
Creating the assets folder and adding fonts
The assets folder is needed to store a wide variety of resources, including fonts. You can create it either manually in the main root:
\ app \ src \ main \ assets
Or in a simpler way.
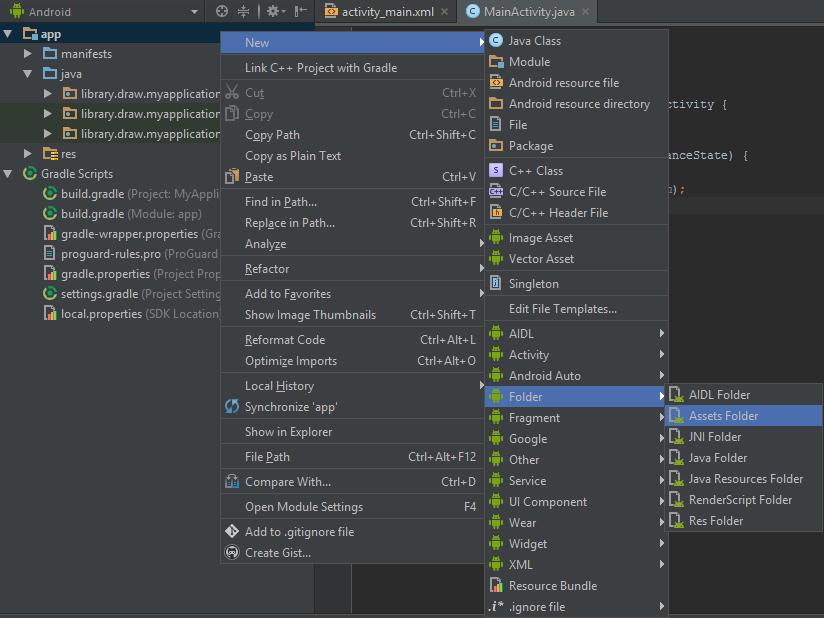
Next, files with the .ttf format are thrown in assets or at the root, or we create the fonts folder, as assets supports nesting.
\ app \ src \ main \ assets
Or in a simpler way.
Next, files with the .ttf format are thrown in assets or at the root, or we create the fonts folder, as assets supports nesting.
So, now let's turn to the implementation of the use of fonts for TextView, in its pure form it looks like this:
')
Typeface type = Typeface.createFromAsset(getAssets(),"fonts/font1.ttf"); myTextView.setTypeface(type); When it comes to more than five TextViews, this process becomes annoying. But irritation is not the only problem with which a developer using this design is encountered. The fact is that the processing of the font file itself and its transformation into a Typeface object is a rather laborious process, therefore, the use of such a construction in the sheet will cause incredible glitches.
I propose to solve this problem with an ordinary sington. And so we create something similar:
public class SingletonFonts { private static Typeface font1; private static Typeface font2; private static Typeface font3; public Typeface getFont1() { return font1; } public Typeface getFont2() { return font2; } public Typeface getFont3() { return font3; } public static void setFont1(Typeface font1) { SingletonFonts.font1 = font1; } public static void setFont2(Typeface font2) { SingletonFonts.font2 = font2; } public static void setFont3(Typeface font3) { SingletonFonts.font3 = font3; } private static volatile SingletonFonts instance; private SingletonFonts() {} public static SingletonFonts getInstance(Context activity) { SingletonFonts localInstance = instance; if (localInstance == null) { synchronized (SingletonFonts.class) { localInstance = instance; if (localInstance == null) { instance = localInstance = new SingletonFonts(); } } setFont1(Typeface.createFromAsset(activity.getAssets(), "fonts/font1.ttf")); setFont2(Typeface.createFromAsset(activity.getAssets(), "fonts/font2.ttf")); setFont3(Typeface.createFromAsset(activity.getAssets(), "fonts/font3.ttf")); } return localInstance; } } And install the fonts using singleton, like this:
public class MainActivity extends AppCompatActivity { TextView textView1; TextView textView2; TextView textView3; @Override protected void onCreate(Bundle savedInstanceState) { super.onCreate(savedInstanceState); setContentView(R.layout.activity_main); textView1 = (TextView) findViewById(R.id.text_view_1); textView2 = (TextView) findViewById(R.id.text_view_2); textView3 = (TextView) findViewById(R.id.text_view_3); textView1.setTypeface(SingletonFonts.getInstance(this).getFont1()); textView2.setTypeface(SingletonFonts.getInstance(this).getFont2()); textView3.setTypeface(SingletonFonts.getInstance(this).getFont3()); } } Using this construction, we solved the second problem, regarding the lags in the sheet, but not the first, the most important, you still need to find all the text fields and mesh the fonts again and again, write separate methods and lose nerve cells. Another problem is that in the preview - the standard font, hence the width, height of its font. You can only see it on a live device or an emulator, this is not very convenient.
I will introduce the above problems, we will now write your TextView with blackjack and fonts.
First of all, create a class that inherits the usual TextView with constructors:
public class CustomFontsTextView extends TextView { public CustomFontsTextView(Context context) { super(context); } public CustomFontsTextView(Context context, AttributeSet attrs) { super(context, attrs); } public CustomFontsTextView(Context context, AttributeSet attrs, int defStyleAttr) { super(context, attrs, defStyleAttr); } public CustomFontsTextView(Context context, AttributeSet attrs, int defStyleAttr, int defStyleRes) { super(context, attrs, defStyleAttr, defStyleRes); } } Next, create the attrs.xml file in the values folder.
Create attrs.xml
Come here

and create a file called attrs.xml, after creation it should look something like this:
and create a file called attrs.xml, after creation it should look something like this:
<?xml version="1.0" encoding="utf-8"?> <resources> </resources> In it we create the following block of code:
// <declare-styleable name="CustomFontsTextView"> // . name = "fonts" - xml <attr name="fonts" format="enum"> <enum name="font1" value="0"/> <enum name="font2" value="1"/> <enum name="font3" value="2"/> </attr> </declare-styleable> Then we return to our class CustomFontsTextView and write the following method:
public class CustomFontsTextView extends TextView { public CustomFontsTextView(Context context) { super(context); } public CustomFontsTextView(Context context, AttributeSet attrs) { super(context, attrs); setFonts(attrs,context); } public CustomFontsTextView(Context context, AttributeSet attrs, int defStyleAttr) { super(context, attrs, defStyleAttr); setFonts(attrs,context); } public CustomFontsTextView(Context context, AttributeSet attrs, int defStyleAttr, int defStyleRes) { super(context, attrs, defStyleAttr, defStyleRes); setFonts(attrs,context); } private void setFonts(AttributeSet attributeSet, Context context){ TypedArray a = context.getTheme().obtainStyledAttributes( attributeSet, R.styleable.CustomFontsTextView, 0, 0); a.recycle(); int fonts = a.getInt(R.styleable.CustomFontsTextView_fonts,-1); SingletonFonts singltonFonts = SingletonFonts.getInstance(context); switch (fonts){ case (0): setTypeface(singltonFonts.getFont1()); break; case (1): setTypeface(singltonFonts.getFont2()); break; case (2): setTypeface(singltonFonts.getFont3()); break; } } } That's all. Now you need to rebuild the project so that you have custom attributes. After that we go to our activation xml file and write:
<?xml version="1.0" encoding="utf-8"?> <LinearLayout xmlns:android="http://schemas.android.com/apk/res/android" xmlns:tools="http://schemas.android.com/tools" xmlns:app="http://schemas.android.com/apk/res-auto" android:id="@+id/activity_main" android:layout_width="match_parent" android:layout_height="match_parent" android:orientation="vertical" tools:context="library.draw.myapplication.MainActivity"> <library.draw.myapplication.CustomFontsTextView android:layout_width="wrap_content" android:layout_height="wrap_content" android:layout_gravity="center_horizontal" android:layout_margin="16dp" app:fonts="font1" android:textSize="24sp" android:id="@+id/text_view_1" android:text="Hello World!" /> <library.draw.myapplication.CustomFontsTextView android:layout_width="wrap_content" android:layout_height="wrap_content" android:layout_gravity="center_horizontal" android:layout_margin="16dp" android:textSize="48sp" app:fonts="font2" android:id="@+id/text_view_2" android:text="Hello World!" /> <library.draw.myapplication.CustomFontsTextView android:layout_width="wrap_content" android:layout_height="wrap_content" android:layout_gravity="center_horizontal" android:layout_margin="16dp" android:textSize="24sp" app:fonts="font3" android:id="@+id/text_view_3" android:text="Hello World!" /> </LinearLayout> In the preview, we will see already completely finished text fields with our fonts.
It is better to refer to our custom text fields as to ordinary TextView, in a standard form:
TextView textView = (TextView) findViewById(R.id.text_view_1); Thanks for attention.
Source: https://habr.com/ru/post/315478/
All Articles