Creating and testing a firewall in Linux, Part 1.2. Simple interception of traffic with Netfilter
Content of the first part:
1.1 - Creating a virtual lab (so that we have where to work, I'll show you how to create a virtual network on your computer. The network will consist of 3 Linux ubuntu machines).
1.2 - Writing a simple module in Linux. Introducing Netfilter and intercepting traffic with it. We combine everything together, we test.
1.3 - Writing a simple char device. Adding a virtual file system - sysfs. Writing user interface. We combine everything together, we test.
The content of the second part:
A very brief introduction to operating systems.
')
For those who are not familiar with the basics of operating systems in general and linux-systems in particular, VERY briefly needed basic concepts so that we can move on. In Linux, like many other operating systems, there are two address spaces - kernel space and user space . Kernel space - the operating system works here, it mainly deals with the distribution of computer resources between programs (for example, which program is currently running on the processor (scheduling), which program to send output from the keyboard, what to do with packets from the network card, IO operation and many other things). The OS is in very intimate connections with the hardware (mouse, monitor, printer ...). Since its work is very important, a separate part of it is allocated for it, which is not related to the user space - the place where most user programs work, such as: editors, calculators, browsers, etc. In Linux, to change or add new functions in the OS - there are several ways. One of them is to change the source code of the kernel and compile it again. But this method is long and difficult, especially when you need to extend the functionality of a minimal or dynamic. Therefore, there is another way - modules. Modules - roughly speaking - this is a program that can be dynamically and quickly added to the kernel space, after which, the module will become part of the operating system and get more functionality and access to resources than regular programs.
There are many articles on this topic, for example, this one is very good. I hope that I was able to bring intuition.
To begin with, very briefly we will consider an example of a simple module from here - then we will consider what Netfilter is and combine it all together in one source code. Below, there will be pictures, at the end of the article, links to all source texts. So:
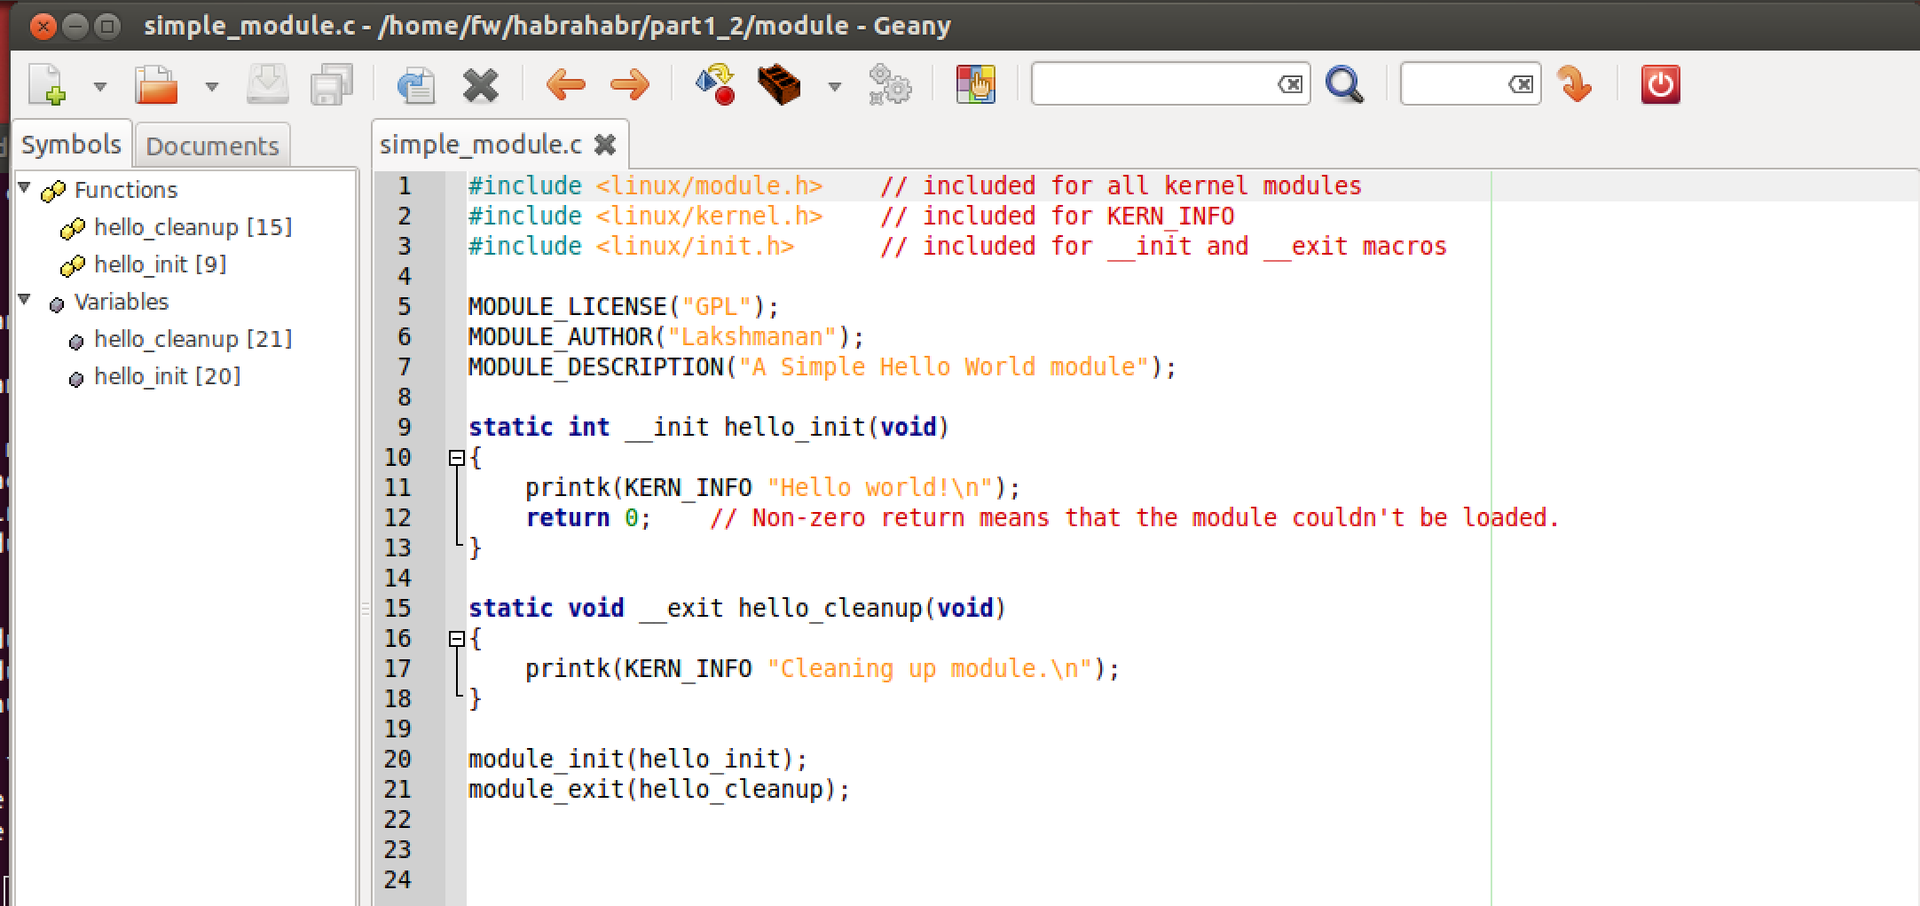
This is the source code of a very simple module. A few things:
1 - I work in the Geany editor, as Eclpise-like ones in this case will not work. I compile through the terminal, but it seems possible through Geany.
2 - there is no printf in the kernel, but there is its printk counterpart, which works in the same way. By the way, in the kernel there are analogues of all the necessary libraries and functions (and there are no standard libraries like stdlib).
3 - printk, does not write to the console, but writes to a special file, the contents of which can be read using the dmesg command. With us, this will be the main way to debug the program (there are other ways to see how printk works, for example, if you switch to the console without the X interface Ctrl + Shift + F1). It will also be useful dmesg –c , for cleaning everything that has accumulated in this file.
4 - MODULE_LICENSE, MODULE_AUTHOR, MODULE_DESCRIPTION are macros that "give" linux information about the module, which can then be obtained using special commands (search for more on the link).
5 - The kernel uses the C89 syntax for writing when in C. For example (and most importantly) - unlike the usual C99, all variables must be declared at the very beginning of functions and cannot be declared in another part of it. If you do NOT comply with this rule, the code will be compiled, but with warnings (which is bad and not for us).
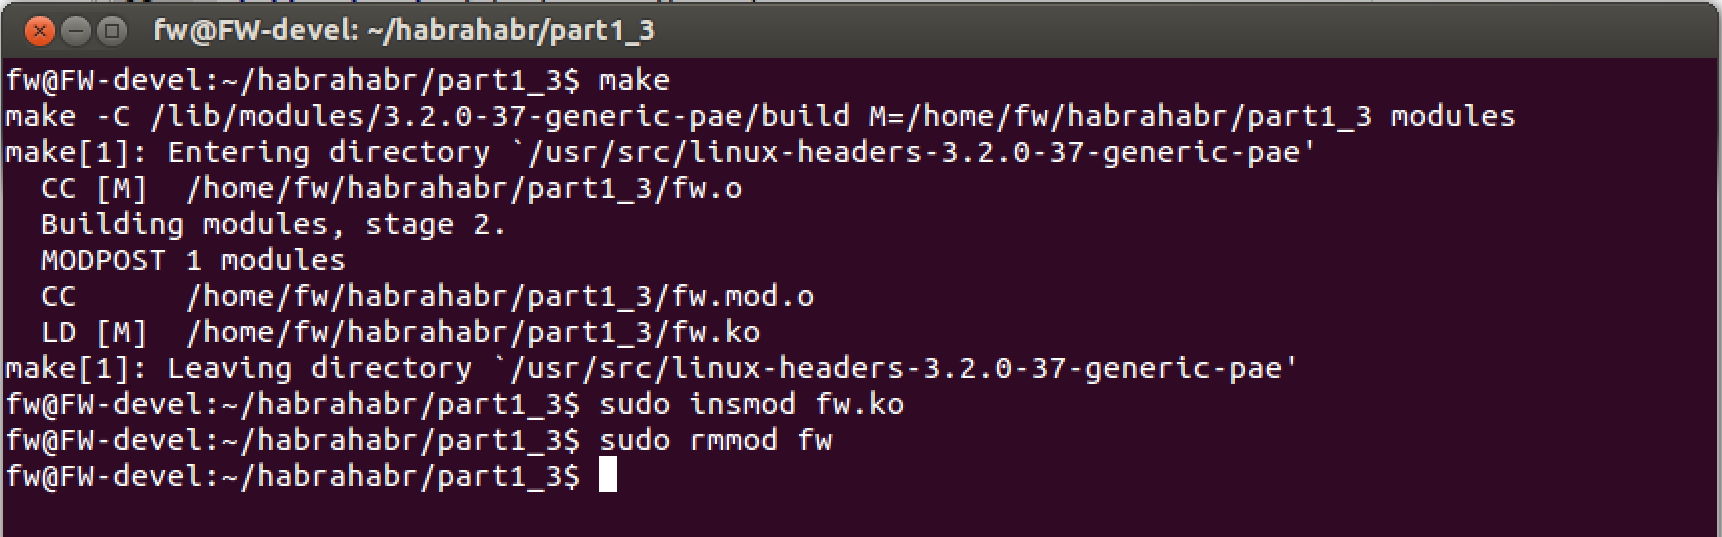
Pay attention (below on the picture) to the Makefile. It differs from ordinary programs in user space. So the whole process looks like:
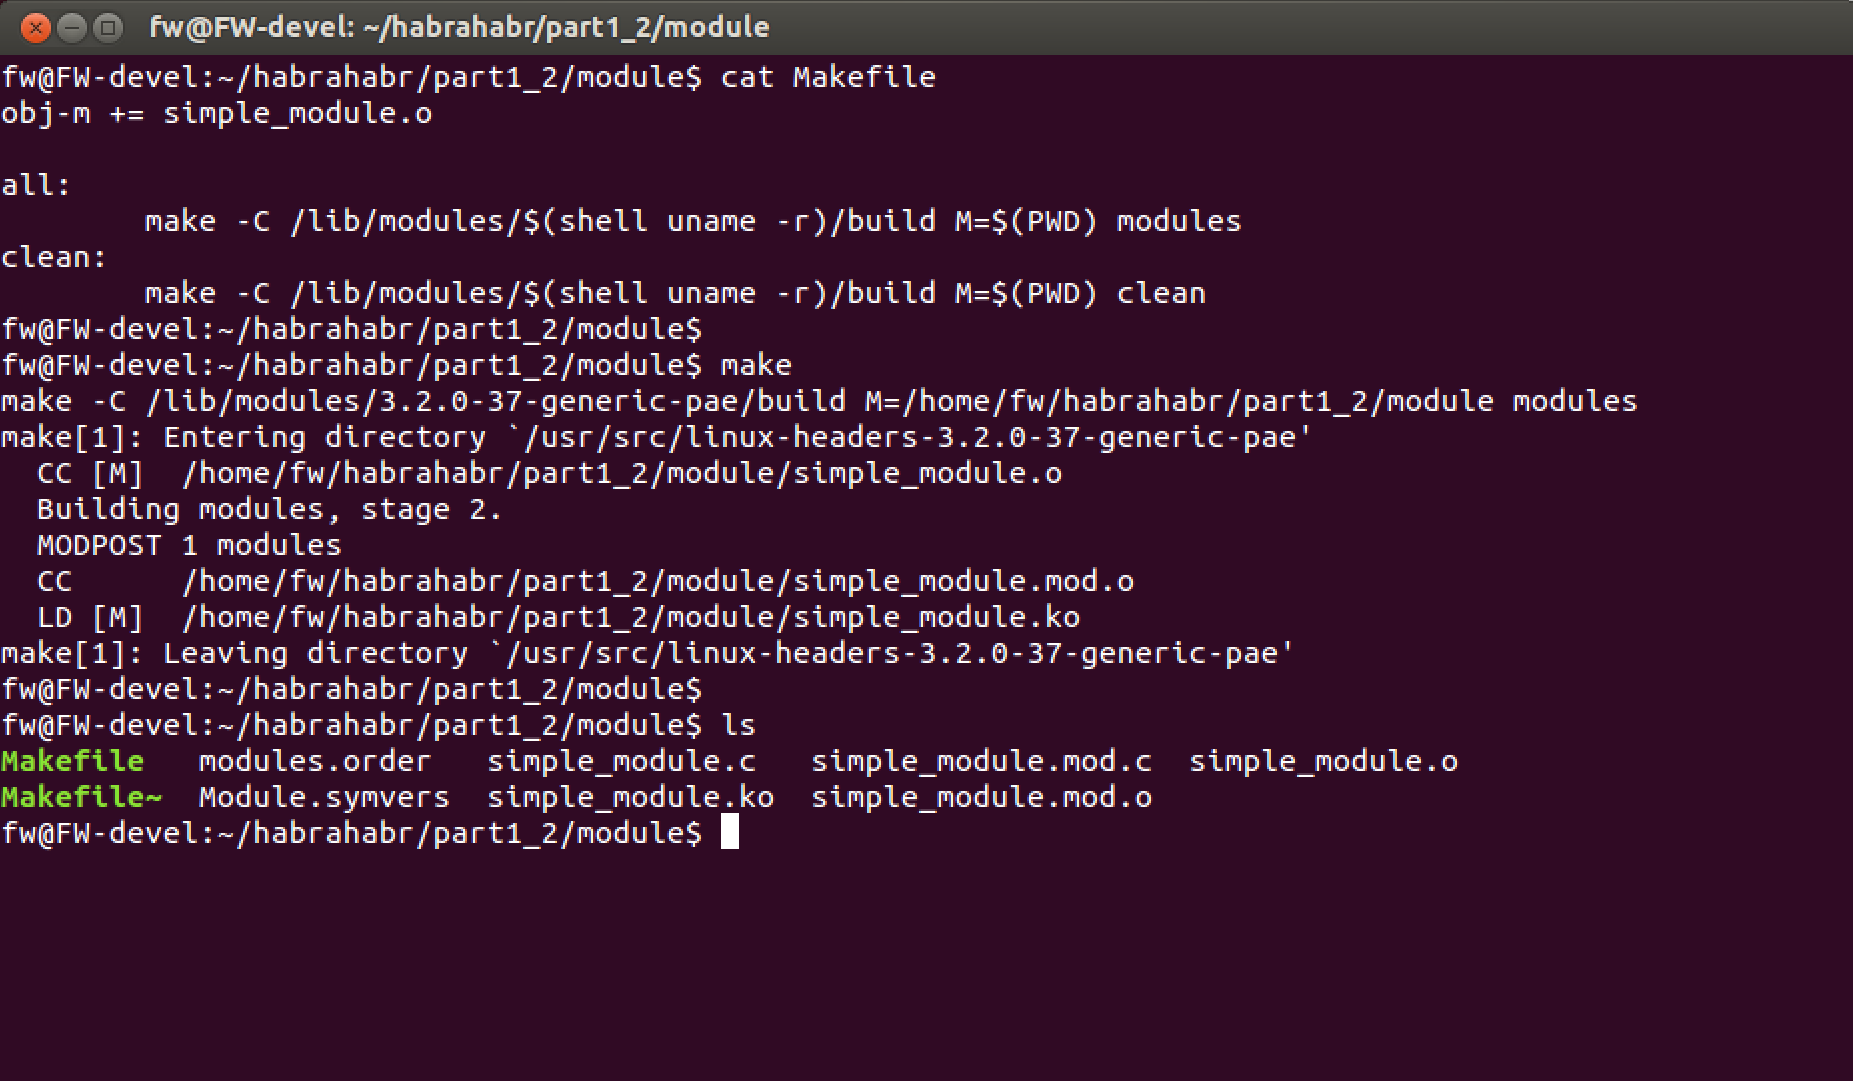
The module is loaded with the special command “insmod ./module_name.ko” and the macro module_init is launched . The module is deleted from the computer memory by the command “rmmod module_name” .
We are checking. Just load the module, and then unload and look at the dmesg
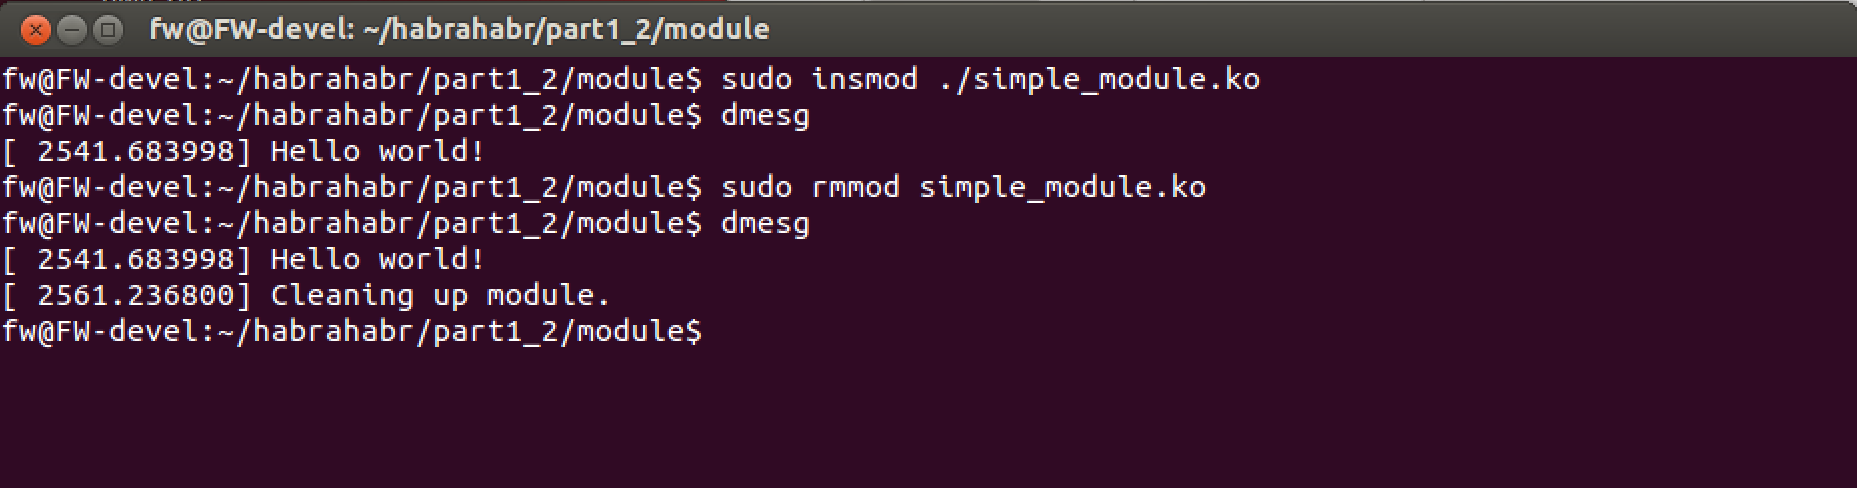
Is done. On this introduction to the modules is completed.
Netfilter is a framework built into the linux kernel that allows you to perform various network operations. We will be interested in intercepting incoming and outgoing traffic.
By the way, the most frequently associated program with this framework is iptables , which allows you to dynamically set traffic filtering rules (that is, this is nothing but a simple firewall) built into Linux. In the Russian version of Wikipedia, there was almost no distinction between the two terms, which I consider to be incorrect, therefore I give the link to the English version. Wikipedia - Netfilter
and on the official website. It has all the necessary information. www.netfilter.org
The netfilter traffic hooking architecture is as follows:
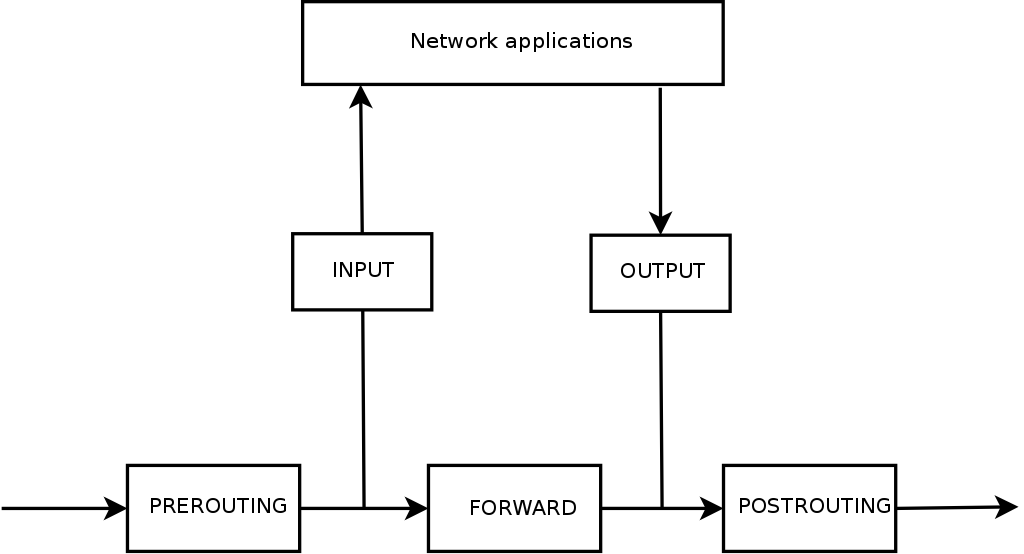
A photo
The diagram shows the stages that pass packets after hitting the phy network card. Let's take a closer look:
Mathematically:
Input data = Prerouting = Forward + Input
Output data = Postrouting = Output + Forward
Of course, usually input! = Output (if you don’t understand for some reason it’s worth rereading the topic again or look additionally on the Internet).
For example, after we type in the browser line www.site.com, the package will go through two “stops” before it hits the network — Output and Postrouting .
When site.com will respond to us, the packet will go through two “stations” before it reaches the browser — Input data and Prerouting .
Other packets, for example, with host1 -> host2, will go through Input, Forward, Output.
At each “stop” we will be able to make a decision about the “caught packet” - whether we want to skip it further or not (or something else).
For interest, we will come up with a rule - all packages that are intended for the FW_dev computer (the one where we set up the firewall), or which FW_dev sends on its behalf to other computers - we will allow it to pass (accept). All other traffic, we will close (deny). The ultimate goal is to calculate how many packets have passed, how many we have banned, and transfer data to the user (in the user space).
To do this, at the beginning of the module, we define several global variables.
Now we will install hook functions, in the necessary traffic interception points. To begin, we write the functions themselves. All functions must have a predefined type:
Feature Code:
The next step is to register them in the system, so it is logical to do this when the module is loaded. It looks like this:
Here you should pay attention to the hooknum field, to which we assign a value that determines the location of packet interception and corresponds to the diagram above. The last step is to remove them (deregister) before removing the module from the OS.
It remains to check the work, and also add a user interface so that any user can read data from our module. Check first.
Helmet with host2 ping one message to 10.0.2.3 (we expect the module to skip it, because 10.0.2.3 is the internal interface. If the message was for host1 - 10.0.1.1 , then we would not have missed it)

we look at "logs", we unload the module
At this stage, you can play with the system and make sure that traffic from host1 -> host2 does not pass.
That's all for now, a list of links:
The Linux Kernel Module Programming Guide
» How To Write Your Own Linux Kernel Module With A Simple Example
» Https://en.wikipedia.org/wiki/Netfilter
www.netfilter.org
" Firewall or Packet Filtering - here I took the picture :)
1.1 - Creating a virtual lab (so that we have where to work, I'll show you how to create a virtual network on your computer. The network will consist of 3 Linux ubuntu machines).
1.2 - Writing a simple module in Linux. Introducing Netfilter and intercepting traffic with it. We combine everything together, we test.
1.3 - Writing a simple char device. Adding a virtual file system - sysfs. Writing user interface. We combine everything together, we test.
The content of the second part:
Hidden text
2.1 - Introduction to the second part. We look at the network and protocols. Wireshark.
2.2 - Firewall Tables. Transport Layer. TCP structures, UDP. Extend the firewall.
2.3 - Expanding functionality. We process the data in user space. libnetfilter_queue.
2.4 - (* Optionally) We study the real Buffer Overflow attack and prevent it with the help of our Firewall.
2.2 - Firewall Tables. Transport Layer. TCP structures, UDP. Extend the firewall.
2.3 - Expanding functionality. We process the data in user space. libnetfilter_queue.
2.4 - (* Optionally) We study the real Buffer Overflow attack and prevent it with the help of our Firewall.
A very brief introduction to operating systems.
')
For those who are not familiar with the basics of operating systems in general and linux-systems in particular, VERY briefly needed basic concepts so that we can move on. In Linux, like many other operating systems, there are two address spaces - kernel space and user space . Kernel space - the operating system works here, it mainly deals with the distribution of computer resources between programs (for example, which program is currently running on the processor (scheduling), which program to send output from the keyboard, what to do with packets from the network card, IO operation and many other things). The OS is in very intimate connections with the hardware (mouse, monitor, printer ...). Since its work is very important, a separate part of it is allocated for it, which is not related to the user space - the place where most user programs work, such as: editors, calculators, browsers, etc. In Linux, to change or add new functions in the OS - there are several ways. One of them is to change the source code of the kernel and compile it again. But this method is long and difficult, especially when you need to extend the functionality of a minimal or dynamic. Therefore, there is another way - modules. Modules - roughly speaking - this is a program that can be dynamically and quickly added to the kernel space, after which, the module will become part of the operating system and get more functionality and access to resources than regular programs.
There are many articles on this topic, for example, this one is very good. I hope that I was able to bring intuition.
Writing a simple module in Linux. Practice
To begin with, very briefly we will consider an example of a simple module from here - then we will consider what Netfilter is and combine it all together in one source code. Below, there will be pictures, at the end of the article, links to all source texts. So:
This is the source code of a very simple module. A few things:
1 - I work in the Geany editor, as Eclpise-like ones in this case will not work. I compile through the terminal, but it seems possible through Geany.
2 - there is no printf in the kernel, but there is its printk counterpart, which works in the same way. By the way, in the kernel there are analogues of all the necessary libraries and functions (and there are no standard libraries like stdlib).
3 - printk, does not write to the console, but writes to a special file, the contents of which can be read using the dmesg command. With us, this will be the main way to debug the program (there are other ways to see how printk works, for example, if you switch to the console without the X interface Ctrl + Shift + F1). It will also be useful dmesg –c , for cleaning everything that has accumulated in this file.
4 - MODULE_LICENSE, MODULE_AUTHOR, MODULE_DESCRIPTION are macros that "give" linux information about the module, which can then be obtained using special commands (search for more on the link).
5 - The kernel uses the C89 syntax for writing when in C. For example (and most importantly) - unlike the usual C99, all variables must be declared at the very beginning of functions and cannot be declared in another part of it. If you do NOT comply with this rule, the code will be compiled, but with warnings (which is bad and not for us).
Compile module
Pay attention (below on the picture) to the Makefile. It differs from ordinary programs in user space. So the whole process looks like:
The module is loaded with the special command “insmod ./module_name.ko” and the macro module_init is launched . The module is deleted from the computer memory by the command “rmmod module_name” .
We are checking. Just load the module, and then unload and look at the dmesg
Is done. On this introduction to the modules is completed.
Introduction to Netfilter. Theory
Netfilter is a framework built into the linux kernel that allows you to perform various network operations. We will be interested in intercepting incoming and outgoing traffic.
By the way, the most frequently associated program with this framework is iptables , which allows you to dynamically set traffic filtering rules (that is, this is nothing but a simple firewall) built into Linux. In the Russian version of Wikipedia, there was almost no distinction between the two terms, which I consider to be incorrect, therefore I give the link to the English version. Wikipedia - Netfilter
and on the official website. It has all the necessary information. www.netfilter.org
The architecture of intercepting (hooking) traffic. Theory
The netfilter traffic hooking architecture is as follows:
A photo
The diagram shows the stages that pass packets after hitting the phy network card. Let's take a closer look:
Prerouting - all the packets that came to the device’s network card from outside (here, for example, someone from the network, tries to send us mail, or we are on the way of the packet and must transfer it further).
Forward - if the received packet is not intended for this IP address, then the operating system will forward it (remember forward enable from the previous part?) Or throw it out if it considers it unnecessary.
Input - all packages that are intended for any application will get here. For example, it may be packages for the browser, after the request of a page.
Output - here all the packets that the computer applications send to the network (that is, not the ones we do forwarding) appear. For example, the same browser request to get a page from the Internet. Or ping.
Postrouting - combines all outgoing packets.
Mathematically:
Input data = Prerouting = Forward + Input
Output data = Postrouting = Output + Forward
Of course, usually input! = Output (if you don’t understand for some reason it’s worth rereading the topic again or look additionally on the Internet).
For example, after we type in the browser line www.site.com, the package will go through two “stops” before it hits the network — Output and Postrouting .
When site.com will respond to us, the packet will go through two “stations” before it reaches the browser — Input data and Prerouting .
Other packets, for example, with host1 -> host2, will go through Input, Forward, Output.
At each “stop” we will be able to make a decision about the “caught packet” - whether we want to skip it further or not (or something else).
The architecture of intercepting (hooking) traffic. Practice
For interest, we will come up with a rule - all packages that are intended for the FW_dev computer (the one where we set up the firewall), or which FW_dev sends on its behalf to other computers - we will allow it to pass (accept). All other traffic, we will close (deny). The ultimate goal is to calculate how many packets have passed, how many we have banned, and transfer data to the user (in the user space).
To do this, at the beginning of the module, we define several global variables.
static unsigned int accepted_num = 0; static unsigned int dropped_num = 0; Now we will install hook functions, in the necessary traffic interception points. To begin, we write the functions themselves. All functions must have a predefined type:
unsigned int hook_func(unsigned int hooknum, struct sk_buff *skb, const struct net_device *in, const struct net_device *out, int (*okfn)(struct sk_buff *)) {} Feature Code:
// hook out packets, accept packet unsigned int hook_func_out(unsigned int hooknum, struct sk_buff *skb, const struct net_device *in, const struct net_device *out, int (*okfn)(struct sk_buff *)) { accepted_num++; return NF_ACCEPT; } // hook in packets, accept packet unsigned int hook_func_in(unsigned int hooknum, struct sk_buff *skb, const struct net_device *in, const struct net_device *out, int (*okfn)(struct sk_buff *)) { accepted_num ++; return NF_ACCEPT; } // hook forward packets, drop packet unsigned int hook_func_forward(unsigned int hooknum, struct sk_buff *skb, const struct net_device *in, const struct net_device *out, int (*okfn)(struct sk_buff *)) { dropped_num++; return NF_DROP; } The next step is to register them in the system, so it is logical to do this when the module is loaded. It looks like this:
// hook functions structs for registration usage static struct nf_hook_ops nfho_forward; static struct nf_hook_ops nfho_out; static struct nf_hook_ops nfho_in; static int __init fw_module_init(void) { ..... // netfilter functions printk("initialize kernel module\n"); nfho_in.hook = hook_func_in; nfho_in.hooknum = NF_INET_LOCAL_IN; nfho_in.pf = PF_INET; nfho_in.priority = NF_IP_PRI_FIRST; nf_register_hook(&nfho_in); // Register the hook nfho_out.hook = hook_func_out; nfho_out.hooknum = NF_INET_LOCAL_OUT; nfho_out.pf = PF_INET; nfho_out.priority = NF_IP_PRI_FIRST; nf_register_hook(&nfho_out); // Register the hook nfho_forward.hook = hook_func_forward; nfho_forward.hooknum = NF_INET_FORWARD; nfho_forward.pf = PF_INET; nfho_forward.priority = NF_IP_PRI_FIRST; nf_register_hook(&nfho_forward); // Register the hook … } Here you should pay attention to the hooknum field, to which we assign a value that determines the location of packet interception and corresponds to the diagram above. The last step is to remove them (deregister) before removing the module from the OS.
static void __exit fw_module_exit(void) { … // net filter functions nf_unregister_hook(&nfho_in); nf_unregister_hook(&nfho_out); nf_unregister_hook(&nfho_forward); // end netfilter functions … } It remains to check the work, and also add a user interface so that any user can read data from our module. Check first.
Prefinal code
#include <linux/module.h> #include <linux/netfilter_ipv4.h> #include "fw.h" MODULE_AUTHOR( AUTHOR); MODULE_DESCRIPTION( DESCRIPTION); MODULE_VERSION( VERSION); MODULE_LICENSE("GPL"); static unsigned int accepted_num; static unsigned int dropped_num; // hook functions static struct nf_hook_ops nfho_forward; static struct nf_hook_ops nfho_out; static struct nf_hook_ops nfho_in; // hook out packets unsigned int hook_func_out(unsigned int hooknum, struct sk_buff *skb, const struct net_device *in, const struct net_device *out, int (*okfn)(struct sk_buff *)) { printk("Get output packet, accept\n"); accepted_num++; return NF_ACCEPT; } // hook in packets unsigned int hook_func_in(unsigned int hooknum, struct sk_buff *skb, const struct net_device *in, const struct net_device *out, int (*okfn)(struct sk_buff *)) { printk("Get input packet, accept\n"); accepted_num++; return NF_ACCEPT; } // hook forward packets unsigned int hook_func_forward(unsigned int hooknum, struct sk_buff *skb, const struct net_device *in, const struct net_device *out, int (*okfn)(struct sk_buff *)) { printk("Get forward packet, drop\n"); dropped_num++; return NF_DROP; } static int __init fw_module_init(void) { printk("Starting FW module loading\n"); accepted_num = 0; dropped_num = 0; nfho_in.hook = hook_func_in; nfho_in.hooknum = NF_INET_LOCAL_IN; nfho_in.pf = PF_INET; nfho_in.priority = NF_IP_PRI_FIRST; nf_register_hook(&nfho_in); // Register the hook nfho_out.hook = hook_func_out; nfho_out.hooknum = NF_INET_LOCAL_OUT; nfho_out.pf = PF_INET; nfho_out.priority = NF_IP_PRI_FIRST; nf_register_hook(&nfho_out); // Register the hook nfho_forward.hook = hook_func_forward; nfho_forward.hooknum = NF_INET_FORWARD; nfho_forward.pf = PF_INET; nfho_forward.priority = NF_IP_PRI_FIRST; nf_register_hook(&nfho_forward); // Register the hook return 0; } static void __exit fw_module_exit(void) { printk("Removing FW module\n"); nf_unregister_hook(&nfho_in); nf_unregister_hook(&nfho_out); nf_unregister_hook(&nfho_forward); } module_init( fw_module_init); module_exit( fw_module_exit); Compile, load the module
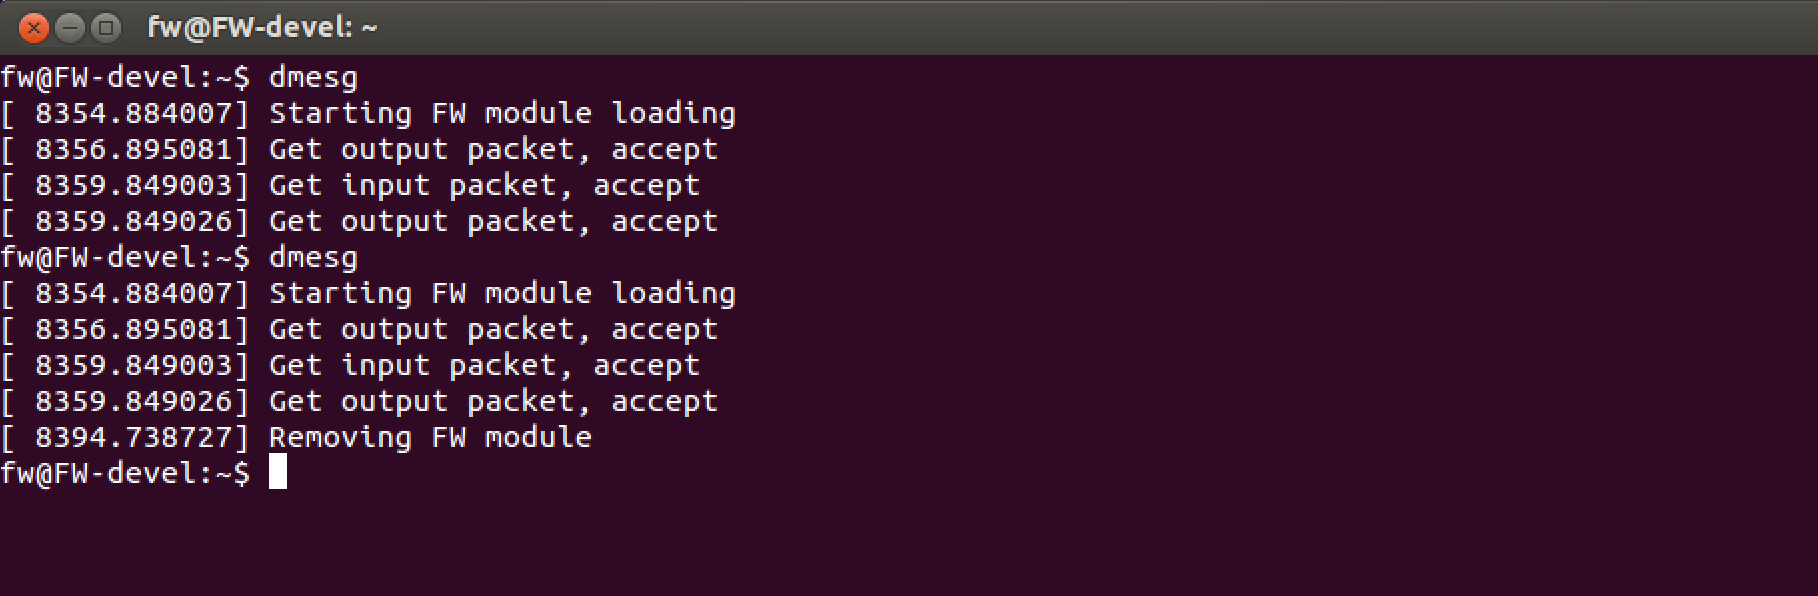
Helmet with host2 ping one message to 10.0.2.3 (we expect the module to skip it, because 10.0.2.3 is the internal interface. If the message was for host1 - 10.0.1.1 , then we would not have missed it)
we look at "logs", we unload the module
What happened?
In 8354 - I loaded the module.
In 8356 - we found some outgoing packet. At this stage, we can not know what it is, but most likely one of the packets of the DHCP interface that we have configured.
In 8359 - we found the incoming packet - it was our ping. After we received it, we immediately sent the answer which we see further.
In 8359 - the answer to ping.
In 8394 - unloaded module.
At this stage, you can play with the system and make sure that traffic from host1 -> host2 does not pass.
That's all for now, a list of links:
The Linux Kernel Module Programming Guide
» How To Write Your Own Linux Kernel Module With A Simple Example
» Https://en.wikipedia.org/wiki/Netfilter
www.netfilter.org
" Firewall or Packet Filtering - here I took the picture :)
Source: https://habr.com/ru/post/315350/
All Articles